
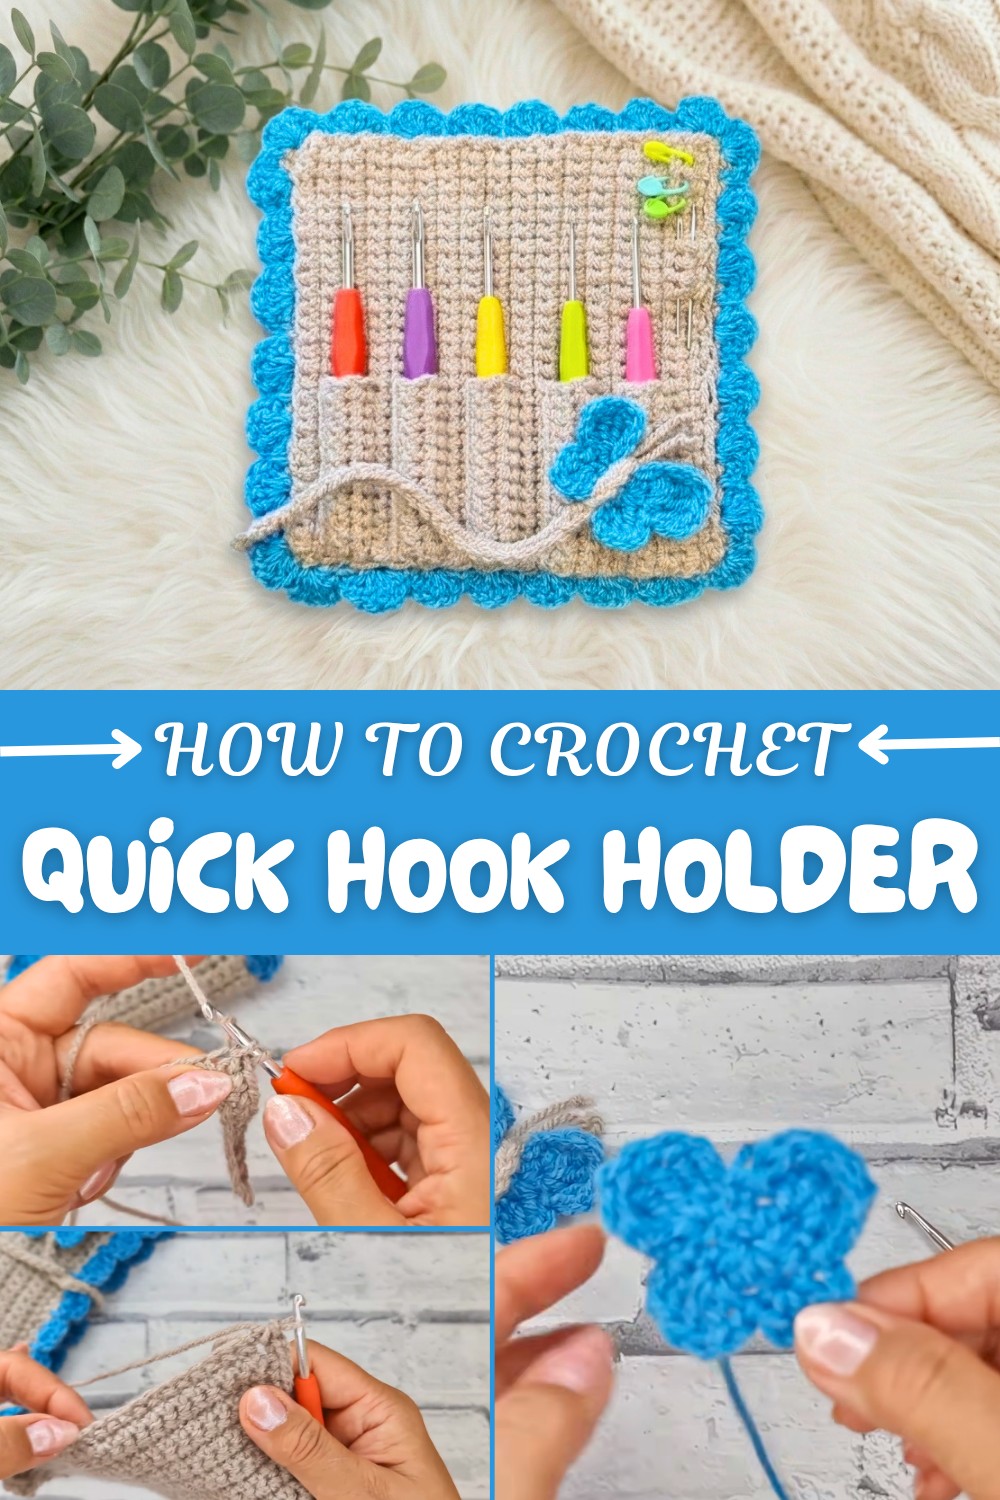
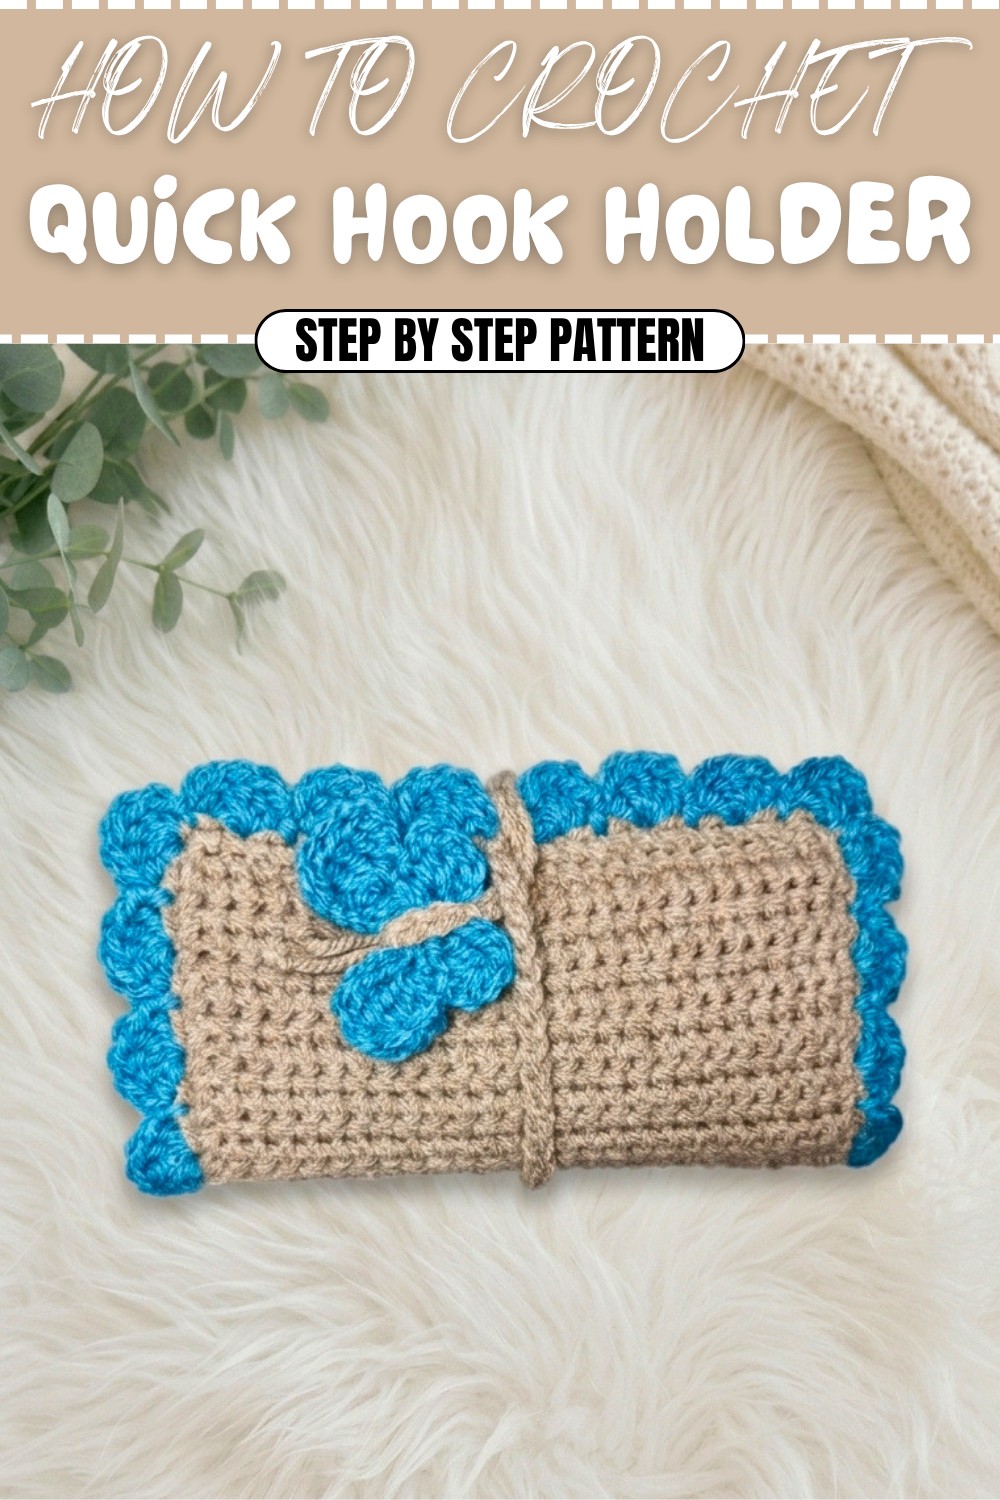
Crochet Hook Holder Free Pattern with Easy Shell Border
Keeping your crochet hooks neat and easy to find is a game-changer for any crochet lover. A free crochet hook holder pattern is a delightful project that brings both beauty and order to your crocheting routine. With a design that features elegant shell edging and a charming butterfly closure, this holder instantly adds a cheerful touch to your workspace. Each pocket holds your hooks securely in place, while extra sections keep your needles and stitch markers nearby.
How to Crochet Hook Holder Free Pattern with Butterfly Closure
Soft, flexible yarn protects the tools from scratches and bends, and the foldable style means it’s simple to pack in a bag for classes or travels. Selecting your favorite colors makes each holder unique, and the finished piece adds handmade character to any creative corner.
Trying this pattern is a great way to build confidence with basic crochet techniques. You’ll be working mainly with single crochet stitches, learning to shape pockets, borders, and decorative finishes along the way. The experience teaches you how to assemble flat pieces, seam them together, and add special details like buttons, appliques, and custom edging.
This practical project has many uses beyond organizing hooks—you can adjust the pattern to fit makeup brushes, art supplies, or even transform it into a small wallet or pouch. The cheerful butterfly can be reused as an appliqué for hats, bags, or other accessories, giving you plenty of ways to personalize future projects.
Making a crochet hook holder offers the satisfaction of learning new skills while producing a useful and attractive organizer. It keeps your embroidery or crochet tools ready whenever creativity strikes, and shows how easy stitches can come together in something both practical and lovely. The process is straightforward and perfect for beginners, by the end, you’ll have a handmade piece that feels personal, functional, and full of colorful character.
Crochet Hook Holder with Butterfly Closure
This elegant crochet hook holder is designed for both left- and right-handed users, featuring a sturdy double-layered base, five roomy pockets for hooks, and a charming butterfly motif closure. The completed holder measures approximately 7" x 7", perfect for travel and everyday use. You may customize its width and number of pockets to fit your collection. The project incorporates tight single crochet, shell edging, and a butterfly motif for the chain.
Skill Level & Terminology
Skill Level: Intermediate to Advanced
Terminology: US Crochet Terms
Materials & Tools
- Yarn: Worsted-weight acrylic yarn (Yarn Fair or similar; two colors recommended)
- Hook: 4.5mm crochet hook
- Notions: Scissors, darning needle, stitch markers or pins
- Optional: Extra yarn for sewing, measuring tape
Abbreviations
- ch: chain
- sc: single crochet
- dc: double crochet
- sl st: slip stitch
- tr: treble crochet
- hdc: half double crochet
- st(s): stitch(es)
- rep: repeat
Special Notes
- All instructions are in US terminology.
- Pattern is easily adjustable for more hooks by widening the initial chain.
- Tight tension is recommended for structure.
Pattern Instructions
1. Outer Base (Shell Border Square)
Foundation Chain:
- With Main Color, ch 27.
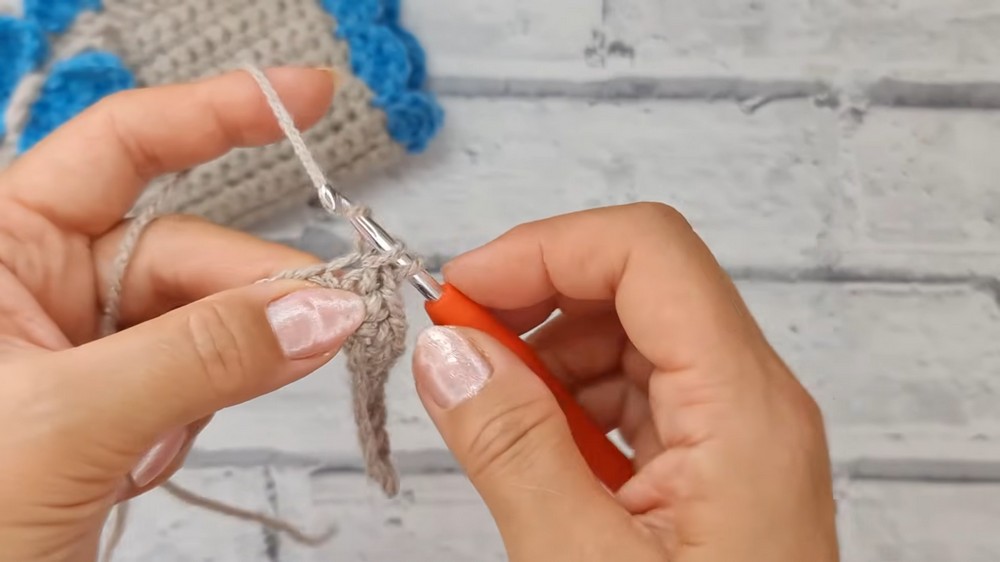
Row 1:
- Sc in 2nd ch from hook and in each ch across (26 sc).
- Ch 1, turn.
Rows 2–29:
- Sc in each st across, ch 1, turn after every row.
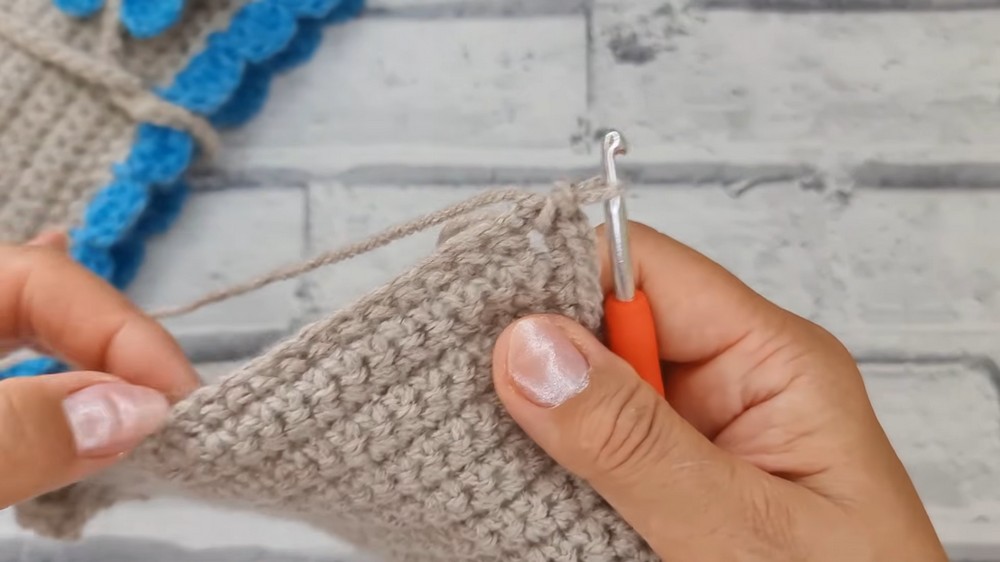
Border:
- After 29th row, do not fasten off.
- Round 1: Work sc evenly around all four sides, placing (sc, ch 1, sc) in each corner.
- Join with sl st to first sc and fasten off.
For those unfamiliar with crochet patterns:
Build a square of single crochet rows, turning at the end of each line. Then, crochet single stitches around the entire edge, making corners by doing two stitches and a chain in the same gap.
2. Shell Edging
With Contrast Color (e.g., blue):
- Attach yarn at any midpoint of a side.
- Shell Round:
- Skip 1 st, work 5 dc in next st (shell).
- Skip 1 st, sl st in next st to anchor shell.
- Rep shells and slip stitches all the way around.
- At corners, place two shells close together (work shells consecutively for fuller corners).
- Join with sl st after last shell and fasten off.
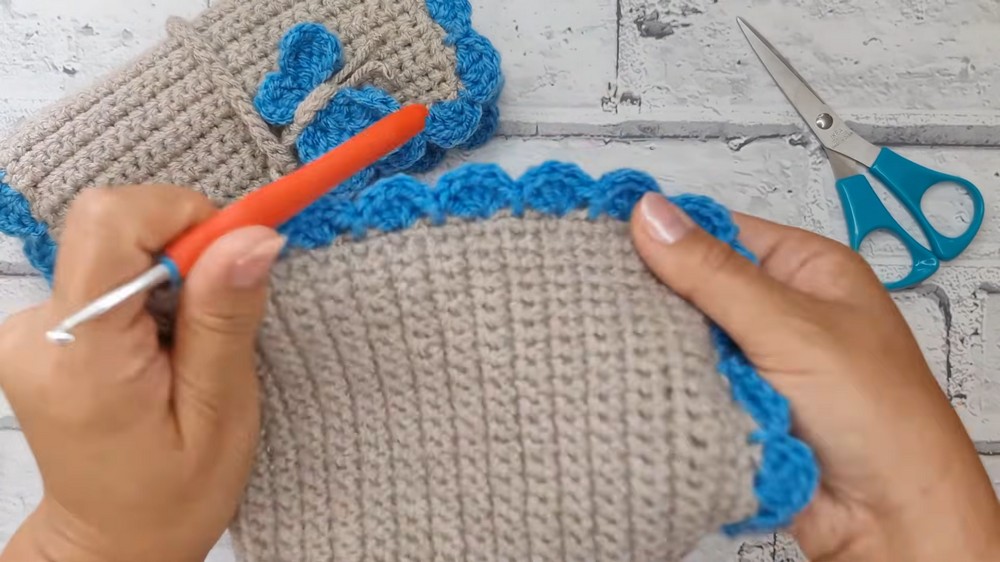
Plain instructions:
With a new yarn color, make five double crochets in one spot, skip the next, then do a slip stitch. Repeat around the square, focusing on corners for extra shells.
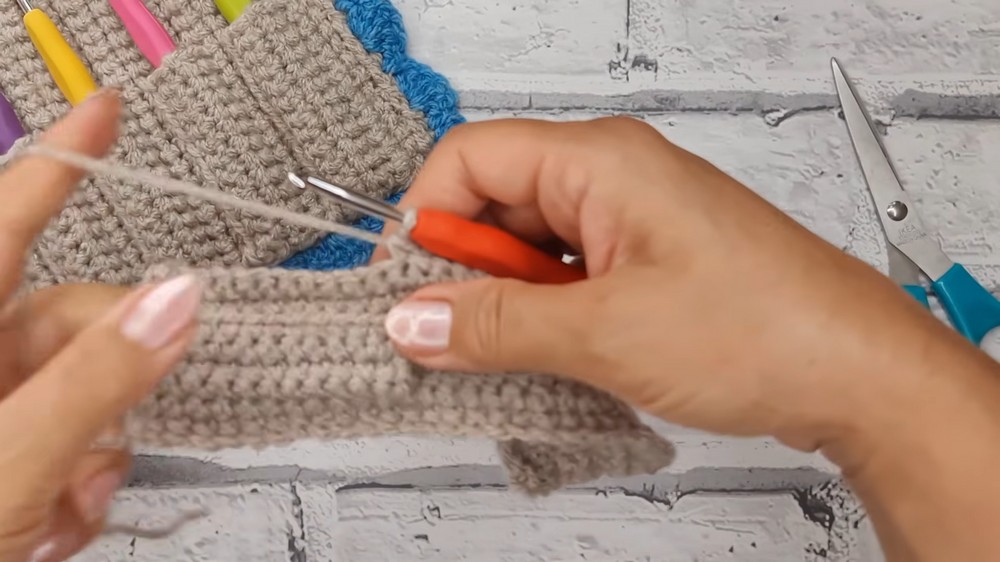
3. Inner Pocket Panel
Foundation Chain:
- With Main Color, ch 29.
Rows 1–2:
- Sc in 2nd ch from hook and in each ch across (28 sc), ch 1, turn.
First Pocket Section:
- Row 3:
- Sc in first 16 sts.
- In last 12 sts, sc in back loops only (create pocket base).
- Ch 1, turn.
- Row 4:
- Sc in the skipped loops from previous row (creating pocket opening), ch 1, turn.
- Rows 5–6:
- Sc across pocket section (12 sts), turn, repeat (build pocket depth).
- Row 7:
- Continue with sc across 16 sts (outside pocket area), ch 1, turn.
- Rows 8–12:
- Repeat pocket sequence above (repeat as needed for more pockets).
Close Pocket:
- Fold pocket and, working through back loop of front pocket and both loops of back panel, sc down the edge to join.
Make 5 pockets:
Continue up and down, repeating the pocket sequence for five rows.
Edge Border:
- Work a final round of sc evenly around entire panel, placing extra stitches in corners.
If you’re new to pockets:
Create your square. Work partway across, then single crochet into just the back loop for the pocket flap. Turn and work into skipped loops, repeating for each pocket. Close the pocket by stitching two sides together.
4. Assembly
- Place inner pocket panel onto outer base.
- Pin or clip to hold in place.
- Using matching yarn and a darning needle, sew around the edge using whip stitch or crab stitch, catching both layers but avoiding shell edge when possible.
- Weave in all ends.
Simple explanation:
Center the pocket layer on the base, pin it, then use a needle and yarn to sew it around the edge, skipping the shells.
5. Chain & Butterfly Closure
Chain Cord:
- With Contrast Color, attach to shell edge at desired side (middle for left- or right-handed closure).
- Ch to approximately 54 inches in length (long enough for wrap and butterfly body).
Butterfly Motif:
- Begin with a magic ring.
- Ch 2.
- Round 1:
- Work 7 hdc into ring, pull tight to close.
- Sl st into 2nd ch of start.
- Wing 1:
- Ch 3, work 4 tr into same st.
- Ch 3, sl st into next st.
- Wing 2:
- Ch 2, 3 dc in next st, ch 2, sl st in next st.
- Wing 3:
- Ch 2, 3 dc in next st, ch 2, sl st in next st.
- Wing 4:
- Ch 3, 4 tr in next st, ch 3, sl st in next st.
- Fasten off and sew in ends.

Attach Butterfly:
Wrap chain cord around butterfly, use yarn ends for antennae (knot and snip to short length). Secure chain to shell edge by threading or tying.
For those who don’t read patterns:
Make a long chain for the closure. Crochet a small butterfly by working half double crochets in a loop, then create wings with trebles and doubles. Use leftover yarn for antennae and attach the butterfly at the end of your chain.
Conclusion, Corrections, and Tips
Conclusion:
Your hook holder now has pockets, sturdy shell edging, and a delightful butterfly closure. It’s custom-sized and travel-friendly.
Tips:
- Adjust the initial chain length or rows for extra hooks.
- If shell edges don’t align perfectly at corners, add or skip a stitch for balance.
- Keep tension tight for structure.
- Use a contrasting yarn for the butterfly motif for extra charm.
Pattern Correction:
If pockets seem too narrow for your preferred hooks, add more stitches to pocket sections. For a firmer case, consider lining the holder with felt.