
Free Crochet Flower Bouquet Pattern for Special Occasions
Make your own crochet flower bouquet with this free pattern and enjoy crocheting easy colorful blossoms that stay fresh and beautiful forever.
On a warm Sunday afternoon, you sit by the window with a ball of yarn and a crochet hook in hand, thinking of ways to add a touch of nature to your home. What better way to bring a lasting charm indoors than with a handmade flower bouquet? These crocheted flowers don’t just brighten up any space; they carry a personal touch that speaks volumes. Every stitch worked into these flowers is a small building block for something beautiful and lasting.
The joy of these bouquets lies in their timelessness. Each stem is carefully constructed, while the petals bloom in vibrant colors, offering a striking visual appeal. Paired with a recycled glass jar as a base, it becomes more than just a centerpiece—it turns into a symbol of thoughtfulness and care. Whether used as a heartfelt gift for a loved one, a charming decorative item on your desk, or as a centerpiece for your next gathering, these flowers add life and elegance to every setting.
Free Crochet Pattern: Unique Flower Bouquet That Impresses

Patterned By Marcela Block Crochet
This project is brought to life by the talented hands behind Marcela Block Crochet. Through her YouTube channel, Marcela teaches projects that combine practicality and beauty. In her flower bouquet tutorial, she showcases a step by step guide to crochet delicate flowers and stems, complete with an easy to make jar lid cover. By using recycled materials, Marcela also shows how thoughtful crocheting can bring joy while being kind to the planet.
Brighten up your space with long lasting floral arrangements made entirely by hand. These bouquets not only bring a cheerful charm but also represent thoughtfulness and care in every single stitch. Whether for yourself or as a gift, they offer something truly special.

Crochet Pattern: Floral Arrangement for Glass Jar
This crochet tutorial will guide you step by step through creating a floral bouquet with stems, flowers, and leaves, along with a crocheted lid cover for a glass jar. Using a 3 mm crochet hook and semi thick yarn, this project is ideal for gifts, decoration, or upcycling jars. Follow the stitches exactly as described for perfect results.
Quick Overview of Pattern
- Crochet flowers and leaves to form a bouquet.
- Create stems with intertwined floral buds and leaves.
- Add a decorative touch with a crocheted lid cover for the glass jar.
- Assemble multiple stems for a complete bouquet.
Notes
- This project works best with lightweight or medium weight yarns.
- Vary the number of chains between flowers for a more natural look.
- You can add candies, sand, or decorations inside the glass jar.
Skill Level
Skill Level: Beginner to Intermediate
You’ll need basic crochet knowledge, including:
- Chain (ch)
- Slip stitch (sl st)
- Single crochet (sc)
- Double crochet (dc)
- Double treble crochet (dtr)
- Puff stitch
Materials
- Yarn:
- Green (stems and leaves)
- Your choice of colorful yarn for flowers
- Beige, brown, or neutral color for the jar lid cover
- Crochet hook: 3 mm
- Glass jar with lid (examples include recycled jam jars)
- Hot glue gun and glue sticks
- Pearls (optional, for flower centers)
- Scissors
- Darning needle
Measurements / Sizing
- Height of individual stems: Approx. 10–20 cm depending on the number of chains created.
- Lid cover diameter: Adjusted to fit the diameter of the jar.
Gauge
Gauge is not critical, but here’s the approximate stitch count for the lid:
- Round 1 (Foundation): 16 double crochets in the magic ring
- Round 2: 32 sts (2 dc in each st)
- Round 3: 48 sts (alternating increases)
This pattern suits most medium weight yarn and a 3 mm crochet hook. Adjust yarn or hook size if necessary.
Stitch Abbreviations
- ch = chain
- sl st = slip stitch
- sc = single crochet
- dc = double crochet
- dtr = double treble crochet (uses two yarn overs)
- puff st = puff stitch
- picot = a decorative 3 chain loop created at the tip of a stitch
Special Stitches
Puff Stitch (puff st):
- Yarn over, insert hook into designated space, and pull up a loop.
- Repeat this process to create 5 loops (or adjust based on yarn weight).
- Yarn over and pull through all the loops at once.
- Slip stitch or chain to secure.
Back Loop Double Crochet:
- Yarn over, insert your hook into the back loop only of the next stitch, and finish the double crochet as normal.
Piquito (Picot):
- Chain 3.
- Insert hook into the top of the stitch below.
- Pull through all loops on the hook and finish as a slip stitch.
Step by Step Pattern
1. Creating the Flower Stem
- Start the Base:
- Make a slip knot and place it on the hook.
- Chain 5.
- In the first chain, work:
- 1 dc,
- Chain 1,
- 1 dc.
- Continue working alternately:
- 1 dc + 1 ch in the same chain,
- Repeat until you have 4 dc, each separated by 1 chain.
- Form the Stem Base:
- Chain 5.
- Slip stitch into the starting chain to close.
- Begin Stem and Leaf Segment:
- Chain 16.
- Create the First Leaf:
- Skip 4 chains.
- In the 5th chain, work:
- 3 dc.
- In the next chain, work:
- 1 dtr.
- Chain 3. Slip stitch into the base of the dtr to form the tip.
- Work another 1 dtr.
- Work 3 dc in the same chain as the dtr.
- Chain 4. Join with sl st at the stem's base.
- Repetition for Additional Leaves and Flowers:
- Chain 16.
- Repeat leaf construction as above.
- Continue alternating leaves with flower segments until you have completed 6–8 patterns.


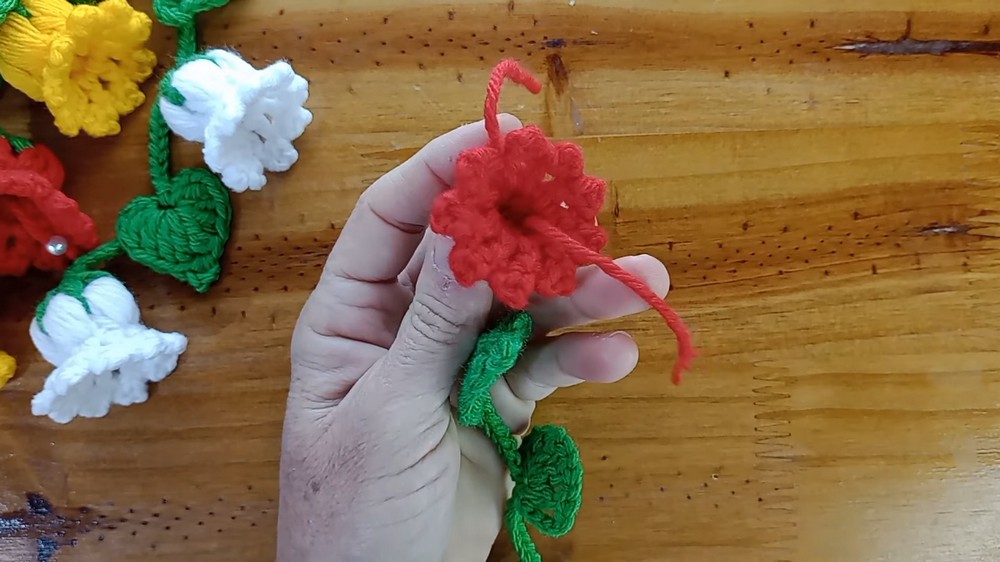
2. Creating the Flowers
- Attach the Flower Yarn:
- Switch to the chosen flower color.
- Attach the yarn to the first chain space of the stem.
- Create the Flower:
- Work a puff stitch in the first chain space:
- Yarn over, insert the hook into the space, and pull up a loop. (5 loops on the hook in total).
- Pull through all loops on the hook. Secure with a sl st.
- Repeat the puff stitch around the foundation until all chain spaces are filled.
- Work a puff stitch in the first chain space:
- Edging (Petal Detailing):
- Turn the work around so the correct side is facing up.
- Chain 2.
- In the first puff stitch, work 1 dc.
- Add a picot to the top of the dc (Chain 3 and sl st into the base of the dc).
- Repeat 1 dc + picot for every puff stitch, creating decorative petal points.
- Finalize:
- Secure the yarn with a sl st.
- Cut yarn, leaving a long tail for attaching optional decorative beads.
3. Creating the Lid Cover
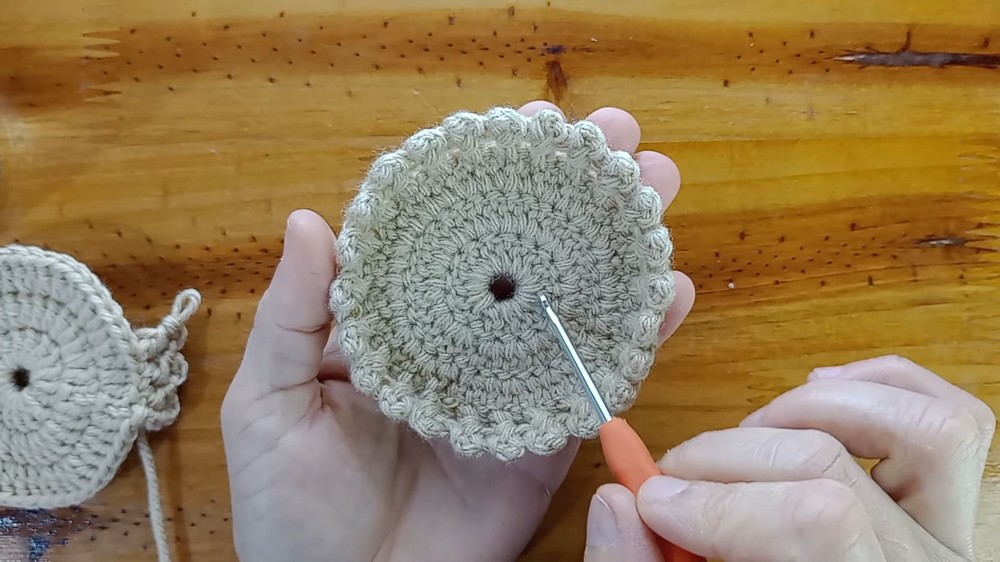
- Round 1 (Foundation Circle):
- Start with a magic ring.
- Chain 2 (does not count as a stitch).
- Work 16 dc into the magic ring.
- Round 2 (First Increase Round):
- Chain 2.
- Work 2 dc in every stitch around.
- Total: 32 sts.
- Round 3 (Alternating Increases):
- Chain 2.
- Work alternately:
- 2 dc in one stitch,
- 1 dc in the next stitch.
- Continue until the round is complete.
- Final Round (Decorative Edge):
- Work into the back loop only of each stitch:
- 1 dc.
- Chain 3, sl st into the space between the current and the previous stitch (forms a scallop).
- Repeat this all around.
- Fasten off when the round is complete, leaving a neat decorative edge.
- Work into the back loop only of each stitch:
4. Assembly
Step A: Preparing the Lid
- Prepare Metal Lid:
- Use a screwdriver to punch small holes into the surface of the jar’s lid for threading stems.
- Attach the Crochet Lid Cover:
- Apply hot glue around the top of the lid.
- Press the crocheted cover onto the glued surface, making sure it adheres neatly and evenly.
Step B: Securing the Stems
- Insert Stems:
- Thread the long tails of your crocheted stems directly through the holes in the lid.
- Secure Inside the Lid:
- Tie knots on the inside of the lid to hold each stem securely in place.
- Trim excess yarn for a clean finish.

Step C: Final Assembly
- Fill the Jar:
- Add decorative filler (e.g., candy, colored sand, or small pebbles) into the jar.
- Position the Flowers:
- Arrange the stems and flowers in the jar to create a balanced bouquet.

Finished Size
- Stem Height: Approx. 10–20 cm, depending on customization.
- Lid Diameter: Adjusted to match your jar lid size.

Conclusion
Congratulations on completing your crochet floral bouquet. This project is a wonderful way to repurpose glass jars and create a stunning decorative piece. Whether used as a gift or a centerpiece, your creation is sure to brighten any room. Experiment with colors and arrangements to make it uniquely yours.
https://www.youtube.com/watch?v=7Ez9WyxGBzQ