
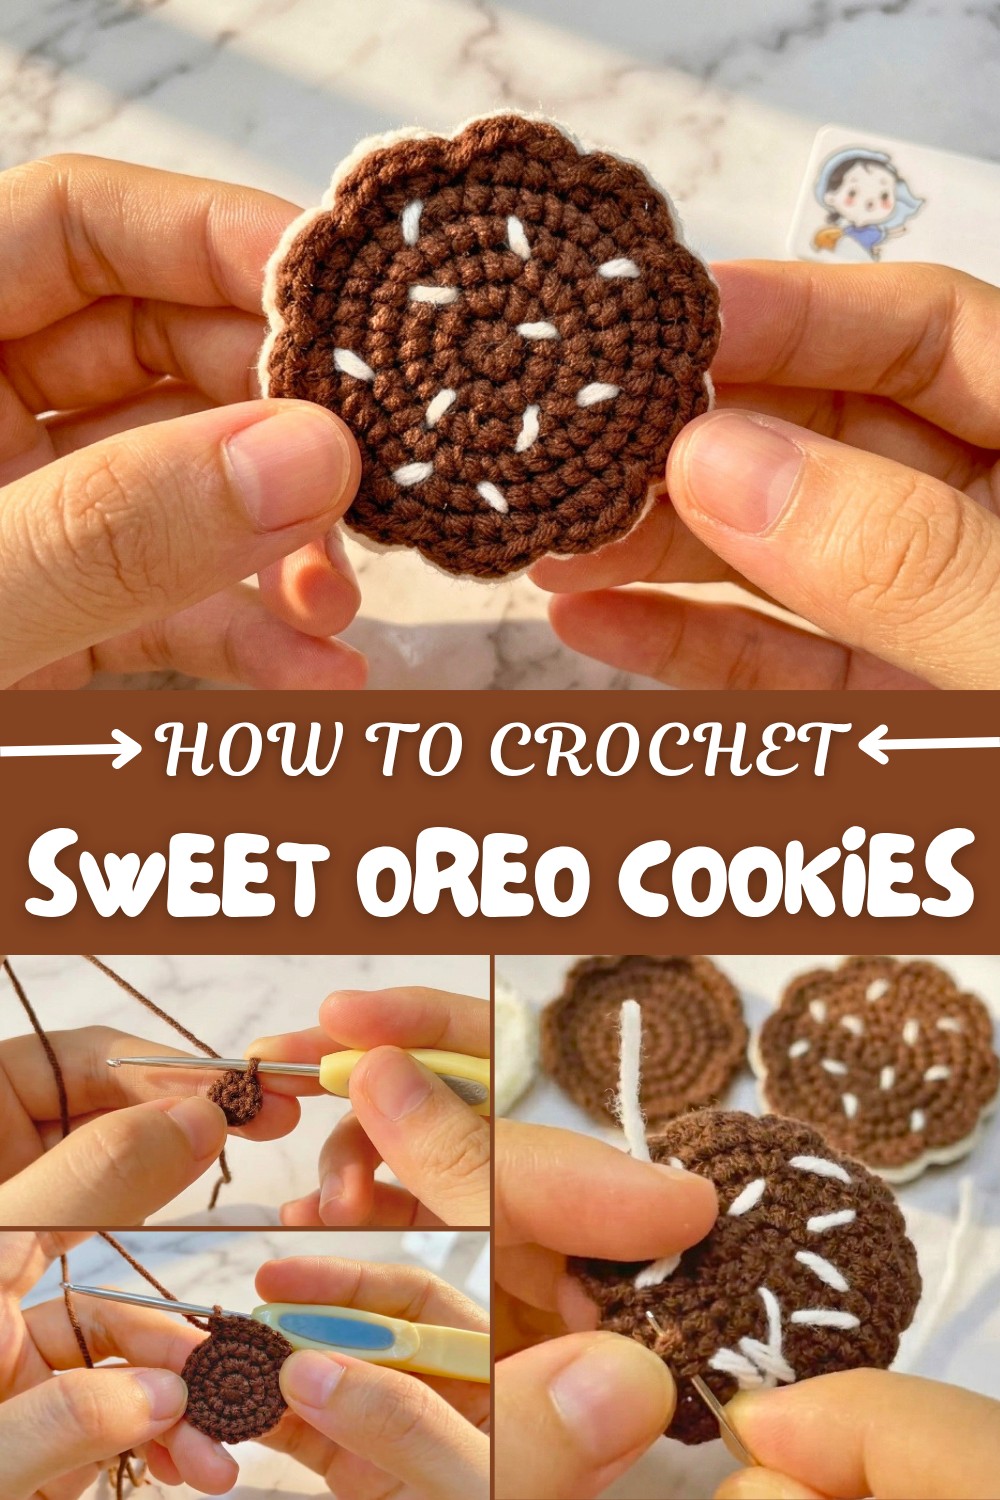
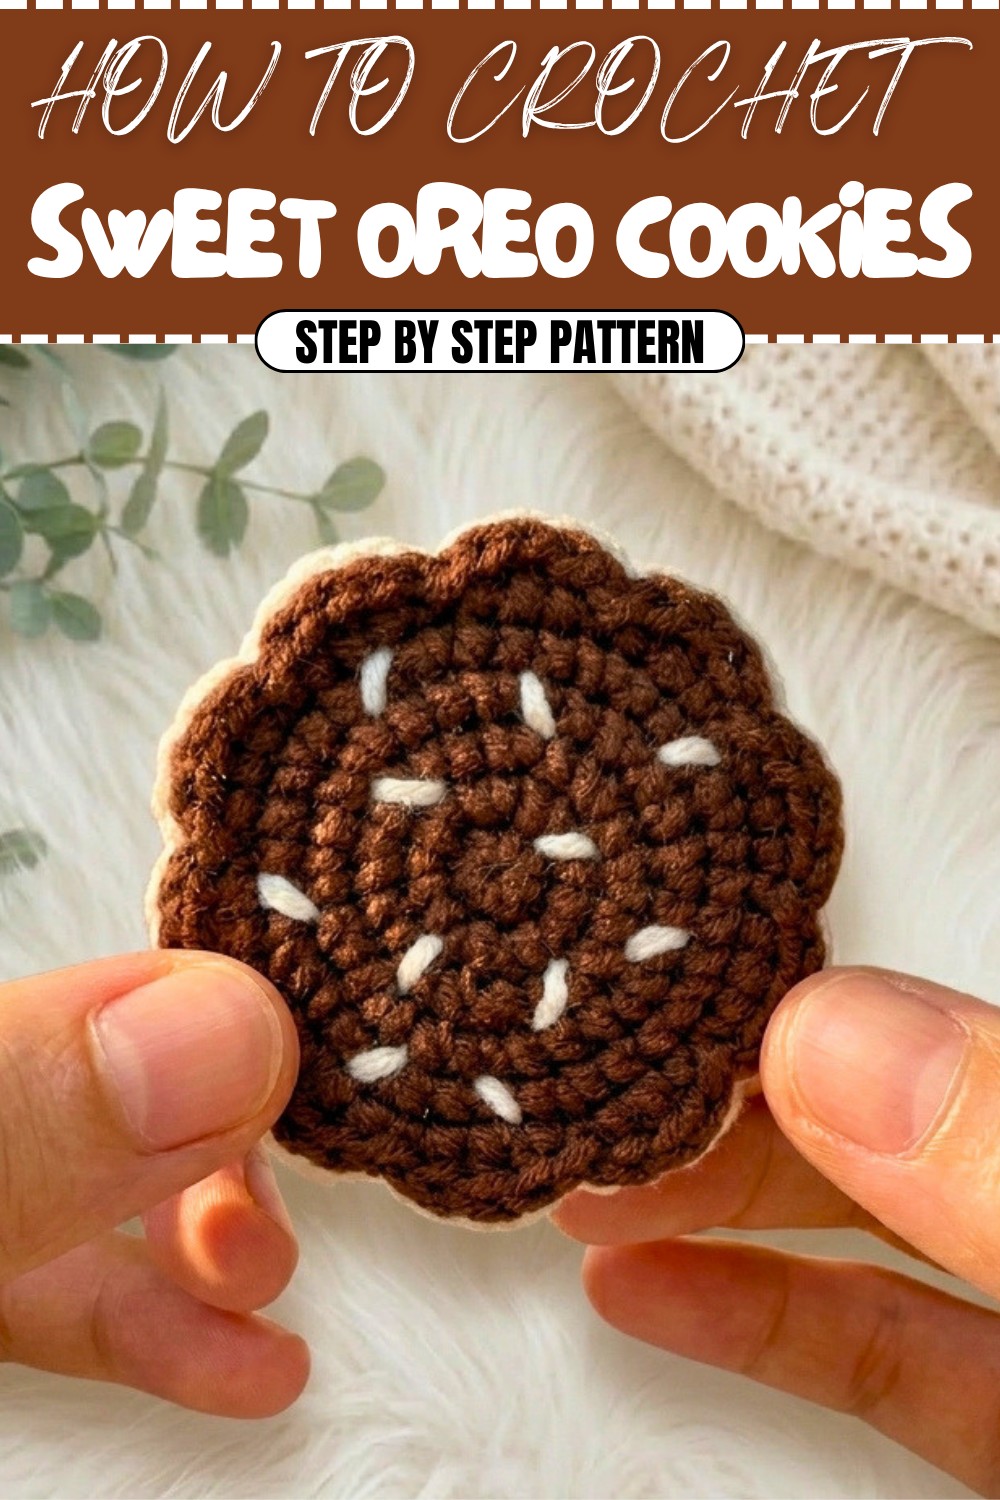
Playful Free Crochet Oreo Cookies Pattern for Handmade Decor
Sweeten up your day the easy way with a free crochet Oreo cookies pattern that promises endless fun and smiles.
Who doesn’t love the charm of a handmade treat that looks good enough to eat? Crocheting these adorable Oreo cookie replicas is as delightful as the real thing! With rich chocolatey brown yarn for the cookie layers and a crisp white yarn for the cream filling, this project creates a perfectly realistic sweet treat. The end result can be turned into whimsical refrigerator magnets, cute pendants, or fun decor for a dessert-themed crochet collection. This is an ideal beginner-friendly project that introduces textured techniques like crossed single crochet stitches, making the cookies look almost embossed with their irresistible pattern. If you enjoy crocheting food-inspired projects, this one will tickle your creativity with its simplicity and charm.
Creative Free Crochet Oreo Cookies Pattern for Beginners
This pattern mainly uses single crochets and slip stitches, ensuring it’s easy to follow while still offering a polished look. You'll also work with half double and double crochets in the later steps, adding some versatility to your skillset. The color combination is classic, but feel free to get creative—use pink yarn for strawberry cream or mint for a playful twist. The cookies are crocheted in pieces and then sewn together, making it an excellent opportunity to practice joining and finishing your crochet projects.
What You Can Crochet Beyond This Pattern
- Sandwich-style cookies in different colors, like macarons.
- Mini donut magnets with a similar circular base.
- Playfood sets for kids or decor.
- Keychains or ornaments with a dessert theme.
Why You’ll Love This Pattern
- Beginner-friendly stitches make it easy to follow.
- Quick project that’s fun to finish in no time.
- Customizable designs allow you to experiment with creative color combinations!
Detailed Crochet Oreo Cookie Pattern
Create your very own crocheted Oreo Cookie, perfect as keychain pendants, refrigerator magnets, or fun decorations. This step-by-step pattern uses simple techniques like chain stitches, single crochets, half-double crochets (hdc), and double crochets (dc), making it beginner-friendly. You’ll be crocheting three layers—two chocolate "cookies" and a white "cream"—to complete the pattern.
Skill Level & Terminology
- Skill Level: Beginner
- Terminology: US Terminology
Materials & Tools
- Yarn:
- Brown yarn (for Oreo "cookies") – Worsted weight.
- White yarn (for Oreo "filling") – Worsted weight.
- Hook: Size 3.5mm (E/4) or size required to achieve tight stitches.
- Accessories:
- Tapestry needle for sewing and detailing.
- Scissors.
- Stitch markers (optional).
- Hot glue gun (optional, for assembly).
- Small flat magnets (optional, for creating refrigerator stickers).
Gauge
Gauge is not critical for this project, but ensure your stitches are tight so the shape retains stiffness and the fiber fill does not poke through.
Abbreviations List
- ch: Chain
- sc: Single Crochet
- hdc: Half-Double Crochet
- dc: Double Crochet
- sl st: Slip Stitch
- inc: Increase (2 sc in the same stitch)
- st(s): Stitch(es)
- MR: Magic Ring
Special Stitch Instructions
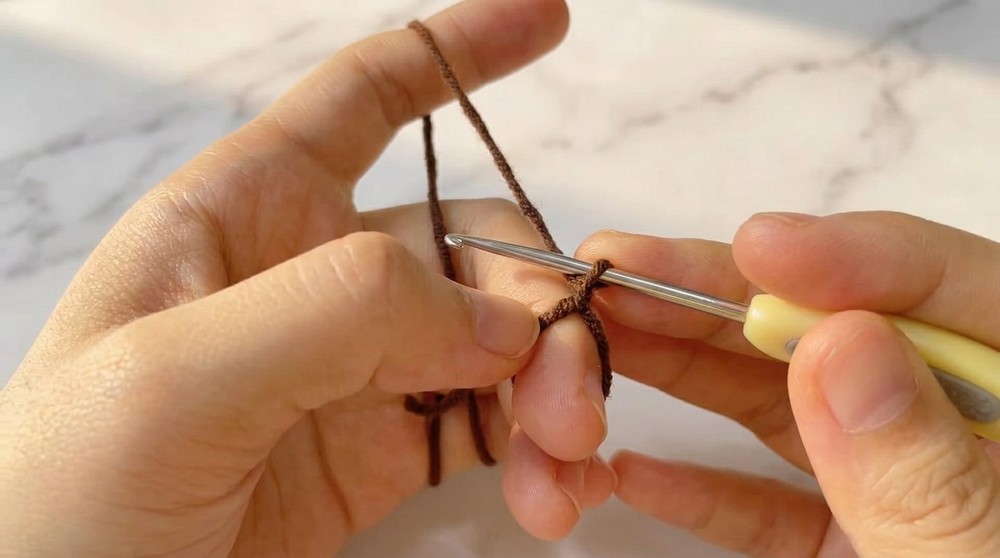
- Magic Ring (MR):
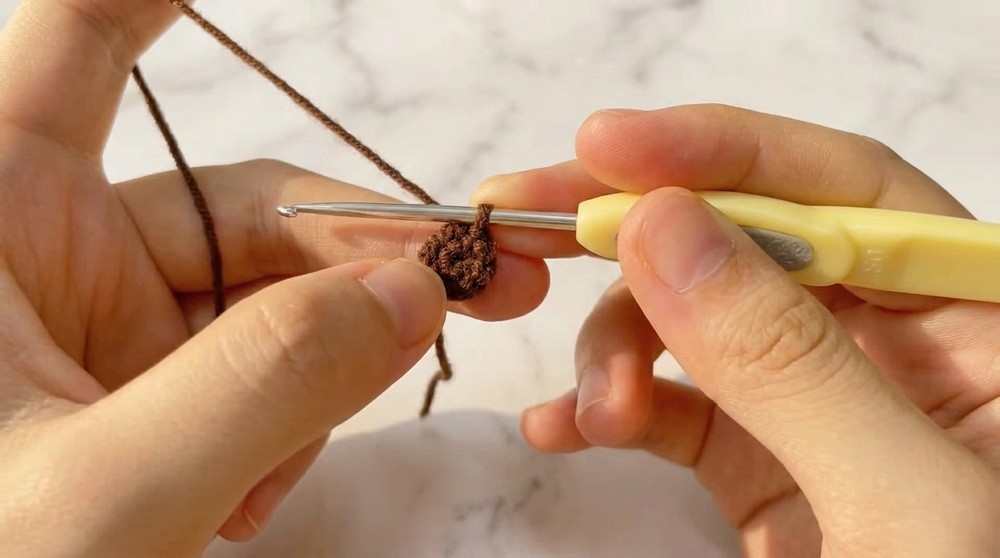
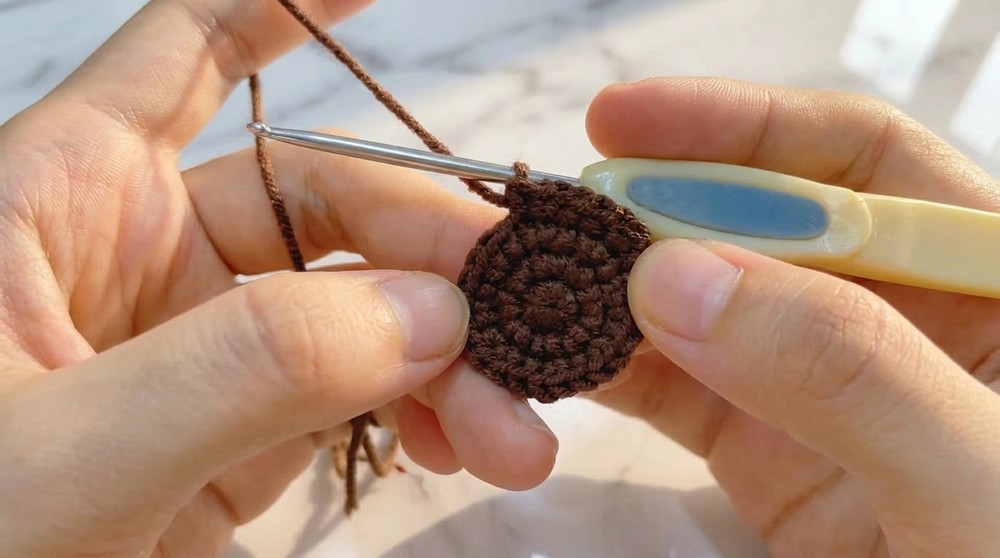
Wrap the yarn around your finger to form a loop. Insert the hook into the loop, yarn over, pull up a loop, and secure with a chain stitch. Begin crocheting inside the loop. - Crossed Single Crochet:
Insert the hook into the stitch, place the yarn on the right side of the crochet hook (unlike the usual left), pull through the stitch, yarn over, and pull through two loops on the hook. This creates the signature "crossed texture" for the Oreos.
Finished Size
- Cookie Diameter: Approximately 2.5 inches when finished.
What You’ll Learn from This Pattern
- Using crossed single crochet stitches to create texture and depth.
- Practicing simple increases and shaping for a perfect circular cookie base.
- Working with half-double and double crochet stitches for added variation.
- How to seamlessly join layers using neat stitching techniques.
- Optional tips for turning your cookies into magnets, pendants, or fun plushies.
Pattern
Cookie Layer (Make 2 Brown Pieces)
- Round 1:
- Begin with a Magic Ring (MR) and work 8 crossed single crochets into the ring.
- Tighten the ring and connect to the first stitch with a sl st. (8 sts)
- Round 2:
- Ch 1 to begin. Work 2 crossed sc in each stitch (inc). (16 sts)
- Join with a sl st to the first stitch.
- Round 3:
- Ch 1. Work 1 crossed sc, 1 inc; repeat from * to complete the round. (24 sts)
- Join with a sl st.
- Round 4:
- Ch 1. Work 2 crossed sc, 1 inc; repeat from * to complete the round. (32 sts)
- Join with a sl st.
- Round 5 (Decorative Edging):
- Ch 1. Work 3 crossed sc, 1 inc; repeat from * to complete the round. (40 sts)
- Join with a sl st.
- Work 1 additional round in the following sequence: 1 hdc in next st, 1 dc in next st, 1 hdc in next st, 1 sl st in next st. Repeat this pattern to complete the decorative cookie edge.
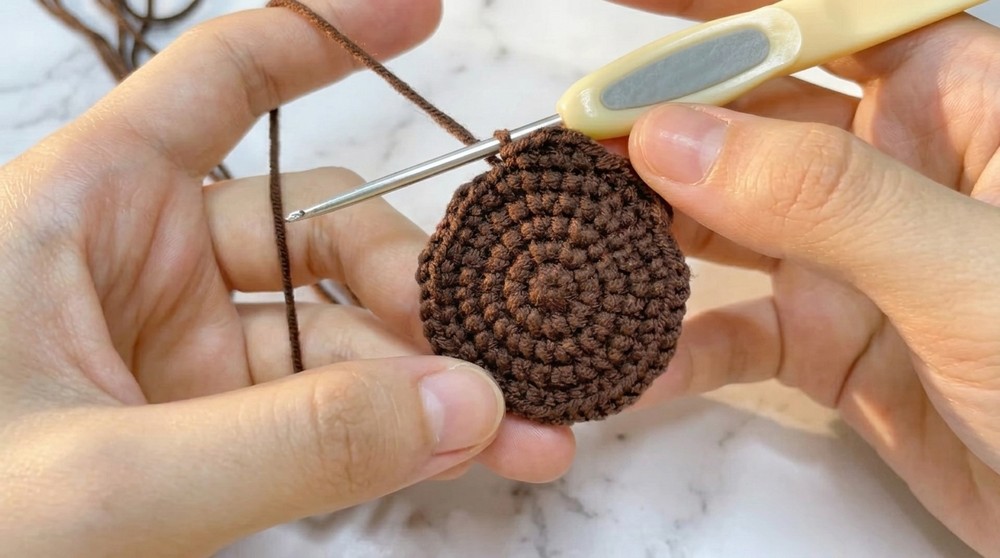
Fasten off, leaving a long tail for assembly.
The cookie layers feature a textured crossed single crochet stitch that mimics the Oreo design. Ensure even tension when working the edging for a smooth finish.
White Cream Layer
- Round 1:
- Begin with a Magic Ring (MR), work 8 sc into the ring.
- Tighten and connect with a sl st. (8 sts)
- Round 2:
- Ch 1. Work 2 sc in each st (inc). (16 sts)
- Connect with a sl st.
- Round 3:
- Ch 1. Work 1 sc, 1 inc; repeat from * to complete the round. (24 sts)
- Connect with a sl st.
- Round 4:
- Ch 1. Work 2 sc, 1 inc; repeat from * to complete the round. (32 sts)
- Connect with a sl st.
Fasten off, leaving a long tail for assembly.
This layer serves as the "cream" of the Oreo cookie. You can adjust the size by adding or eliminating rounds based on your design preference.
Assembly
- Sewing the Layers Together:
- Using the white yarn tail, position the white cream layer between the two brown cookie layers.
- Sew around the edges evenly, ensuring all three layers are secured. Try not to pull too tightly; you want a clean, flat edge.
- Optional Glue Assembly:
- For quick assembly (e.g., magnets), use hot glue to attach the white layer between the brown layers. Ensure even distribution of the glue to prevent bumps.
- Adding Details:
- If you’re making a refrigerator magnet, attach a small magnet to the back center of the cookie with hot glue.
- Hide Ends:
- Weave in any remaining thread tails seamlessly into the layers.
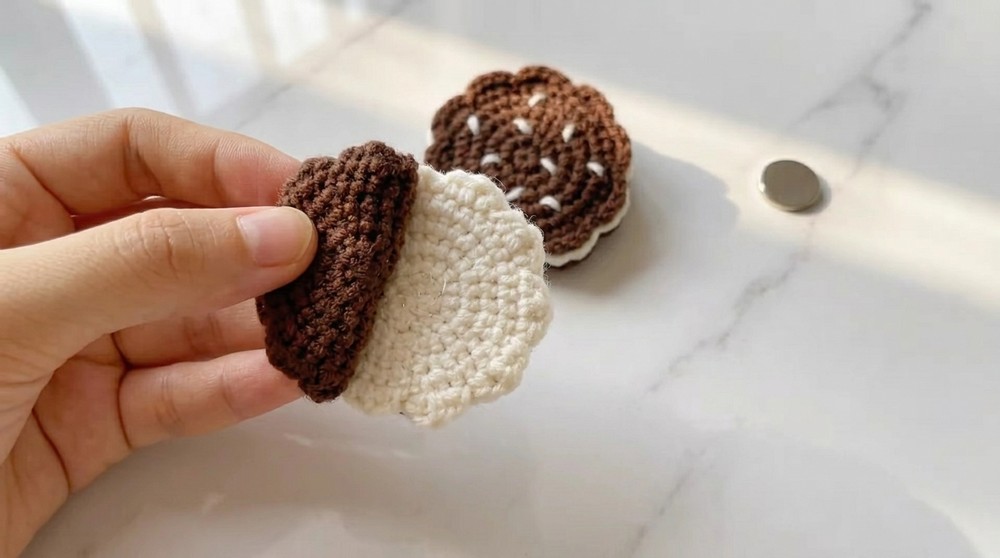
Enjoy Your Oreo Cookie!
Congratulations! You've finished your crochet Oreo cookie. Use these adorable cookies as pendants, bag charms, magnets, or even play pieces for kids. Experiment with yarn colors to "flavor" your Oreo cookies—mint green for mint filling or pink for a strawberry version.
Crocheting Tips for Beginners
- Crossed Single Crochet: Unlike the typical single crochet, ensure that the yarn wraps over the right side of the hook to create the textured effect. Practice this until it feels natural.
- Stitch Marker: Use a stitch marker to track the first stitch of your round as you work continuously.
- Even Sewing: To ensure your cookie looks neat, sew slowly and check alignment as you work around the edge.
This project uses basic single crochet, increases, and slip stitches, making it perfect for beginners to practice round shaping and texturing. Have fun and make a whole plate of these fun crochet Oreos!
Challenges & Solutions
While this pattern is beginner-friendly, you may find certain parts a little tricky—like maintaining even tension in your stitches or aligning the cookie pieces when sewing them together. Uneven tension can cause irregular shapes, while misaligned layers may affect the final look. To overcome this, it’s helpful to use a stitch marker to keep track of your rounds and consistently count stitches after each row. For sewing, pinning the layers lightly before stitching ensures perfect alignment. If you're new to the crossed single crochet stitch, practice a few rows separately to build confidence. Take your time, and remember the patience and attention to detail will make your cookies look polished and professional!