
How to Crochet Cropped Top Pattern for Stylish Appeal
Stitch style into your wardrobe with this Free Crochet Cropped Top Pattern, a chic and easy project perfect for any season.
Crocheting your own wearable piece is more than just a fun hobby—it’s a rewarding way to design clothing that reflects your personal style and fits you perfectly. This unique cropped top pattern is ideal for sunny days or casual outings and can even double as a thoughtful handmade gift. Its standout feature lies in its flexibility, as it can be tailored to suit different sizes and preferences based on simple adjustments. Lightweight and perfect for layering, the finished pattern is chic yet comfortable, making it a go-to addition to any wardrobe.
Simple Yet Elegant Crochet Cropped Top Pattern for Attractive Looks

For an accurate fit, periodically measure the work as you go and adjust the length or width as needed. This adaptable pattern makes it easy for crocheters of any size to enjoy the process while crocheting a fashionable cropped top that’s truly their own.

Crochet Pattern: Square Motif Halter Piece with Lace Tie
This pattern guides you to create a stylish and versatile square motif halter top, perfect for summer wear or layering. The repetitive block stitch pattern makes it beginner-friendly while allowing you to experiment with color changes, yarn weights, and sizes for a unique look. Whether you’re just learning crochet or looking for a quick, chic project, this piece is a fun and satisfying creation.
About this Pattern
This square motif halter top is created using simple stitches and a repetitive long block stitch pattern. The top features a square centerpiece worked in rounds, and it’s finished with a long, decorative lace strap that can be tied at the back of the neck and waist. It’s a great beginner-to-intermediate project that’s highly customizable, allowing you to adapt it to your size and style by adjusting the starting chain and number of rows.
Skill Level & Terminology
- Skill Level: Beginner to Intermediate
- Terminology: US Crochet Terms
This pattern is suitable for beginners who are familiar with foundation chains, double crochet (dc), chain stitches (ch), and working in rows. The stitch pattern is easy to memorize, making this a relaxing yet rewarding project.
Materials & Tools
To create this piece, you’ll need:
- Yarn:
- Baroque yarn from Círculo (size #4, #6, or #8).
- The green piece shown in the original was created with Baroque size #4, and the natural-colored piece was made with Baroque size #8.
- Choose your desired yarn weight to achieve the size and thickness you prefer.
- Crochet Hook:
- 4 mm hook (use a hook size suitable for your yarn weight).
- Additional Supplies:
- Scissors
- Tapestry needle (for weaving in ends and assembling the straps)

Gauge
Gauge depends on the yarn and hook size chosen. The pattern is highly adaptable, but for guidance:
- Using Baroque yarn size #4 and a 4 mm hook: 10 dc x 4 rows = approximately 4 inches (10 cm).
If you'd like a smaller or larger piece, adjust the starting chain and test your gauge.
Abbreviations
- ch – Chain
- sc – Single crochet
- dc – Double crochet
- sl st – Slip stitch
- yo – Yarn over
Special Stitch Instructions
Block Stitch (3dc together):
- Yarn over (yo): Insert hook into the designated stitch and pull up a loop (3 loops on the hook).
- Pull through 2 loops: Yo and pull through the first 2 loops.
- Repeat twice: Insert hook into the same stitch, yo and pull up a loop, yo and pull through 2 loops. After repeating 3 times, there will be 4 loops on your hook.
- Pull through all loops: Yo and pull through all 4 loops to finish the block stitch.
Finished Size
The finished square size can vary depending on your desired fit and the number of foundation chains:
- Size S: Start with 44 chains—ideal for a smaller individual.
- Size M: Start with 47 chains.
- Size L: Start with 50 chains (or more in multiples of 3 + 5).
The length and width of your square will determine how the piece fits your body. Make sure to measure the work to ensure the halter fits well when tied.
What Stitches Are Used & Starting the Pattern
This pattern uses chains (ch), double crochet (dc), block stitch (3dc together), and slip stitch (sl st). You’ll start by forming foundation chains that determine the size of the square. After completing the square motif, you’ll work on fine tuning, finishing, and adding decorative lace ties.
The Pattern Itself
Step 1: Foundation Chains
- Start with a slip knot.
- Chain a multiple of 3 + 5 for the foundation row.
- Refer to the following size options as a guide for your chain count:
- Size S: 44 chains (small bust).
- Size M: 47 chains.
- Size L: 50 chains (or adjust according to your size).
- Refer to the following size options as a guide for your chain count:
- Make sure your chains are worked loosely to ensure flexibility.
The foundation chain determines the width of the finished square, so adjust as needed for your measurements.
Step 2: First Row
- Skip the first 4 chains from the hook.
- Work the block stitch (3dc together) into the 5th chain. To do this:
- Yo, insert hook into the chain, pull up a loop.
- Yo, pull through 2 loops (leave remaining loops).
- Repeat 3 times into the same chain, leaving loops on the hook each time (4 loops on the hook).
- Yo, pull through all 4 loops to finish the stitch.
- Skip the next 2 chains, and in the 3rd chain, work 1 dc.
- Repeat The Pattern:
- Ch 1, and in the same chain where you worked the dc, work another block stitch (3dc together).
- Skip the next 2 chains and work 1 dc.
- Continue this sequence until the end. For the last chain:
- Work 1 dc only.


You’ve completed the foundation row with your first blocks alternating with spaces. The spacing creates the structural design for the square motif.
Step 3: Building the Square
- Ch 5 to begin the next row (counts as 1 dc + 2 ch).
- Turn your work and begin the next row by:
- Working the block stitch (3dc together) into the first group of chains or space from the previous row.
- Continue the alternate 1 dc, chain 1, block stitch sequence across the row, making sure to align your stitches with the gaps from the previous row.
- Always finish the row with 1 dc into the turning chain.
- Repeat Rows:
- Work until the square reaches your preferred height. For a more fitted piece, aim for a square shape with equal height and width.
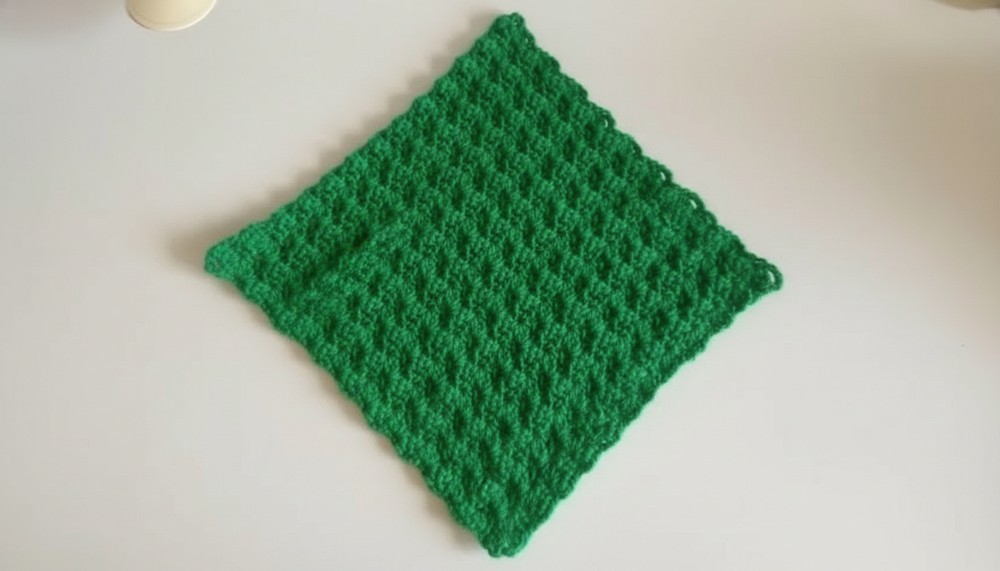
Once you’ve completed the body of the piece, you’re ready to work on the finishing touches, including the straps.
Step 4: Lace Tie
- Attach a new yarn strand to the top of one corner of the square.
- Work a long chain (length determined by fit; 60–80 chains recommended for standard halter straps).
- Slip Stitch Along the Chain:
- Turn and work a sl st into each chain back to the starting point. This creates a sturdy, decorative tie.
- Repeat this process to create the second halter strap.

The lace straps are easy to adjust for a snug, personalized fit.
Step 5: Assembly
- Fold the square diagonally to form a triangle.
- Pass the straps through the top corner holes for the neck tie.
- Insert the bottom tie through the holes in the lower rows to wrap and secure the top around the back.
Assembly & Finishing
- After completing your work, weave in loose ends using a tapestry needle.
- Block the piece (lightly wash or steam the top) to ensure your stitches lay evenly and the square retains its shape.
- Adjust the straps and test the fit to ensure the top ties securely and comfortably.
What You’ll Learn from This Pattern
- Block Stitch Mastery: Learn how to create the decorative 3dc together block stitch that adds texture and uniqueness.
- Size Adjustments: Discover how to tailor this adaptable pattern to varying sizes by altering the starting chain and overall rows.
- Strap Integration: Practice creating advanced finishing techniques for functional and stylish ties.
Why You’ll Love This Pattern
The square motif halter top is a timeless crochet design that offers endless customization possibilities. Choose different color combinations, explore unique yarn weights for texture, or adjust the dimensions for various sizes—it’s your canvas to play with. This piece is lightweight, comfortable, and perfect for warm weather or layering when paired with other outfits.