
Easy Free Crochet Demogorgon Pattern for Amigurumi Lovers
Charm your way into making a fun and spooky Free Crochet Demogorgon Pattern that’s easy to follow and adds a Stranger Things twist to your creations.
Trying a new crochet project can be exciting, especially when the steps are straightforward and the results are unique. The free crochet Demogorgon pattern uses clear instructions and basic stitches, making it a perfect choice for beginners. Each section of the Demogorgon, its body, arms, legs, and the well-known petal-shaped face is created separately. Making one simple part at a time helps beginners stay organized and confident throughout the project.
The pattern’s most playful detail is its face, designed with five rounded petals that flare out to create a memorable look. Crocheting these shapes is surprisingly easy, and watching them come together to form the Demogorgon’s “mouth” is especially satisfying. The pattern calls for basic yarn and a standard crochet hook, so there’s no need for fancy supplies. Texture is built in with simple stitches, giving the finished toy a soft and slightly bumpy feel that’s pleasant to touch.
Cute and Spooky Free Crochet Demogorgon Pattern

Assembling the Demogorgon is also beginner-friendly. The instructions guide you step by step through sewing the parts together, and there’s flexibility for personal touches. Changing yarn colors or adding a keyring turns your creation into a unique decoration or custom gift for a friend. Many crafters use their Demogorgon as a quirky desk buddy, a bag charm, or to brighten up a shelf at home.

Overall, the free crochet Demogorgon pattern is a fun and approachable way to build crochet skills. Whether it’s your very first crochet toy or an early project, the clear layout and manageable pieces ensure a creative and enjoyable experience. Every beginner can feel proud finishing this charming and unusual little creature.

Domocarbon Amigurumi Pattern
In this tutorial, I’ll guide you step-by-step to crochet a Domocarbon, a cute, flower-topped character perfect for kitchen, workspace, or shelf decor. With easy-to-follow instructions, helpful notes, and a touch of creative flair (such as optional wired petals), you’ll love making this fun, practical piece. This pattern is suitable for those with basic crochet skills. Let’s get started!
Skill Level & Terminology
Skill Level: Confident Beginner to Intermediate
Terminology: US Crochet Terms
Basic knowledge of magic ring, single crochet, increases, decreases, slip stitch, and assembly is recommended. Optional: Color change, surface embroidery, and inserting wire for shaping the petals.
Materials & Tools
- 4-ply acrylic yarn in primary/contrast colors (suggested for the character and flower)
- 3 mm crochet hook
- Scissors
- Tapestry/darning needle
- Stitch marker or scrap yarn
- Small amount of poly fiberfill
- Optional: Wire for shaping flower petals, pin for securing during assembly
Gauge
Gauge is not critical but use a small enough hook to create a firm, non-gappy fabric so stuffing does not show through.
Approximate finished size: Palm-sized (can be adjusted by changing yarn weight/hook).
Abbreviations List
| Abbreviation | Meaning |
|---|---|
| MR | Magic ring |
| sc | Single crochet |
| inc | Increase (2 sc in same stitch) |
| dec | Decrease (sc 2 together) |
| sl st | Slip stitch |
| ch | Chain |
| st(s) | Stitch(es) |
| FLO | Front loop only |
| BLO | Back loop only |
Special Stitch Instructions
- Magic Ring (MR): Loop yarn, insert hook, pull up a loop, sc required number into the ring, pull tail to tighten.
- Increase (inc): 2 sc in the same st.
- Decrease (dec): Insert hook in next st, yarn over and pull up a loop, insert hook in following st, yarn over and pull up loop (3 loops on hook), yarn over and pull through all loops.
- Changing Color: Finish the last step of the final sc in old color with new color.
Finished Size
- Height: ~8-10 cm (with flower)
- Width: ~4-6 cm (body)
- Size will vary based on yarn, hook, and tension.
Pattern Overview & Getting Started
The Domocarbon is made by crocheting the arms, legs, and body as separate pieces, combining them, then adding a pieced flower on the head. Simple embroidery and optional shapeable, wired petals complete the look. The primary stitch in this project is single crochet, with rounds worked in continuous spirals, so use a marker to track your rows.
The Pattern Itself
Arms (Make 2)
Round 1:
- MR, 6 sc into ring (6)
Rounds 2-5:
- sc in each st around (6 per round)

Make a magic ring and place 6 single crochets. Work 4 more rounds of 6 single crochets. This forms a tubular arm.
At End:
- Flatten arm, sl st across to close.
- Leave long tail for sewing.
- Do NOT stuff.
Your arm should be flat and tube-like. Make a second arm the same way.
Legs (Make 2, then join for Body Base)
Round 1:
- MR, 6 sc into ring (6)
Round 2:
- sc in next st, inc in next st around (total 9)

Rounds 3-4:
- sc in each st around (9 per round)
- sl st to finish leg, ch 1, cut but leave long tail for sewing.
Repeat for second leg. Do NOT stuff.
Each leg starts with a magic ring and grows gently. These serve as the base for the body.
Joining Legs & Building Body
Step 1:
- After finishing the second leg, do NOT cut yarn. Continue:
- ch 1, join to first leg with a sc, work around first leg (9 sc), sc in ch space (joining both legs), then work around the second leg (9 sc), sc in same ch space.
= 20 sts (18 sc around legs + 2 sc in chain space).
Step 2 (Body and shaping):
- Work sc in each st around for several rounds (Rounds 6-7, 20 sc per round).
After joining, you create a rounded base for the body and continue to form the torso.
Step 3 (Body Tapering):
Round 8:
- sc in next 8, dec, sc in next 8, dec (total 18)
Round 9:
- sc in each st around (18)
Round 10:
- sc in next 4, dec repeat 3× (total 15)
Round 11:
- sc in each st around (15)
Round 12:
- sc in next 3, dec repeat 3× (total 12)
Rounds 13-14:
- sc in each st around (12)
You are now shaping the body and neck area. Begin stuffing the body lightly with fiberfill before it gets too small.
Step 4 (Head and Increasing):
Round 15:
- inc in each st (2 sc in each, 12) = 24
Rounds 16-19:
- sc in each st (24 per round)
Stuff neck/body as you go.
The increase forms the head; keep it round and well-stuffed.
Step 5 (Head Taper & Closing):
Round 20:
- sc in next 2, dec repeat 6× (total 18)
Round 21:
- sc in next, dec repeat 6× (total 12)

Round 22:
- dec in each st around (total 6)
- Fasten off, leaving long tail. Use tapestry needle to weave in and out of front loops, pull tight to close, secure, and weave end into head.
Finish off with a decrease round to close the head. Pull tight for a neat finish.
Assembly: Attaching Arms and Shaping
- Position arms just below neck.
- Sew arms securely across flattened edge to sides with tails left from arms.
Arms should be snug and firmly stitched. Do the same for both sides.
Flower: Center
Round 1:
- MR, 5 sc (5)
Round 2:
- 2 sc in each st (10)
Make adjustable with tight sc. Fasten and leave tail to sew to head.
Flower: Color Change and Petals
Round 3:
- Join contrasting color. sc in next st, inc in next st repeat for 15 sc.
This increases and creates base stitches for five petals. Place stitch marker for petal placement if desired.
For each Petal (make 5 around center):
Worked over 3 sts each.
- sc in next 3 sts
- ch 1, turn.
Row 2: sc in first st, inc in next st, sc in last st (total 4); ch 1, turn.
Row 3: sc in first st, dec over next two, sc in last (3); ch 1, turn.
Row 4: skip first st, sc in next (2); ch 1, turn.
Row 5: skip first st, sc in last (1).
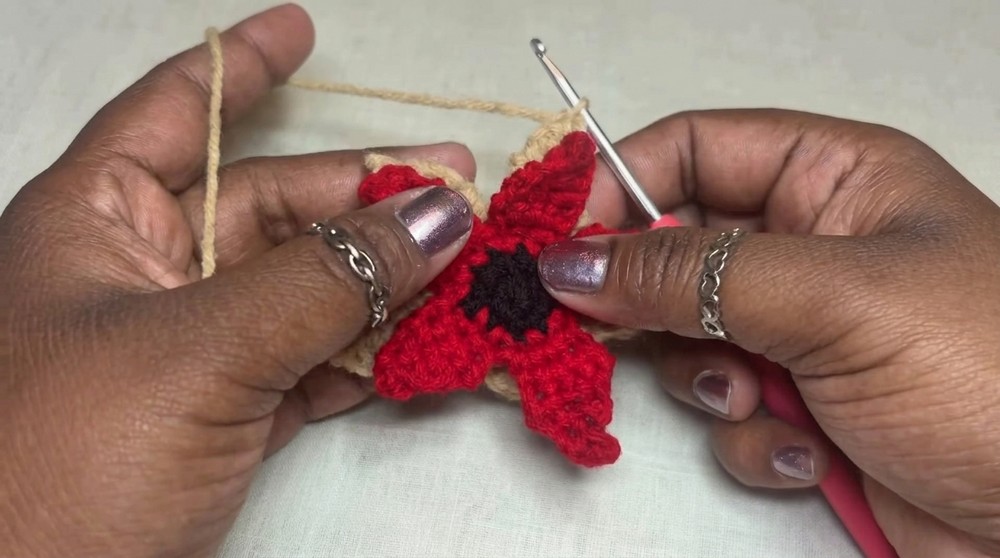
Cut and fasten, weave in ends. Repeat for all 5 petals.
(Optional: With wire, insert along the edges of each petal before crocheting the final row. Twist and secure wire at flower center.)
Each petal is worked over 3 stitches, building out, decreasing for the pointed tip. Add wire for structure and shape if desired.
Flower Assembly
- Attach flower to head at center with sewing needle/yarn tail.
- If using wire, shape petals as desired for a 3D effect. Make sure wire ends are safely tucked.
Sew flower securely to head’s top center. Adjust and fold petals for dimensional look.
Facial & Decorative Embellishments (Optional)
- With contrasting yarn or embroidery thread, stitch eyes, mouth, or blush.
- Embroider white dots or lines as highlights on flower petals for extra charm.
Use simple embroidery or small bits of yarn for the Domocarbon’s face and flower accents. Be creative!
Final Assembly & Shaping
- Tuck in any loose yarn tails. Gently shape the body, head, legs.
- Fold or pose petals as desired if you used wire.
- Your Domocarbon amigurumi is complete!
Final shaping can make your flower and character come to life. Be sure all elements are sewn securely for durability.
Conclusion
You have now created a playful, customizable Domocarbon decorated with a cheerful flower crown! Using only single crochet, a few increases and decreases, and some basic shaping, you’ve made a delightfully sturdy figure with limitless potential for personal touches. This pattern is a great foundation—try varying the yarn colors, adding more flowers, or adapting to other fun characters.
Pattern Recap:
- Make arms, legs, then join legs for body and build up for head.
- Crochet a flower, create petals (with or without wire), and sew on top.
- Stuff as you go and finish details with embroidery for a unique look.