
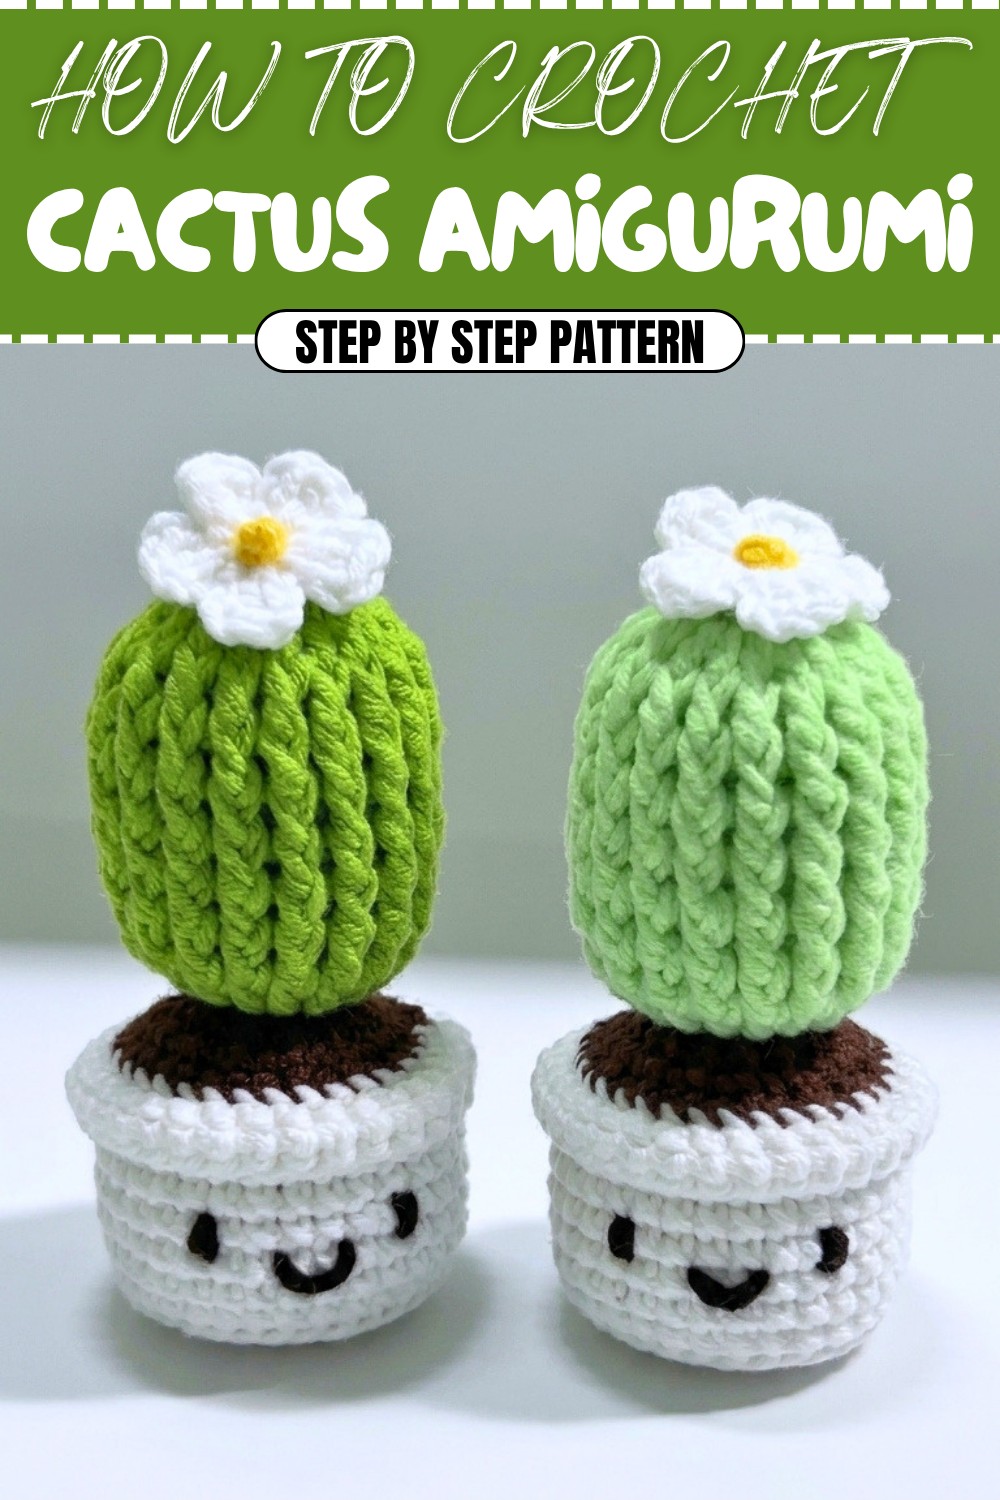
Cute Crochet Cactus Amigurumi Pattern for Modern Home Vibes
Simple and easy way to brighten your room with a Free Crochet Cactus Amigurumi Pattern, perfect for fun gifts or cute decorations.
Creating a little handmade piece that brings a touch of nature indoors is such a delightful way to brighten up your home or workspace. This project walks you through making a charming cactus in a pot using simple crochet techniques that anyone can learn. Starting with the magic ring to make neat, seamless circles, you’ll work your way through single crochet and front post double crochet stitches that give the cactus its lively texture and shape. The front post double crochet, in particular, is a fun stitch that adds raised ridges to your cactus, making it look extra realistic and interesting.
Easy Crochet Cactus Amigurumi Pattern for Effortless Style

As you build the cactus body, pot, soil, and even a little flower on top, you’ll gain confidence working in rounds and joining pieces together with slip stitches and yarn sewing. The pattern is designed to be beginner-friendly, taking you through each stitch slowly and clearly so you can enjoy every step without feeling overwhelmed. Plus, using cotton yarn and a small hook helps create a sturdy and neat finish that’s perfect for display.
Once you’ve mastered this project, the techniques you learn can open doors to many other cute creations. The magic ring, front post double crochet, and working with stitches in rounds are all skills that help you make other amigurumi plants, adorable animals, or colourful home decor items. You might find yourself inspired to crochet a whole little garden of crocheted succulents or personalize your space with whimsical handmade accents. This pattern not only adds charm to any room but also builds the foundation for countless creative crochet adventures.
Skill Level & Terminology
- Skill Level: Beginner
- Terminology: US Crochet Terms
This pattern focuses on basic stitches and manageable rounds, making it the perfect learning project for new crocheters or those looking to create a quick and thoughtful gift.
Materials & Tools
- Yarn (5-ply Cotton Yarn):
- Green: For the cactus body.
- Brown: For the soil.
- Light Brown or Clay Color: For the pot.
- Pink or another vibrant color: For the flower.
- Yellow (optional) for flower pistil details.
- Hook: 2.5 mm crochet hook.
- Stuffing: Polyester fiberfill for the cactus and pot.
- Scissors: For cutting yarn.
- Stitch Marker: Optional, to help track rounds.
- Hot Glue Gun: For attaching the cactus and flower.
- Darning Needle: For sewing parts together.
Gauge
Gauge is not critical for this project, but aim for consistent, tight stitches to ensure the stuffing does not show through.
Abbreviations
| Abbreviation | Explanation |
|---|---|
| mr | Magic Ring |
| ch | Chain |
| sc | Single Crochet |
| dc | Double Crochet |
| sl st | Slip Stitch |
| inc | Increase (2 stitches in the same stitch) |
| dec | Decrease (2 stitches worked together) |
Special Stitch Instructions
Magic Ring (mr)
Wrap yarn around your fingers to form a loop, insert your hook under the first loop, pull up a loop, ch 1, and work all stitches into the loop. Once complete, pull the yarn tail tightly to close.
Front Post Double Crochet (FPdc)
To work a front post double crochet: Yarn over, insert your hook around the post (the vertical bar) of the stitch instead of into the top loops, yarn over and complete the double crochet as normal. This creates a raised texture.
Finished Size
The completed cactus (pot included) measures approximately 6–8 cm (2.5–3 inches) tall, depending on yarn thickness and hook size.
The Pattern Itself
The pattern is divided into four parts:
- Cactus Body
- Pot
- Soil
- Little Flower
Each part is crocheted separately and assembled together to create the final product.
Part 1: Cactus Body
Yarn: Green
Round 1:
- Start with a magic ring.
- Work 9 sc into the ring. (9 sts)
- Pull yarn tightly to close the ring.
- Sl st into the first st to join.

Round 2:
- Ch 2 (counts as the first dc).
- Work 2 dc in each st around (dc increase). (18 sts)
- Sl st into the first st to join the round.
Rounds 3–9:
- Ch 2. Work FPdc into each st around. (18 sts per round)
- Mark the first stitch with a stitch marker to keep track.
- Sl st into the first st at the end of each round.


Tip for Beginners: You can stop the cactus body when it reaches approximately 6 cm (2.5 inches) tall if you prefer flexibility over stitch counting.
Finishing the Body:
- Fasten off, leave a long tail for sewing.
- Stuff the body firmly with fiberfill.
- Using a darning needle, sew the opening closed by weaving the needle through front loops only and pulling tightly. Pass the needle through the center to secure and weave off the tail.

Part 2: Pot
Yarn: Light Brown
Round 1:
- Start with a magic ring.
- Work 8 sc into the ring. (8 sts)
- Pull the yarn tightly to close the ring.
- Sl st into the first st to join.
Round 2:
- Ch 1. Work 2 sc in each st (sc increase). (16 sts)
- Sl st into the first st to join.
Round 3:
- Ch 1. (1 sc, 1 inc) repeat around. (24 sts)
- Sl st into the first st to join.
Round 4:
- Ch 1. (2 sc, 1 inc) repeat around. (32 sts)
- Sl st into the first st to join.
Round 5:
- Ch 1. Work 1 sc in each st around using back loops only. (32 sts)
- Sl st into the first st to join.
Rounds 6–11:
- Ch 1. Work 1 sc in each st around (use both loops). (32 sts per round)
- Sl st into the first st at the end of each round.

Round 12–13:
- Ch 1. Work 1 sc in each st around, alternating between front loops only for round 12 and both loops for round 13. (32 sts per round)

Finishing the Pot:
- Fold the edge outward gently to form a lip for the pot.
- Fasten off and weave in all loose ends.
Part 3: Soil
Yarn: Brown
Round 1:
- Start with a magic ring.
- Work 16 dc into the ring. (16 sts)
- Mark the first stitch with a stitch marker.
- Pull yarn tightly to close the ring.
- Sl st into the first st to join.
Round 2:
- Ch 1. Work 2 sc in each st around (sc increase). (32 sts)
- Sl st into the first st to join.
Finishing the Soil:
- Fasten off, leaving a long tail for sewing.
Part 4: Little Flower
Yarn: Pink
Round 1:
- Start with a magic ring.
- Ch 3 (counts as the center base).
- Work 1 dc, ch 3, sl st into the ring to form the first petal.
- Repeat this sequence 4 more times for a total of 5 petals.
Finishing the Flower:
- Pull the yarn tightly to close the ring.
- Fasten off, weave in any loose ends.
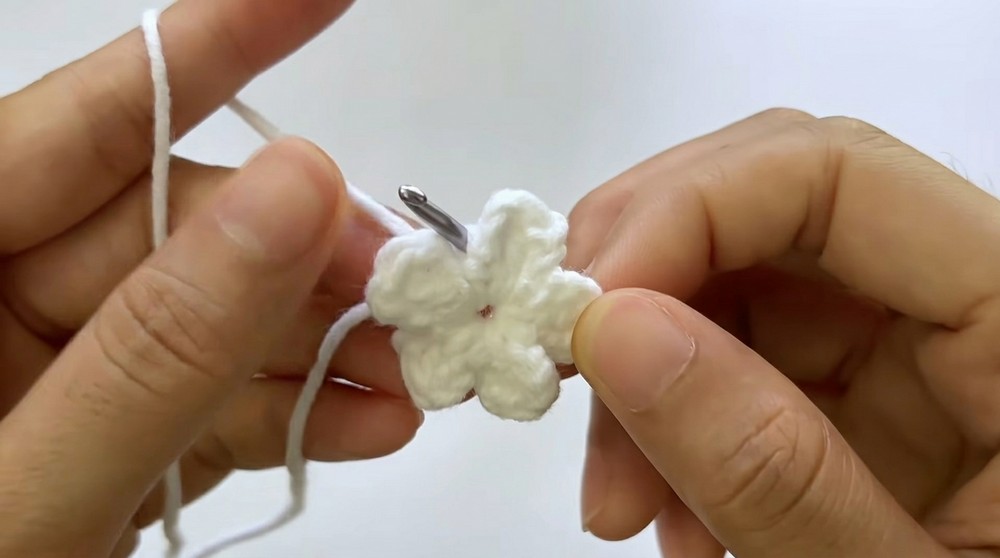
Optional: Use yellow yarn to embroider or glue on the pistil (center detail) of the flower.
Assembly & Finishing
Sew the Soil to the Pot:
- Stuff the pot firmly with fiberfill for a stable shape.
- Position the soil inside the pot and sew the soil to the pot using the overlap stitch technique (working into the edges of both pieces).
Attach the Cactus Body:
- Use hot glue to secure the cactus body into the center of the soil. Be sure the body is firmly attached for stability.
Glue the Flower:
- Center the flower on top of the cactus and use glue to attach securely.
Face Details:
- Optional: Use black yarn or embroidery thread to add eyes and a smiling mouth to the cactus for extra cuteness!
How to Start and Stitches Used
Getting Started: Begin with a magic ring to create each of the cactus, pot, soil, and flower components. This pattern uses basic stitches such as single crochet (sc), double crochet (dc), slip stitch (sl st), and front post double crochet (FPdc). The process is simple, yet produces a polished and adorable result – perfect for beginners!
Conclusion
Congratulations! Your cute Cactus in a Pot is complete. This adorable crochet project makes for a fantastic gift or a charming decoration for your space. If you enjoyed this tutorial, why not experiment with different colours or textures for your flower and pot?