
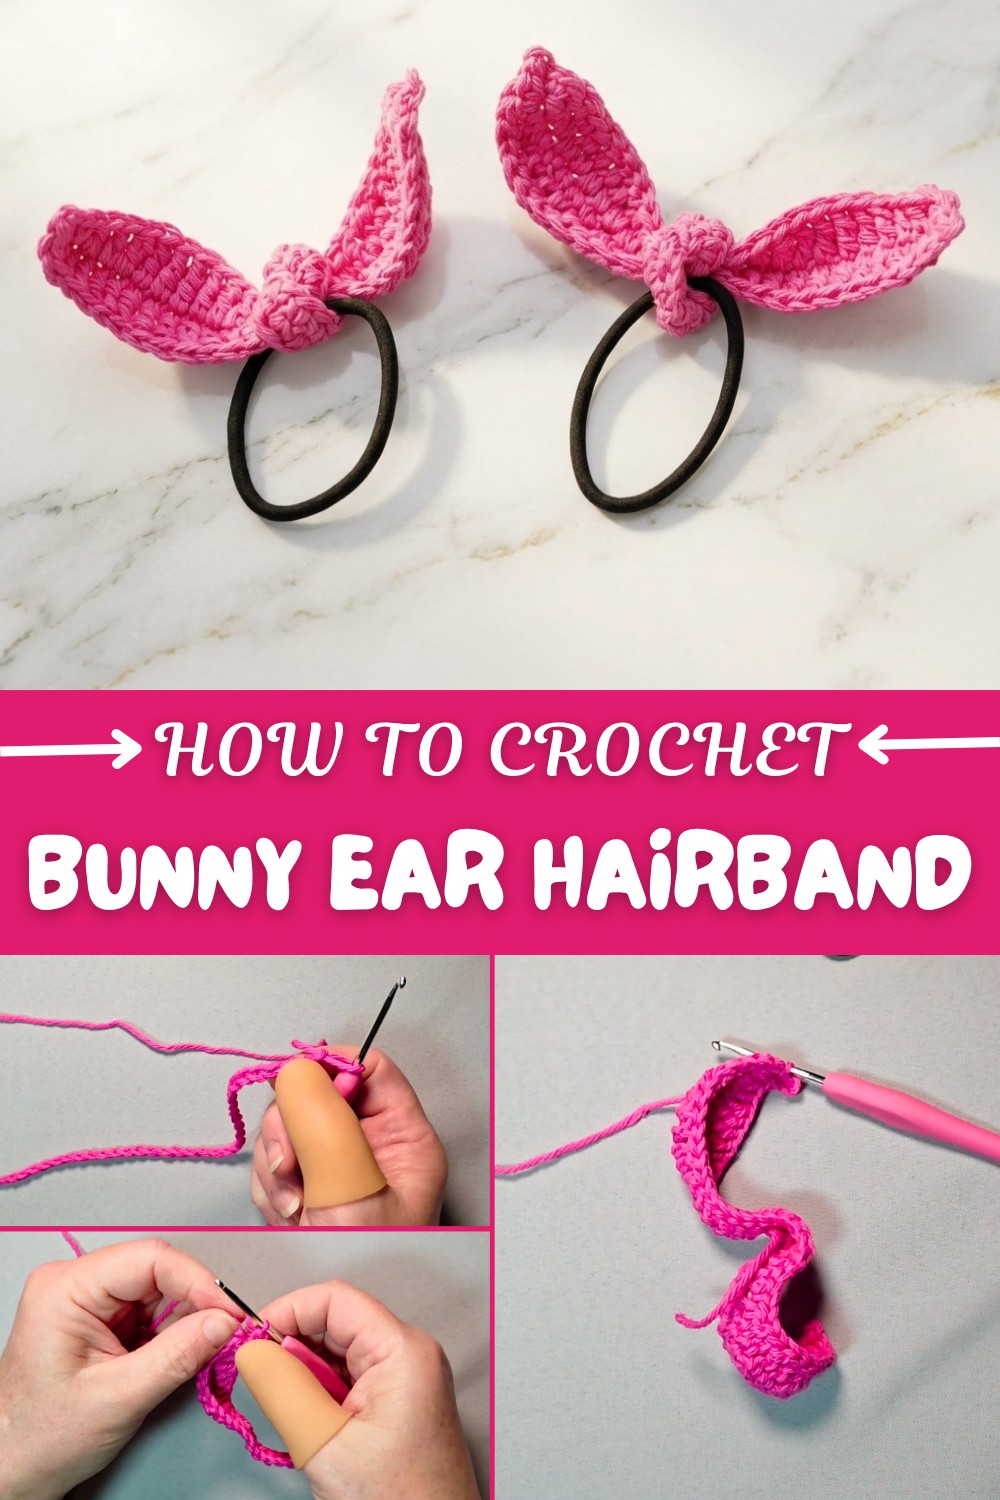
Bunny Ear Headband Free Crochet Pattern You’ll Love
Add a touch of charm to your hair with this free crochet bunny ear hairband pattern crafted with 100 percent cotton yarn for durability and adorable spring style.
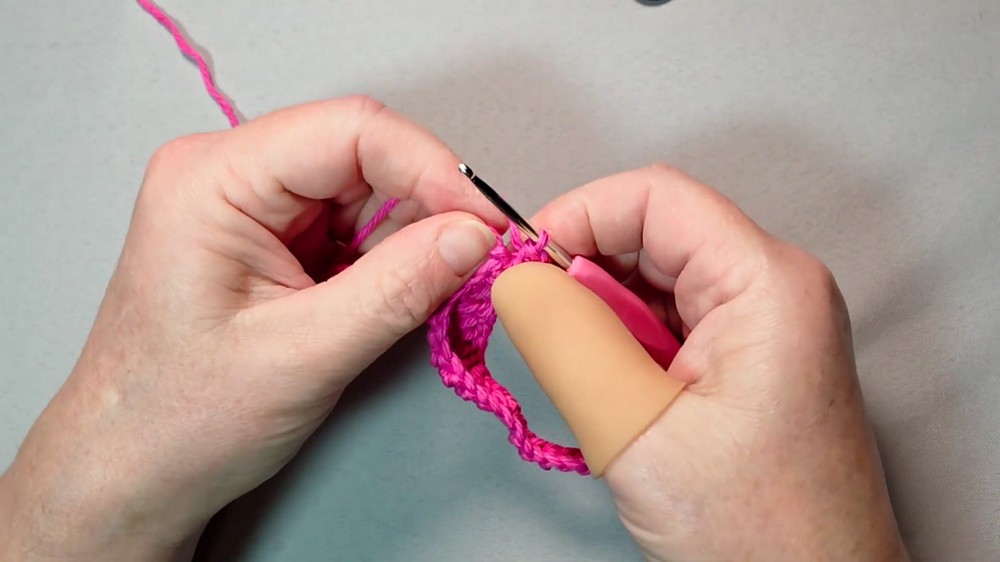
Looking for a charming seasonal accessory for kids or festive occasions? This crochet project introduces a delightful wearable hairband featuring bunny ears, perfect for springtime, Easter, or adding a touch of whimsy to everyday outfits. With the Free Bunny Ear Hairband Pattern, you can create cute and playful bunny ear hairbands that are as enjoyable to make as they are to wear. Using a 3 mm crochet hook and sturdy cotton yarn, the project is designed for a quick finish—most can complete it in about ten minutes, even at a relaxed pace.
Free Crochet Bunny Ear Hairband Pattern with Step-by-Step Guide
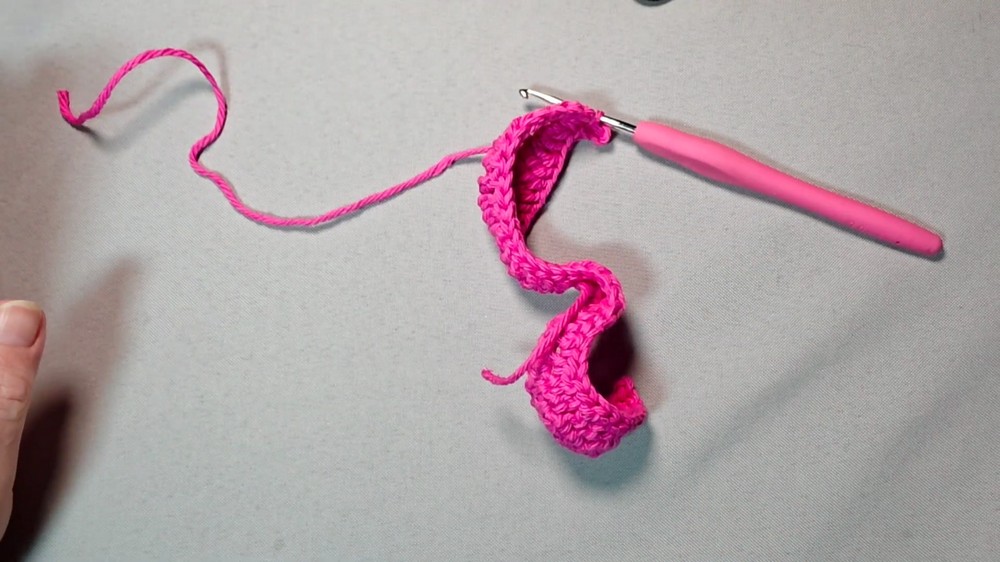
What makes this bunny ear hairband special is its cheerful appearance and eye-catching details. The finished accessory features upright, textured bunny ears that reliably hold their shape. The pattern incorporates a range of stitches, such as single crochet, half double crochet, double crochet, half treble, and treble, which sculpt the ears with gentle curves and lifelike style. Choosing matching hairbands and vibrant yarn colors enhances its appeal, making the accessory festive and adorable for holidays or spring events. The neat shaping and clean finishing create a beautiful look, and the spiral edge technique gives the ears extra structure and dimension.
This project best suits those comfortable with basic crochet stitches and keen to explore new stitch variations for shaping. Beginners who know how to work in rows and follow pattern instructions will find it approachable, and intermediate crocheters can enjoy perfecting their finishing touches, like weaving in ends for a seamless look.
The bunny ear hairband is a practical addition to any accessory collection, with plenty of gifting potential for children or festive gatherings. Both novice and seasoned crocheters can easily achieve delightful results. Give this project a try for quick, beautiful results that bring playful energy to any occasion.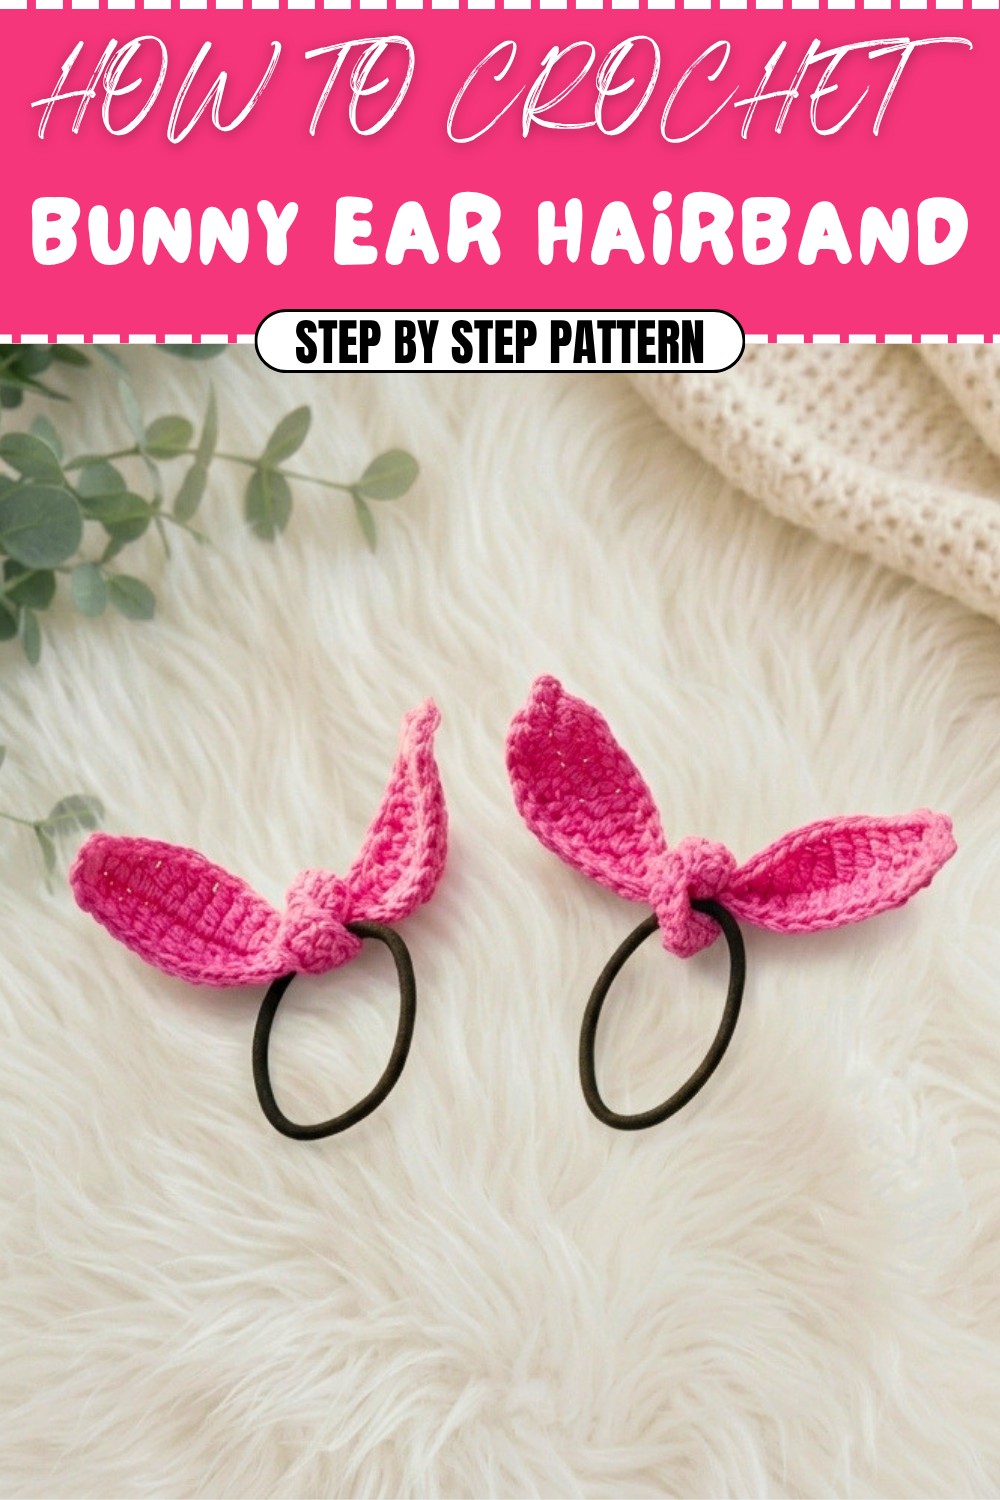
Bunny Ear Hair Tie Crochet Pattern
Create adorable bunny ears to brighten up any child’s hairstyle, add a touch of whimsy to your holiday gift baskets, or prepare for a crochet fair. This fun, quick, and beginner-friendly project uses a variety of basic stitches for maximum texture and shape in under 10 minutes.
Before You Start
- Read through the entire pattern before beginning.
- Opt for a stiffer cotton yarn to help your bunny ears keep their shape.
- Choose a contrasting or matched hair elastic for extra cuteness.
- Keep a yarn needle and sharp scissors ready for neat finishing.
- If new to treble/half-treble stitches, refer to the Special Stitches section for step-by-step help.
Pattern Notes
- Pattern is worked in rows, not rounds.
- Uses a mix of stitches in order—single, half double, double, half treble, and treble—to shape each bunny ear.
- Both sides of the starting chain are worked to give fullness.
- The ear is finished with a tiny picot (ch 2, sl st in first st) for a realistic tip.
- Secure ends well as hair ties are handled and pulled frequently.
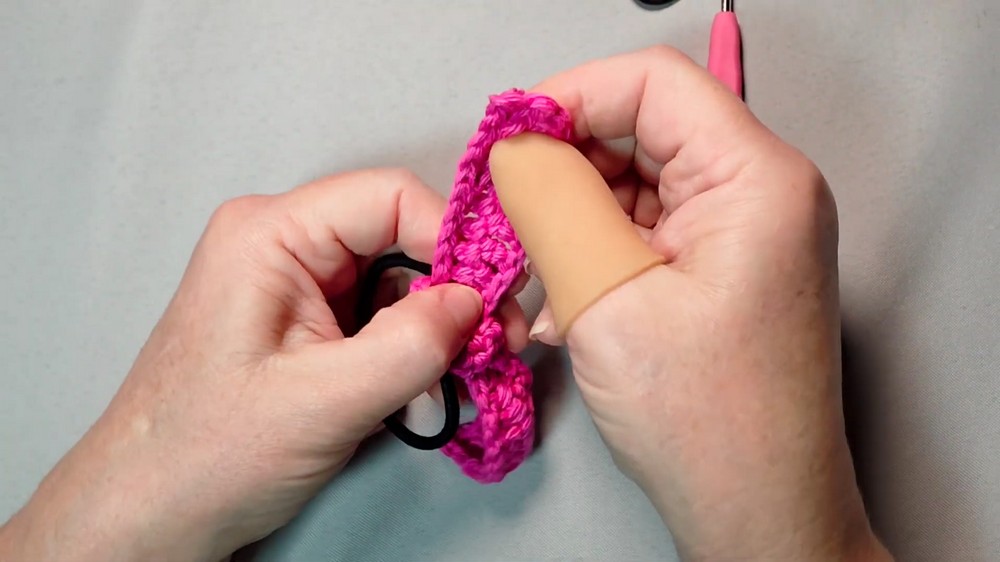
- The hair elastic is attached by twisting ear around and through the band.
How I Made the Crochet Pattern?
- Started with a long chain (foundation) for easy shaping.
- Used a graded progression of stitches to form the ear curve.
- Worked up one side and then back down the other for symmetry and fullness.
- Finished with a picot tip and seamless joining for a neat look.
- The ear is attached by twisting around the elastic for a secure, cute attachment.
Skill Level
Beginner (Great for learning stitch heights and practicing neat finishes!)
Finished Size
Each ear: Approx. 4.5–5 inches (11–13 cm) long and 1–1.5 inches (2.5–4 cm) at widest.
Materials
- Worsted weight 100% cotton yarn (Loops & Threads “Fuchsia” shown, color of your choice)
- 3 mm crochet hook
- Standard hair elastic (neutral or coordinating color)
- Yarn needle
- Scissors
Measurements / Sizing
- Chain of 38 for each ear creates approximately 5" length; customize by adding or fewer chains.
- Ears may be sized up or down for different effects.
Gauge
- Not crucial for this project, but aim for tight, even stitches for structure.
Stitch Abbreviations
- ch – chain
- sc – single crochet
- hdc – half double crochet
- dc – double crochet
- htr – half treble crochet (yarn over twice, pull through 2, pull through 3)
- tr – treble crochet
- sl st – slip stitch
- st(s) – stitch(es)
Special Stitches
Half Treble Crochet (htr):
Yarn over twice, insert hook into st, yarn over, pull up loop (4 loops on hook), yarn over, pull through 2, yarn over, pull through remaining 3 loops.
Picot:
Ch 2, sl st in the first chain made (makes a small “point” at the tip of the ear).
The Pattern!
Bunny Ear (Make 1)
Foundation:
- Ch 38.
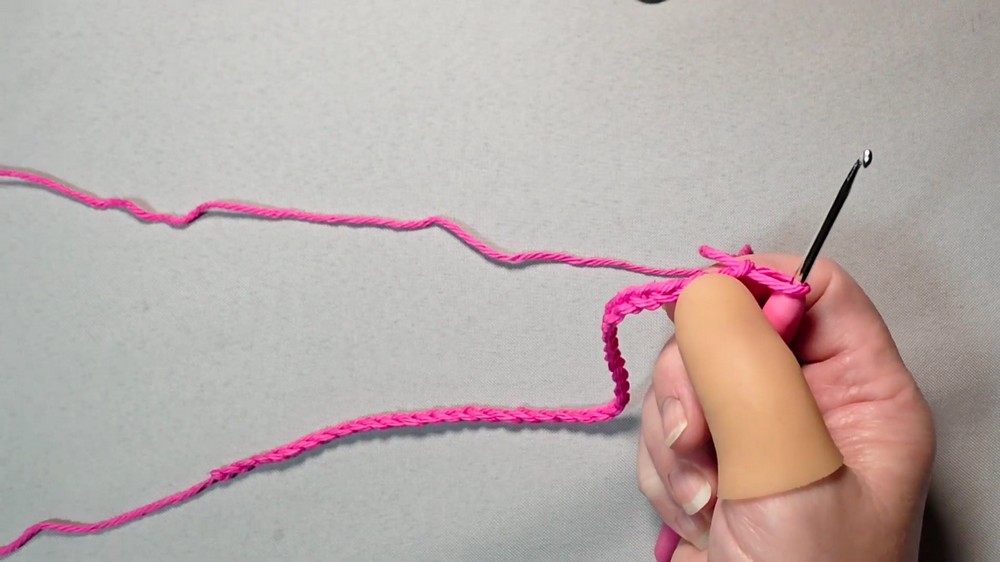
Row 1 (working into chain):
- In 2nd ch from hook: sc.
- Next ch: hdc.
- Next ch: dc.
- Next ch: htr.
- Next 4 ch: tr in each (1 tr in each ch, 4 tr total).
- Next ch: htr.
- Next ch: dc.
- Next ch: hdc.
- Next 15 ch: sc in each (so 15 sc total).
- Next ch: hdc.
- Next ch: dc.
- Next ch: htr.
- Next 4 ch: tr in each.
- Next ch: htr.
- Next ch: dc.
- Next ch: hdc.
- Last ch: sc.
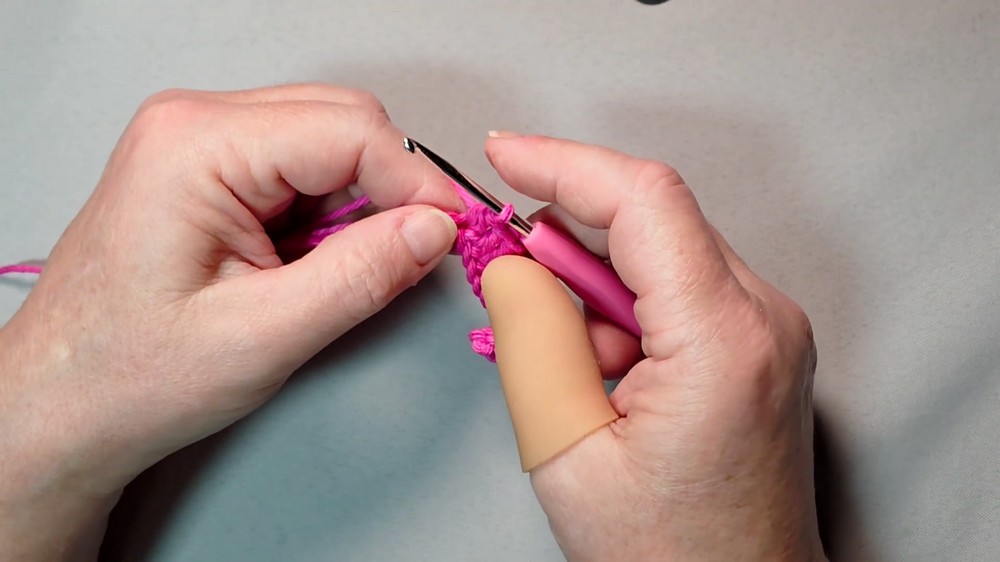
Tip & Turn:
- Ch 2.
- Sl st into the first st just made (forms picot tip).
Row 2 (working down the opposite side of foundation chain):
- Sc in first st.
- Hdc in next.
- Dc in next.
- Htr in next.
- Tr in next 4 sts.
- Htr in next.
- Dc in next.
- Hdc in next.
- Next 15 sts: sc in each.
- Hdc in next.
- Dc in next.
- Htr in next.
- Tr in next 4 sts.
- Htr in next.
- Dc in next.
- Hdc in next.
- Sc in last stitch.
Final Picot & Seamless Join:
- Ch 2.
- Sl st back to the first stitch to close the ear.
Fasten off and leave a moderate tail.
Plain English Recap:
Start with a long chain. Use taller stitches (trebles, half trebles) in the middle and single crochets on the ends, this gives the ears a nice point and rounded base. After one side, make a little point (picot) for the ear tip. Work down the reverse side of the chain, finishing with another picot. Seamlessly join, then your bunny ear is ready for assembly!
Assembly & Finishing
- Weave in all loose yarn tails for neatness.
- Choose the “wrong” (less pretty) side to touch the hair tie.
- Thread the finished ear through the elastic band, leaving a long side and a short side.
- Wrap the longer side around the elastic and poke through itself to knot firmly.
- Adjust, twist, and shape as desired.
- Use sharp scissors to trim any leftover tails.
Solution of Problem
- Problem: Ears are floppy or don’t hold their shape well.
Solution: Use stiff cotton yarn and a smaller hook (3 mm). Avoid soft or saggy acrylic blends. - Problem: Seam or yarn end looks untidy on finished side.
Solution: Use the seamless join as described; carefully weave in ends using a yarn needle for a professional finish. - Problem: Ears don’t look symmetrical.
Solution: Be careful to match your stitch counts working down both sides of the chain. Counting stitches as you go prevents lopsided ears.
What you can make by using these stitches
- Bunny ear hair ties or scrunchie toppers
- Easter basket decorations
- Quick animal-themed bookmarks (use longer chain, no elastic)
- Fun brooches or hat pins (attach to pin back)
- Cute applique for baby hats or crochet bags
- Headbands or wristbands with bunny ears
- Gifts for kids, party favors, craft fair items
Make your own set of cute bunny ears for spring or Easter, or just to bring a smile to anyone’s day! They whip up in minutes, use minimal yarn, and are a perfect stash-busting project. Happy crocheting!