
Amazing Crochet Granny Square Heart Motif Pattern
Add love to your crochet projects with this free granny square heart pattern, easy to follow and great for creating unique handmade items.
With its blend of classic granny square design and a heartfelt twist, this motif brings warmth and creativity to every stitch. Its beauty lies in the simplicity of combining traditional stitches like double crochets and slip stitches to create a design that works for almost any project. From cozy blankets to decorative coasters or even festive garlands, this heart shaped pattern adds a soft, personal touch to handmade creations.
Featured By kcihangir
This pattern is especially beginner friendly, making it perfect for crafters of all levels, even those just picking up a hook for the first time. The repetitive stitches and clear structure help build confidence, while the heart shape in the center introduces a playful, creative twist. It’s also a wonderful way to practice working with yarn tension and color changes seamlessly, skills that will come in handy for more advanced crochet projects.
Make a Love Filled Granny Square Heart Free Crochet Pattern

Working through this pattern introduces techniques like forming clusters and shaping motifs within a square frame. By learning these steps, one can explore enhancing projects such as blankets, scarves, or pillows with this dynamic design. Additionally, color combinations allow for endless customization, turning each piece into a unique expression.
This versatile motif doesn’t stop at traditional projects. It can be used as a stylish applique on clothing, transformed into bunting for celebrations, or even paired with other shapes for multi themed designs, such as hearts combined with stars or flowers. There’s no limit to creativity when using this motif as a foundation for new ideas and heartfelt gifts.
Heart Motif Crochet Pattern
Materials
- Red Yarn: For the heart shape (any medium weight yarn).
- White Yarn: For the square base (contrast colors like black or blue can also be used).
- Crochet Hook: Size 2.5mm or appropriate size for your yarn.
- Scissors
- Tapestry Needle: For weaving in ends.
Gauge
Gauge is not critical for this pattern. Maintain consistent tension throughout your work.
Finished Size
Approximately 5x5 inches, depending on your yarn and hook size.
Stitch Abbreviations
| Abbreviation | Meaning |
|---|---|
| CH | Chain |
| SL ST | Slip Stitch |
| DC | Double Crochet |
Special Technique: Yarn Carrying
During color changes, the non working yarn is carried behind the current stitches and tucked neatly using your hook.
Step by Step Pattern
Round 1: Creating the Foundation Ring
- Begin with a magic ring (or chain 5 and join with a SL ST to form a ring).
- Foundation Cluster:
- Chain 3 (counts as the first DC).
- Work 2 DCs into the ring to complete the first cluster.
- Chain 2 (forms the corner space).
- Repeat Clusters:
- [Work 3 DCs into the ring, CH 2] Repeat 3 more times for a total of 4 clusters, separated by CH 2 spaces.
- Close the round:
- Slip Stitch (SL ST) into the top of the first CH 3 to join. Cut the yarn if necessary, leaving the end neat.


Round 2: Expanding to Corners
- Move to the closest CH 2 corner space using SL STs. Begin your work from this point.
- Corner Work:
- Chain 3 (counts as the first DC), then work 2 DC, CH 2, 3 DC all into the same corner space.
- Repeat this for the remaining 3 corner spaces:
- Work [3 DC, CH 2, 3 DC] into each CH 2 corner space, forming square edges.
- Complete the round: Slip Stitch to the top of the starting CH 3 to finish the square.
Round 3: Introducing the Heart Shape
- Start Shaping the First Corner Curve (Heart ‘Ears’):
- Slip Stitch to the nearest corner space. Chain 3 and work a corner cluster: 3 DC, CH 2, 3 DC.
- Transition to Side Spaces:
- Skip chaining and immediately work 3 DC into the next side space. Repeat for all side spaces.
- Second Color Transition (Switching to White):
- To switch colors for the surrounding square, finish the third DC of a cluster with white yarn (leave the last two loops to pull through the new color). Carry the red yarn neatly behind your stitches.
- Work the Second Corner Cluster:
- Work [3 DC, CH 2, 3 DC] in the next corner space using the white yarn while carrying red yarn internally.
- This forms the heart’s outer curves.
- Create the Heart Tip:
- In the center space (bottom of the heart shape), work 3 DC using white yarn. This cluster forms the pointed tip of the heart.

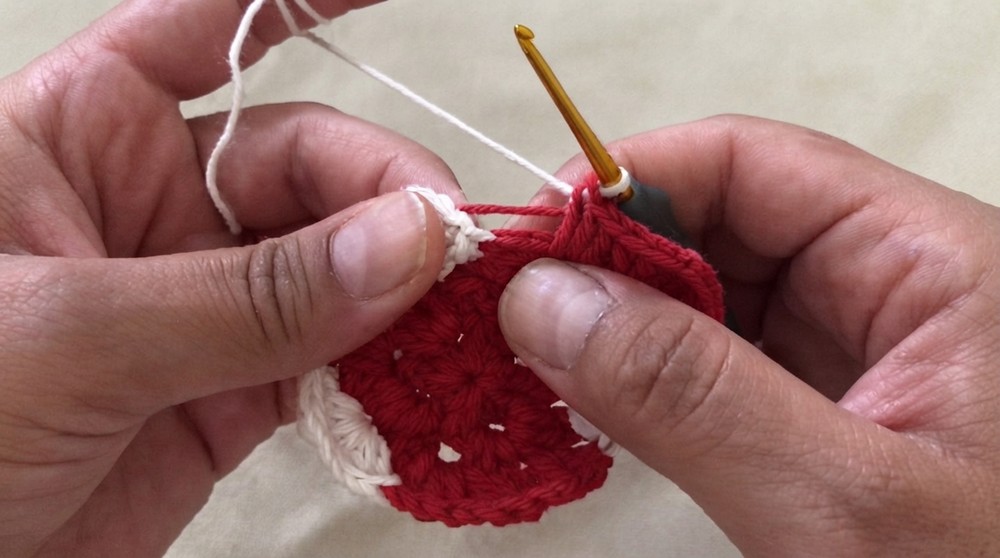
Rounds 4 & 5: Alternating Colors and Building the Square
- Continue the Alternating Colors:
- Use red yarn for the heart clusters and white yarn for the square edges.
- Change colors at the final pull through of the last DC in the current cluster. Ensure the non working yarn is carried neatly behind the active stitches.
- Follow the Standard Pattern:
- In CH 2 corner spaces: Work [3 DC, CH 2, 3 DC].
- In side spaces: Work 3 DC.
- Ensure Color Consistency: Always align red yarn within the heart shape and white for the square borders.
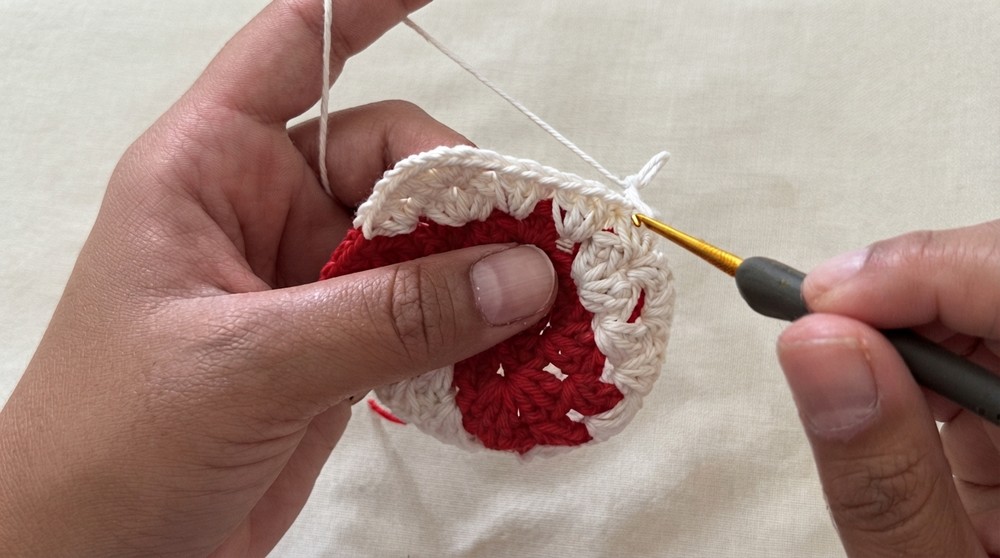
Final Round: Solid White Border
- Complete the motif with a single solid round of white yarn:
- Work [3 DC, CH 2, 3 DC] into each corner space.
- Work 3 DC into each side space around the motif.
- Fasten Off:
- At the end of the round, join with a SL ST to the top of the starting CH 3 and neatly cut the yarn, leaving a tail for securing stitches.
Finishing
- Cut the Red Yarn: Once the heart is formed, cut the red yarn, leaving a sufficient tail for securing.
- Weave Ends: Use a tapestry needle to weave in all loose ends behind the motif.
Assembly & Usable Size
- Assembly: Multiple heart motifs can be sewn together to create larger projects like blankets, bags, or table runners.
- Finished Size: Approximately 5x5 inches (final size depends on hook and yarn).
Conclusion
This Heart Motif Crochet Pattern is a charming and versatile design perfect for personal gifts or holiday projects. With its use of alternating colors and yarncarrying techniques, it offers a beautiful way to create customizable motifs for a variety of uses.