
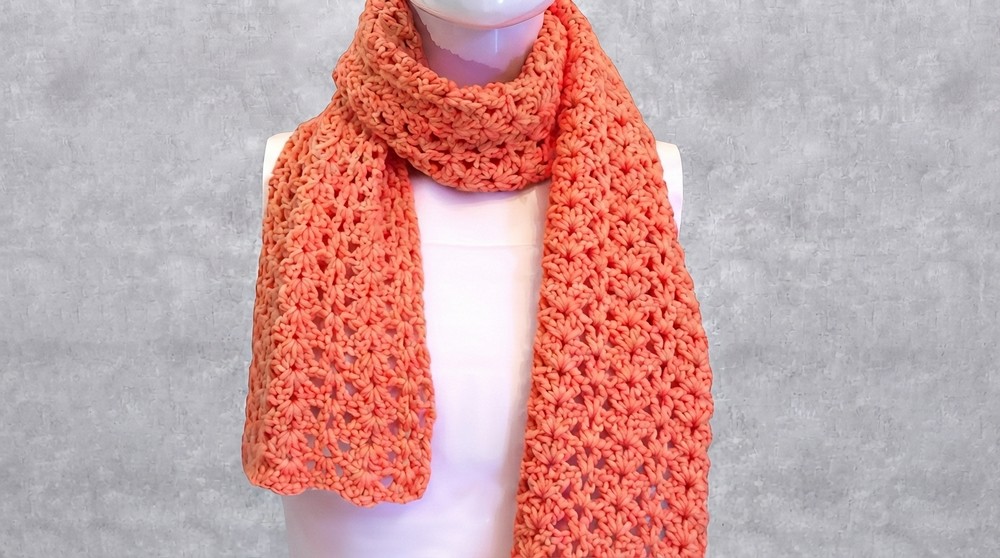
Stylish Crochet Shell and V Stitch Scarf Pattern for Everyday Glam
Simple to follow, the Free Crochet Shell & V Stitch Scarf Pattern gives you the perfect mix of classic shells and trendy V stitches.
There’s a special joy in creating a scarf that feels like a cozy and shows off beautiful stitchwork at the same time. This pattern blends the soft, flowing shell stitch with the open, lacy V stitch to produce a scarf with lovely texture and gentle waves along the edges. Using a size-4 soft yarn and the recommended hook, this pattern comes together quickly, using less than half a skein, making it an ideal project for beginners and seasoned crocheters alike who want something simple yet stunning.
Step by Step Free Crochet Shell and V Stitch Scarf Pattern for Cozy Style
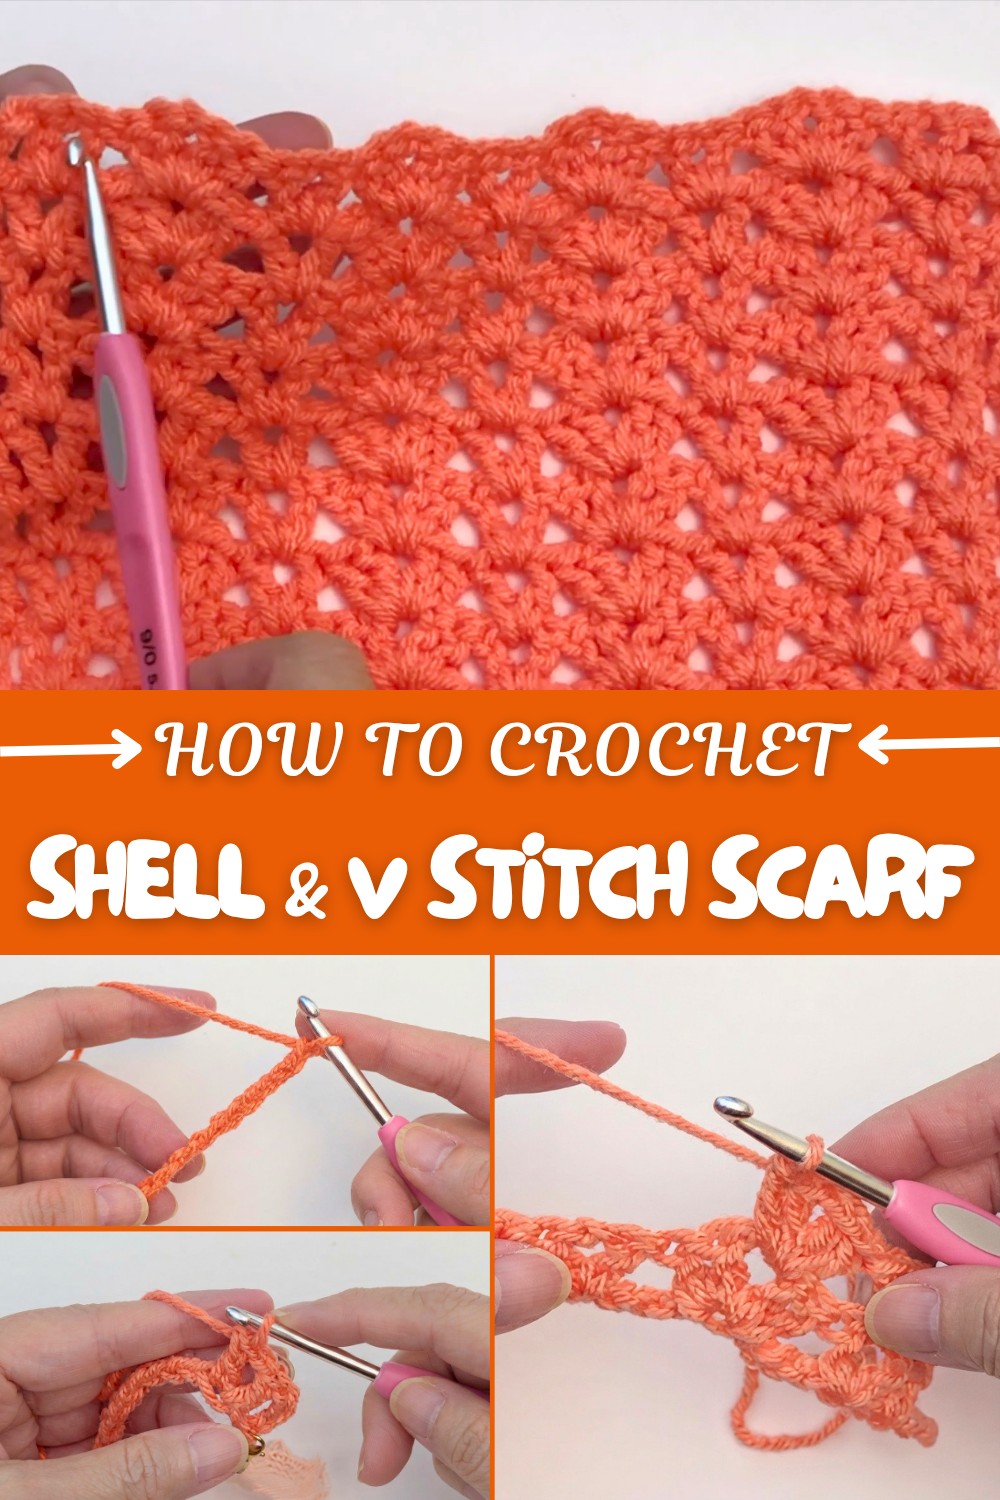
The shell stitch creates fan-like clusters of double crochets that add fullness and richness, while the V stitch builds charming open spaces that lighten the fabric. Together, they form a balanced pattern that’s both warm and breathable. The neat double crochet stitches framing the edges give the scarf a tidy, professional finish and help maintain its beautiful wavy shape.
This stitch combination is incredibly versatile. Beyond scarves, you can use it to crochet light shawls, cozy blankets, or stylish cardigans, each carrying the same lovely textured look. Exploring this pattern opens up many creative possibilities for your crochet projects, helping you crochet items that are both practical and uniquely beautiful.
Crochet Pattern: Shell and V-Stitch Scarf
This beautiful scarf combines two timeless and elegant crochet stitches: the V-stitch and the shell stitch. The interplay between the two creates a soft texture with a flowing, wavy edge perfect for any season. This pattern works up quickly, uses less than half a skein of yarn, and featdures a stunning pattern that is both straightforward and impressive.
This Shell and V-Stitch Scarf Pattern is designed with alternating clusters of V-stitches and shell stitches. The result is a visually striking pattern with a smooth and wavy border on both ends. The pattern is lightweight, easy to customize for any size, and makes a great gift or cozy accessory for yourself.
Skill Level & Terminology
- Skill Level: Beginner to Intermediate
- Terminology: This pattern uses US crochet terms.
Even if you’re new to crochet, this tutorial is perfect for learning the V-stitch and shell stitch techniques. Detailed instructions ensure you can follow along with ease, whether this is your first project or your fiftieth!
Materials & Tools
To complete this scarf, you’ll need the following:
- Yarn: Size-4 soft yarn (such as worsted-weight or acrylic, approx. 150 g or half a skein).
- Hook: Use the recommended hook size for your yarn (ideally, 4.5 mm).
- Additional Notions:
- Stitch marker (to help keep track of stitches).
- Scissors.
- Yarn needle for finishing.
Gauge
While gauge is not critical for this project, maintain consistent tension throughout the scarf for even stitches. For reference:
- Gauge for the Shell and V-Stitch Pattern:
16 stitches and 8 rows = 4 x 4 inches.
Abbreviations
Here’s a helpful list of abbreviations for this pattern:
- ch: Chain
- dc: Double crochet
- V-stitch: Cluster V-stitch (dc, ch 1, dc in the same stitch).
- shell: Shell stitch (2 dc, ch 1, 2 dc in the same stitch).
- st: Stitch
Special Stitch Instructions
V-Stitch:
- Yarn over, insert your hook into the target stitch, and pull up a loop.
- Yarn over, pull through 2 loops. Yarn over again, pull through the last 2 loops to complete the first dc.
- Ch 1.
- Work another dc in the same stitch.
Shell Stitch:
- Yarn over, insert your hook into the target stitch, and pull up a loop.
- Yarn over, pull through 2 loops. Yarn over again, pull through the last 2 loops to create the first dc.
- Yarn over, insert your hook into the same stitch, and repeat the process to create a second dc.
- Ch 1.
- Work 2 more dc in the same stitch.
Finished Size
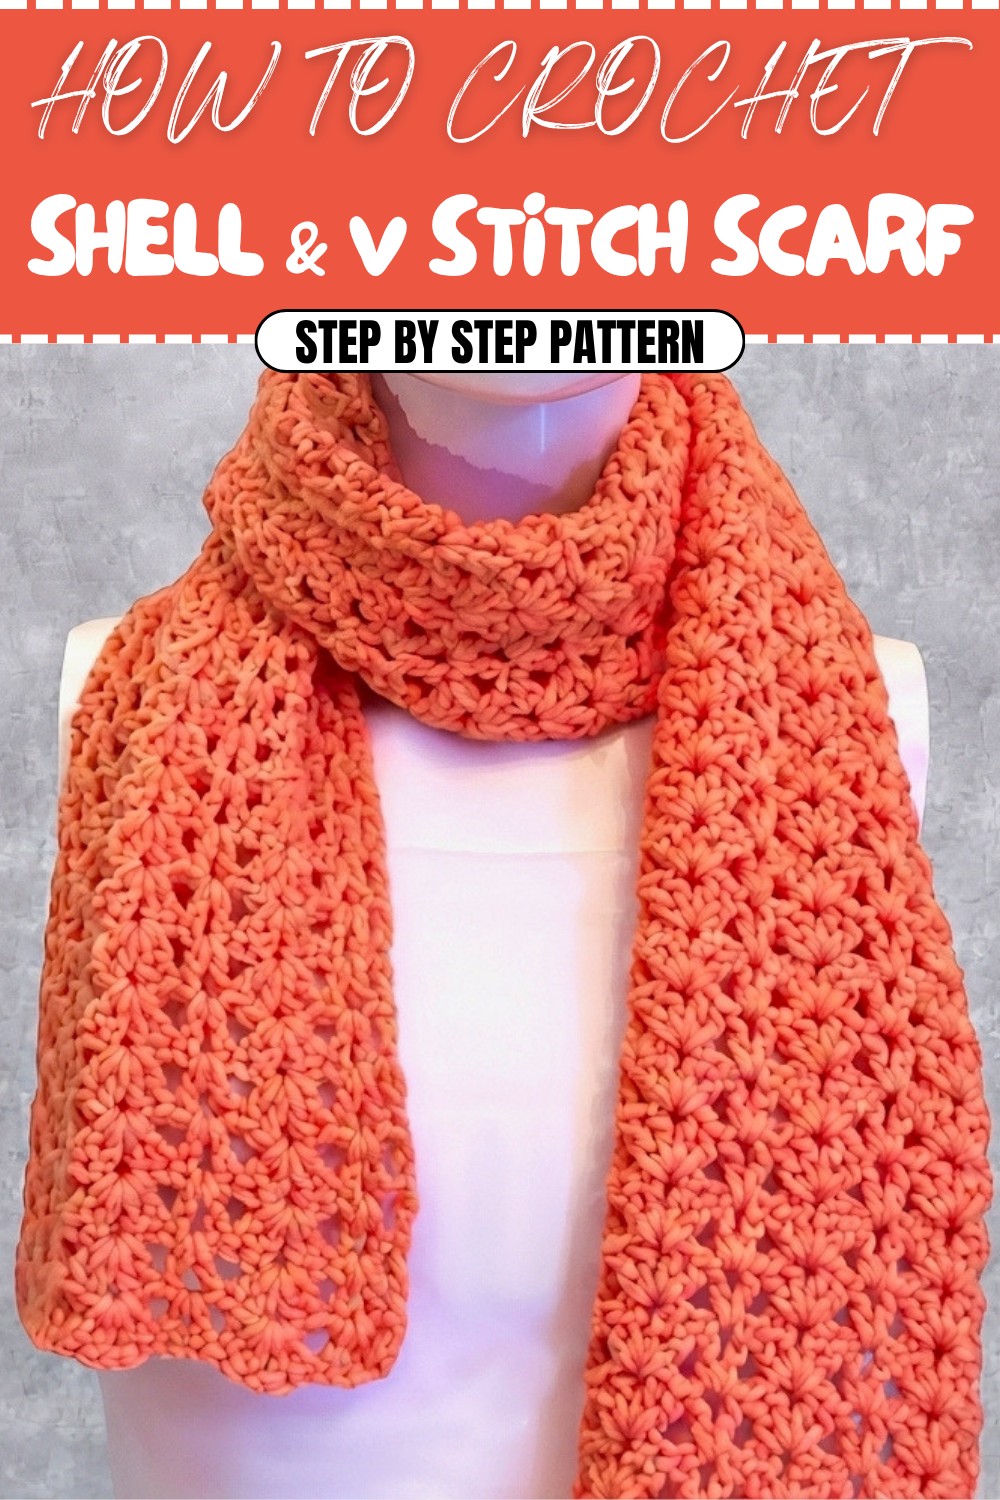
The original scarf measures approximately:
- Width: 6.5 inches.
- Length: 60 inches.
You can customize the final size of your scarf by adjusting the number of foundation chains (width) or rows (length).
What You’ll Learn from This Pattern
This project teaches:
- Foundational skills, including working stitch repeats and maintaining straight edges.
- Techniques for the V-stitch and shell stitch.
- How to create wavy edges for a decorative finish.
The Pattern Itself
Step 1: Foundation Chain
- Begin with a chain in multiples of eight plus five extra chains.
- Example: For a smaller sample, start with ch 29. For the original size, ch 69 will create 15 V-stitches across.
- Mark the last chain of your foundation for easier counting.
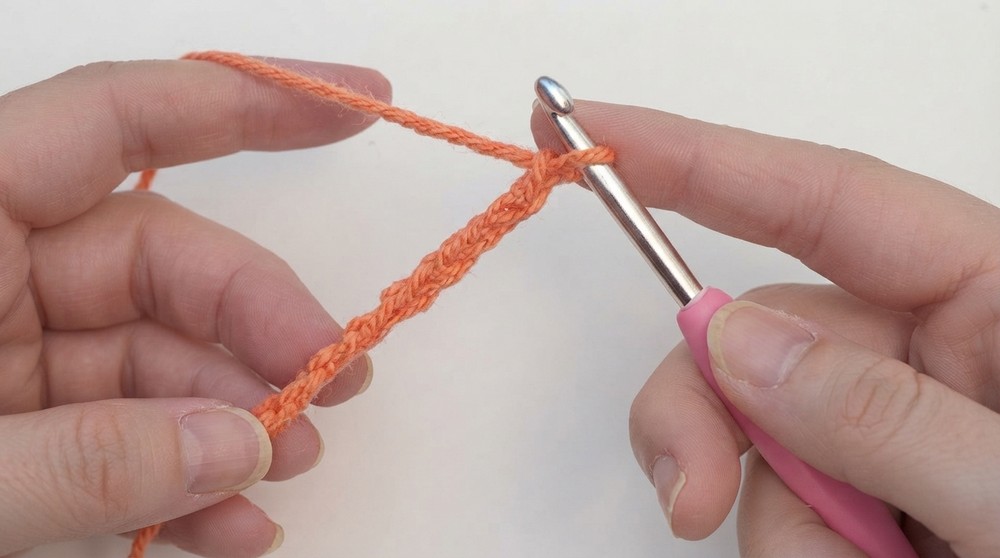
Crocheting a sturdy foundation is essential for establishing the base of your scarf. The multiple of eight ensures the pattern repeats evenly across the row.
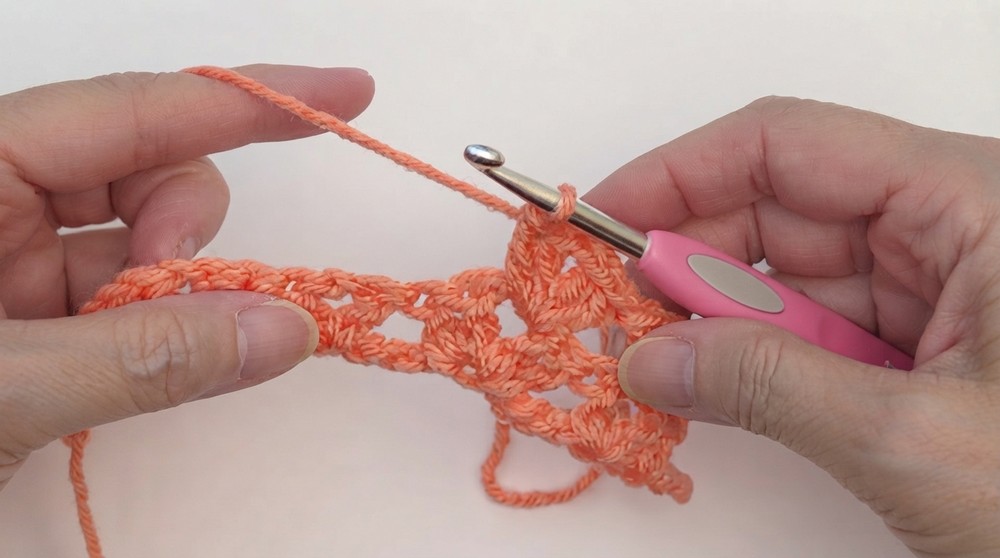
Step 2: Row 1 – Alternating Shells and V-Stitches
- Ch 3 (counts as the first dc), then skip 1 chain stitch.
- Work a V-stitch into the next chain:
- Dc, ch 1, dc in the same chain.
- Skip 3 chains, and work a shell stitch in the next chain:
- Dc, dc, ch 1, dc, dc in the same chain.
- Repeat the pattern (skip 3 chains, V-stitch; skip 3 chains, shell) until the end of the row.
- After the last V-stitch, skip 1 chain and work 1 dc in the very last chain.
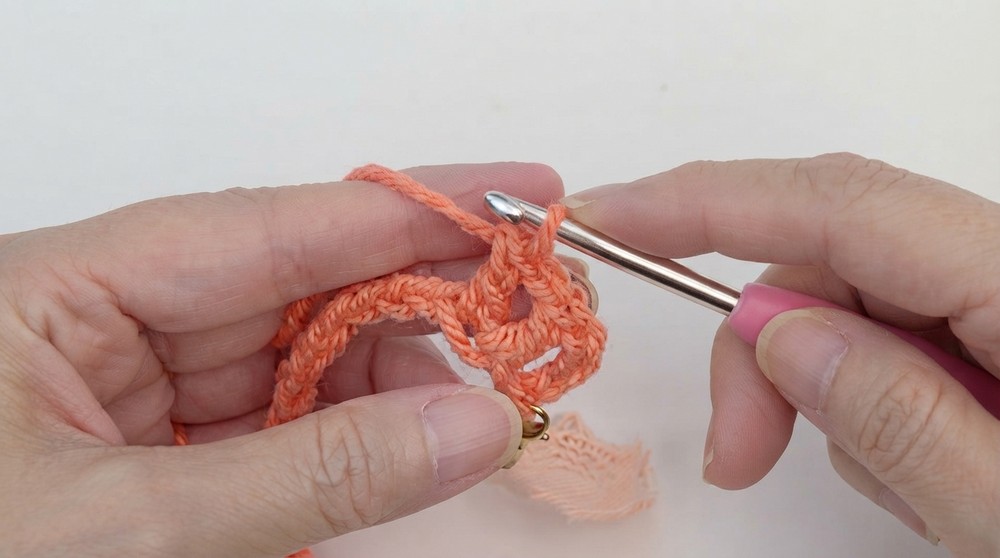
Your completed Row 1 should have:
- One dc at the beginning of the row.
- Alternating V-stitches and shell stitches in each chain space.
- One dc at the end to ensure straight edges.
This first row defines the alternating pattern of textured stitches for the scarf.
Step 3: Row 2 – Work Clusters into Chain Spaces
- Begin with ch 3 and turn your work (counts as the first dc).
- Skip the first stitch. Work 1 V-stitch into the chain space of the previous row’s V-stitch.
- Dc, ch 1, dc in the chain space.
- Work 1 shell stitch into the chain space of the previous shell stitch.
- Dc, dc, ch 1, dc, dc in the chain space.
- Repeat this pattern (V-stitch in V-stitch chain space; shell stitch in shell chain space) across.
- End the row by working 1 dc into the top of the ch 3 from the previous row.
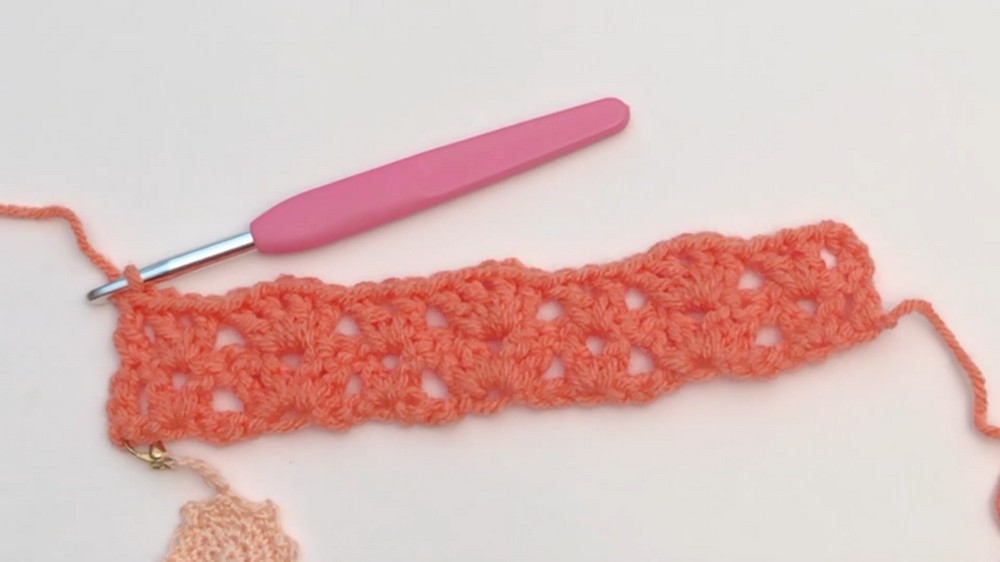
From Row 2 onward, the pattern becomes simpler and builds upon itself, with clusters stacking neatly on top of corresponding clusters.
Step 4: Rows 3 and Beyond – Repeat for Desired Length
- Ch 3 and turn the work over.
- Repeat Row 2, working V-stitches into V-stitch chain spaces and shell stitches into shell stitch chain spaces.
- Continue alternating V and shell stitches until your scarf reaches the length you want.
The repetition of these rows creates the main body of your scarf, showcasing the interplay between V-stitches and shell stitches.
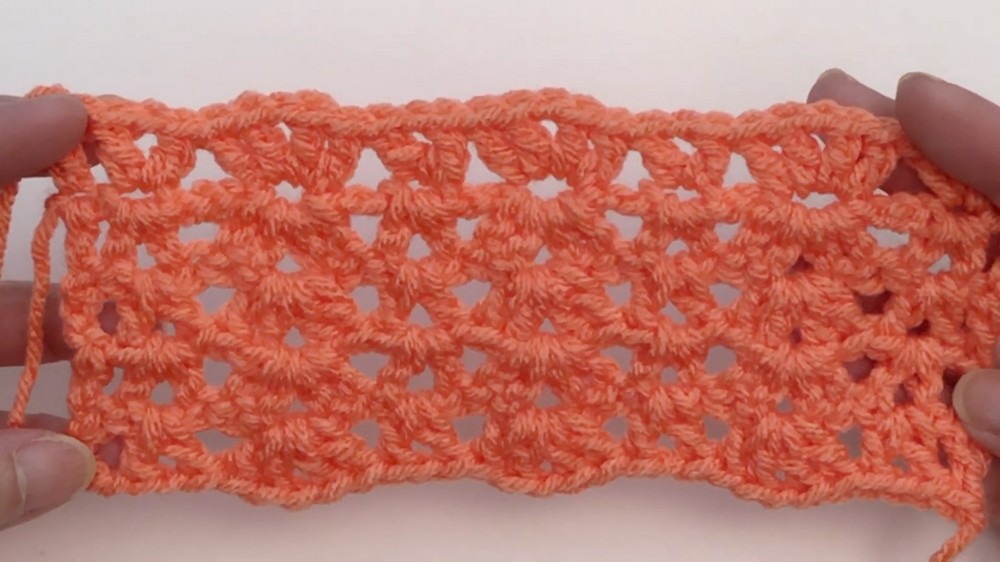
Step 5: Mirror the Pattern for Matching Edges
- After the final row of clusters, ch 1, turn the work over, and work 1 sc into each stitch across for a clean edge.
- Switch to the opposite side of the foundation chain and mirror the pattern:
- Work V and shell clusters, by inserting stitches into the underside loops of the foundation chain.
- Continue until both ends of the scarf have matching wavy edges.
This step creates a balanced scarf with symmetrical wavy edges, perfect for a polished and professional finish.
Step 6: Fasten Off
- After your final row, work 1 last dc into the edge, then finish with a sl st to secure the last stitch.
- Fasten off the yarn and weave in all loose ends using a yarn needle.
Assembly & Finishing
- Final Adjustments: Weave in all loose ends. Trim any uneven yarn strands.
- The resulting scarf features soft texture, beautiful drape, and wavy edges at both ends.
Why You’ll Love This Pattern
This scarf pattern not only creates a lightweight, flowing design, but also introduces two classic crochet styles (V and shell stitches). Its versatility and beauty ensure it complements any outfit or occasion. Whether you're making gifts or creating something for yourself, this is a relaxing and satisfying project suitable for beginners and beyond.