
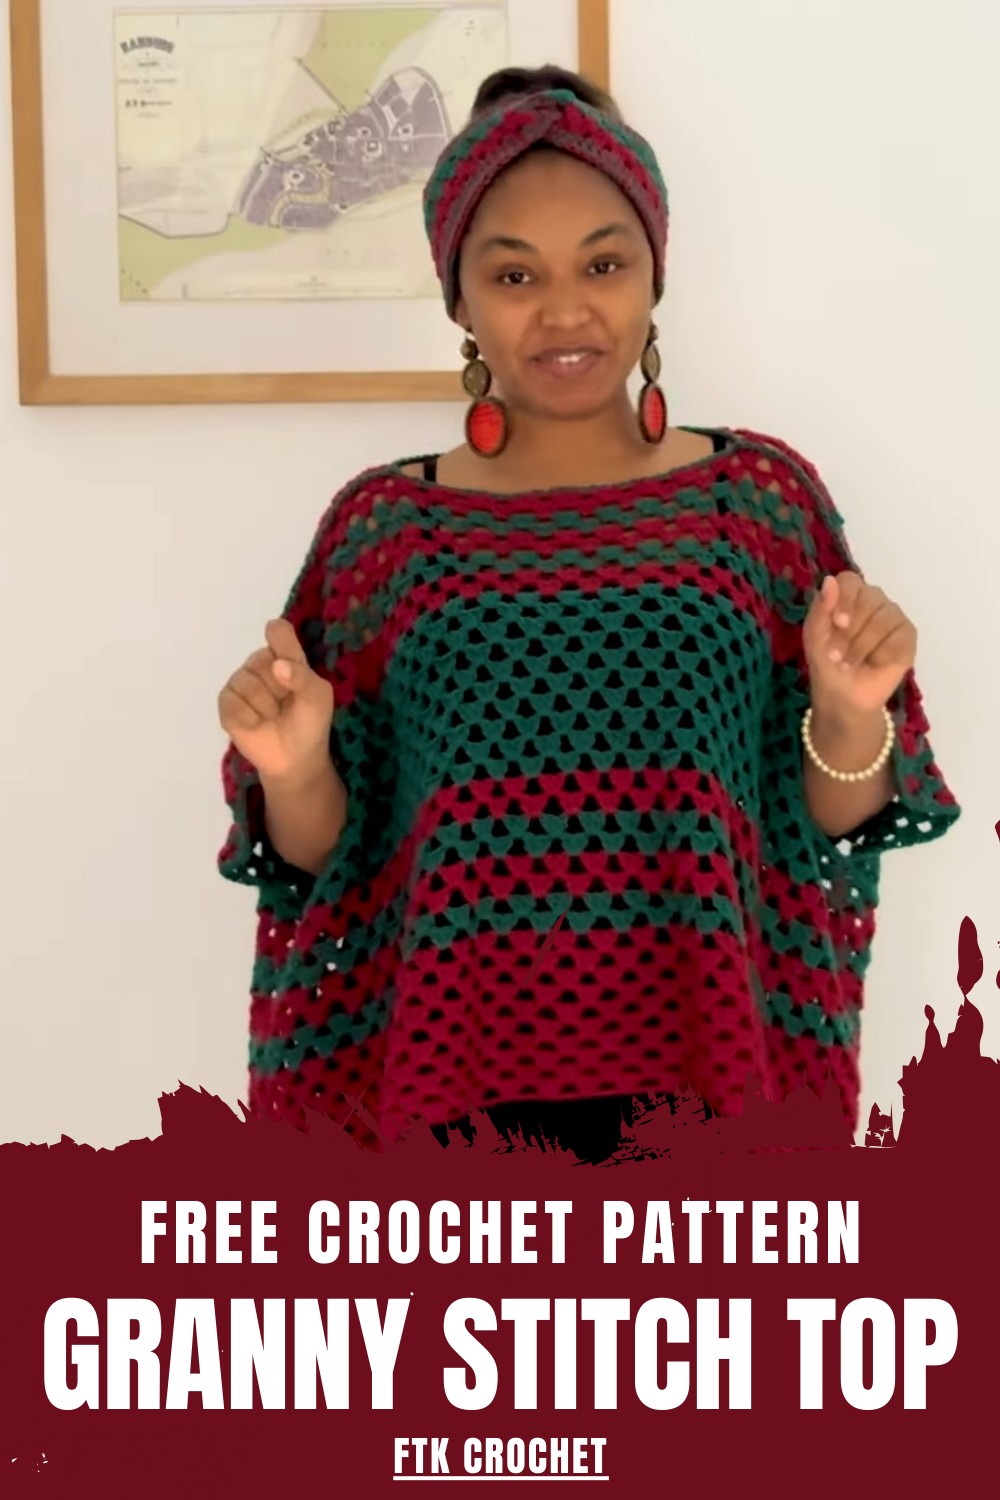
Colorful Crochet Granny Stitch Top Pattern For Modern Twist
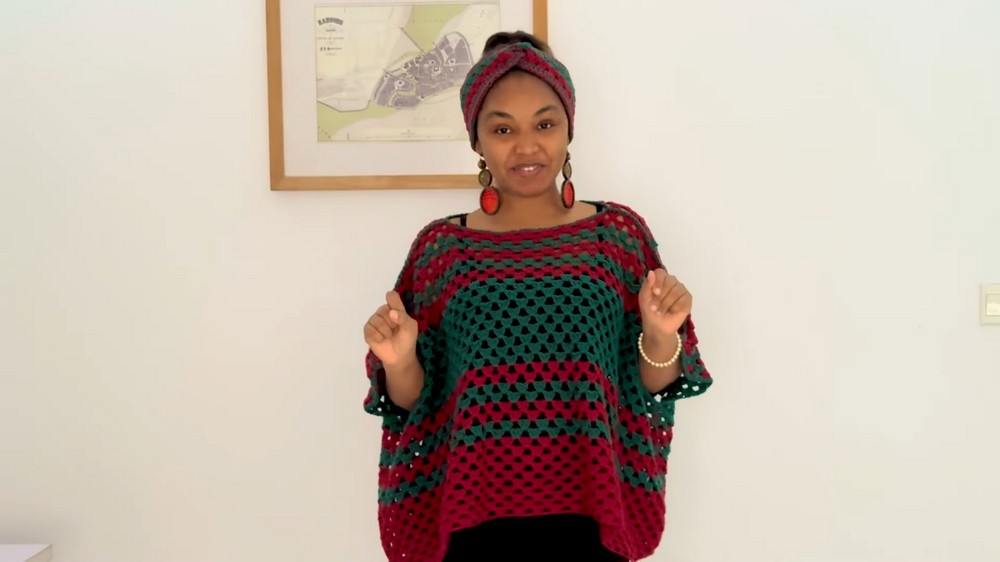
Modern style and comfort come together with this Crochet Granny Stitch Top Pattern, offering airy texture, relaxed fit, and everyday wear.
Soft texture and classic stitch work come together in a top that feels both nostalgic and modern. This Crochet Granny Stitch Top Pattern showcases the timeless granny stitch in a refined silhouette, making it suitable for casual outings, relaxed layering, or seasonal styling. Lightweight yarn keeps the fabric breathable, while the open stitch pattern allows comfortable movement throughout the day.
Statement Crochet Granny Stitch Top Pattern That Stands Out
The visual rhythm of repeating clusters adds depth and charm, giving the piece a handmade look that stands out without feeling heavy. Versatility remains a key benefit, as it pairs easily with jeans, skirts, or high-waisted trousers for a balanced outfit. Color choices can range from subtle neutrals to bold contrasts, allowing personal expression through every row.
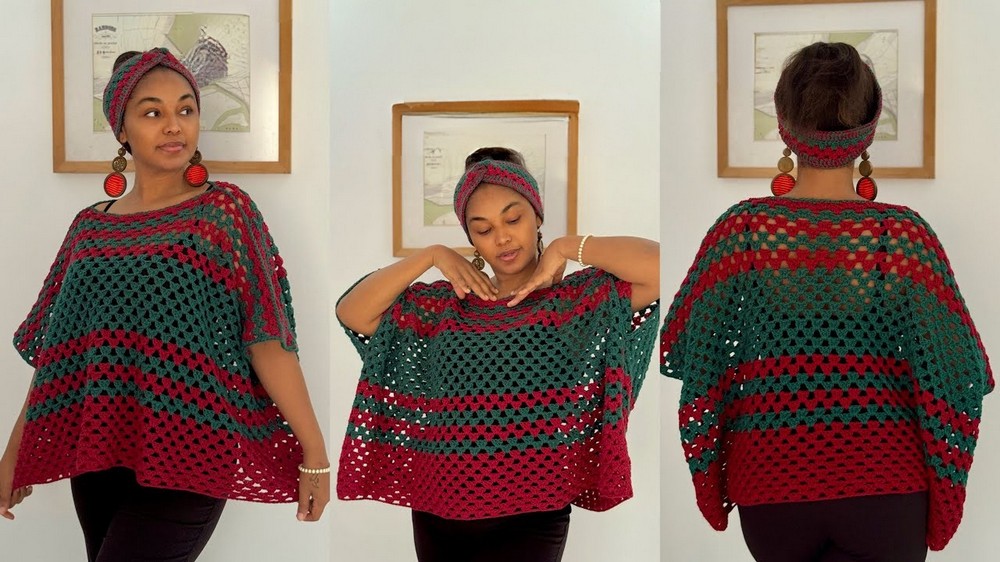
The overall structure feels flattering and relaxed, offering ease of wear for different body types. With its blend of comfort, texture, and visual appeal, the Crochet Granny Stitch Top Pattern continues to remain a stylish and practical wardrobe option.
Step-by-Step Details
Materials Needed
- Yarn: T recommends Lar Classic yarn, which is a 100% wool yarn weighing 100g. Though the yarn is medium weight, it works well with many choices, so feel free to use a yarn you are comfortable with.
- The tutorial suggests red and green colors for a festive look (Christmas theme).
- Crochet Hook: 5mm size (although a smaller hook like 4.5mm can be used for a tighter finish).
- Measurement Tape: To measure bust size and adjust panel dimensions.
- Stitch Markers: To track important placement points.
- Tapestry Needle: For sewing the panels together.
- Scissors: For finishing edges and cutting yarn.
Steps to Make the Crochet Top
-
Foundation Chain:
- Measure your bust size and multiply it by two to determine the length of the foundation chain (e.g., a bust measurement of 40 inches will require 80 inches). Use multiples of four for the chain length.
- For one panel, chain 120 (for a bust size of 40 inches).
-
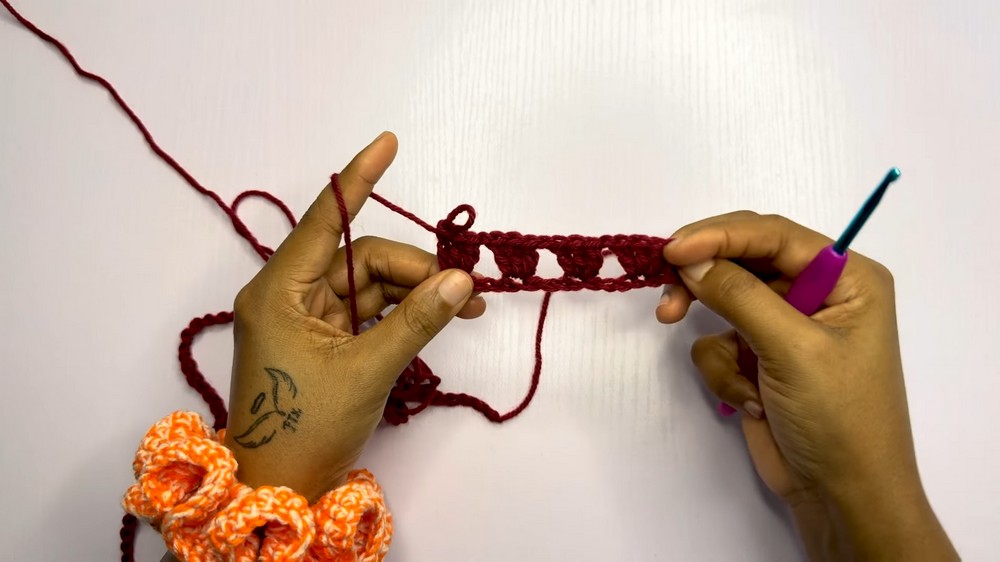
Row 1:
- Chain 5. Count back five stitches and create the first cluster (three double crochets in one stitch).
- Chain 1, skip three stitches, and make another cluster in the fourth stitch.
- Repeat this process until the end of the row, ending with a single double crochet in the last stitch.
- Row 2:
- Chain 3 and turn your work. Create a cluster in the first space by adding two more double crochets.
- Chain 1 and make clusters in the spaces from Row 1, skipping previous clusters.
- Repeat until the end, finishing with a cluster formed by two double crochets and one double crochet into the last stitch.
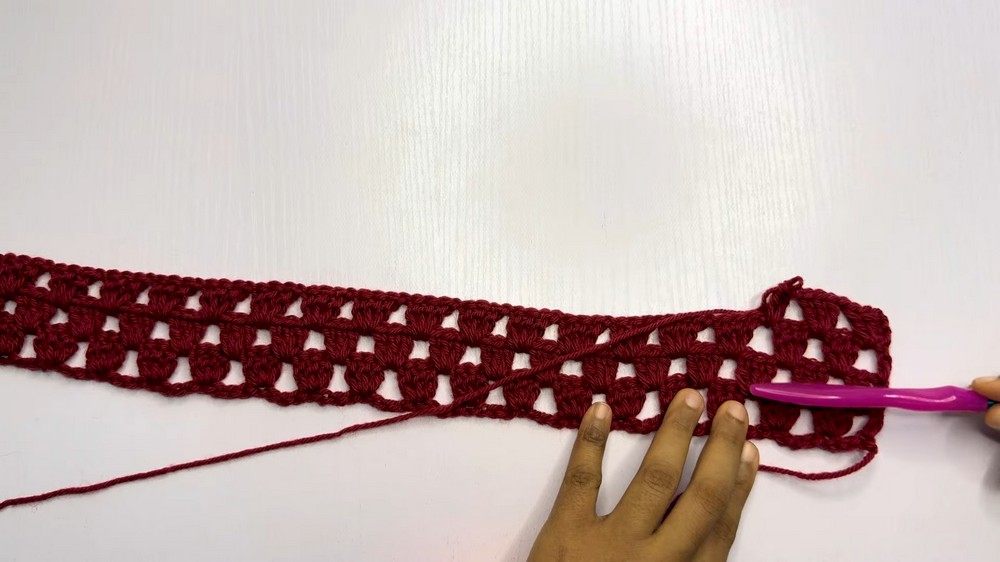
- Row 3 and Beyond:
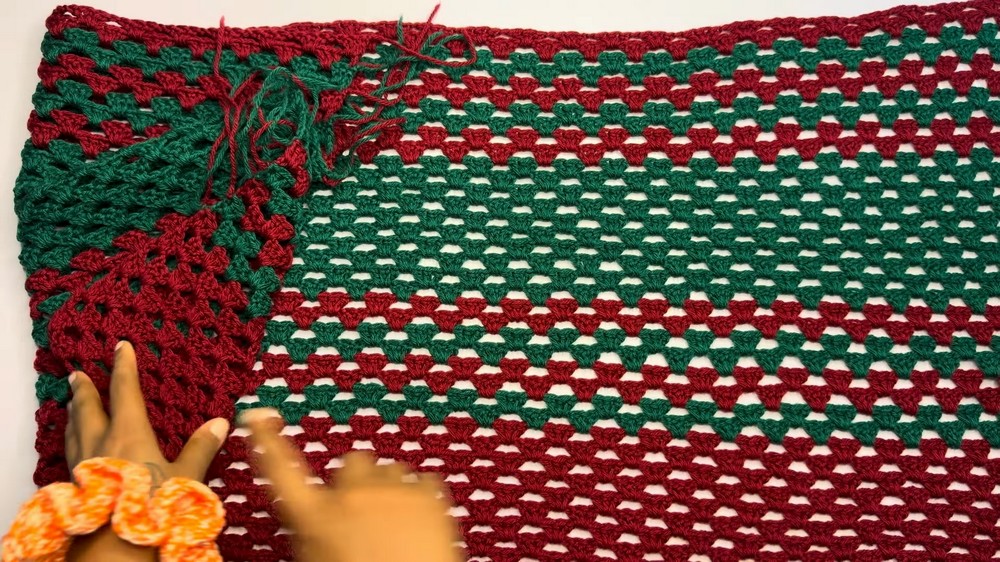
- Repeat Row 2 for all subsequent rows, alternating chains to create clusters. For the first panel, crochet up to 19 inches in length, which typically requires 38 rows.
- Create a second panel identical to the first and block both panels for a cleaner look.
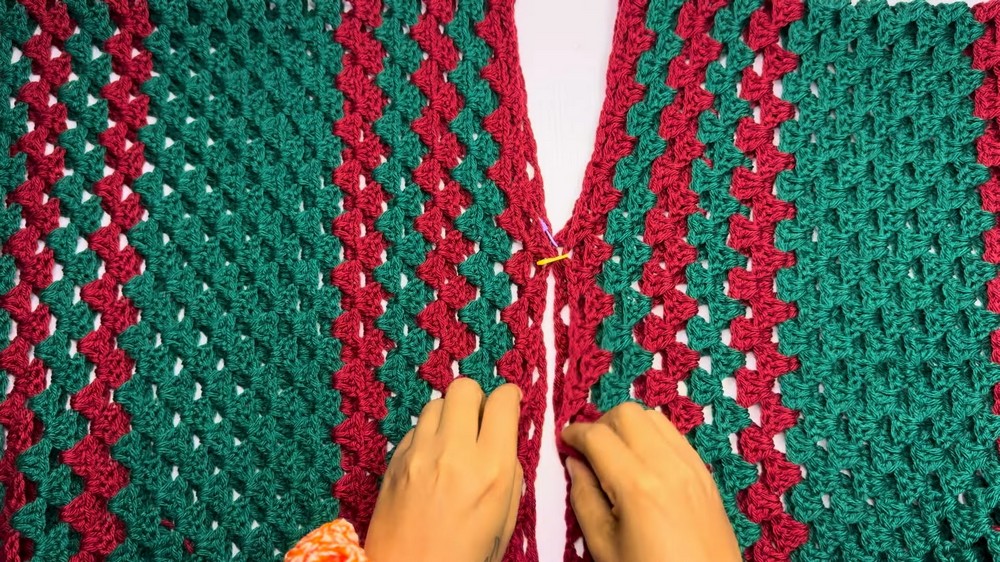
- Joining the Panels:
- Fold each panel in half and align them together. Use stitch markers to mark the neck area.
- Using single crochet, sew the panels together at the shoulders, leaving space for the neck opening. Alternatively, use tapestry needle or slip stitch methods.
- Creating the Neckline:
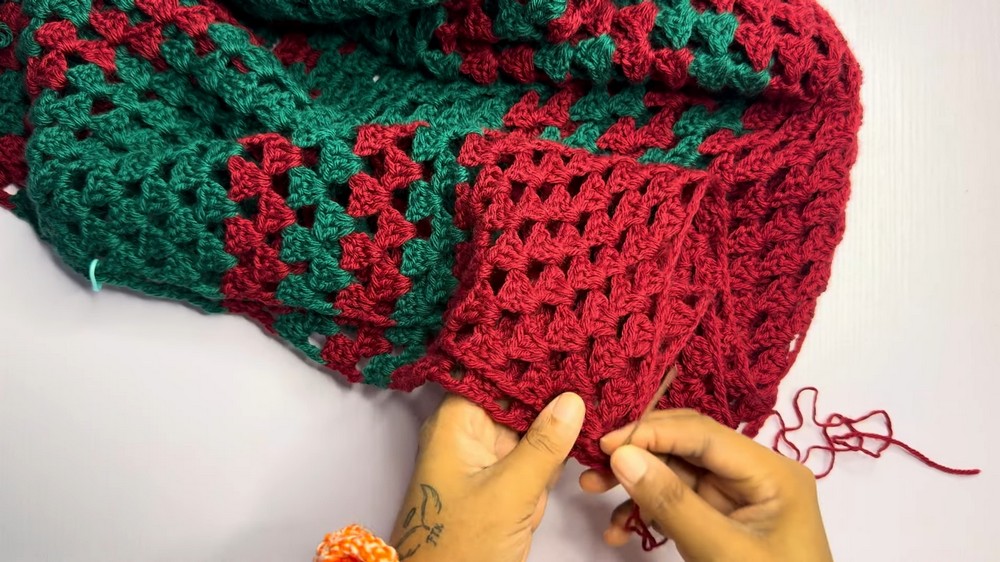
- Add single crochet stitches around the neckline for finishing touches. This adds neatness and structure to the design.
- Working on the Arms:
- Measure your arm width and mark off sections on the sides to leave for armholes. Use the tapestry needle method to sew the sides of the top, stopping at the stitch markers for the armholes.
- Finish the armholes with single crochet stitches to create polished edges.
- Finishing Touches:
- Complete any remaining joins, check for even stitching, and ensure the final product is symmetrical. Once the top is done, trim excess yarn and secure with a knot.
Special Features
- Beginner-Friendly Design: The project is straightforward, focusing on cluster stitches and repetitive patterns, perfect for someone new to crochet.
- Customizable Measurements: Adjustments can be made for different body sizes, ensuring an inclusive fit.
- Holiday Theme: The suggested red and green yarn colors make it festive and ideal for Christmas.
- Blocking Technique: T introduces blocking for beginners, showing how it enhances the crochet’s appearance and texture.
Level of Difficulty
This crochet project is beginner-friendly, making it accessible for those with little to no prior experience in crochet. The repetitive pattern helps build foundational skills.
Tutor’s Suggestions
- Use a larger crochet hook (5mm) if you want the stitches to be more spacious; opt for smaller hooks for tighter work.
- Feel free to personalize the colors and patterns to suit your preferences.
- Double-check measurements by wearing the piece or testing against your body to ensure the fit is comfortable.
- For a neater finish, experiment with blocking as demonstrated in the video.
Uses
This crochet top is:
- Stylish and easy to pair for casual outings.
- A thoughtful handmade gift for loved ones.
- Excellent for festive occasions like Christmas, especially when themed colors are used.
Tip
Take your time with measurements and stitch placement. Accurate measuring and consistent stitches ensure a well-fitting and polished top. Use stitch markers to keep track and avoid errors while joining panels and creating armholes.
Conclusion
This step-by-step pattern provides a simple yet rewarding crochet project that beginners can confidently take on. The festive design and customizable fit make it a perfect piece for yourself or as a gift. With clear instructions, practical tips, and a welcoming teaching style, T ensures you finish the project with excellent results.