
Unique Crochet Turtle Amigurumi Pattern to Try
Pick up your hook to make a cute pocket-sized sea buddy using this easy Free Crochet Turtle Amigurumi Pattern which is a great weekend project for any beginner.
I spent my entire Sunday afternoon stitching up a storm, and I am completely in love with how this little ocean creature turned out. Following this free crochet turtle amigurumi pattern is a fantastic way to turn standard cotton yarn into a gorgeous, textured toy that is packed with personality. The true beauty of this piece lies in its tiny details, from the round green head and matching flippers to the rich brown shell with its wavy, ruffled edges.
Easy Turtle Crochet Pattern With Coastal Charm
The entire project is worked up using a number 2 hook to keep all your stitches nice and tight so that none of the fluffy stuffing peeks out. One of the coolest features of the shell is how the border is made.
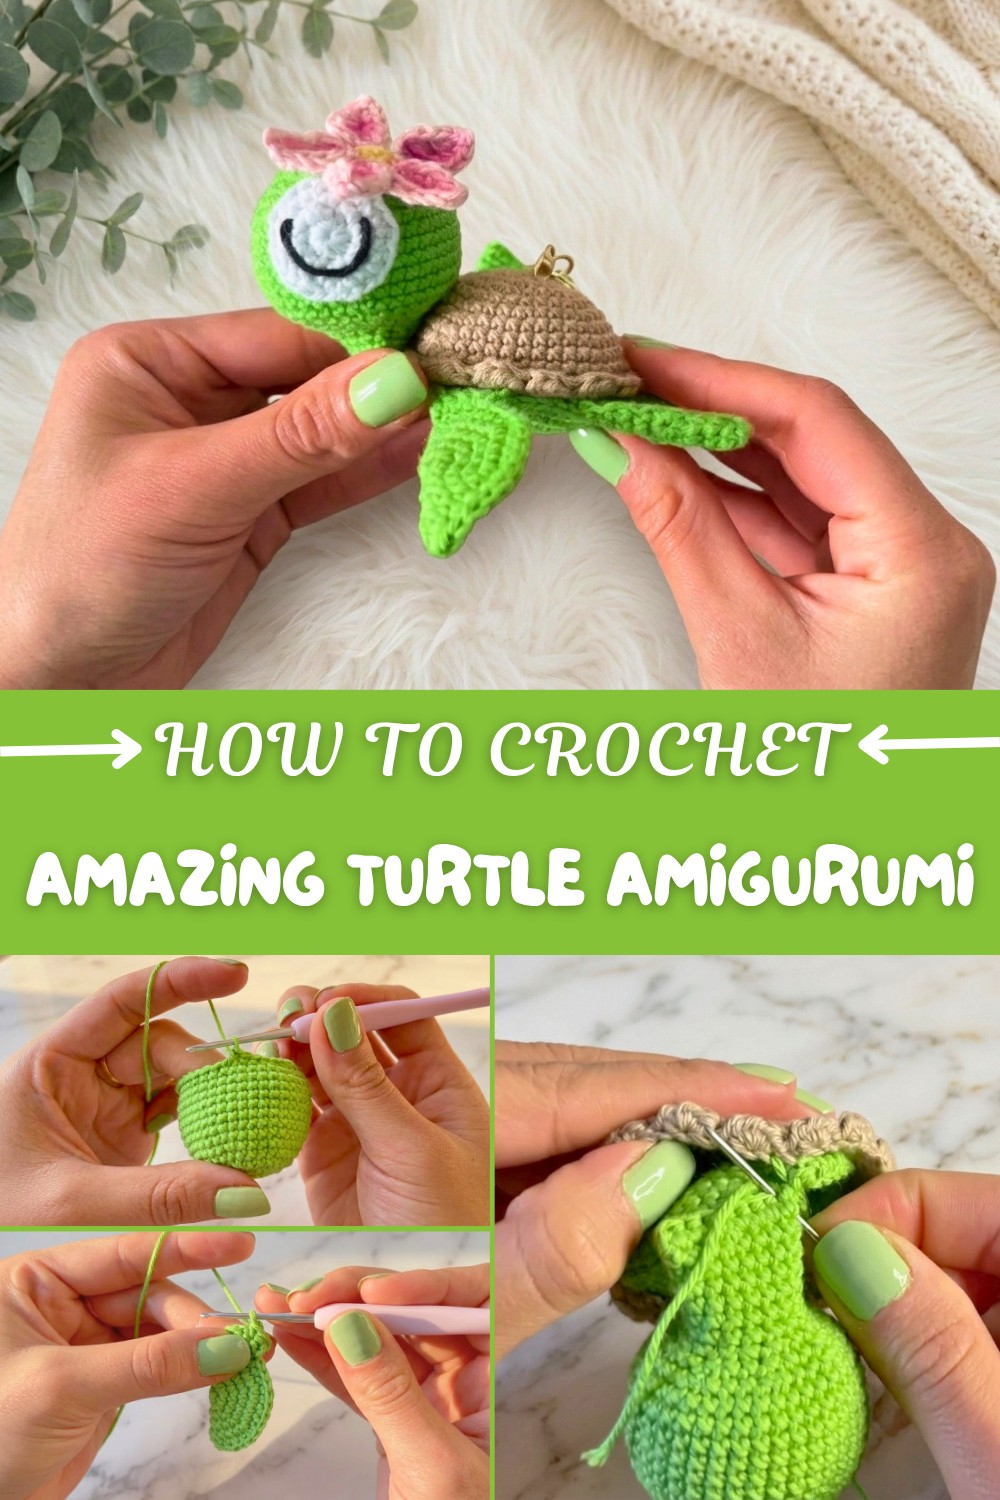
By skipping spaces and grouping three half double crochet stitches into a single front loop, you form a beautiful scalloped rim all the way around the back. To make it even sweeter, the design includes a tiny five-petal pink flower with a yellow center that sits right above the eye, measuring about 3 centimeters across.
You can use this adorable little plushie for making a turtle keychain, which is super handy for spotting your school backpack or locker keys instantly in a busy hallway. Color customization is also a total breeze here. You can easily switch the green skin for a pastel blue, or make the shell match your favorite school colors.

Because it relies on simple circular rounds, it is an awesome way to practice your tension without getting frustrated. This quick project is SO FUN to put together and makes a wonderful handmade gift for your friends.
Crochet Turtle Keychain – Step-by-Step Pattern
Create this adorable turtle keychain with a cute flower accessory! This detailed pattern, inspired by the video tutorial, walks you through every step to ensure a sturdy, beautiful amigurumi turtle that will charm anyone. Each section features a simple summary after the technical steps, so crocheters of any background can follow along.
Materials List
- Yarn: Cotton or acrylic, sport (2) or light worsted (3) weight in green, brown, yellow, pink, and white, plus a bit of black for eyes
- Crochet Hook: 2.5 mm (adjust size for desired firmness and yarn weight)
- Toy stuffing / fiberfill
- Yarn or tapestry needle
- Stitch marker
- Small amount of blush (optional), glue (for eyes and flower), and a keyring
- Scissors, pins
Skill Level
Intermediate to Advanced:
Experience with working in the round, shaping, joining amigurumi, color changes, and surface embroidery is recommended.
Abbreviations (US Terms)
| Abbreviation | Meaning |
|---|---|
| MC | Magic Circle / Magic Ring |
| ch | Chain |
| sc | Single crochet |
| hdc | Half double crochet |
| st(s) | Stitch(es) |
| inc | Increase (2 sc in one st) |
| dec | Decrease (sc2tog) |
| sl st | Slip stitch |
| FO | Fasten off |
| rep | Repeat |
Special Notes
- Stitch Markers: Use a marker for the first st in each round to avoid losing your place.
- Increases/Decreases: Work increases by crocheting two sc in one stitch, and decreases by sc2tog (single crochet two together).
- Gauge: Not critical but aim for tight, firm stitches.
- Seaming: When instructed to close/open fabric, use invisible seaming or whip stitch as needed.
Pattern
Turtle Head & Neck
With green yarn:
- Round 1:
- MC, ch 1, 8 sc into ring. (8)
- Pull tight to close.
- Round 2:
- 2 sc in each st around. (16)
- Round 3:
- [1 sc, inc] around. (24)
- Round 4:
- 1 sc, inc, then [2 sc, inc] 7 times, 1 sc. (32)
- Round 5:
- 32 sc.
- Round 6:
- [3 sc, inc] x8. (40)
- Rounds 7–14:
- 40 sc each round.
- Round 15:
- [3 sc, dec] x8. (32)
- Round 16:
- [2 sc, dec] x8. (24)
- Stuff head firmly.
- Round 17:
- [1 sc, dec] x8. (16)
- Rounds 18–23:
- 16 sc per round. Do not stuff the neck.
- Close:
- Fold in half, sc through both sides to close (8 sc). Ch 1, FO. Weave in end.


Summary:
Start with a ball shape (the head), shape it with increases, stuff, then continue a narrow tube for the neck and close it flat for a smooth join to the shell.
Front Fins (Make 2)
In green:
- Round 1:
- MC, ch 1, 7 sc into the ring. Pull tight. (7)
- Round 2:
- 2 sc in each st around. (14)
- Round 3:
- [1 sc, inc] x7. (21)
- Round 4:
- [2 sc, inc] x7. (28)
- Round 5:
- [3 sc, inc] x7. (35)
- Close:
- Fold in half; sc through both sides across (about 17/18 sc). Ch 1, turn.
- Short Row 1:
- 4 sc, ch 1, turn.
- Short Row 2:
- 4 sc, ch 1, FO, leave tail.

Summary:
Create a fan-shaped piece, flatten it, close, then work a short protrusion for the fin tip. Make two identical fins.
Back Fins (Make 2)
In green:
Follow steps 1–5 as front fins.
- Close:
- Fold, sc through both sides across. Ch 1, turn.
- Short Row:
- 4 sc, ch 1, FO, leave tail.
Summary:
Similar to the front fins, but slightly smaller due to omitting the second short row. Again, make two.
Tail
Green:
- Round 1:
- MC, ch 1, 6 sc in ring. (6)
- Rounds 2–5:
- 6 sc per round.
- Close:
- Fold, sc through both sides (2 sc). Ch 1, FO. Do not stuff.
Summary:
A very short tube; flatten and close for the tail.
Shell (Top)
Brown:
- Round 1:
- MC, ch 1, 8 sc. (8)
- Round 2:
- 2 sc in each st around. (16)
- Round 3:
- [1 sc, inc] around. (24)
- Round 4:
- 1 sc, inc, then [2 sc, inc] x7, 1 sc. (32)
- Round 5:
- 32 sc.
- Round 6:
- [3 sc, inc] x8. (40)
- Round 7:
- 40 sc.
- Round 8:
- [9 sc, inc] x4. (44)
- Rounds 9–11:
- 44 sc each round.

Shell Edge:
- Work in front loops only: In next st, sl st, (skip 1 st, 3 hdc in next st FL, skip 1 st, sl st in next st FL); repeat to end. FO and weave in end.

Summary:
Make a large dome starting from the center, add a decorative ruffled edge with front-loop-only half double crochet clusters.
Shell Base (Bottom)
Green:
- Round 1:
- MC, ch 1, 8 sc (8)
- Round 2:
- 2 sc in each st (16)
- Round 3:
- [1 sc, inc] x8 (24)
- Round 4:
- 1 sc, inc, then [2 sc, inc] x7, 1 sc (32)
- Round 5:
- [3 sc, inc] x8 (40)
- Round 6:
- [9 sc, inc] x4 (44)
- Round 7:
- 44 sc, FO leaving a long tail.
Summary:
Make a green circle matching the shell top in stitch count/count. Leave a long end for sewing.
Assembly
- Join Base to Shell:
- Whip stitch or mattress stitch through free loops from top shell edge and base.
- Sew Head:
- Attach neatly at the neck using the closed edge to the shell’s front center.
- Attach Front Fins:
- Sew to sides of shell, straight edge up.
- Attach Back Fins and Tail:
- Space evenly at rear of shell.
- Stuff:
- Stuff the turtle firmly before sewing final gap shut. Reinforce head, fin, and tail joins.
Summary:
Sew all parts carefully; add stuffing as you go so the turtle remains plump and sturdy.
Eyes (Make 2)
In white:
- Round 1:
- MC, ch 1, 8 sc (8)
- Round 2:
- 2 sc in each st (16)
- Round 3:
- [1 sc, inc] x8 (24)
- Finishing:
- Sl st to next st. Ch 1, FO with a long tail.
Details:
- Sew a small black circle or embroider a pupil for each eye.
- Optionally, glue in place. Stitch securely between rounds 5 and 12 of the head.
Summary:
Make two eye-circles, embroider or glue on pupils, and sew/attach above the head.
Flower
Center (yellow):
- MC, ch 1, 5 sc, sl st to first st, ch 1, FO.
Petals (make 5, pink or any color):
- Ch 6, turn, skip 2 chains;
- hdc in next 2 ch, sc in next 2 (4th and 5th chains), ch 2, sc in same st.
- Rotate to work in underside of chain: sc in next 1, hdc in next 2, sl st to yellow center. FO.
- Repeat for 5 petals, sew each to one sc of yellow center.

Attach flower above one eye (glue or sew).
Summary:
Make a small round for the flower center, create five petal shapes, and sew around the edge.
Keyring Attachment
- Use brown yarn and a yarn needle.
- Securely sew the keyring to the shell’s magic ring center, making several passes to anchor it.
- Hide all knots/ends inside the shell.
Summary:
Firmly attach your keyring through multiple stitches in the shell top to finish your keychain.
Conclusion
Congratulations on crafting an adorable turtle keychain! You have shaped, embellished, and assembled each unique part for a polished, sturdy, and whimsical accessory.
Pattern Corrections & Tips
- If your stitches are too loose, use a smaller hook or firmer tension to prevent stuffing from showing.
- Adjust number of rounds or fin sizes for a personalized look.
- Sew parts securely to withstand keychain use.
- Embellish further by adding embroidery or miniature accessories.
Tip:
Take your time with the assembly and check placement with pins before sewing. This will help your turtle look proportional and neat.