
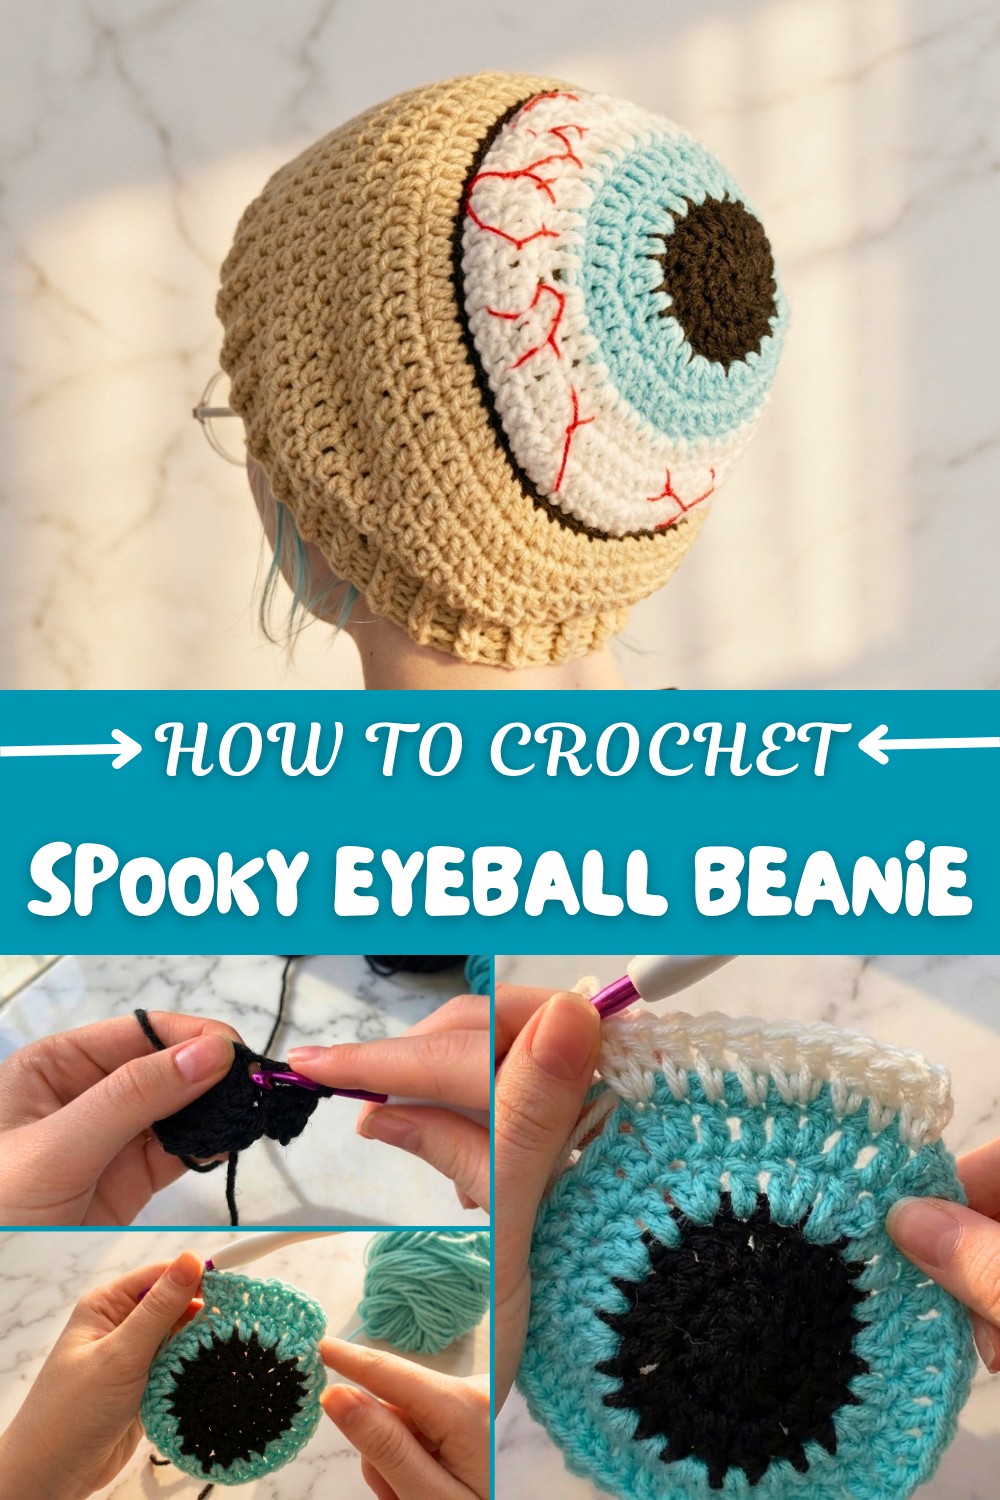
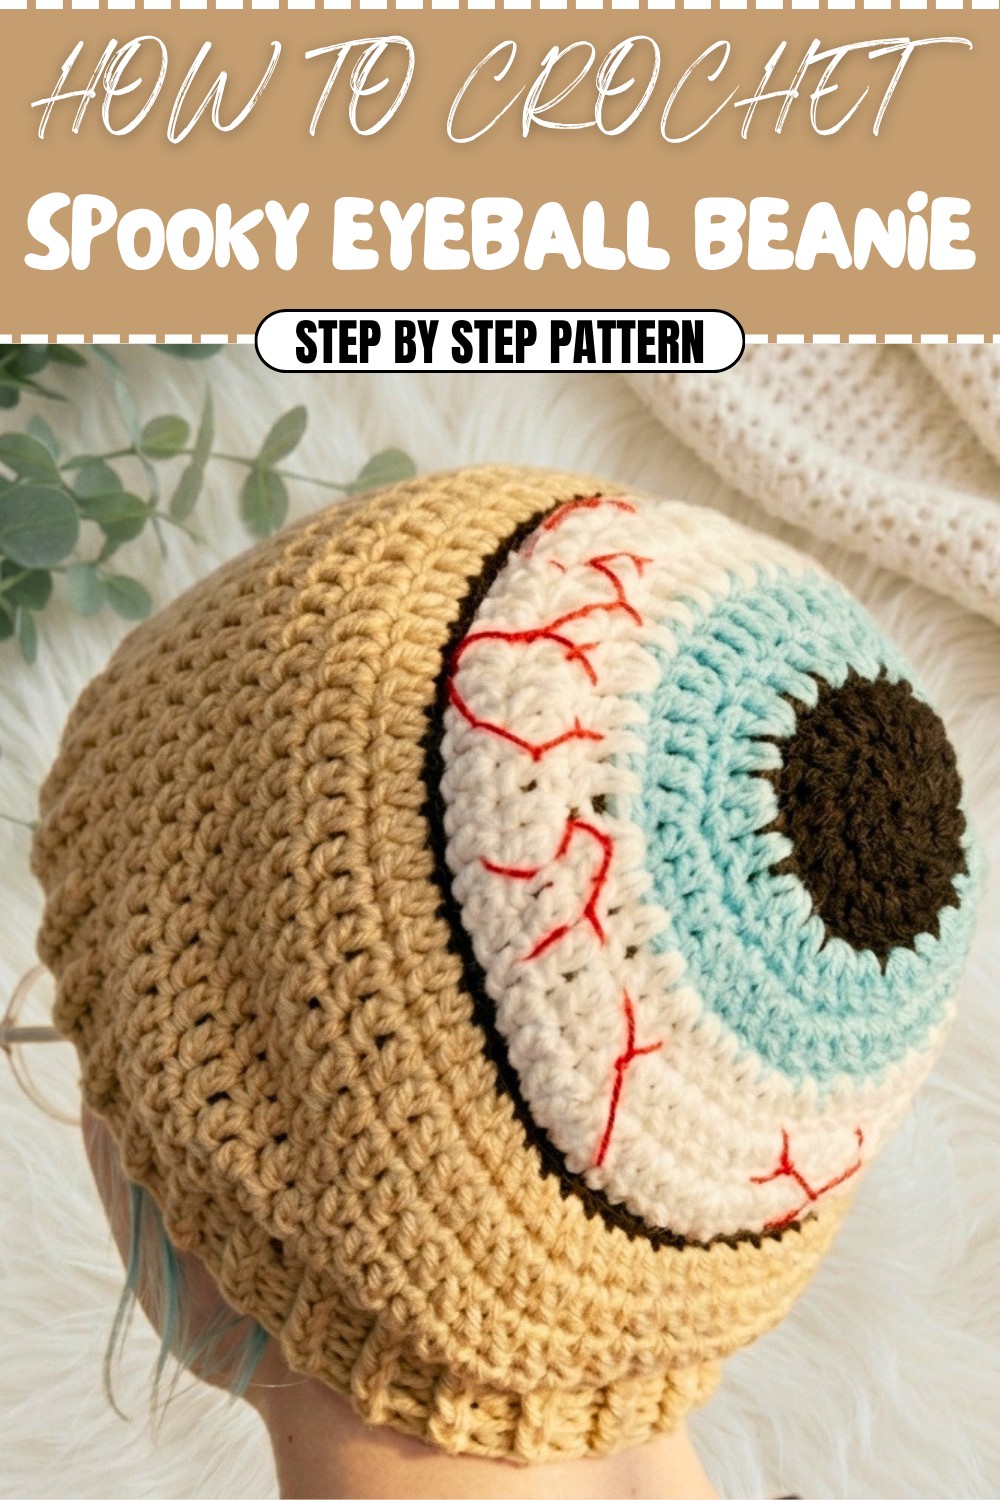
Crochet Spooky Eyeball Beanie Pattern for Festive Goodness
Enjoy a free crochet spooky eyeball beanie pattern to add a touch of Halloween magic to your look in just a little time.
Who doesn’t love a bit of creepy fun now and then? This Spooky Eyeball Beanie is the perfect crochet project for fans of quirky accessories, Halloween enthusiasts, or anyone who wants unique headwear with a pop of 3D design. The centerpiece; a vividly lifelike eyeball—is what makes this pattern special. You can customize the hat’s base color, iris shade, and even add embroidered veins for an extra eerie touch. Crocheted mostly with double crochet (dc) stitches, this pattern is approachable for beginners while offering room for creativity with techniques like front loop, back loop crochet, and post stitches for the ribbed brim.
Free Crochet Spooky Eyeball Beanie Pattern Creepy Cool Looks
The beauty of this pattern is how versatile it is. Select softer pastel tones for a whimsical twist, or opt for bold, contrasting colors to make your beanie stand out. The 3D eyeball delivers not only a fun visual but also sophisticated stitch work that gives the pattern depth. Whether you’re keeping warm at a Halloween event or gifting a spooky-loving friend, this pattern is sure to turn heads and spark conversations.
Other Things You Can Crochet Inspired by This Pattern
Once mastered, the techniques from this pattern can be used to create:
- Eyeball plushies: Apply the eyeball pattern to stuffed toys or cushions.
- Halloween garlands: Create miniature eyeballs and thread them together for festive decorations.
- Matching mittens: Incorporate the eyeball motif onto gloves or mittens for a spooky set.
- Custom hats: Swap out the eyeball motif for other seasonal or fun designs, like pumpkins or snowflakes.
Creative Reasons to Try This Pattern
- Endless customization makes every hat unique.
- Perfect for Halloween or quirky everyday wear.
- Utilizes multiple crochet techniques for skill-building.
- Fun gift idea for someone who loves spooky style!
Crochet Spooky Eyeball Hat – Step-by-Step Pattern
This crochet eyeball hat pattern is a fun, spooky addition to your Halloween wardrobe or a quirky accessory for year-round wear. The hat features a 3D eyeball pattern that adds a vibrant, playful, and slightly creepy look. You can customize the iris color to your preference and even embroider red veins for an extra eerie effect. The pattern is worked mostly in double crochet (dc), with front and back post stitches used for the ribbed brim. Beginners who are familiar with basic crochet techniques will enjoy working on this unique project.
About this pattern
Whether you’re prepping for Halloween or crafting for someone with a love for spooky accessories, this Spooky Eyeball Hat is bound to turn heads. The 3D eyeball design is created using simple crochet techniques, including increases, front loop/back loop crochet, and slip stitches, giving the hat a "pop-out" effect. This quirky hat fits most head sizes, and its ribbed brim finishes the look with a snug and stylish fit. You'll love experimenting with different color combinations for the iris and hat base for a truly customized look.
Skill Level & Terminology
Skill Level: Advanced Beginner to Intermediate
Crochet Terms Used: US Terminology
Materials & Tools
- Yarn: Worsted weight (Size 4) in the following colors:
- Black (pupil)
- A color of your choice for the iris (example: blue)
- White (eyeball)
- Any hat base color (example: beige)
- Optional: Red Embroidery Thread (for veins)
- Hook Size: 5.5 mm crochet hook
- Tools: Scissors, yarn needle, embroidery needle, fabric scissors (for thread).
Gauge
Gauge isn’t critical for this pattern, but aim for consistent stitching to ensure the correct fit. Approx. 12 dc and 7 rows = 4" square.
Abbreviations List
- ch: Chain
- dc: Double crochet
- sc: Single crochet
- sl st: Slip stitch
- st(s): Stitch(es)
- hdc: Half double crochet
- inc: Increase (2 stitches in one stitch)
- dec: Decrease (stitching 2 stitches together).
- BPdc: Back post double crochet
- FPdc: Front post double crochet
Special Stitch Instructions
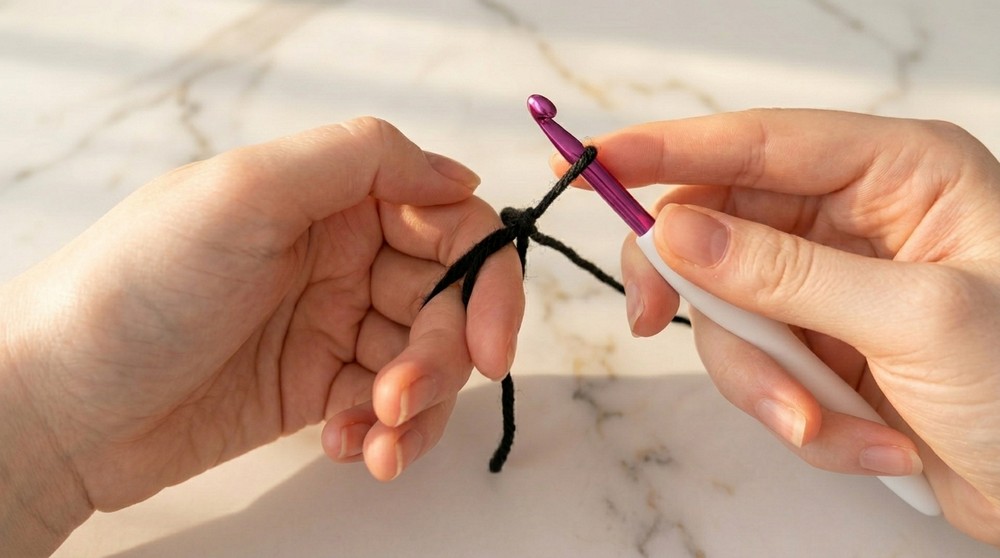
- Magic Ring: Wrap the yarn around your fingers to create a loop. Work the first round directly into the loop, then pull the tail tightly to close.
- Front/Back Post Stitches: These are used to create ribbing for the brim. For BPdc, work around the back of the post of the stitch from the previous round. For FPdc, work around the front of the post.
Finished Size
Fits most adult head sizes with a snug or slouchy fit, depending on brim folding.
What You’ll Learn from This Pattern
This pattern is a great opportunity to strengthen your crochet skills while making something exciting:
- How to create a magic ring, essential for seamless circular designs.
- Techniques for stitch increases, decreases, and shaping a 3D effect.
- Using front loop and back loop stitches to create texture and depth.
- Working with front and back post double crochet to design the ribbed brim.
The Pattern Itself
Eyeball Center (Pupil – Black Yarn)
- R1: Start with a magic ring. Ch 2 (does not count as a st). Work 10 dc into the ring. Tighten the ring, and sl st into the first dc to join (10 sts).
This round forms the center pupil of the eyeball. Make sure to tighten the magic ring securely to eliminate gaps.
- R2: Ch 2. Work 2 dc in each st around (inc in every st). Sl st to join (20 sts).
- Fasten off black yarn.

👉 The pupil is now complete. If unsure about counting your stitches, double-check to ensure you have a consistent 20 stitches in this round.
Iris (Your Color Choice)
- R3: Attach iris yarn. Ch 2. Work 1 dc in the first st, 2 dc in the next st (pattern: 1 dc, inc). Repeat around. Sl st to join (30 sts).
- R4: Ch 2. Work 1 dc in the next 2 sts, 2 dc in the next st (pattern: 2 dc, inc). Repeat around. Sl st to join (40 sts).
- Fasten off iris yarn.
👉 This section creates the colorful iris of the eyeball. You can make this round in any color that suits your design preferences.
Whites of the Eye (White Yarn)
- R5: Attach white yarn. Ch 2. Work 1 dc in the next 3 sts, 2 dc in the next st (pattern: 3 dc, inc). Repeat around. Sl st to join (50 sts).
- R6: Ch 2. Work 1 dc in the next 4 sts, 2 dc in the next st (pattern: 4 dc, inc). Repeat around. Sl st to join (60 sts).
- R7: Ch 2. Work 1 dc in the next 5 sts, 2 dc in the next st (pattern: 5 dc, inc). Repeat around. Sl st to join (70 sts).
- R8: Ch 2. Work 1 dc in the next 6 sts, 2 dc in the next st (pattern: 6 dc, inc). Repeat around. Sl st to join (80 sts).
- Fasten off white yarn.
👉 At this stage, the eyeball is fully formed. Take a moment to admire the 3D popping effect!
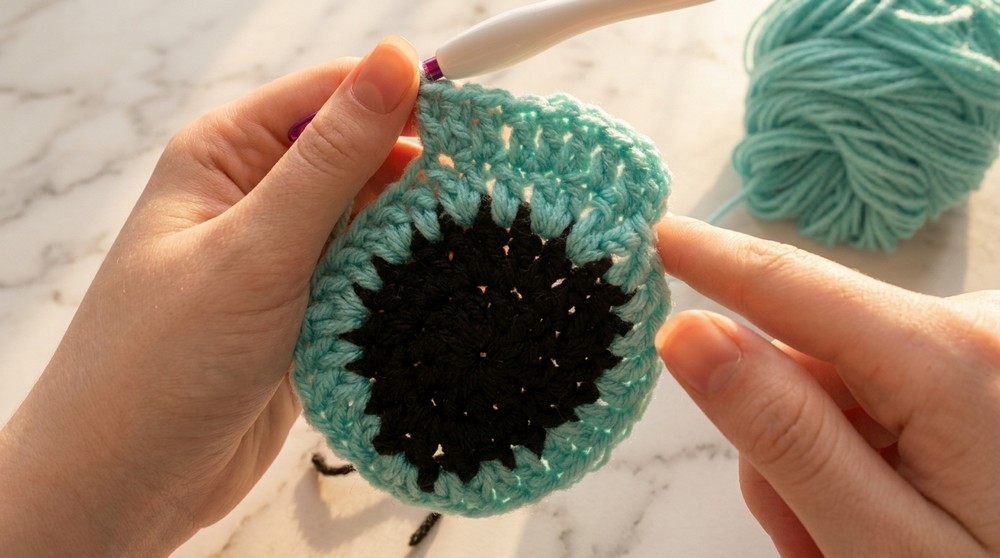
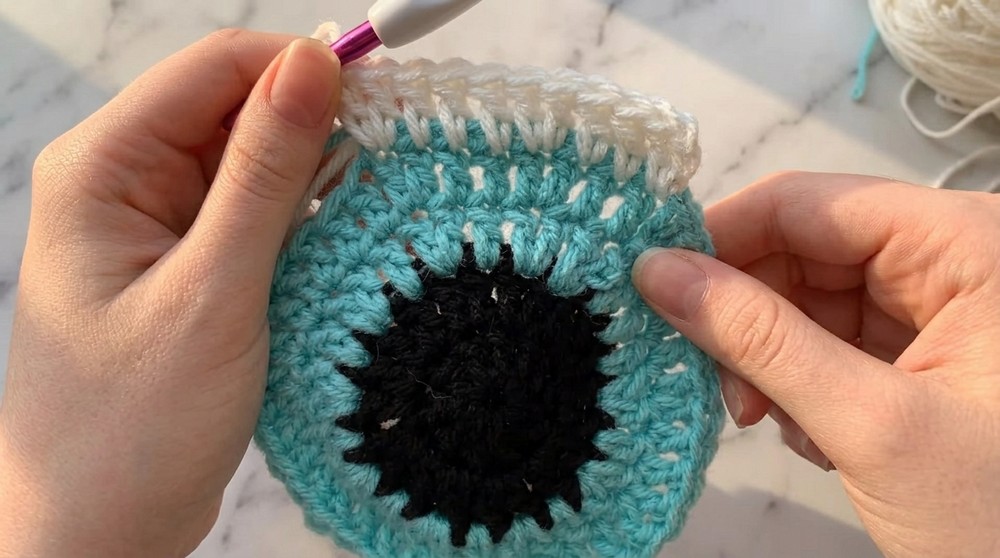
Outline (Black Yarn)
- R9: Attach black yarn to the front loop only of R8. Ch 1, and sl st in the front loop only of each st around (80 sts). Fasten off.
👉 This black outline around the eyeball adds definition and creates a distinct 3D separation for the final design.
Hat Base (Main Color)
- R10: Attach yarn in the back loop only of R8. Ch 2. Work 1 dc in each st around (80 sts).
Working in the back loop creates a dramatic effect, making the eyeball "pop" out from the rest of the hat.
- R11–18: Ch 2. Continue working 1 dc in each st around (80 sts). Repeat for 8 rounds total.
- R19: Ch 2. Work 1 dc in the next 39 sts, dc2tog, 1 dc in the next 39 sts (78 sts).
- R20: Ch 2. Work 1 dc in each st around (78 sts).

At this point, the body of the hat is finished, tapering slightly during the decrease round.
Ribbed Brim
- R21: Ch 2. Alternate 1 FPdc, 1 BPdc around (78 sts).
- R22–26: Repeat R21 for a total of 5 rounds.
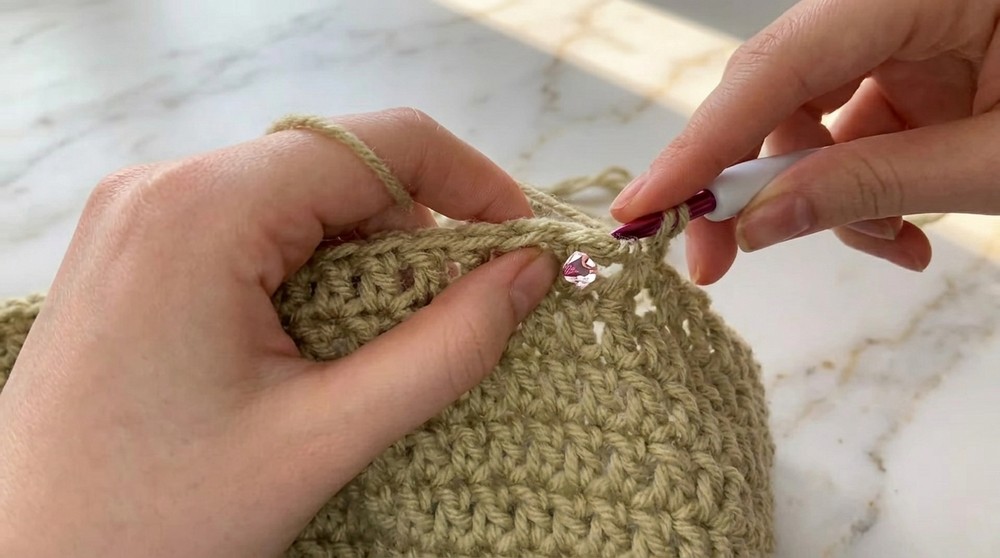
The ribbed brim not only ensures a snug fit but also adds to the beanie's stylish appearance. You can fold it up for a snugger fit or leave it down for a slouchy look.
Assembly & Finishing
- Embroider Veins:
- Using red embroidery thread, add vein-like stitches starting at the outer edge of the eyeball. Work outward in branching patterns for a realistic effect.
- Securely fasten all ends at the back of the hat.
- Weave in Loose Ends:
- Use a yarn needle to tuck in all loose ends.
- Block the Hat:
- Lightly block the hat if needed to shape it perfectly.
Starting Instructions & Stitches Used
To start, you’ll need to know how to make a magic ring, work double crochet (dc) in rounds, and use post stitches for the brim. The design features increases and slip stitches for seamless transitions, with gradual shaping through alternating front/back loop stitching. This pattern is great for expanding your skills while crafting something eye-catching and functional.
Extra Possibilities with This Pattern
- Change the Iris Color: Create hats with green, brown, or hazel irises.
- Make Kid-Sized Versions: Start with fewer rounds to scale down for children.
- Holiday Variations: Swap colors to create monster or alien-themed hats.
- Matching Accessories: Use the eyeball motif to crochet matching mittens or scarves!