
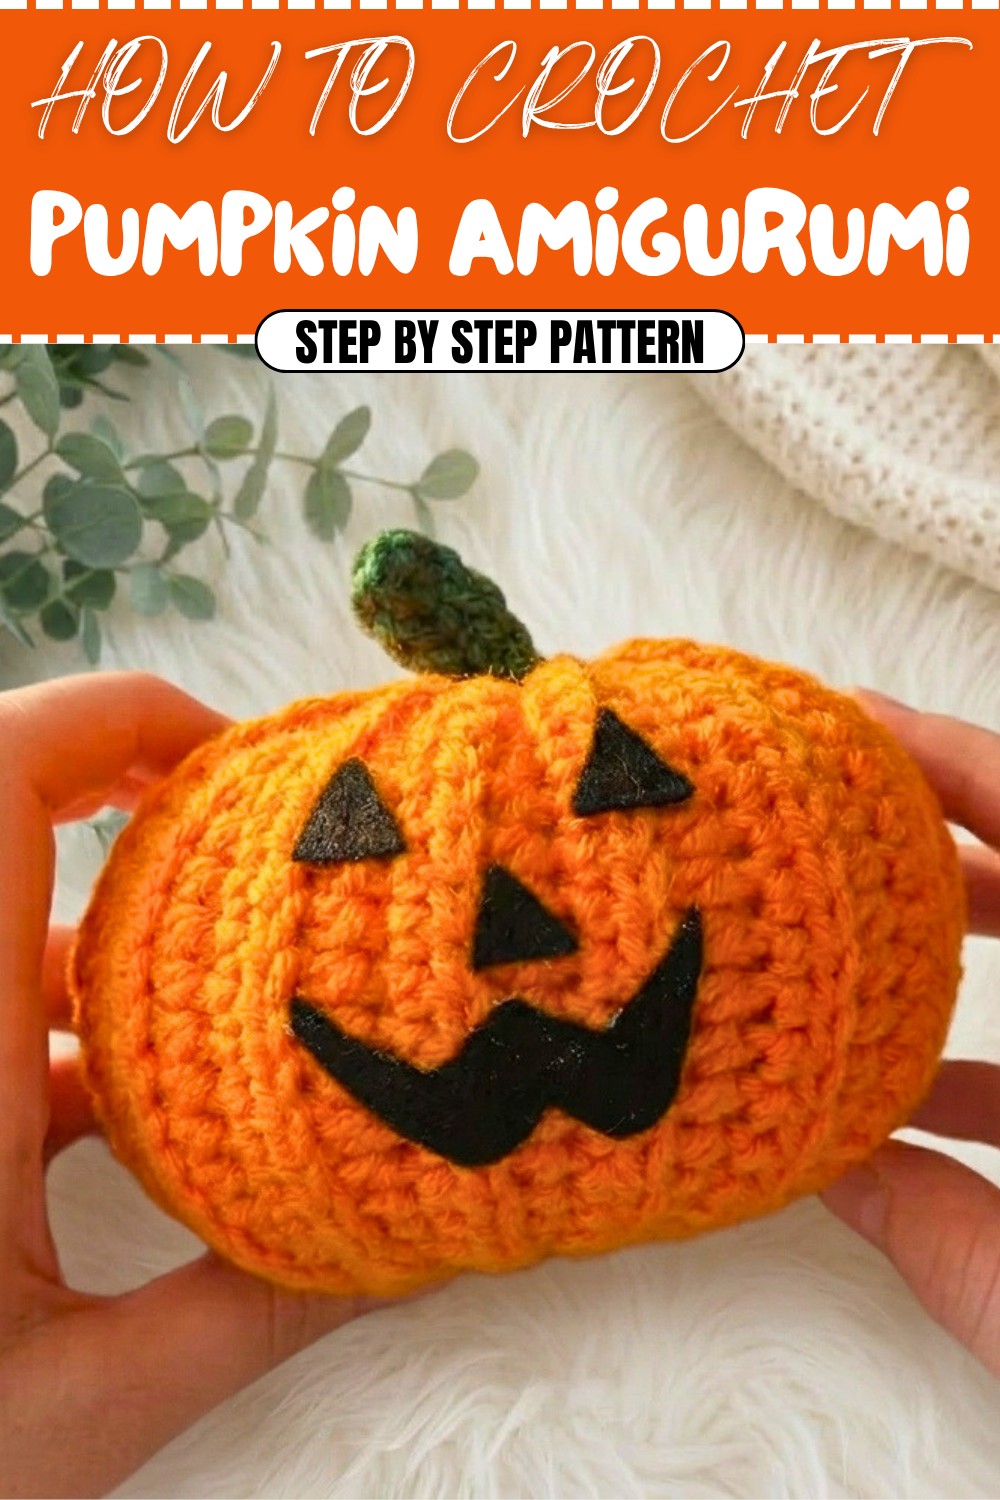
Free Crochet Pumpkin Amigurumi Pattern for Playful Decorations
Solve seasonal decorating with a free crochet pumpkin amigurumi pattern that's trendy, easy, and adds handmade flair instantly.
There’s something undeniably charming about hand-crocheted pumpkins! Their cozy textures, vibrant orange hues, and ability to add a touch of autumn whimsy make them a favorite project for beginners and seasoned crocheters alike. This free crochet pumpkin amigurumi pattern is perfect for creating soft, textured pumpkins that are great as fall decorations or thoughtful handmade gifts. With this pattern, you can crochet plain pumpkins for Thanksgiving décor or playful Jack-o’-lanterns for Halloween by adding creative felt-based faces. Using simple yarns in orange for the body and green or brown for the stem, the pattern lets you experiment with sizes and even mix colors for a quirky, striped pumpkin!
Lively Free Crochet Pumpkin Amigurumi Pattern for Cute Home Accents

This pattern primarily uses half double crochet (HDC) stitches worked into the back loop only (BLO), creating a ribbed texture that beautifully mimics a real pumpkin’s ridges. Once you get the hang of HDC, you’ll find it easy to apply these stitches not just for pumpkins but for other projects like textured dishcloths, cozy scarves, or even ridged baskets. The beauty of this pattern lies in its simplicity, and it’s perfect for beginners who want a quick and enjoyable project.
Other Crochet Projects You Can Make Using This Pattern
This is more than just a pumpkin tutorial! Once you’re comfortable, apply your newly learned skills to crochet:
- Striped pumpkins or gourds with multi-colored yarns.
- Textured placemats or coasters in warm autumn tones.
- Mini pumpkin keychains or ornaments for holiday gifting.
- Festive decorative bowls for candies or jewelry.
Why You’ll Love It
- Easily adaptable for all sizes.
- Beginner-friendly, fun, and quick to complete.
- Perfect for exploring fall-themed creativity—your handmade pumpkins will add warmth to any setting!
Crochet Pumpkin (or Jack-o’-lantern) Pattern
This step-by-step guide will help you create an adorable pumpkin, suitable for fall décor or as a festive handmade gift. Use this versatile pattern to crochet a plain pumpkin or add a Jack-o’-lantern face for Halloween. You can customize the size by changing starting chain counts and rows. Creative and fun, this project makes for a perfect beginner’s crochet session!
Introduction
Skill Level: Beginner/Intermediate
Terminology: This pattern uses US crochet terms.
The pumpkin pattern is built with half double crochets (HDC), slip stitches (SS), and simple sewing techniques. It is highly customizable, whether you prefer wide pumpkins or smaller ones. Work with care and enjoy crafting this festive and beginner-friendly piece!
What You’ll Learn from This Pattern
Through this pattern, you’ll:
- Master the half double crochet stitch (HDC) and learn how to work in the back loop only for stunning textures.
- Practice creating shapes by pairing crochet with basic sewing techniques.
- Learn how to add stuffing and construct a seamless pumpkin shape using slip stitches.
- Learn tips for neat finishing, like weaving yarn ends securely and adding decorative elements like felt faces.
Materials & Tools
- Yarn:
- Orange worsted-weight yarn (for the pumpkin).
- Green or brown worsted-weight yarn (for the stem).
- Black felt (optional, for Jack-o’-lantern details).
- Crochet Hook: 4.5mm crochet hook.
- Stuffing: Polyfill or other soft stuffing material.
- Yarn Needle: For sewing and weaving in loose ends.
- Scissors: To cut and trim yarn.
- Glue: Tacky glue or fabric glue (optional for felt features).
Gauge
Gauge is not crucial for this project; aim for uniform stitches to prevent visible gaps between rows.
Abbreviations
| Abbreviation | Meaning |
|---|---|
| HDC | Half Double Crochet |
| SS | Slip Stitch |
| CH | Chain Stitch |
| BLO | Back Loop Only |
Special Stitch Instructions
- Half Double Crochet (HDC): Yarn over, insert hook into stitch, yarn over and pull through (3 loops on hook), yarn over again and pull through all 3 loops.
- Back Loop Only (BLO): When working into stitches, insert hook into the back loop of the stitch instead of through both loops.
Finished Size
The pumpkin in this tutorial measures approximately 4–5 inches tall. Sizes vary based on the number of rows and chains.
The Pattern
Follow the instructions to crochet the pumpkin base, sew it together, and add extra details such as the stem or optional face.
Part 1: Pumpkin Base
Step 1: Starting Chain
- Slip Knot: Begin with a slip knot using the orange yarn.
- CH 21: Loosely chain 21 stitches.
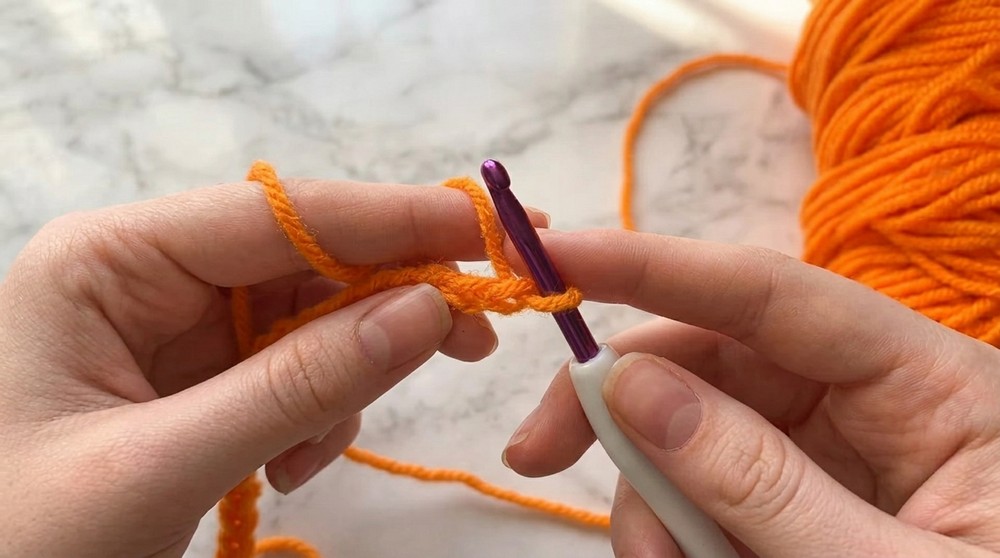
Completion Tip: Working loosely allows for easier crochet into the back loops during subsequent rows.
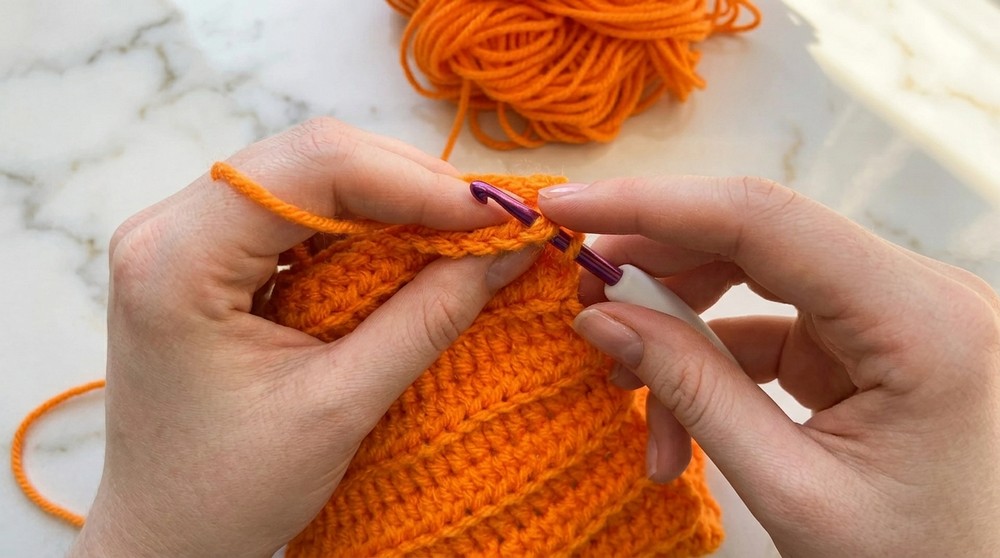
Step 2: Row 1 (HDC into BLO)
- Start in 2nd CH from hook: Insert hook into the back loop of the stitch.
- HDC across: Work 20 HDC in the back loop only (BLO).
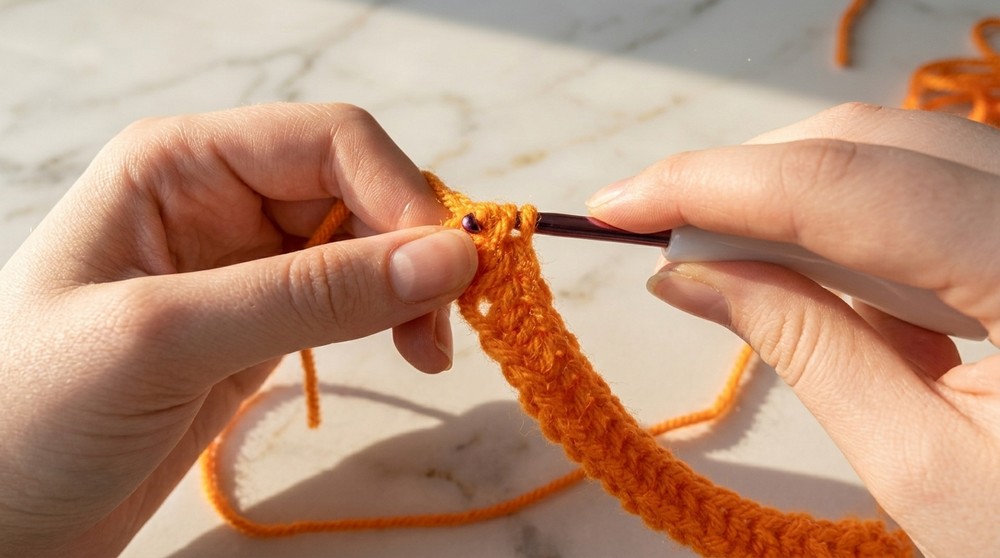
Completion Tip: Working into BLO gives the pumpkin its ribbed texture, resembling a real pumpkin’s ridges.
Step 3: Rows 2–30 (HDC into BLO)
- At the end of Row 1: CH 1, turn your work.
- HDC into BLO: Crochet 20 HDC across in the back loop only for each row.
- Repeat this for 30 rows total (or adjust number based on desired size).
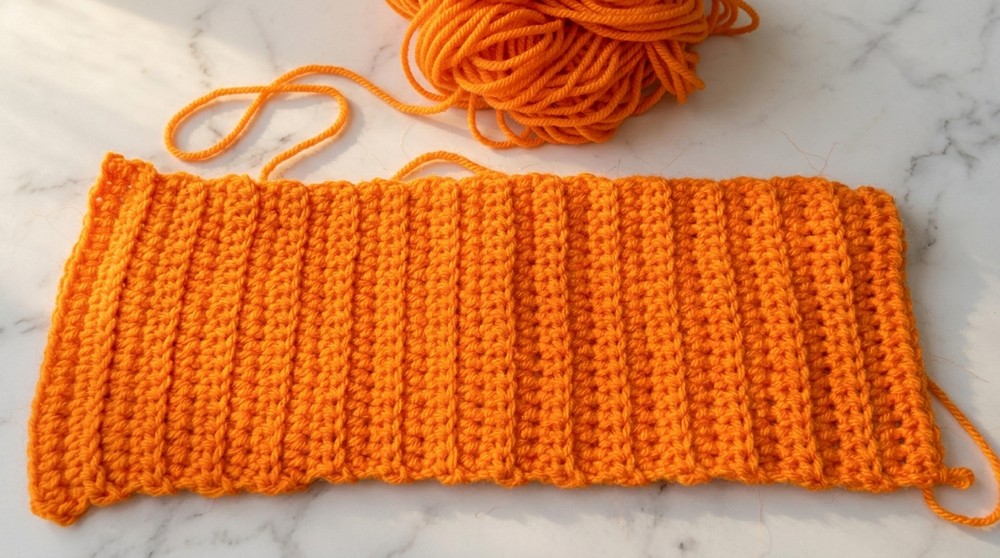
Completion Tip: The ribbed rows are key to creating the distinct texture of the pumpkin. Continue crocheting patiently, ensuring all rows remain even.
Part 2: Sewing the Pumpkin Together
Step 1: Folding and Slip Stitching
- Fold ends together: Align the first and last row to form a tube.
- Slip Stitch (SS): Working through the stitches of both ends, SS rows 1 and 30 together to sew the tube closed.
Completion Tip: The slip stitches blend into the texture of the pumpkin, ensuring the seam is nearly invisible.
Step 2: Closing One End
- CH 1 after SS: Secure the seam and prepare to close one side of the tube.
- Running Stitch: Thread a yarn needle with orange yarn and sew around the edge using a running stitch.
- Pull Tight: Gently pull the yarn to gather and close the hole. Sew back and forth to secure the opening.
Completion Tip: Don’t worry about neatness here—this part will be the bottom and won’t be visible.
Step 3: Stuff the Pumpkin and Close the Top
- Stuffing: Add polyfill through the open top. Aim for medium firmness so the stitches don’t stretch too much. Close the top slightly to adjust firmness.
- Sew Top Closed: Repeat the running stitch process at the top. Pull tight to cinch the opening, sewing back and forth for a secure seal.
Completion Tip: Closing the top creates a perfect rounded shape for the pumpkin. Don’t pull the yarn too tightly to avoid breakage.
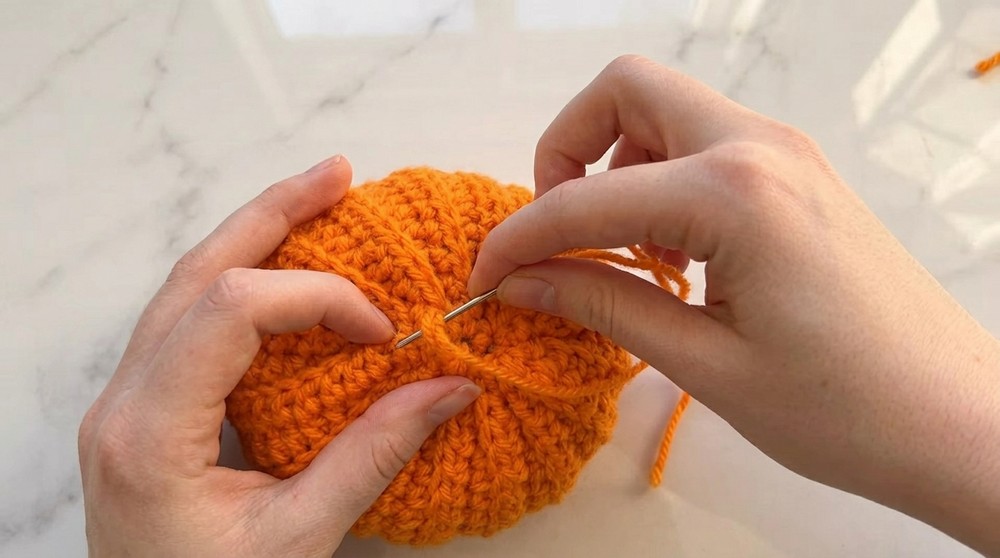
Part 3: Adding Indentation
(Optional Step) Create a realistic pumpkin indent:
- Thread Yarn: Push leftover yarn through the pumpkin from the top to the bottom.
- Pull Tight: Cinch the yarn to create an indent, then tie a knot at the bottom to secure.
Completion Tip: This step gives the pumpkin a dimensional, authentic shape and helps define the area for attaching the stem.
Part 4: Stem
Step 1: Crochet the Stem
- Slip Knot: Start with a slip knot using green or brown yarn.
- CH 5: Loosely chain 5 stitches.
- HDC into BLO: Work 4 HDC across, starting in the second chain from the hook.
Completion Tip: The stem can be adjusted in size by increasing or decreasing the chain count.
Step 2: Attach the Stem
- Position Stem: Place the stem at the indent created earlier.
- Sew Stem: Use leftover yarn to sew the stem securely onto the pumpkin. Use short, careful stitches for a clean look.
Completion Tip: Double-check placement before sewing to ensure symmetry and balance.
Part 5: Optional Jack-o’-lantern Face
Step 1: Create Felt Features
- Cut 2 triangular pieces for eyes, a zigzag mouth, and a small triangle for the nose from black felt.
- Glue Felt: Use fabric glue (or tacky glue) to attach the felt features. Adjust placement freely until satisfied.
Completion Tip: Experiment with fun face designs to make each Jack-o’-lantern unique!
Assembly & Finishing
- Trim Excess Yarn: Ensure all leftover yarn is securely woven into the pumpkin and trimmed neatly.
- Final Adjustments: Reshape your pumpkin if necessary using light pressure or re-position any features.
Final Words
Congratulations! You’ve crocheted a festive pumpkin (or Jack-o’-lantern) that’s perfect for fall décor. Whether you choose a plain, ribbed pumpkin look or add a playful face for Halloween, the results are always delightful.