
Card Holder Wallet Free Crochet Pattern for Stylish Organizing
Follow this free crochet card holder wallet guide with simple instructions to stitch a practical and stylish accessory for everyday use with ease and creativity.
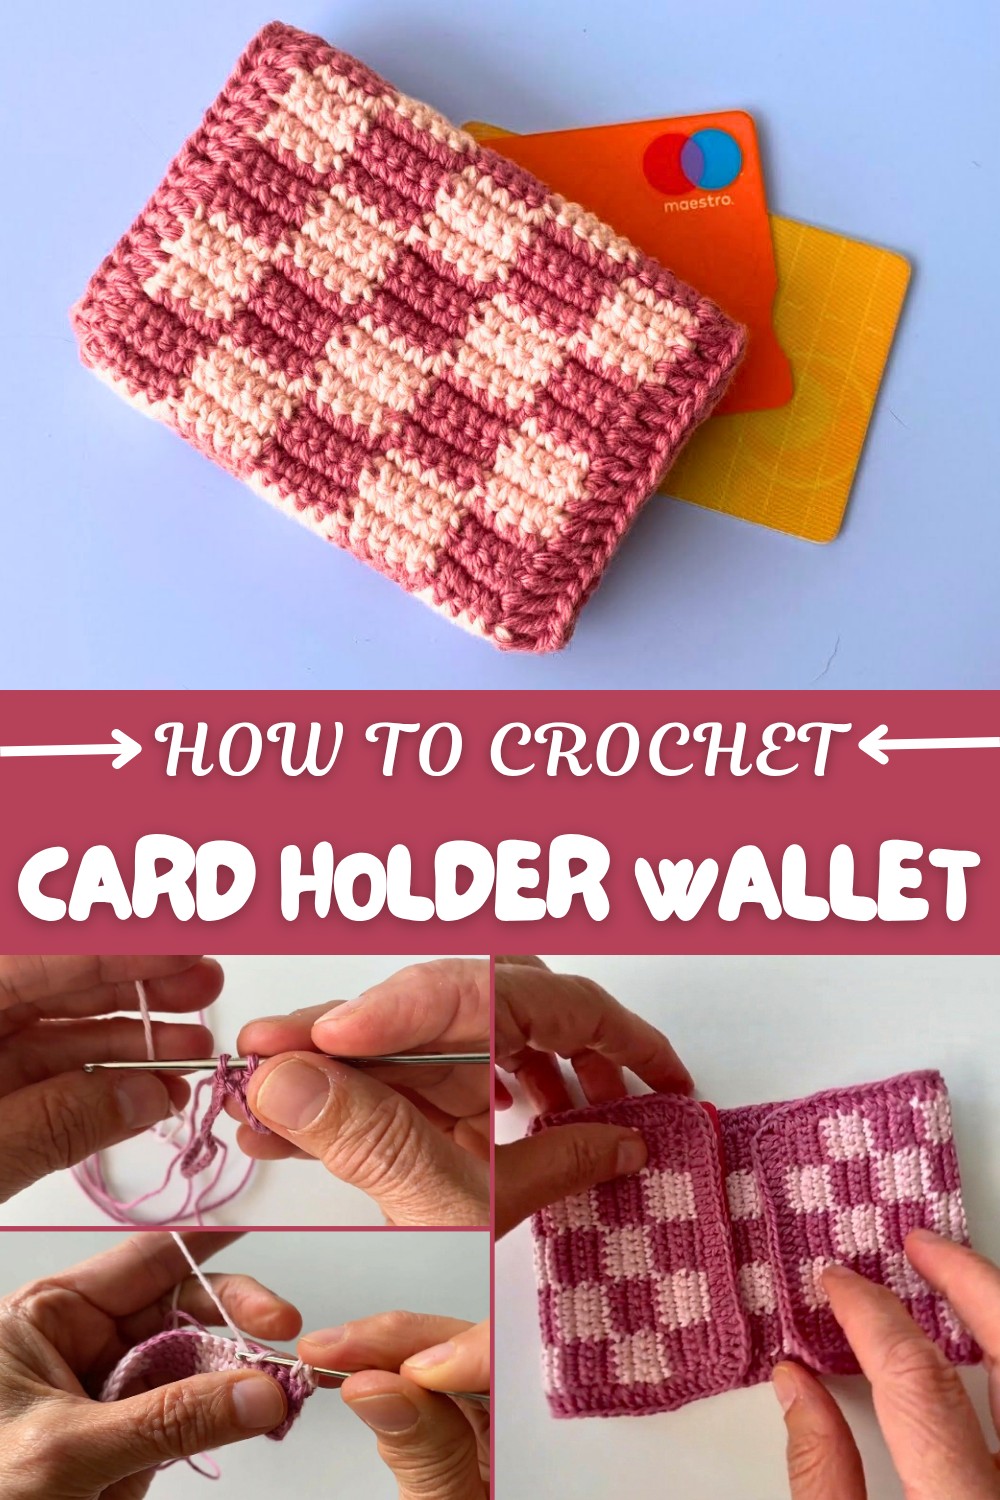
Soft, colorful stripes and a neat, compact shape make this crochet card holder wallet a lovely and practical project for anyone who enjoys crafting. Using two shades of yarn creates a bright, cheerful design that’s easy to spot in any bag. The stitches are close together, so the wallet feels sturdy while staying flexible and gentle to the touch.
Free Crochet Card Holder Wallet Pattern Using Basic Stitches
The double-sided pocket style means there’s lots of room for your everyday essentials, credit cards, gift cards, or business cards all fit nicely. Everything stays in place thanks to a shiny snap button right in the center, which adds a cute bit of detail and an extra feeling of security. It’s satisfying to see how the color changes form neat stripes, giving you a fresh look that stands out.
Making this project is enjoyable because the steps are clear and beginner-friendly. You only need simple stitches and a small amount of yarn, making it a great way to use up leftover bits in your favorite colors. By changing the color order or adding more rows, you can easily personalize your wallet or make matching sets for friends. With a little tweak, this pattern can turn into a coin purse or even a small pouch for receipts and tiny items.

Everyday organization becomes easier with a handmade wallet like this. Slip it into your purse, school bag, or even your pocket, and your important cards will always be easy to reach. Gifting one of these clever little wallets shows you care, and every time it’s used, it will remind someone of your thoughtful handmade touch.

Two-Tone Crochet Card Holder Pattern
This little project is quick, practical, and can be customized with your favorite colors. made to fit a standard credit or ID card, the modern two-tone pattern and pressure button closure make it cute and functional. You’ll use basic crochet stitches with simple color changes—great for practicing your skills or making gifts. The instructions include helpful lines after every key section, perfect for crocheters who need extra guidance.
Skill Level & Terminology
Skill Level: Beginner
Terminology: US Crochet Terms
This pattern is beginner-friendly. You should be able to chain, single crochet, work basic color changes, and make simple seams.
Materials & Tools
- 2 colors of bio cotton or similar medium-weight yarn
- 2.5 mm or 3.0 mm crochet hook
- 4 stitch markers
- Scissors
- Tapestry/yarn needle
- Pressure (snap) buttons
- Measuring tape
- A “credit card” or ID as template
Gauge
Gauge is not critical, but you want a dense, slightly stiff fabric so the card holder keeps its shape. Finished sample should measure approx. 9.8 in (25 cm) long before folding (for both card sides), and fit snugly around a credit card.
Abbreviations List
| Abbreviation | Meaning |
|---|---|
| ch | Chain |
| sc | Single crochet |
| dc | Double crochet |
| sl st | Slip stitch |
| st(s) | Stitch(es) |
| RS/WS | Right Side / Wrong Side |
Special Stitch Instructions
- Color Change: On the last yarn over of the final sc before a color change, pull through new color.
- Work Along the Tail: As you crochet, hold the tail of the unused color along the top of the row and stitch over it, carrying the yarn invisibly.
- Corner Increase: For the dc border, work 2 dc in the same corner st to help the piece lay flat.
Finished Size
- Approx. 25 cm x 6.5 cm (9.8 in x 2.5 in) before folding
- Fits 1–2 cards per side when folded
Pattern Notes
You’ll begin with a long chain and work rows of single crochet, changing color every few stitches for a modern striped effect. After working the main rectangle, you’ll add a sturdy double crochet border, a final slip stitch edge, and finish with pressure buttons for closure. This project is great for color practice and makes a fast, practical gift.
The Pattern Itself
Begin with the foundation chain and practice consistent stitch size for an even fabric. Don’t worry if the stripes seem fiddly at first—by the second row, the rhythm becomes intuitive.
Main stitches used:
Single crochet (sc), double crochet (dc), slip stitch (sl st), chain (ch).
How the pattern works:
You’ll alternate colors to make a modern, color-blocked rectangle, then add sturdy borders, fold into pockets, and finish with secure snap buttons.
Main Body
Row 1 (Foundation Row):
- Using Color 1, make a slipknot and ch 25.
- Ch 1 extra (26 total) for turning.
- Sc into 2nd ch from hook.
- Sc into next 3 ch (4 sc worked so far, not completing the last pull through).
- Color change: With Color 2, yarn over and pull through the 2 loops on the hook for the 4th sc.
- Holding the unused color’s tail along the top, sc into next 5 ch (crocheting over the tail).
- Switch back to Color 1 by pulling through last 2 loops of 5th sc and continue: work 5 sc in next 5 ch, always changing color after the 5th stitch.
- Repeat across the row, carrying the unused yarn and changing color every 5 stitches.
- At the end, ch 1, turn.

You are creating a striped color block effect. Always switch color by pulling through new color at the last loop of the fifth sc.
Rows 2–4 (and as needed):
- Repeat Row 1, inverting colors each row for a checkerboard/stripe look.
- Each time you reach the fifth sc in a color, change to the next color before completing the stitch.
- Remember: always crochet over the tail of the unused color to keep the work tidy.
- Continue until your rectangle measures approx. 25 cm (or desired length, enough for two card slots when folded).

Working these rows with careful color changes gives your card holder visual interest and a firm fabric.
Border (Double Crochet Edge):
- With either color (or a third accent), ch 2 (counts as first dc), turn.
- Dc in each st across the row.
- When you reach a corner, 2 dc in same corner st (to avoid curling).
- Continue placing 1 dc into the side of each row/post along the long sides, again placing 2 dc at each corner.
- Join border with sl st to first dc, cut yarn, and weave in the tail.

The double crochet border adds structure and frames your colorwork beautifully. Increase at corners for a tidy, flat finish.
Slip Stitch Edging:
- Make a slipknot with another color or same yarn.
- Starting in any st, sl st evenly around the entire piece, including over the dc border.
- At the corners, work extra sl sts if needed for smooth turning.
- When finished, sl st to join to first sl st, cut yarn and weave in end.

This slip stitch edge wraps the whole piece neatly and helps the card holder keep its shape.
Finishing & Assembly
- Weave all Tails:
Use a tapestry needle to weave in every yarn tail on the back of the work. - Fold Construction:
Place a credit card inside and fold both edges over so that the card fits snugly with an overlap. Pin sides in place if needed. - Attach Pressure Buttons:
With a needle and matching thread, sew pressure buttons at the appropriate spots for a secure closure.
Take your time with weaving tails and centering the buttons for a crisp, professional look. The folded-over pockets should securely hold your card(s), and the snap closure keeps everything in place.
Conclusion
Congratulations! You've finished your beautiful, modern crochet card holder. You practiced color-changing techniques, seamless border work, and simple seaming. Your finished piece is both practical and stylish, perfect for gifts or everyday use. Try mixing up your color blocks or adding an embroidered initial for a personal touch. This is a foundational project that will increase your crochet confidence and give satisfying results in just a few hours.