
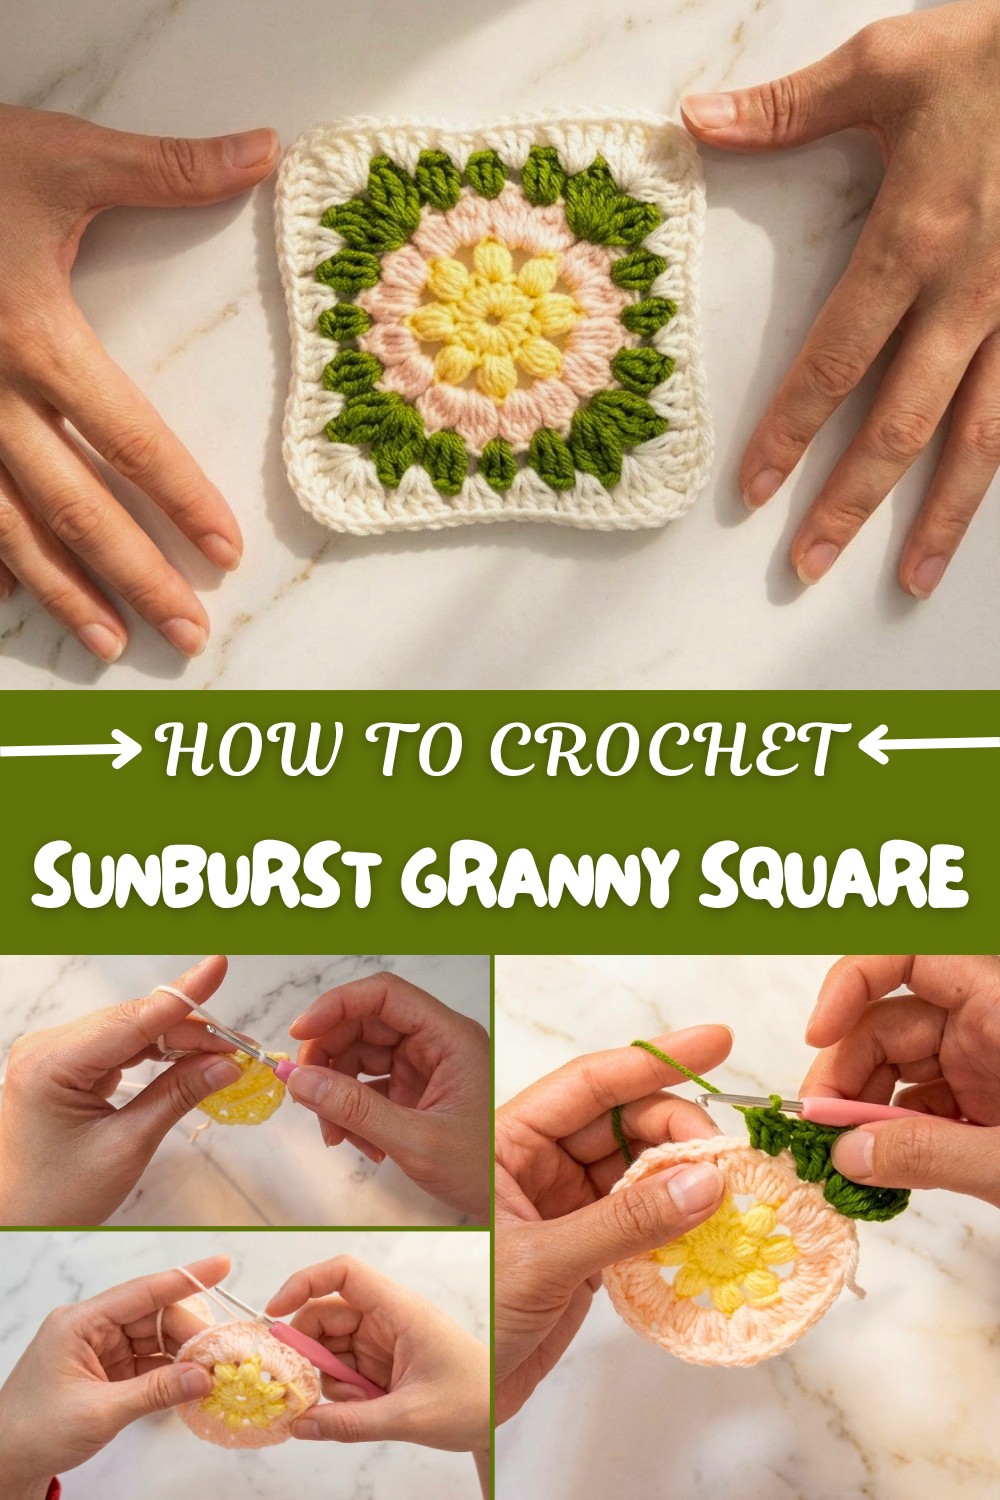
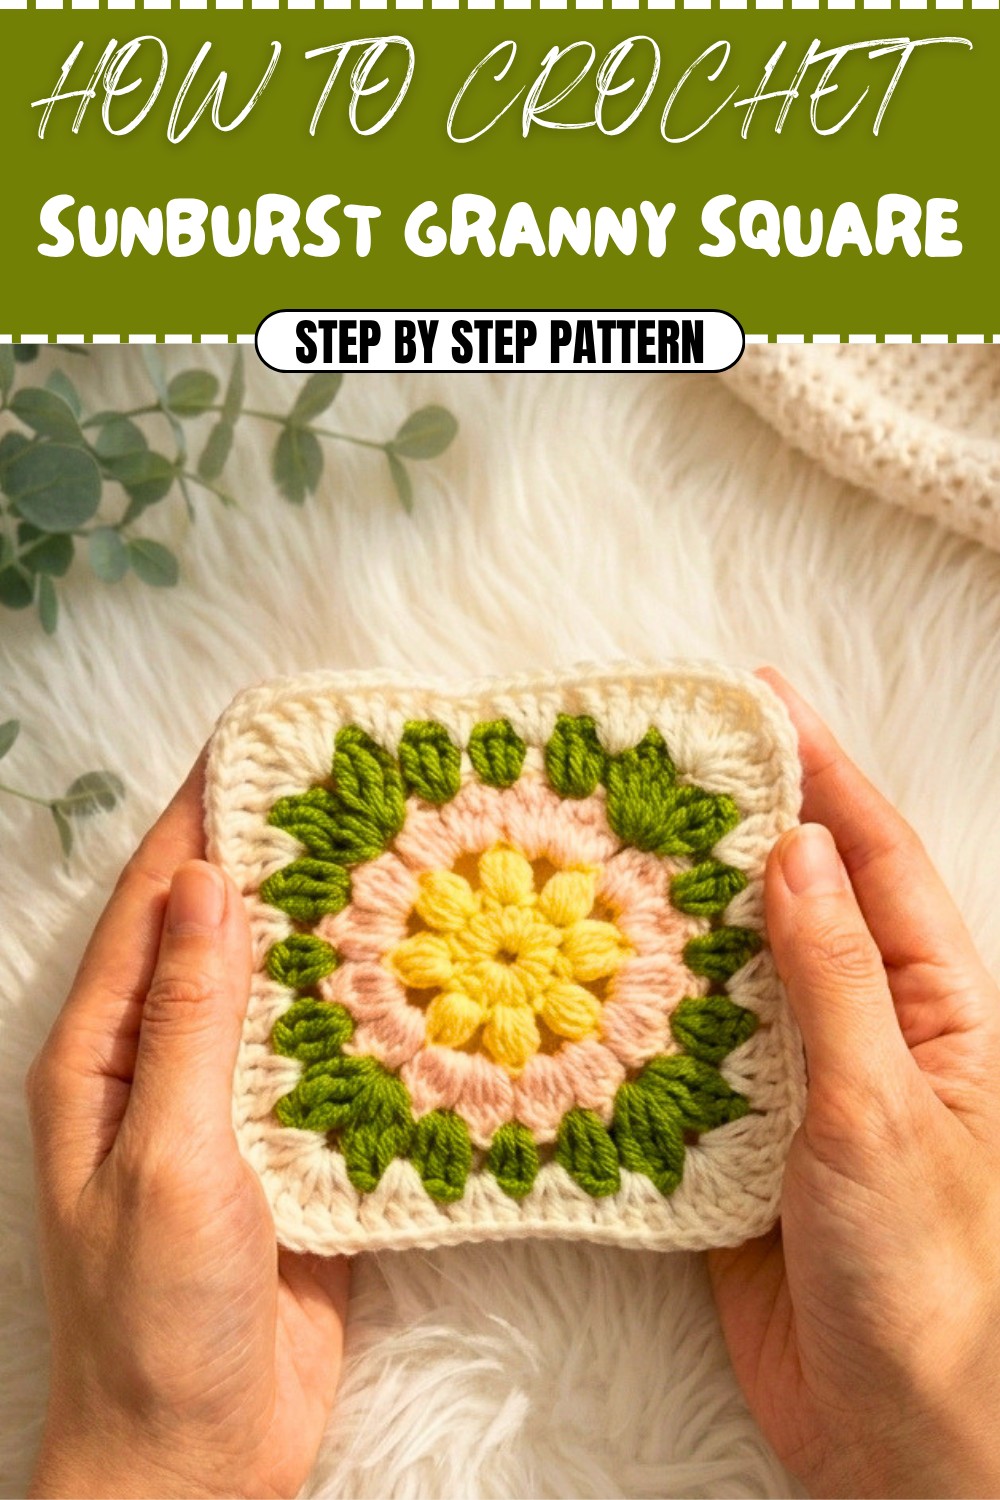
Crochet Sunburst Granny Square Free Pattern for All Projects
Learn how to crochet a Sunburst granny square with this free pattern. Perfect for beginners, create stunning designs solving your color combination needs.
Add a touch of vibrant charm to your next home décor or accessory project with this radiant granny square square. The Free Sunburst Granny Square Pattern captures the lively spirit of a sunburst, combining bold color changes and textured details to produce a stand-out crochet motif. Ideal for blankets, pillow covers, bags, or accent pieces, this adaptable square lets you personalize to your taste with any color combination you choose.
How to Crochet Sunburst Granny Square – Free Step-by-Step Pattern
The finished square catches the eye with a glowing, circular center framed by plush puff stitches that resemble petals, then transitions into neat, structured edges. Alternating layers of clusters and open spaces create depth and dimension, while the interplay of different stitch heights shapes the piece from a soft round into a tidy square. Signature design touches include the dense circle base, soft puff petals, and contrasting corners, all achieved with half double, double, and triple crochet stitches, along with chain spaces for smooth transitions.
This project is suitable for beginners eager to try new textures as well as more experienced crocheters seeking a dynamic addition to their repertoire. The process highlights several fundamental skills: starting with a magic circle, working puff stitches for a lifted effect, creating layered clusters, and finishing with a secure, slip-stitched border. Each round adds new definition and color, making the pattern fun to follow without repetition.
Use your sunburst square as a cheerful element in larger patchwork projects, a standalone decoration, or even as a heartfelt, handmade present. Crocheters looking for an easy to intermediate challenge will find this free sunburst granny square pattern both engaging and rewarding. Give your creativity room to shine and let this square become a unique statement in whatever you choose to create.
Sunburst-Inspired Granny Square Crochet Pattern
Before You Start
- Review the entire pattern before beginning.
- Choose 4 colors for a lively effect, or customize as you wish.
- Practice puff and cluster stitches on a scrap swatch if you’re not familiar.
- Gather all your tools in one place.
- Block and weave ends as you go for a neat result.
Pattern Notes
- The square is worked in joined rounds with chain and slip stitch joins.
- Always change colors at the start of a new round unless you prefer one color.
- Chain space (ch-sp) refers to spaces made by previous chain stitches.
- Begin each cluster or puff in the same space or stitch unless otherwise indicated.
- Adjust your tension: keep puffs and clusters loose for easier working.
- Stitch counts and instructions are given at the end of each round for verification.
- Corners are only formed with special clusters for squaring.
- Do not chain between side clusters unless specified.
How I Made the Crochet Pattern
- Created a compact center with half double crochets in a magic ring.
- Added 8 puffy petals using the puff stitch, skipping every other stitch.
- Worked a sunburst round with two clusters in each chain space, separated by chain stitches.
- Transitioned the circle into a square with a combination of treble, double, and half double clusters.
- Finished with an optional classic granny round.
Skill Level
Beginner to Advanced Beginner
Finished Size
Approximately 4" x 4" (10 x 10 cm) with DK yarn and 3 mm hook after 5 rounds.
Materials
- 4 yarn colors (DK or worsted recommended)
- 3 mm crochet hook
- Scissors
- Darning or tapestry needle for weaving in ends
Measurements / Sizing
- Each finished square: 4 x 4 inches (customize by adding rounds).
- No schematic included; standard granny square structure.
Gauge
- Not crucial for the project, but aim for squares that lay flat.
- 4 sc = 1" (2.5 cm) with your chosen yarn/hook for reference.
Stitch Abbreviations
- ch – chain
- st – stitch
- sl st – slip stitch
- hdc – half double crochet
- dc – double crochet
- tr – treble (triple) crochet
- puff – puff stitch (see Special Stitches)
- cl – cluster (see Special Stitches)
- sp – space
Special Stitches
Magic Ring:
Make a loop, insert hook, pull up a loop and work stitches as required into the ring. Pull tail to close.
Puff Stitch:
(Yarn over, insert into stitch, pull up a loop) x4 (total 9 loops on hook), yarn over, pull through all 9 loops, ch 1 to close puff.
Cluster Stitch (cl):
(Yarn over, insert into space, pull up a loop, yarn over, pull through 2 loops) repeat as required (3 or 4 times), then yarn over, pull through all loops.
The Pattern!
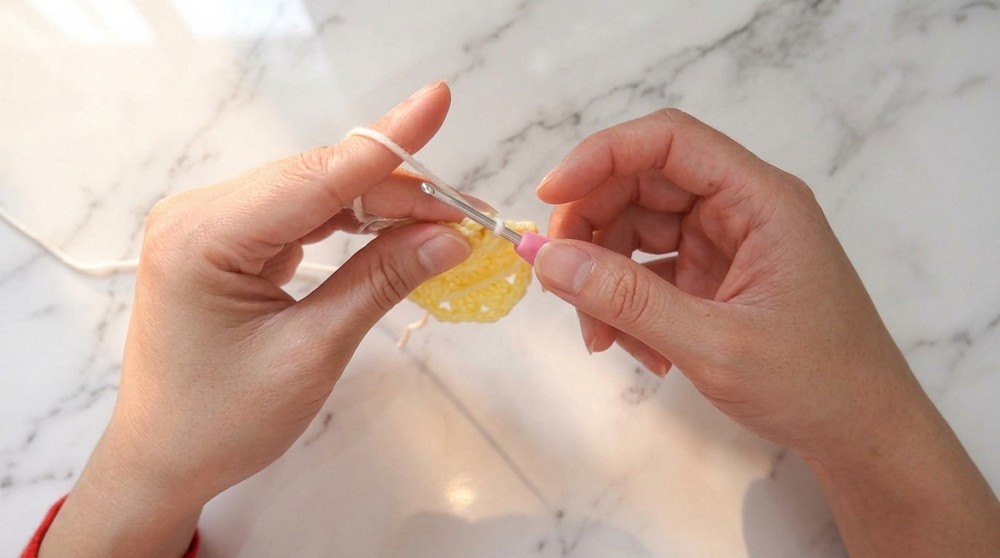
Round 1: Creating the Center
- With Color A, make a magic ring.
- Ch 2 (does not count as a stitch).
- Work 15 hdc into ring (for a total of 15 stitches).
- Pull the tail tight to close.
- Sl st to top of first hdc to join (16 hdc total counting the joining stitch).
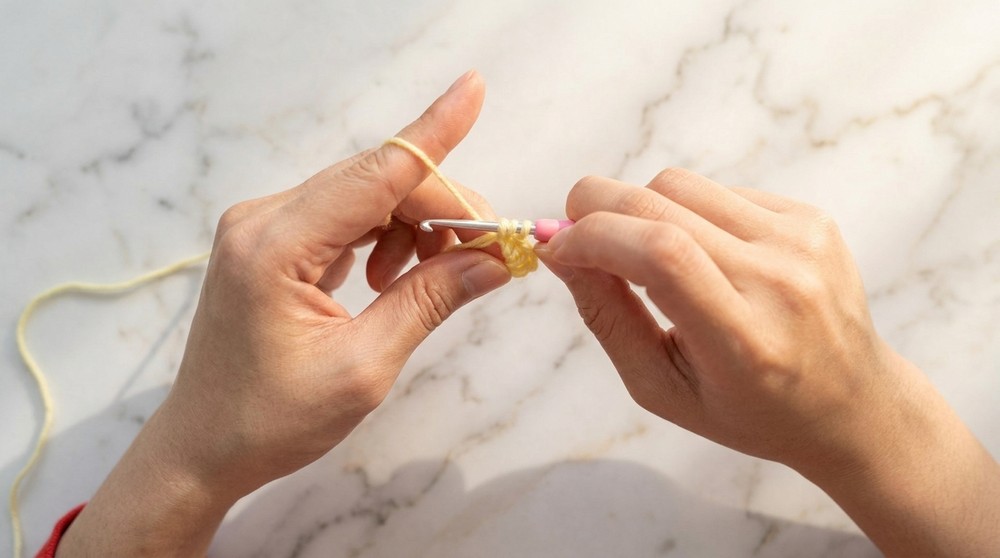
This creates a solid ring of 16 half double crochet stitches — a tidy center for your sunburst. The slip stitch completes the circle. All further stitches will build from this round.
Round 2: First Layer of Petals (Puff Stitches)
- Join Color B to any st from Round 1.
- Work 1 puff stitch in the joining stitch (see Special Stitches).
- Ch 2, skip 1 st, puff stitch in the next st.
- Repeat: (puff, ch 2, skip 1 st) around.
- You should end up with 8 puff stitches total.
- Join with sl st in the top of the first puff to close the round.
This round forms 8 puffy petals. Each puff is separated by a ch-2 space for shape, and you’ll skip every other stitch from the base round. Your sunburst center is now surrounded by raised texture petals.
Round 3: Completing the Sunburst Effect (Double Crochet Clusters)
- Join Color C in any ch-2 sp.
- Ch 3 (counts as first dc of cluster), work a 4-dc cluster in same space:
- (Yarn over, insert, pull up, yarn over, pull through 2) 3 more times (for 4 total dc, 5 loops on hook), yarn over, pull through all 5 loops.
- Ch 1.
- Work another 4-dc cluster in same space, ch 1.
- Repeat: (2 clusters with ch 1 between each) in every ch-2 space around.
- Total: 16 clusters (2 per ch-2 sp).
- Join with sl st to first cluster to close, fasten off.
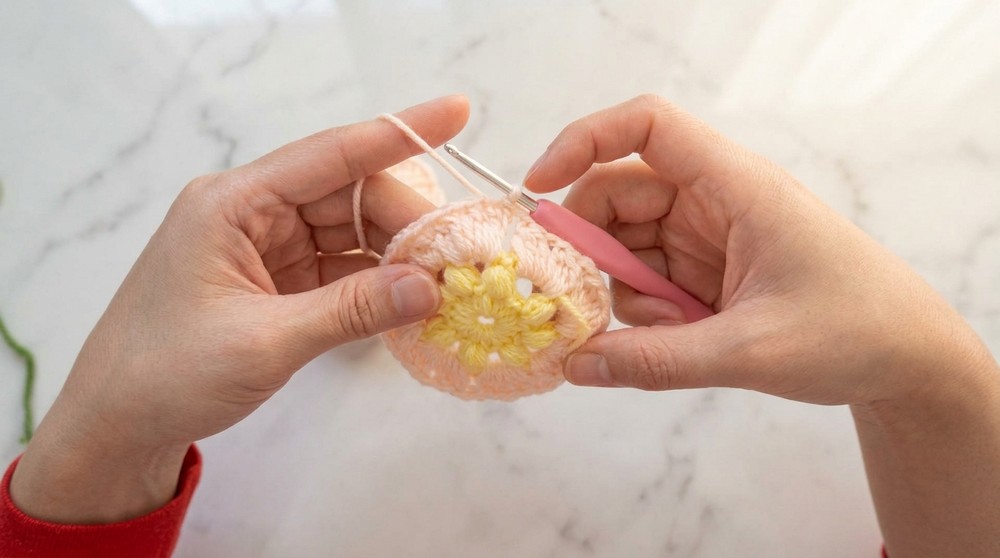
Your petal round is now thickened by 16 clusters, giving the “burst” effect. Every ch-2 space holds two clusters separated by a chain, creating a richly textured round circle, ready to be squared.
Round 4: Building the Granny Square (Clustering & Squaring Up)
- Join Color D in any space between clusters.
- Corners:
- Ch 4 (counts as tr), 3 tr together (tr cluster) in same sp, ch 1, 3 tr together in same sp.
- Sides:
- Next sp: 3-dc cluster (see Special Stitches).
- Next sp: 3-hdc cluster (see Special Stitches).
- Next sp: 3-dc cluster.
- Next sp: repeat corner instructions.
- Continue: (corner, dc cluster, hdc cluster, dc cluster, corner) around all four sides.
- Join with sl st to starting ch-4 to finish.
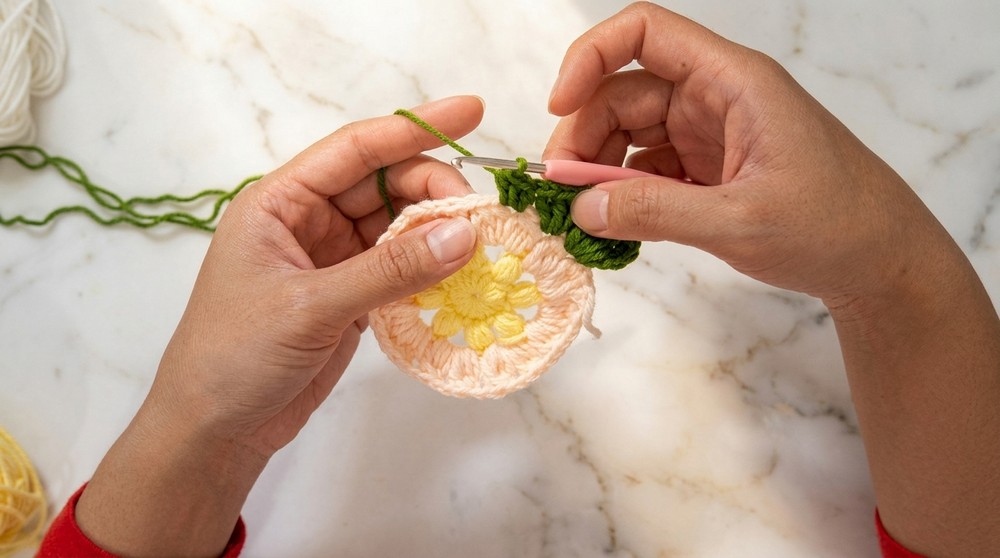
You have now squared off the sunburst. Corners are made from paired treble clusters with sides made from double and half-double clusters, shaping your motif into a classic granny square.
Round 5: Expanding the Granny Square (Optional)
- Join a new color in any corner space from previous round.
- Corners: (ch 3, 2 dc, ch 2, 3 dc) in corner space.
- Sides: 3 dc in each sp along the side.
- At each new corner: repeat (3 dc, ch 2, 3 dc).
- Continue: until all sides and corners completed.
- Join with sl st to top of starting ch 3, fasten off, and weave in ends.
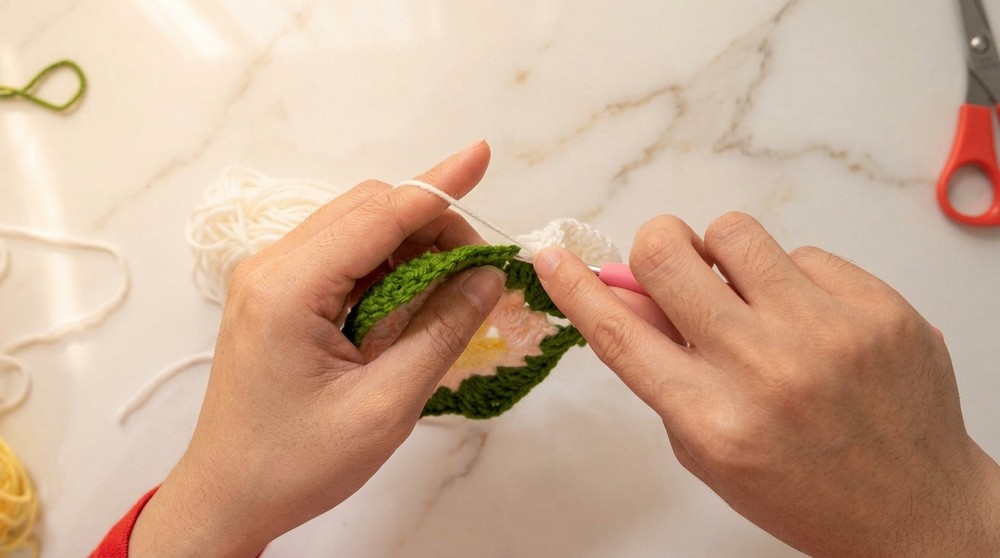
This round extends your square for classic joinability and a finished look. Add as many granny stitch rounds as you want for size.
Plain Explanation:
You start with 16 half double crochets in a magic ring to make the round center. Next, make 8 puff stitches around, skipping every other stitch and chaining between each. Fill all the chain spaces with two clusters separated by a chain, making the sunburst layer. Square things up in the following round: every corner gets special tall clusters, the sides are built of shorter clusters, creating straight edges. If you want the square bigger, add a classic granny round. This square is great for combining in blankets, bags, or as a coaster.
Assembly & Finishing
- Weave in all yarn tails securely with your darning needle.
- Gently block squares for best shape and flatness.
- Join squares with whipstitch, slip stitch, or join-as-you-go technique.
- Make sure all corners and edges align before seaming.
Solution of Problem
Problem: Center hole loosens or puckers.
- Solution: Pull the magic ring tail tightly after Round 1 and weave it securely.
Problem: Clusters or petals are too tight.
- Solution: Keep a loose tension on puff and cluster stitches for easier working and consistent texture.
Problem: Square edges ripple or curl.
- Solution: Adjust your hook size if necessary and block the square after finishing.
What You Can Make by Using These Stitches
- Patchwork blankets or throws
- Vibrant cushion covers and pillows
- Colorful tote bags or purses
- Wall hangings or table runners
- Trivets and coasters (stop after Round 4)
- Cardigans or vests made from joined squares