
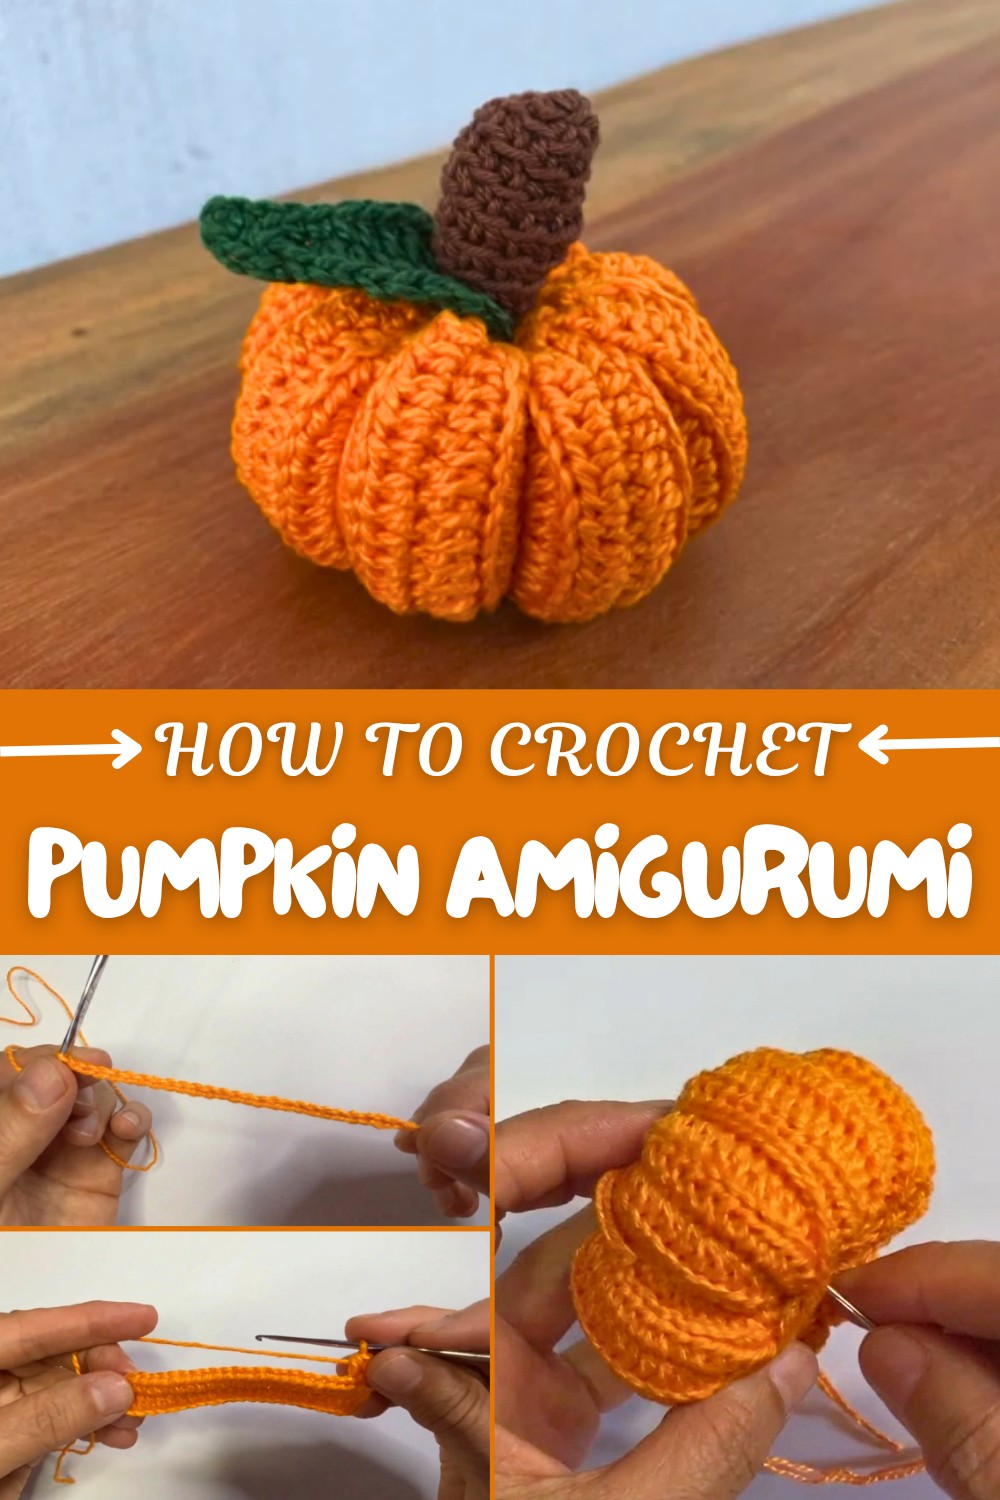
Free Crochet Pumpkin Amigurumi Pattern for Halloween
Create a cozy autumn vibe with this Crochet Pumpkin Amigurumi Pattern, featuring simple stitches and vibrant yarn for charming seasonal décor.
Fall is coming, and there’s nothing cuter than adding a handmade crochet pumpkin to your home. This free crochet pumpkin amigurumi pattern is a real treat for anyone who likes fun, small projects. The finished pumpkin has an adorable, plump shape with classic ribbed lines running straight down the sides. These lines are made by working in the back loop of each row, which gives the pumpkin great texture you can see and feel.
The beauty of this little pumpkin is in its detail. The body is round and slightly squishy, stuffed with soft cotton or polyfill, which makes it extra cozy for any space. On top, the curly leaf and short stalk use green and brown yarn, adding even more charm and looking almost real. The shape is just right, not too big, not too small, making it easy to use in many places.
Crochet Pumpkin Amigurumi Pattern for Beginners
Crocheters will have fun with this pattern because it uses very simple stitches, mostly half double crochet and single crochet. As you stitch it together and gather the yarn to form little pumpkin slices, you can see the shape come to life. For a twist, you can change up the colors or even make the pumpkin larger or smaller, or add more leaves for a fuller look.
There are so many ways to use these pumpkins. Pop them on a table or shelf, fill a basket by your front door, or place them on a windowsill for an autumn touch. You could even turn them into keychains or cute gifts for friends. Every little pumpkin adds a warm, handmade feeling to your home, and you’ll love having these soft friends around all season.

Cute Halloween Crochet Pumpkin Pattern
This plush pumpkin is made with easy stitches, clever shaping, and charming details like a curly stalk and a leaf. It’s the perfect fall home decor accent, a cute gift, or a project to teach yourself new crochet skills. Follow along with detailed step-by-step instructions, alternate explanations for beginners, and tips for beautiful finishing.
Skill Level & Terminology
Skill Level: Beginner/Confident Beginner
Terminology: US Crochet Terms
You’ll use basic stitches (chain, single crochet, half double crochet, double crochet, treble crochet, slip stitch), and simple seaming and stuffing.
Materials & Tools
- Worsted or DK cotton yarn (or similar) in 3 colors:
- Pumpkin color (orange or as preferred)
- Leaf color (green)
- Stalk color (brown/beige or as preferred)
- Crochet hook (size appropriate for your yarn, recommended: 3.0–4.0 mm)
- Small scissors
- Stitch marker
- Tapestry/yarn needle
- Polyfill or cotton stuffing
Gauge
Gauge is not critical for this project, but your stitches should be dense enough so the stuffing does not show through. Your pumpkin will measure approximately 3–4 inches (8–10 cm) in diameter, depending on yarn and hook.
Abbreviations List
| Abbreviation | Meaning |
|---|---|
| ch | Chain |
| sc | Single Crochet |
| hdc | Half Double Crochet |
| dc | Double Crochet |
| tr | Treble Crochet |
| sl st | Slip Stitch |
| BLO | Back Loop Only |
| st(s) | Stitch(es) |
| mr | Magic Ring (for stalk, optional) |
Special Stitch Instructions
- Back Loop Only (BLO): Insert your hook into the back loop of the stitch only (not both top loops), to create ribbing.
- Seaming: Hold sides together and slip stitch across to close.
- Invisible Seaming: Using a yarn needle, weave the long tail through the ends or tops of sts and pull tightly.
- Stalk Base: Can be worked as a magic ring or joined chain.
Finished Size
- Approx. 3–4 inches (8–10 cm) wide and 2.5–3 inches (6–8 cm) tall
Pattern Notes
The pumpkin is worked in rows and shaped into a tube with BLO stitching for realistic segment lines. Once seamed, it is closed at both ends, stuffed, and shaped into slices. The leaf and stalk are crocheted separately and stitched on. This project is excellent for practicing ribbing and learning basic 3D crochet shapes.
The Pattern Itself
Pumpkin Body
- Foundation:
- With pumpkin color, make a slipknot.
- Ch 25.
- Row 1:
- Skip the first ch from the hook.
- Work 1 hdc in each ch to the end. (24 hdc)
- Ch 2, turn.
- Row 2:
- Hdc in BLO of each stitch across. (24 hdc)
- Ch 2, turn.
- Rows 3–30:
- Repeat Row 2 (hdc in BLO across, ch 2, turn) for a total of 30 rows.
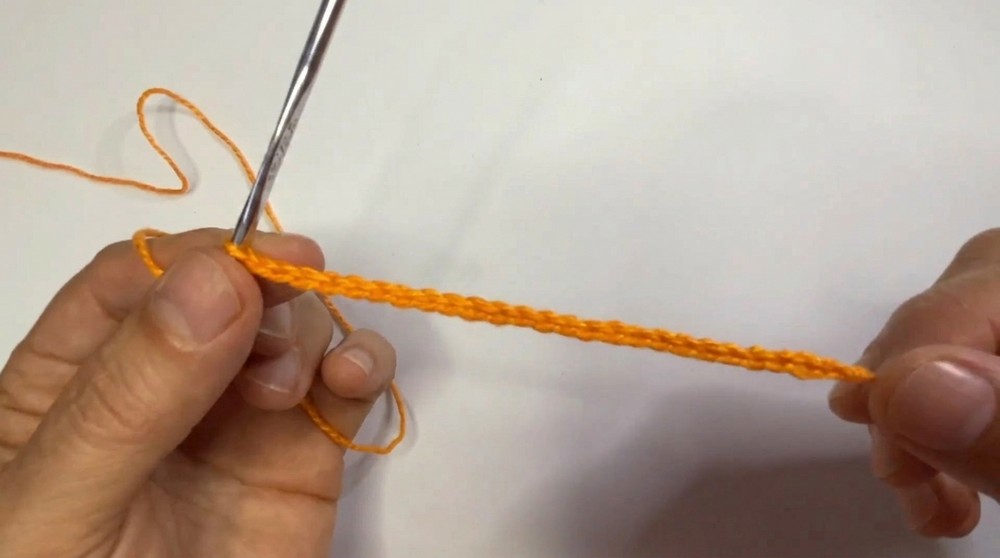
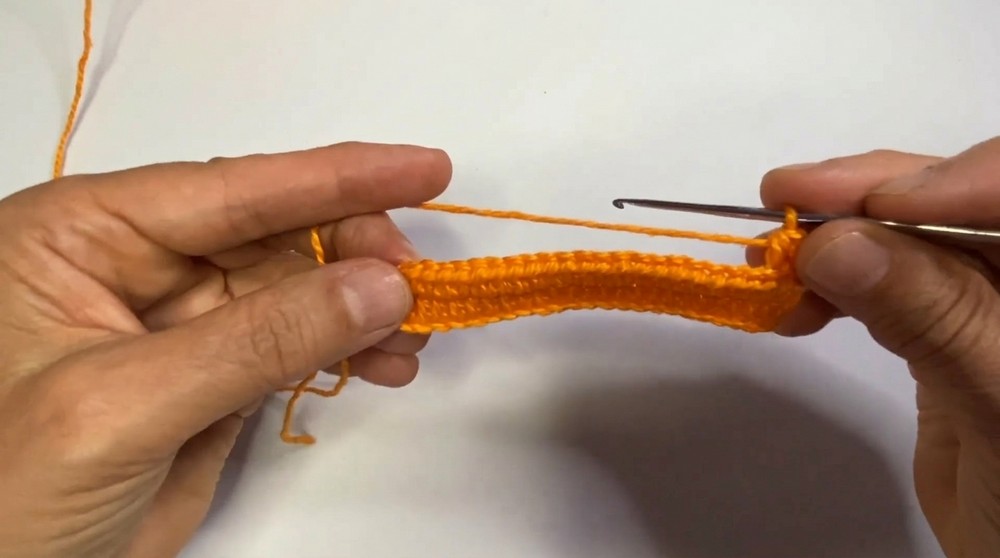
After completing all 30 rows, you’ll have a long ribbed rectangle. This ribbed texture creates the pumpkin’s classic sections.
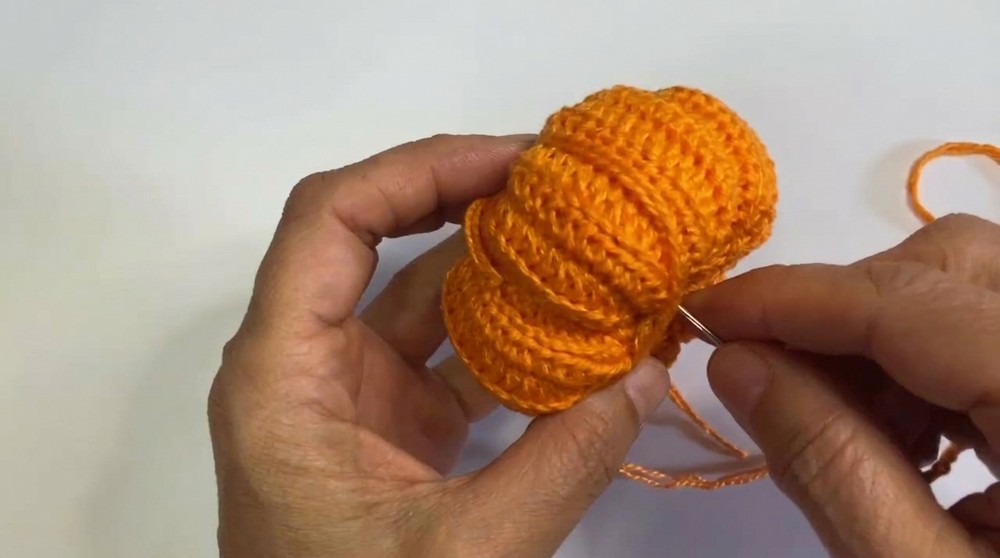
Seaming the Body:
- Fold the piece in half so the short sides are together.
- Slip stitch through both layers across to join, forming a tube.
- Fasten off, leaving a long tail for closing.
- Use the tail and a yarn needle to weave in and out around one open end of the tube.
- Pull tightly to close, secure with a knot if needed, and weave in the tail.
Your rectangle now becomes a pumpkin shape! Closing the bottom forms one end of the pumpkin.
Stuffing and Closing:
- Turn inside out if you want the seam hidden inside.
- Begin to stuff with polyfill or cotton, a layer at a time, so it fills out evenly but isn’t over-stuffed.
- Thread another long yarn tail with a tapestry needle.
- Weave in and out around the other opening, pull to close, and secure.
- Shape into a round, even pumpkin.
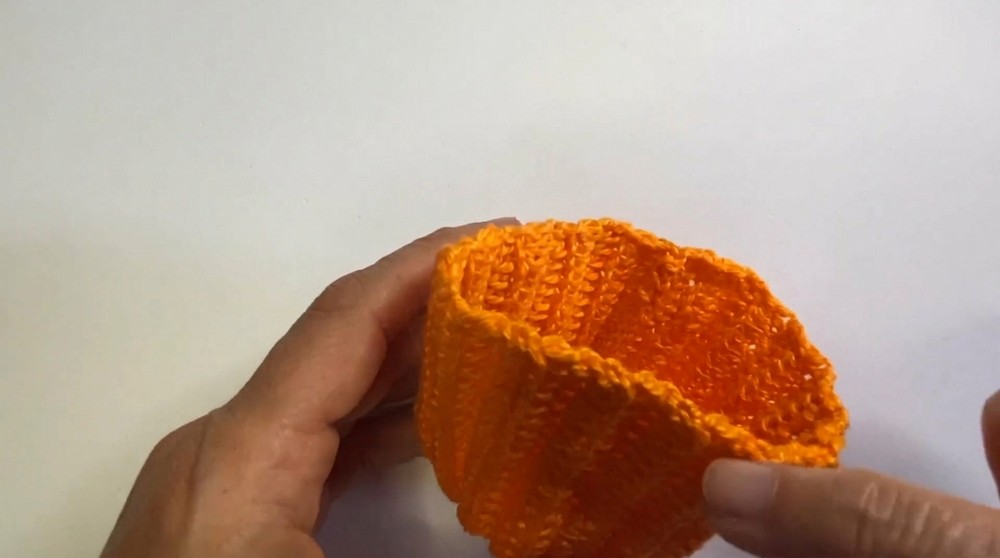
Fill the pumpkin firmly so it stands up and has a plush, pumpkin-like form. Secure the ends well.
Segment Slices (Pumpkin Ridges)
- With a very long piece of yarn in pumpkin (or brown) color and a tapestry needle:
- Insert the needle through the center of the pumpkin, from top to bottom.
- Pull yarn tightly and loop around the outside, insert back into the same center and repeat, sectioning the pumpkin into 6–8 slices. Tighten to create deep ridges.
- Repeat as desired then fasten off and hide tails.
This technique gives your pumpkin realistic sections! Don’t cut yarn too short; you’ll want enough for all slices.
Leaf
- Foundation:
- With leaf color, make a slipknot.
- Ch 10.
- Leaf SHAPE:
- Sc in 2nd and 3rd ch from hook.
- Hdc in next 2 ch,
- Dc in next 2 ch,
- Dc in next ch,
- Tr (US) in next ch, tr in next 3 ch
- Leaf Tip:
- Ch 5, skip 1 st, sl st in next 4 ch backwards (making tendril at the tip of leaf)
- Sl st in the middle tr.
- Other side (down the chain):
- 3 tr,
- 1 tr, 2 dc, 2 hdc, 2 sc on the other side of the chain.
- Small stem:
- Ch 3, sc in 2nd and 3rd ch.
- Sl st to first sc of previous round to finish.
- Fasten off and weave in all ends.
The leaf is crocheted onto the base chain, making one side, curlicue tip, and other side in one go. The slip stitches and small chains give it a realistic rake and tendril!
Stalk
- Base:
- With stalk color, make a slipknot.
- Ch 4, sl st to first ch to form a ring.
- Round 1:
- Ch 1, 6 sc into the ring.
- Sl st to first sc.
- Rounds 2–3:
- Sc in next st, place stitch marker, then 2 sc in next st, 1 sc in next st, repeat twice. (Increase as needed for curve.)
- Rounds 4–6:
- Sc in BLO in each st around.
- Continue for a total of 6 rows.
- Sl st to finish.
- Fasten off, leaving a tail for sewing.
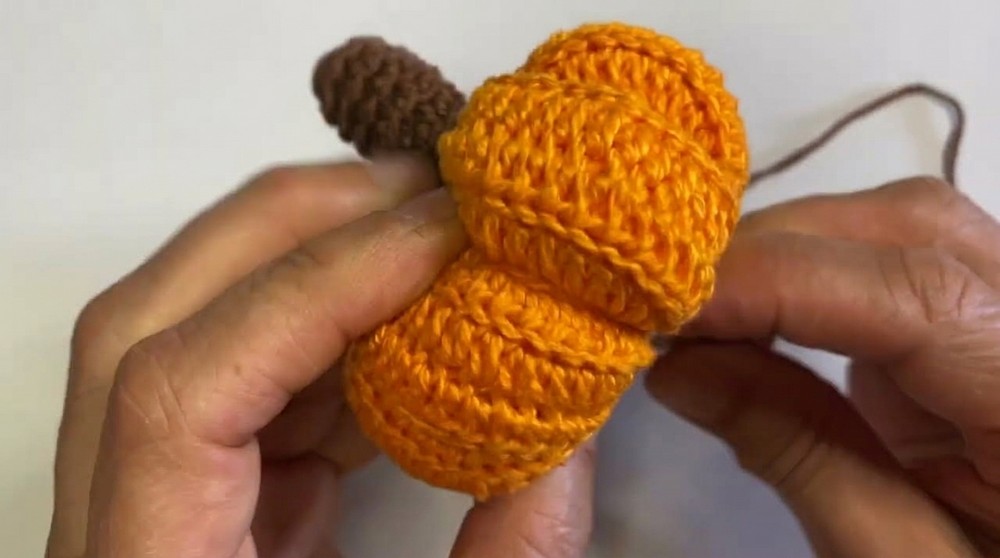
The stalk is a small tube with a slightly expanded top. The BLO rounds give it a natural curl. Try stuffing lightly if desired.
Assembly & Finishing
- Sew the leaf and stalk onto the center top of the pumpkin using yarn tails and tapestry needle.
- Stitch securely so both elements stand upright.
- Hide all yarn ends inside.
- Give your pumpkin a final fluff and shape.
- If you wish, add a cinnamon stick for the stalk or embroider a little smiling face for extra charm!
Assembling the details brings your pumpkin character to life! Take your time and adjust positions to your liking.
Conclusion
Your adorable crochet pumpkin is now complete and ready to brighten your Halloween or autumn décor! You learned how to create ribbed texture, clever closing, and a whimsical leaf and stalk—perfect skills for any future plushie or amigurumi pieces. This project is easy to customize with different colors, faces, or sized up for bigger pumpkins.