
Crochet Coaster Free Pattern for Colorful Home Decor
Crocheting your own coaster is a wonderful way to start exploring your creativity and add a splash of handmade charm to your home. With this free crochet coaster pattern, you can make practical and pretty coasters using only basic stitches—making it a great choice if you’re just learning to crochet or need a quick, relaxing craft. You’ll feel accomplished as you see your yarn turn into a beautiful round coaster with scalloped edges, perfect for protecting your tables and adding a pop of color to your living space.
Free Crochet Coaster Pattern with Step-by-Step Guide
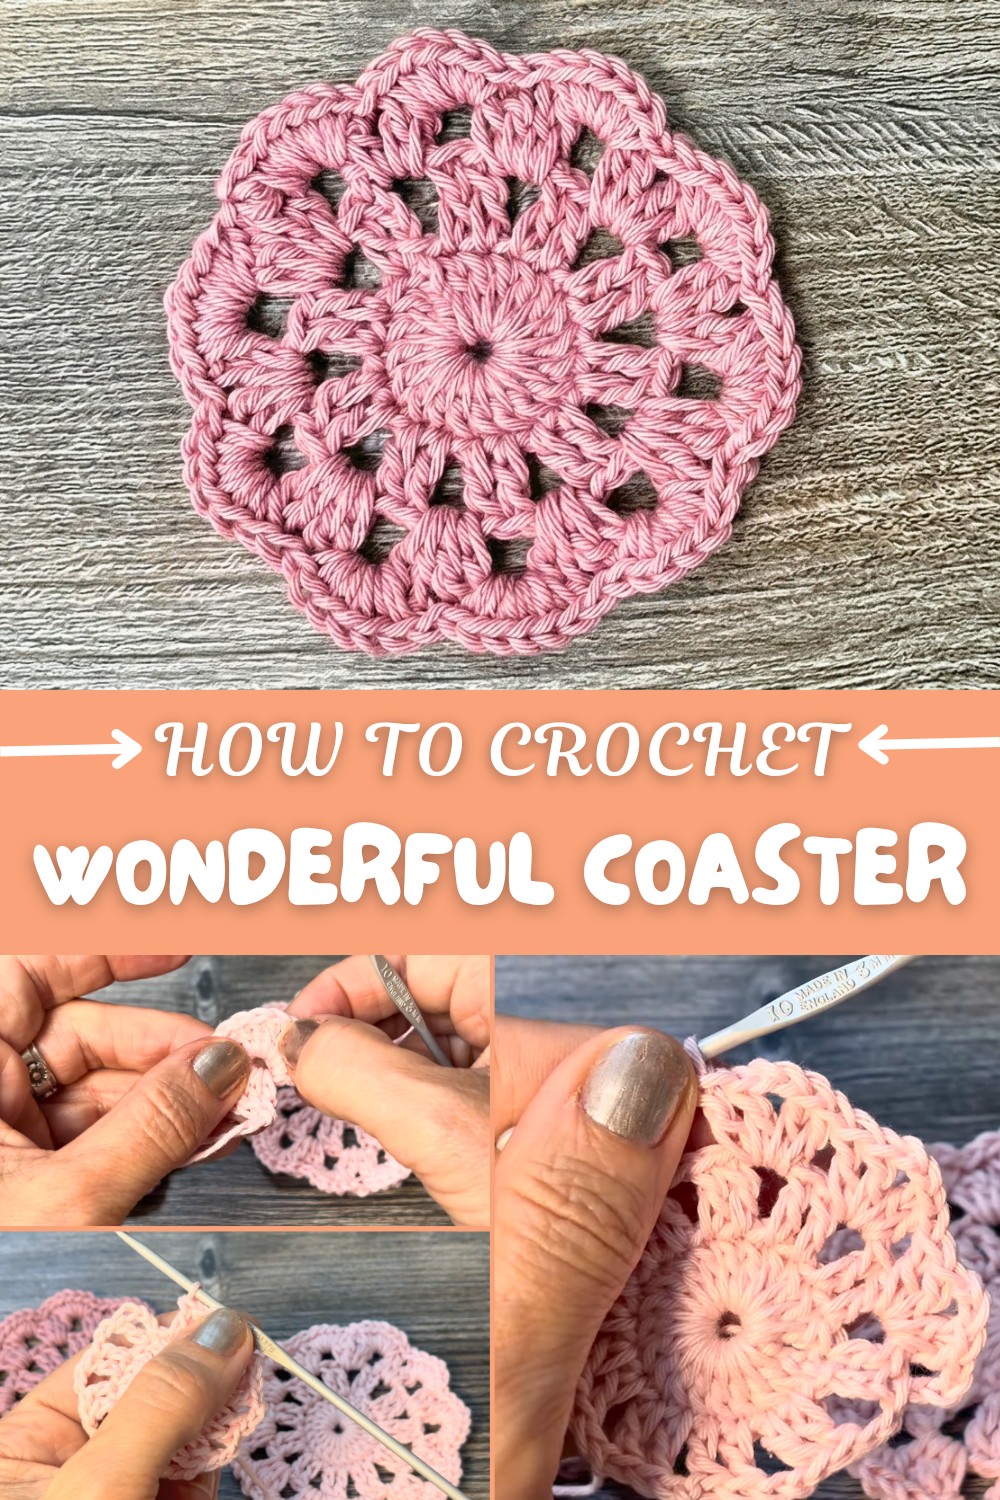
This pattern stands out for its beautiful details. The finished coasters are approximately 9 cm in diameter, creating just the right size to fit cups and glasses. The recommended yarn is durable cotton, allowing you to pick any color that matches your style or season. The coasters use treble crochet stitches (US double crochet) as the main technique, and the scalloped edge is formed by working clusters into the same stitch, giving your coaster a neat and decorative finish. If you’re feeling inspired, you can easily adjust this pattern to make matching doilies, mug rugs, or even colorful bunting by simply changing the number of rounds or yarn thickness.

Some crocheters run into issues like bumpiness or curling edges. If that happens, gently adjust the tightness of your stitches or use a hook better suited to your yarn thickness. Make sure each round sits flat before moving to the next, and don’t skip the final slip stitch, it helps hold the coaster’s shape.
With just a handful of steps and a little patience, you’ll have a colorful, functional accessory ready to use or gift. Experiment with different color combinations to make each coaster unique, and enjoy the satisfaction of finishing a lovely project in no time.
Gorgeous Crochet Coaster
These beautiful, scalloped-edge coasters are the perfect mix of charm and function, measuring about 9 cm across. They make lovely gifts, brighten up your table, and are fun quick projects to try with leftover cotton. Play with colors and yarn weights for endless variations!
Skill Level & Terminology
- Skill Level: Beginner
- Terminology: UK crochet terms (US translation given beside each stitch)
Materials & Tools
- Ricaroomi (DK Cotton) yarn or similar
- 3 mm crochet hook (try 2.5 mm–4 mm for different sizes)
- Scissors
- Darning/yarn needle
Gauge
Not critical for this pattern.
- Your coaster will measure approx 9 cm (3.5”) across after completion.
Finished Size
- Approx 9 cm (3.5”) diameter with DK cotton and 3 mm hook.
Abbreviations
| UK Term | US Term |
|---|---|
| ch | chain |
| sl st | slip stitch |
| dc | single crochet |
| tr | double crochet |
Special Stitch Instructions
UK Treble (tr) / US Double Crochet (dc):
- Yarn over, insert hook into stitch.
- Yarn over, pull through (3 loops).
- Yarn over, pull through 2 loops (2 left).
- Yarn over, pull through remaining 2 loops.
UK Double Crochet (dc) / US Single Crochet (sc):
- Insert hook into stitch.
- Yarn over, pull through (2 loops).
- Yarn over, pull through both loops.
Pattern Instructions
PART 1: Center Circle
- Ch 6.
- Join with a sl st to first chain to form a ring.

This creates the small circle to work into for the coaster center. Don't make the ring too tight; you'll need to work into it.
PART 2: First Round – Foundation
- Ch 3 (counts as first tr).
- Work 19 tr (UK treble/US double crochet) into the ring, working over the tail yarn to crochet it in.
- Total: 20 tr (including starting chain).
- Sl st to top of the beginning ch 3 to close the round.
You’ve made the full circle for the coaster base. Beginners: count carefully and use the starting chain as your first stitch. Working over the tail helps make a tidy center!
PART 3: Second Round – Lacy Set Up
- Ch 3 (counts as first tr).
- 1 tr into same stitch (the stitch at the base of ch 3).
- Pattern:
- 2 ch
- 1 tr into next stitch
- 1 tr into following stitch
- 2 ch
- Repeat around.
- When you get back to start, sl st to top of ch 3 to join.

This round creates pairs of trebles separated by 2 chains for a lacy effect. Don’t skip stitches after chains—continue in the next stitch. This is where the coaster starts to “open up.”
PART 4: Third Round – Building Up
- Ch 3 (counts as first tr).
- Into next chain space:
- 2 tr
- 2 ch
- 2 tr
- Pattern:
- 2 tr into next chain space
- 2 ch
- 2 tr into same space
- Move to the next chain space and repeat.
- At end, after last chain space, sl st to top of ch 3 to join.

This round fits two trebles, two chains, two trebles into every chain space, making lovely clusters that build up the shape and give the coaster strength.
PART 5: Fourth Round – Scalloped Edge
- Ch 3 (counts as first dc/US sc).
- Pattern:
- 6 dc (UK double crochet / US single crochet) into first chain space.
- Sl st into next chain space (to anchor).
- Repeat "6 dc, sl st" in each chain space around.
- For final join:
- After last group, sl st into top of beginning chain or a convenient spot.
- Fasten off.

This round creates the pretty scallop edge. Putting 6 dc in each space gives a gentle wavy border. Slip stitch to anchor, so the scallops stay crisp and flat.
Assembly & Finishing
- Trim yarn tail from your starting chain.
- Use darning needle to weave in ends on the back.
- Make another coaster in any color, or try a larger hook for bigger coasters!

You're finished! Your coaster will have a sturdy circle with a delicate ruffle edge—perfect for mugs. If you've never made a coaster, you'll see how easy it is after following each round. Just work slow, count your stitches, and keep your circle flat.
Beginner Explanations (after each section)
- Center & Foundation:
You start with a ring and work tall stitches (trebles/double crochet) into it to make a circle. The first chain counts as your first stitch. - Lacy Set Up & Building Up:
You’re making pairs with chains in between, forming “spaces” where the scallop will hang later. - Scalloped Edge:
Putting 6 dc/sc in the chain space makes the coaster edge curl and wave. Slip stitches “glue down” the scallops and keep everything neat. - Finishing:
Cut your yarn and weave in ends with a darning needle. Your coaster is done!
Congratulations!
You’ve crocheted a lovely coaster. Take it slow, check your stitch counts, and don’t worry if your circle curves a little—cotton stretches and blocks beautifully! Make a set in different colors for a cheerful table.