
Tropical Crochet Raffia Yarn Bag Pattern for breezy summer vibe
Expand your beach wardrobe with this Crochet Raffia Yarn Bag Pattern, featuring a natural texture that is perfect for any seaside getaway.
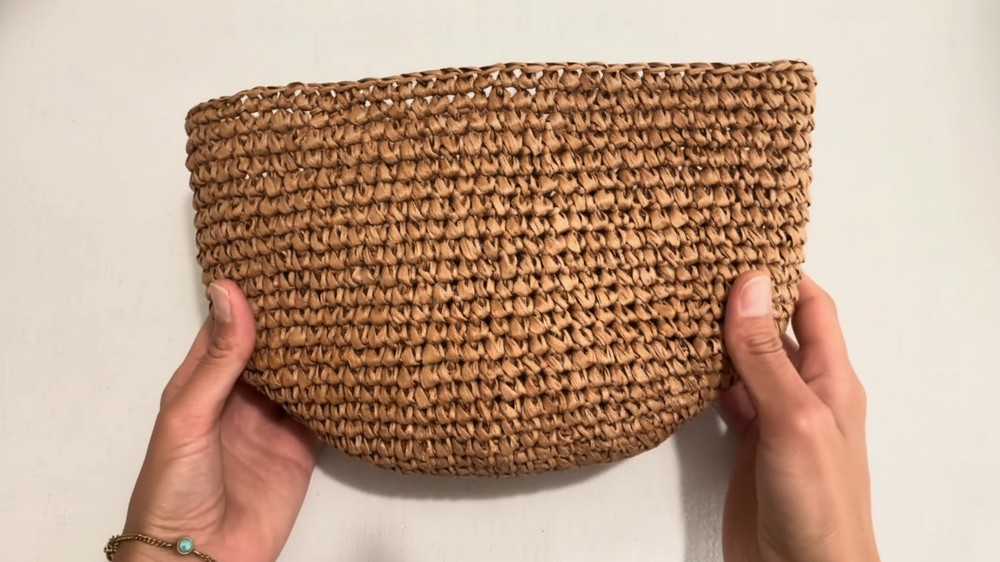
Embodying the breezy essence of a Mediterranean summer a crochet raffia yarn bag pattern serves as a premier blueprint for a high-end accessory that marries organic beauty with daily utility. This design results in a lightweight and airy vessel that mirrors the luxury of high-street boutique finds while offering the incredible durability of natural plant-based fibers. Its primary use spans from an elegant companion for seaside excursions to a chic and structured tote for sophisticated city errands.
Stunning Crochet Raffia Yarn Bag Pattern that wows every time
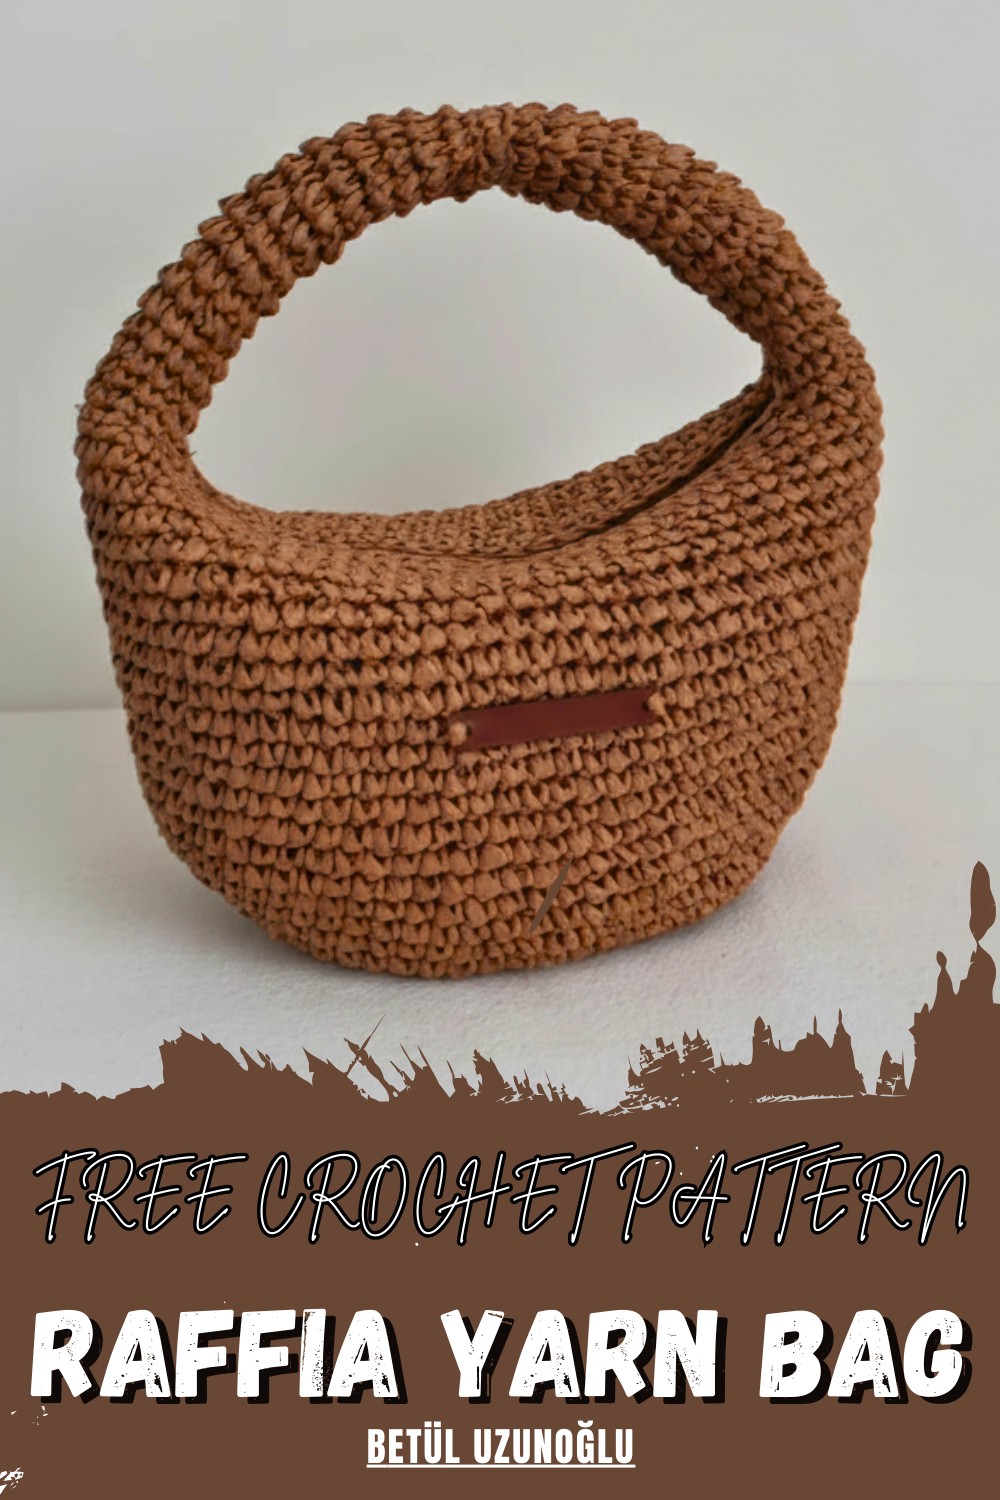
The visual appeal is defined by a matte and straw-like texture that provides a stunning contrast against polished leather handles or gold-toned hardware. Because the material is inherently water-resistant and tough it protects belongings while maintaining its crisp and architectural silhouette over time.
Materials Needed
- Yarn: 3 balls of Fold Elite Raffia Yarn (recommended for its sturdy texture and durability). Other yarn options include strawberry paper yarn (double-layered for similar sizing), polyester macrame, or cotton macrame.
- Crochet Hook: 4 mm (alternatively, use a 3.5 mm to 4.25 mm hook).
- Scissors: For yarn cutting.
- Stitch Markers or Bobby Pins: To mark the start or increase sections.
- Tapestry Needle: For sewing and weaving in the excess yarn.
- Fabric: Cloth for the bag lining (matching or complimentary color).
- Zipper: Approximately 20 cm long (depends on the handle placement).
- Sewing Machine or Needle and Thread: For stitching the lining and attaching the zipper.
- Iron: For smoothing and shaping the raffia bag during construction.

The finished bag exudes an effortless and sun-drenched charm that elevates a simple linen outfit into a curated ensemble. It represents a commitment to sustainable style offering a breathable and timeless accessory that feels both grounded and exceptionally refined.
Step-by-Step Instructions
Process
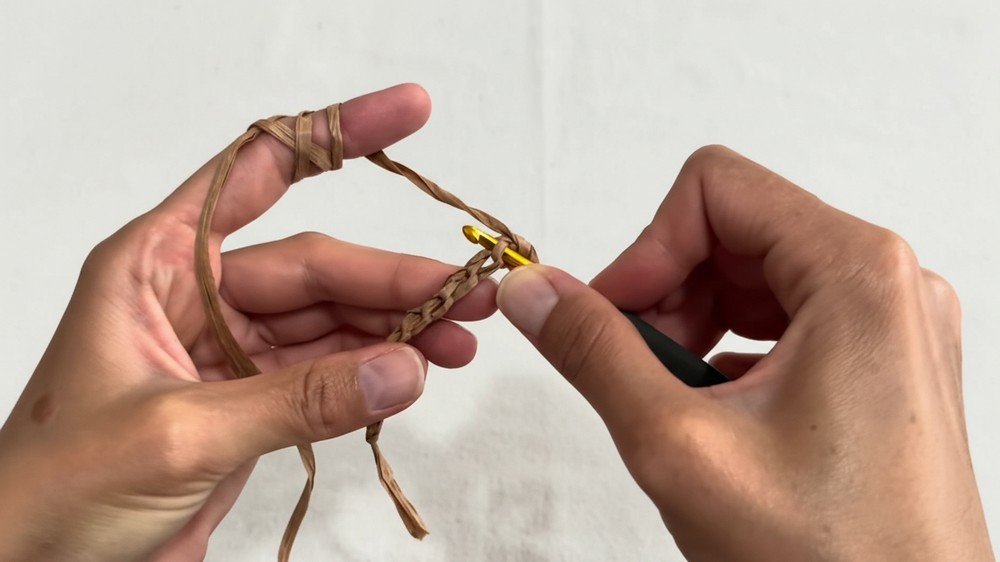
1. Start with the Base
- Create a slipknot and chain 10 stitches for the base of an oval-shaped bag. Chain more if you want a larger, rounder foundation.
- Skip the first chain and turn to work single crochet (SC) into each stitch on one side of the chain.
- At the ends of the chain, make 3 single crochets into the same stitch. This is where you’ll create the rounded edges.
- Continue with SCs along the other side of the chain and increase (2 SC in the same stitch) in the turning points to form a smooth oval base.
- Continue crocheting additional rows using the same technique. Adjust the number of increases over time to meet the desired size of the base.
Tips:
- Use stitch markers to identify the edges where increases should occur.
- Smooth the base with your hands after each row to check the shape.
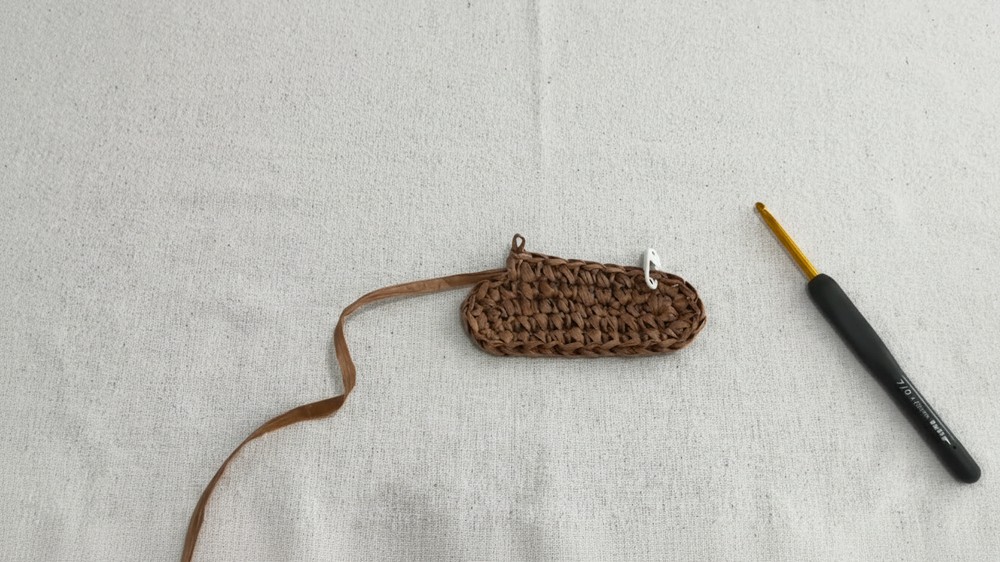
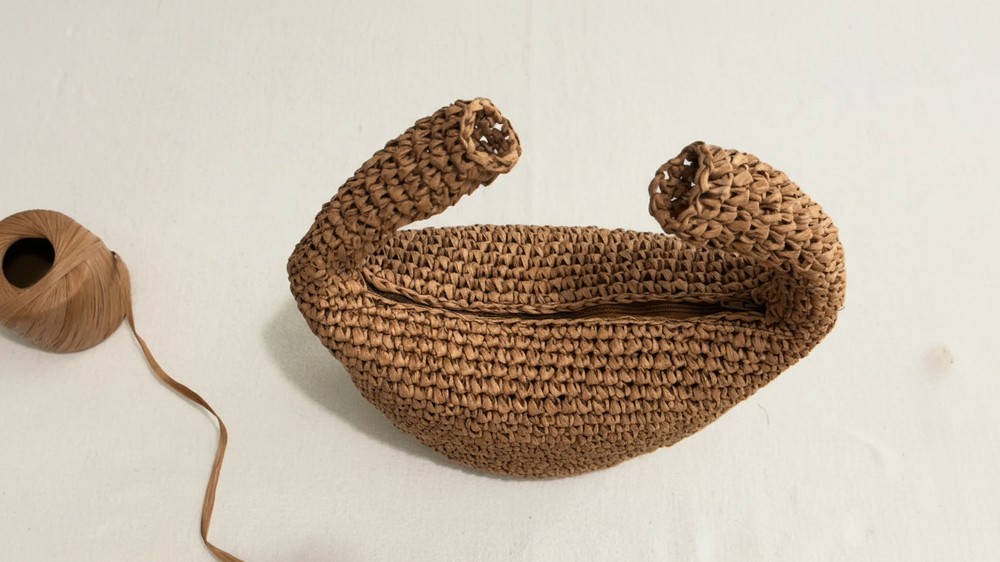
2. Build the Body of the Bag
- Once the base reaches your desired size (about 17 cm for this design), begin working upwards:
- Crochet SCs in a continuous spiral pattern without increases. This will allow the bag’s body to form a rounded, structured shape.
- For the sides, strategically place increases on opposite sections of the bag to create an upward-rounded body:
- In the first body row, make an increase at a single midpoint.
- On subsequent rows, add increases in pairs slightly further toward the opposite edges to provide uniform growth. Use the reference tutorial diagram for more clarity.
- Continue working the body until it reaches your desired height (around 16.5 cm for a medium-sized bag).
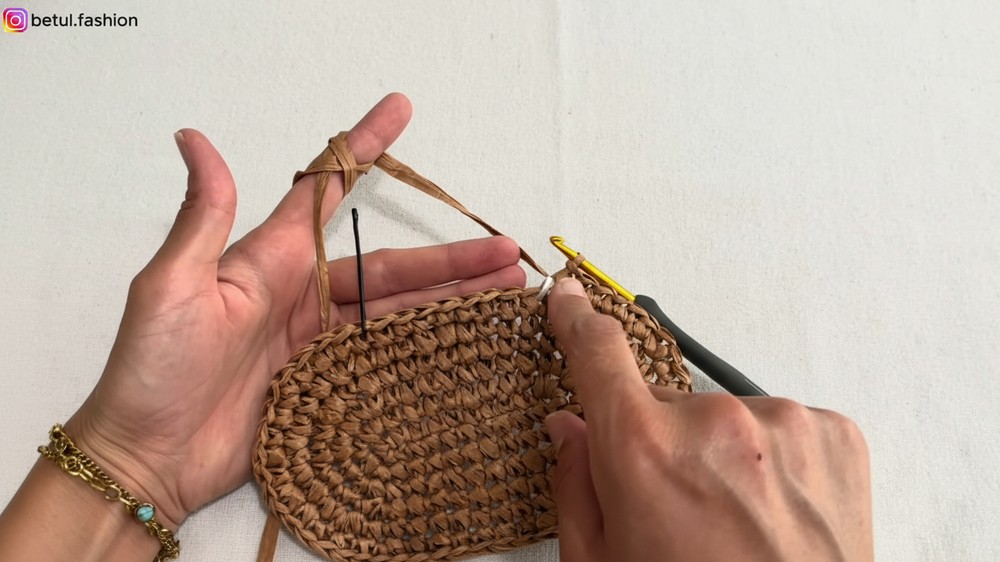
3. Create and Attach the Handles
- Fold the bag in half to determine the location of the handles. Use stitch markers to mark 6 stitches (or more, depending on bag size) for each handle. Ensure handles are symmetrical on both sides.
- Begin SCs at the marked starting point for the handle:
- Attach your yarn to the handle markers and work upwards in a spiral pattern without chaining at the end of rows.
- Ensure consistent stitch counts (12 SC per row) to maintain a straight, even handle.
- Continue crocheting upward until the handle reaches your preferred length (around 16-17 cm for a handbag or longer for a shoulder strap).
- Cut and secure the yarn by weaving the tail inside the stitches. Repeat on the opposite side to create the second handle.
To assemble the handles:
- Double-layer the base of the handles and use a tapestry needle to stitch them securely to the bag. For extra durability, sew the joints twice while aligning the stitches.
4. Add the Lining and Zipper
- Prepare the lining fabric:
- Fold the fabric in half and use the bag as a template for tracing around its shape, leaving a seam allowance (about 1 cm).
- Sew a simple pocket onto the inner lining before attaching it to the bag.
- Sew the lining and zipper:
- First, attach the zipper by sewing it onto the bag’s opening. Ensure the zipper aligns neatly and does not interfere with the surrounding crochet stitches. The zipper should be positioned slightly away from the edges to prevent snagging.
- Use matching thread and stitch the lining onto the inside of the bag. If using a sewing machine, select a size 18 needle and set the tension to 4 for neat, sturdy stitching.
5. Finishing Touches
- Smooth and iron the raffia yarn gently to enhance the bag's appearance and structure.
- Secure all visible loose yarn ends using a tapestry needle.
- Add a leather label or decorative accents to personalize your bag.
Special Features
- Sturdy and Durable Design: The raffia yarn maintains the bag's shape, making it sturdy and long-lasting, even after extended use.
- Practical and Stylish: The bag pairs beautifully with bohemian dresses, casual jeans, and vacation outfits. Its roomy interior fits essentials like phones, makeup, keys, and wallets comfortably.
- Flexible Yarn Options: Use raffia yarn, strawberry paper yarn (double-layered), or macrame to achieve different styles and dimensions.
- Built-In Handle and Zipper: The seamless handles and incorporated zipper make this bag both functional and elegant.
- DIY Lining and Pocket: The project includes instructions for sewing a custom lining with an inner pocket for added practicality.
Level of Difficulty
The difficulty level is Intermediate. While the basic skills required are SCs and working in rounds, the tutorial incorporates shaping, structured increases, handle attachments, and sewing techniques, which may challenge beginners. However, the detailed step-by-step instructions make it accessible to confident novices.
Tutor’s Suggestions
- Relax Your Tension: Raffia yarn is sturdy but prone to cracking if worked too tightly. Use loose hand tension for even, flexible stitches.
- Iron Your Bag: Ironing enhances the shape and smoothness of the raffia bag. Plan to iron during key stages (after finishing the base and body).
- Use Stitch Markers: Marking the starting and turning points simplifies the process and avoids confusion during increases or decreases.
- Experiment with Yarn: If raffia isn’t available, double-layer other paper yarns for similar results. Cotton or polyester macrame can also work for unique finishes.
Uses
- Everyday Bag: Designed for versatility, this bag can hold personal essentials during daily activities.
- Vacation Accessory: Perfect for carrying sunscreen, phones, and sunglasses on beach trips.
- Fashion Statement: Complements bohemian and casual summer outfits effortlessly.
- DIY Gift: A thoughtful and elegant handmade gift for friends or family.
Crochet Tip
Don’t give up if your raffia crochet looks uneven at first. Due to its texture, initial rows may appear bulky or untidy, but as the pattern progresses, the stitches will even out beautifully. Trust the process and smooth the bag as you crochet.
Conclusion
This beautifully designed raffia bag combines elegance and functionality. With clear guidance, you can crochet and assemble a sturdy, stylish accessory customized to your needs. Whether you’re a crochet enthusiast or someone looking for a fun project, this bag is a rewarding choice.