
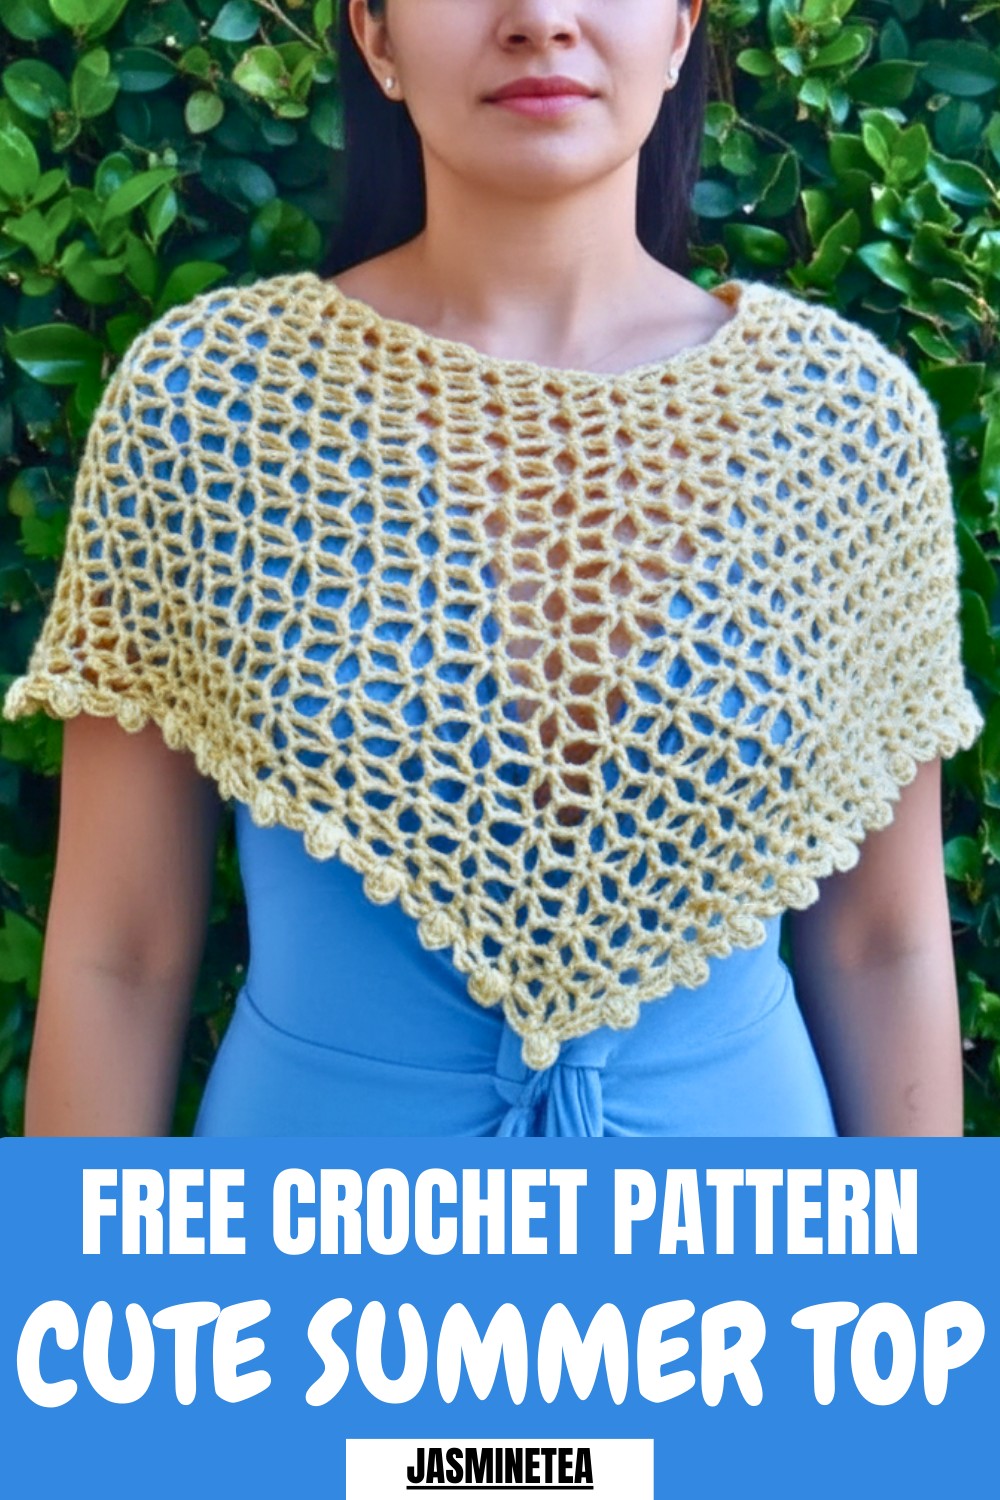
Step into summer with this Free Crochet Summer Top Pattern that's offering a light, airy fit and breezy comfort for sunny, warm-weather days.
Flowing textures and intricate stitch details bring a refreshing and elegant touch to warm-weather wardrobes. This Crochet summer top offers a flattering fit that gently highlights the waist while allowing easy movement and breathability, making it perfect for outdoor gatherings, casual strolls, or beach days. Its lightweight construction ensures comfort without compromising on style, while openwork patterns add subtle sophistication and visual interest.
Airy Crochet Summer Top Pattern Ideal for Warm Weather
The design is highly versatile, pairing effortlessly with shorts, skirts, or jeans, and adapting to both relaxed daytime wear and more polished evening looks. With options to personalize through colors, stitch variations, or delicate accents, each piece becomes a unique expression of style.
Soft, airy textures enhance the overall comfort, while the carefully balanced silhouette ensures a polished and flattering appearance. Combining modern fashion sensibilities with timeless crochet-inspired elegance, this top is both practical and chic, offering a stylish solution for effortless summer dressing.
Step-by-Step Details
Step 1: Materials Needed
- Yarn: Weight 4 (medium) acrylic yarn. The tutorial uses a calming butter-yellow yarn.
- Hook Size: 4.5 mm crochet hook.
- Additional Tools: Scissors, stitch markers, and a measuring tape (optional).
Step 2: Start the Neckline
- Create the Foundation Chain:
- Chain 110. When you reach chain 56, place a stitch marker for your center point. Then complete the rest of the 110 chains.
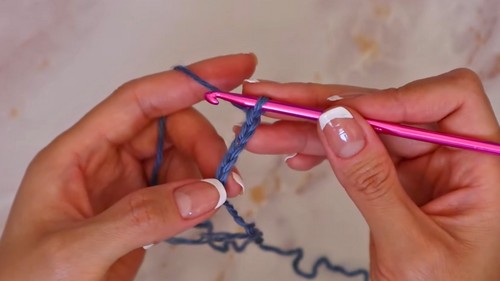
- Slip stitch into the first chain to form a circle. Ensure your chain is not twisted.
- Chain 110. When you reach chain 56, place a stitch marker for your center point. Then complete the rest of the 110 chains.
- Start the Design:
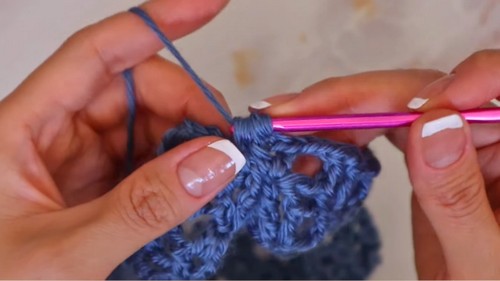
- Chain 5: (Acts as the first double crochet + chain 2).
- Yarn Over Twice: Insert the hook into the same first chain, pull through the loop, yarn over, and pull through two loops repeatedly until none are left on the hook.
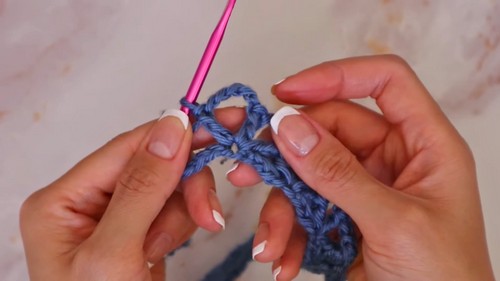
- Proceed with the Pattern with Spacing:
- Skip five chains, and in the fifth chain, repeat the previous step to create the next triangle.
- After the triangle, chain 2, place a double crochet in the same chain, and continue the sequence. Repeat the pattern until you reach the stitch marker.
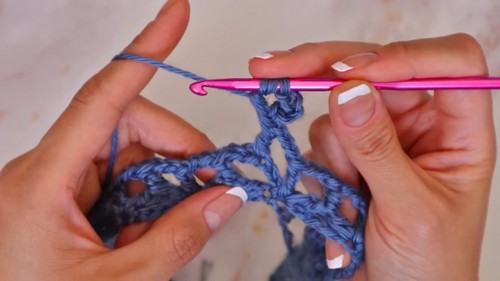
3: Create the First Corner
- When you reach the stitch marker, create a corner space for the poncho to flare:
- After completing a triangle, chain 2 and place a double crochet (DC).
- Chain 5, add another DC in the same space to form the corner.
- Proceed to create another triangle in the same space by chaining 2, yarning over twice, and skipping five chains before adding the next triangle.
- Continue repeating the pattern along the chain until you return to the initial chain.
4: Close the First Round
- At the very last chain of the row, complete the pattern by forming a double crochet and chaining 2 in the same space.
- Slip stitch into the third chain of the chain-5 you started with at the beginning of the row. This ensures you stay at the center of the corner space.
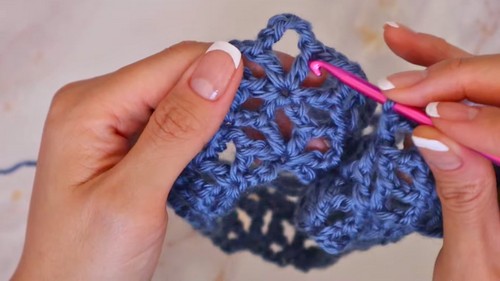
5: Begin and Repeat the Main Pattern
- Start Row 2:
- Place a single crochet in the chain space you ended in.
- Chain 5 (counts as DC + chain 2), then begin forming the first triangle of this row.
- Yarn over twice, insert your hook into the single crochet, and form the triangle. For the second leg of the triangle, find the top of the nearest triangle from the previous row, and complete the stitch.
- Work in Repetition:
- Always align your stitches with the previous row by skipping double crochets and working only into the tops of triangles.
- Alternate between triangles and double crochets, with chain-2 spaces in between.
- Corners: When approaching a corner, increase the space by adding extra stitches in the chain-5 space:
- Add 1 triangle and 2 double crochets to maintain the flare and integrity of the shape.
- Chain 5 inside the same space for flared edges.
- Continue repeating Row 2 until the poncho reaches your desired length. The tutorial creator suggests 12 rows for a flattering, practical poncho size, but you can easily adjust by adding or removing rows.
Step 6: Create the Border
Once the body is complete, proceed to add a decorative edge to enhance the poncho’s look:
- Start the Border Row:
- Begin with a single crochet in the chain space and chain 5.
- Work into the double crochet stitches (instead of triangles) from the previous row.
- Puff Stitch Design:
- After chaining 5, secure with a slip stitch into the next double crochet.
- Chain 3, yarn over, and insert the hook into the same stitch to pull up a long loop matching the height of the chain 3. Repeat this three times to gather loops before pulling through.
- Chain 3, then place a single crochet into the same stitch to complete the puff stitch.
- Repeat Along Edges:
- Continue this puff stitch pattern along the edge, with chain-5 spaces between each puff stitch.
- For corners, work slightly differently:
- Slip stitch into the center of the corner chain space instead, then continue with your puff stitches around the edges.
- Finish Up the Border:
- At the end of the row, chain 5 and slip stitch into the bottom of the first puff stitch to close the pattern.
- Fasten off your yarn, weave in the ends.
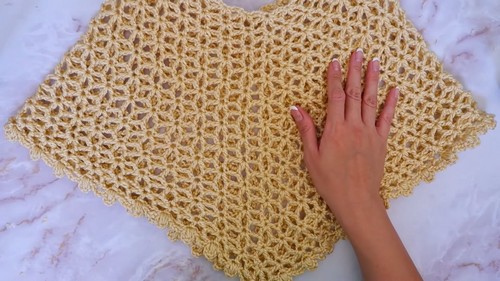
Special Features
- Floral Triangle Design: Creates intricate and airy triangle patterns for a dainty, lightweight poncho.
- Puff Stitch Border: Adds texture and dimension with scalloped edges.
- Customizable Shape and Size: Adjust the number of rows and foundation chains to suit your fit and style preferences.
- Simple Repeat Pattern: Once the core design is memorized, the poncho becomes accessible and easy to crochet.
Level of Difficulty
This project is beginner-friendly to intermediate-level, depending on your familiarity with foundational crochet stitches like double crochets, puff stitches, and yarn overs. It’s an ideal project if you want to gain confidence with repetition and shaping techniques while achieving an aesthetically pleasing garment.
Tutor’s Suggestions
- Mark Stitch Points: Use stitch markers for corners in every row to ensure accurate increases.
- Maintain Loose Tension: Work with relaxed tension, especially for the border and chain sections, to allow the poncho to drape beautifully.
- Repeat Row 2 with Precision: Pay attention to align stitches with the tops of triangles as you continue subsequent rows.
- Experiment with Colors: Bright summer colors or subtle earthy tones pair beautifully with this design.
Uses and Materials
Uses:
- A lightweight poncho for casual outings, summer evenings, or over a swimsuit.
- Can also serve as a stylish accessory for layering during cooler seasons.
Materials:
- Weight 4 Acrylic Yarn – Soft, durable, and versatile for a variety of seasons.
- 4.5mm Crochet Hook – Works well with weight 4 yarn for a balanced structure.
- Other Tools: Stitch markers, scissors, and yarn needles for finishing touches.
Tip
Count your stitches religiously when creating the foundation chains and throughout each row. Miscounting can disrupt the triangle alignment and corners, so accurate stitch placement is key to achieving neat results.
Conclusion
This tutorial offers a fun and relaxing crochet experience by combining simplicity with an elegant floral triangle pattern. The end result is a delicate, breathable poncho that you can easily customize for any size or occasion. With a repetitive one-row pattern and tidy puff stitch edging, you’ll enjoy not only creating this garment but also wearing it or gifting it.


