
Crocheting also promotes creativity and provides a rewarding, mindful experience while producing durable clothing that lasts longer than mass-produced options. Choosing a crochet romper ensures safety, comfort, and style for babies, while giving crocheters the joy of making something meaningful and timeless with their own hands.
How to Crochet a Baby Romper – Step-by-Step Guide
Materials Used
To get started on this romper, you’ll need:
- Yarn:
- Caron One Pound Yarn for the base.
- Another color of yarn (either matching or complementary) for the second half of the romper, if desired.
- You can mix leftover yarn pieces for a unique look, as shown in the video.
- Crochet Hook:
- 4.5mm hook.
- Tools and Accessories:
- Scissors: For trimming excess yarn.
- Stitch Markers: To mark important spots.
- Buttons: For securing the straps in place.
- Threading Needle: To secure straps and sew on the buttons.
- Optional Ribbon/Belt Yarn: To make a decorative waist tie.
Uses of the Baby Romper
- Baby Wear: Perfect for newborns and toddlers as casual or photo-shoot wear.
- Gifting: Great as handmade gifts at baby showers or birthdays.
- Seasonal Projects: Can be adapted for different seasons and holidays (e.g., pastel colors for spring or warm hues for fall).
- Practice Crochet Skills: Improves your skills with techniques like ribbing, half-double crochet stitches, and increases/decreases.
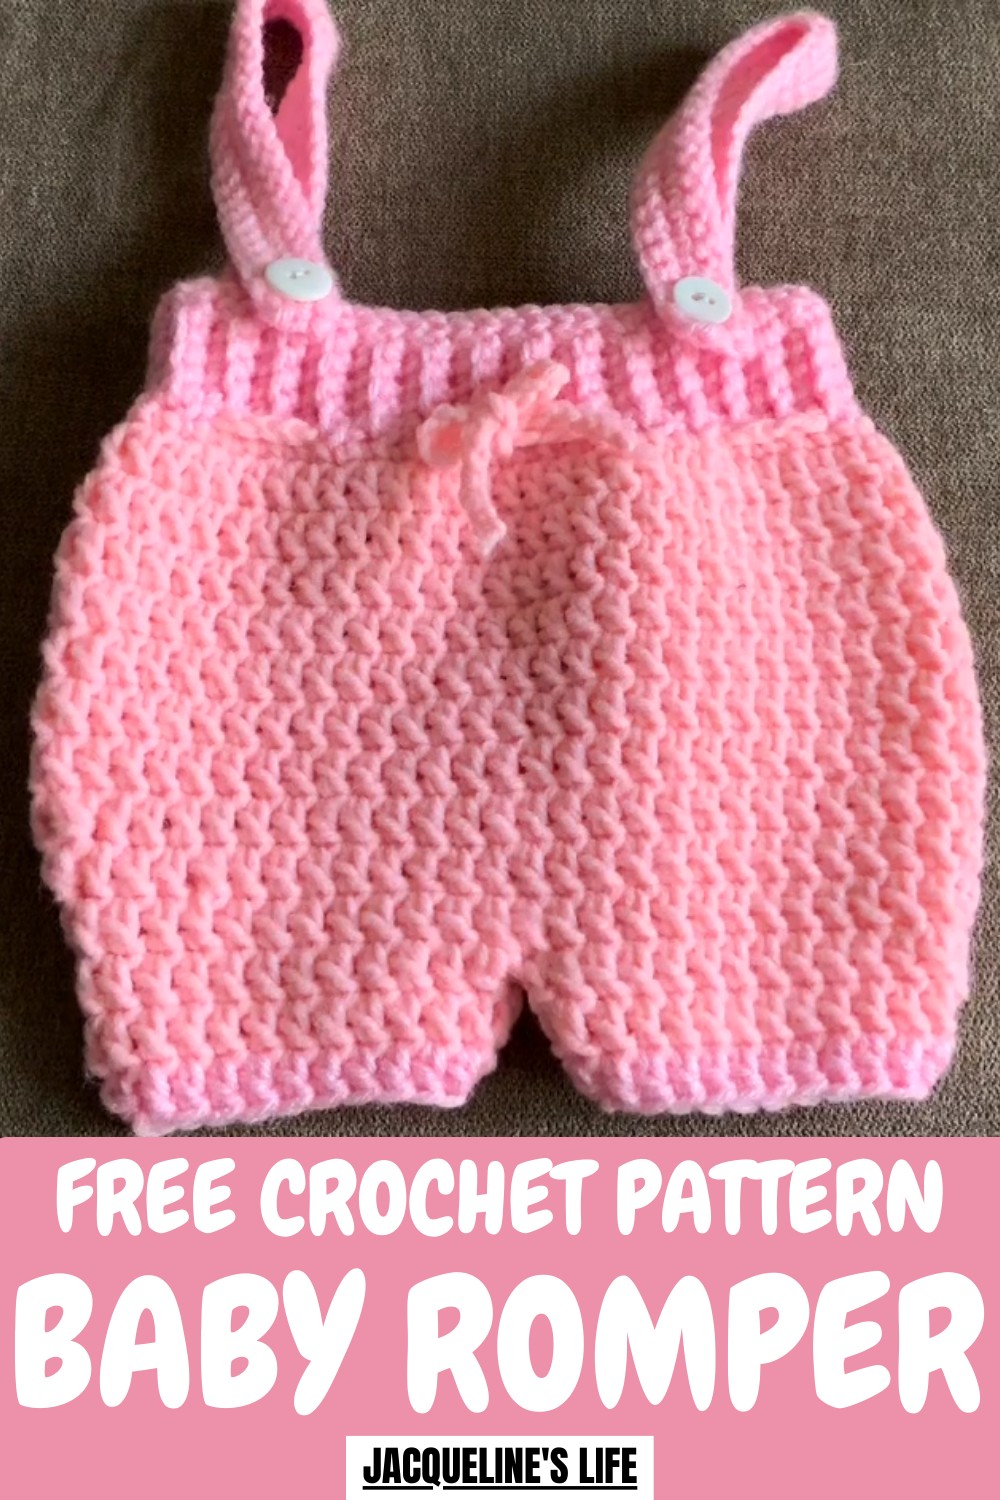
Special Features of the Baby Romper
- Customizable Sizes: Designed to fit newborns and toddlers based on measurements; no fixed stitch counts.
- Easy Adjustability: Adjustable straps allow you to tailor the fit by making the straps longer or shorter.
- Functional Buttons: Practical and decorative.
- Ribbed Waistband: The textured band adds stretch and interest to the romper.
- Personalized Design: Allows you to experiment with yarn colors, patterns, and strap styles to make it one of a kind.
Level of Difficulty
Beginner-Friendly to Intermediate
- Basic skills are required, including slip knots, chain stitch (CH), single crochet (SC), and half-double crochet (HDC).
- Some intermediate concepts are also used, such as working into back loops, decreasing stitches, and shaping the garment.
Tutor’s Suggestions
- Customize the Size: Since there’s no set pattern, measure the romper to match the child’s size and adjust the chains or rows accordingly. For reference, the tutor made a 60-row base section for a newborn.
- Use Light Yarn for Straps: Straps will stretch slightly over time, but yarn tends to shrink back after washing. Avoid overthinking the length; a bit of flexibility is ok.
- Experiment with Colors: Don’t hesitate to add different yarn pieces if needed, as mismatched tones can give your romper a unique aesthetic.
- Add a Belt for Extra Style: A simple crochet chain can be used as a belt by weaving it through the waistband for an adorable touch.
- Take Your Time with Straps and Buttons: The straps and buttons are key to keeping the romper functional, so ensure they are well-fitted and securely fastened.
- Consider Keeping the Seam: For easier assembly, keep the seams visible on the inner side. (This may show slightly but keeps the process simple.)
Step-by-Step Instructions
Step 1: Create the Waistband
- Start with a Slip Knot:
- Create a slip knot by twisting your yarn and pulling it through a loop. Tighten it and insert the crochet hook.
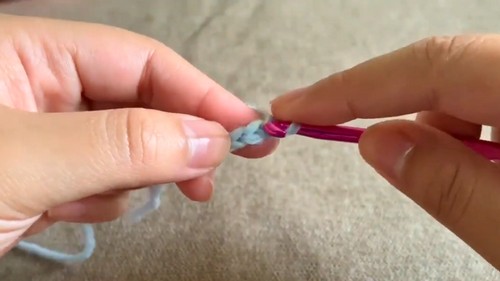
- Create a slip knot by twisting your yarn and pulling it through a loop. Tighten it and insert the crochet hook.
- Chain Your Stitches:
- Chain 7 stitches (or adjust to your desired waistband width). The chain here determines the thickness of the band.
- Chain 7 stitches (or adjust to your desired waistband width). The chain here determines the thickness of the band.
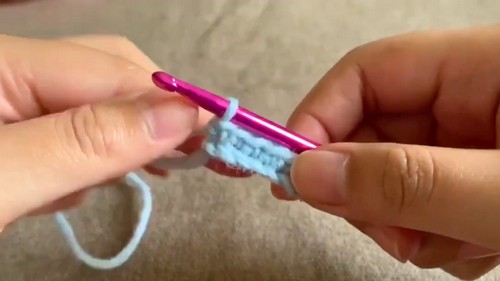
- Begin Single Crochet:
- Start crocheting into the second chain from the hook using single crocheting (SC). To do this, insert the hook into the second chain, pull yarn through, yarn over, and pull through both loops.
- Work Ribbing:
- For texture, crochet into the back loops only in each row.
- At the end of each row, chain 1, turn your work, and continue to single crochet in the back loops across each row.

- Repeat for Desired Length:
- Keep repeating the process until you reach the desired length for the waistband—this will depend on your desired size. For a newborn-sized romper, the video suggests doing about 60 rows.
- Keep repeating the process until you reach the desired length for the waistband—this will depend on your desired size. For a newborn-sized romper, the video suggests doing about 60 rows.
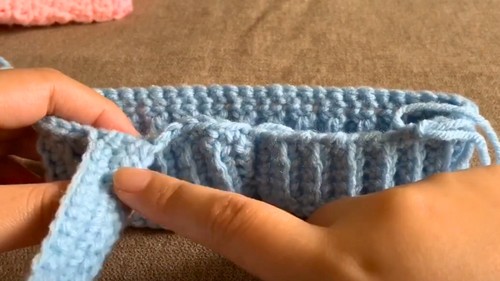
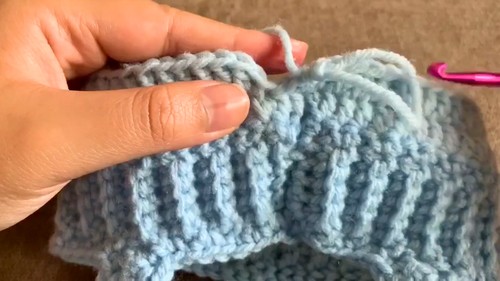
Step 2: Assemble the Waistband
- Join the Ends:
- Fold the waistband in half. Line up the edges and slip stitch through one stitch on each side to connect them. Insert your hook, pull yarn through both loops, and repeat this across the row.
- Turn the Band Right-Side Out:
- Once finished, flip the band inside out so the seam sits on the inside for a neater appearance.
Step 3: Add the Straps
- Single Crochet the Top Portion:
- Add a clean edge to the waistband by single crocheting (SC) along the top.
- Mark Strap Placement:
- Fold the band in half and choose where to attach the straps. The romper in the tutorial uses wide straps, so the straps start slightly inside the edges.
- Create the Straps:
- Chain 40 stitches (or adjust to your desired length).
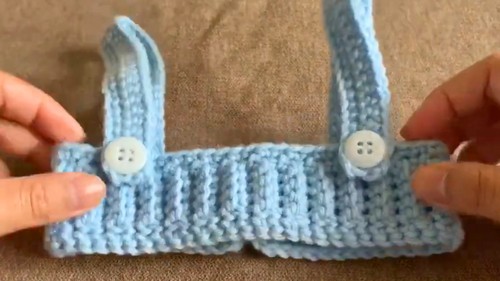
- After chaining, single crochet back down the strap to make it thicker. The tutorial added 3 rows of single crochet for durability.
- Attach the strap back to the waistband along the marked spot using slip stitches, then repeat the same for the second strap.
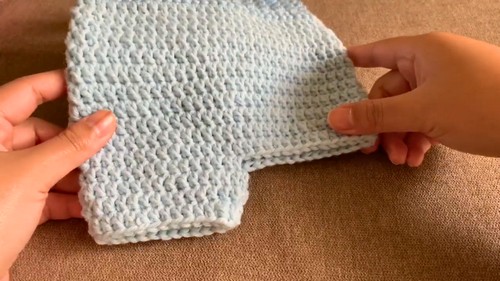
Step 4: Bottom Portion of the Romper
- Attach Yarn for Shorts:
- Attach new yarn to the bottom side of the waistband using a slip knot. Secure it firmly to prevent unraveling.
- Work Half-Double Crochets in Rounds:
- Yarn over and insert the hook into each stitch at the bottom of the band, using half-double crochet (HDC) stitches for every row.
- At the end of each round, slip stitch to join and place a stitch marker at the end of the round.
- Add Length to Shorts:
- Repeat until you reach your desired short length.
- Shaping the Shorts:
- To begin shaping the shorts, decrease at the corners of the garment by combining two stitches together.
- Repeat decreases in every row at the corners, so the shorts taper inward, creating a fitted look.
Step 5: Finish the Legs
- Start First Leg Opening:
- Divide the bottom by stopping halfway around the stitches for the shorts. Work on one leg opening at a time.
- Crochet HDC stitches around one leg hole, decreasing at corners where needed to create a finished shape.
- Repeat for the Second Leg:
- Attach yarn to the next leg hole and repeat the same process, mirroring the first leg. Finish each section by threading and securing loose ends.
- Attach yarn to the next leg hole and repeat the same process, mirroring the first leg. Finish each section by threading and securing loose ends.
Conclusion
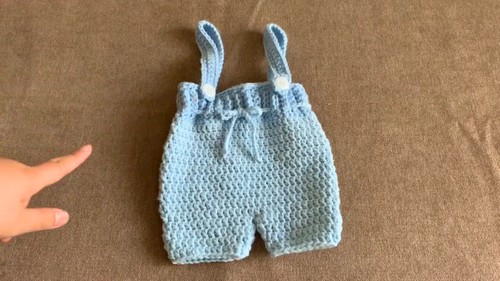
You've successfully crocheted a stunning baby romper! The project is easy to customize and opens up limitless opportunities for creative expression. By simply changing the yarn colors or modifying the straps, you can adapt this romper for different styles or seasons. Great for gifting or creating one-of-a-kind baby clothes, it’s a satisfying and adorable project for crocheters of all levels.
Pro Tip
When making the straps, remember yarn stretches over time. It’s okay to aim slightly shorter, as it will lengthen after wear, and washing helps it return to its original shape. If you’re unsure, go a little longer, as you can always adjust by tightening the buttons!


