
How to Crochet Lily of the Valley with This Free Pattern
Ever since I picked up a crochet hook, I’ve loved turning yarn into things that make people smile. The Lily Of The Valley pattern is one of those small miracles you can make with just a little time and imagination. Right away, you notice how each little bell-shaped flower looks just like the real thing, with its soft white petals and a gentle green stem. It’s amazing how something so simple to crochet can capture the beauty of this classic spring flower.
Free Crochet Lily Of The Valley Pattern for Customizable Floral Gifts
What I love about this pattern is how gentle and calm it feels in your hands. The blooms are small, round, and perfect for practicing simple, repeating stitches. Once finished, the crochet Lily Of The Valley looks pretty whether you put it in a vase, attach it to a gift, or use it as a bookmark. It’s a lovely touch for weddings, spring decorations, or just to brighten up your room. The soft flowers look delicate, but they last forever—no water needed.

If you’re new or just want an easy, relaxing project, you’ll enjoy this pattern. You’ll start by learning how to shape the stems and join the flowers together so they drape naturally, just like real ones. The main stitch is the chain stitch, and you’ll also practice simple single crochets and a little shaping with increases and decreases. With just green and white yarn and a 2.5 mm hook, you can make your own bouquet.
The great thing is once you learn this pattern, you can create so many different things. Try making a flower bookmark, a pretty bag charm, or add a sprig to your next amigurumi for a touch of spring. You can even change the yarn colors to make your own fantasy version. The Lily Of The Valley pattern teaches you how to crochet tiny shapes, join them together, and pay attention to details, which helps in lots of other crochet projects too.
Every stitch of this pattern is a little step to becoming a better crocheter. Most of all, it’s a peaceful project that will leave you with something truly beautiful to share or keep.
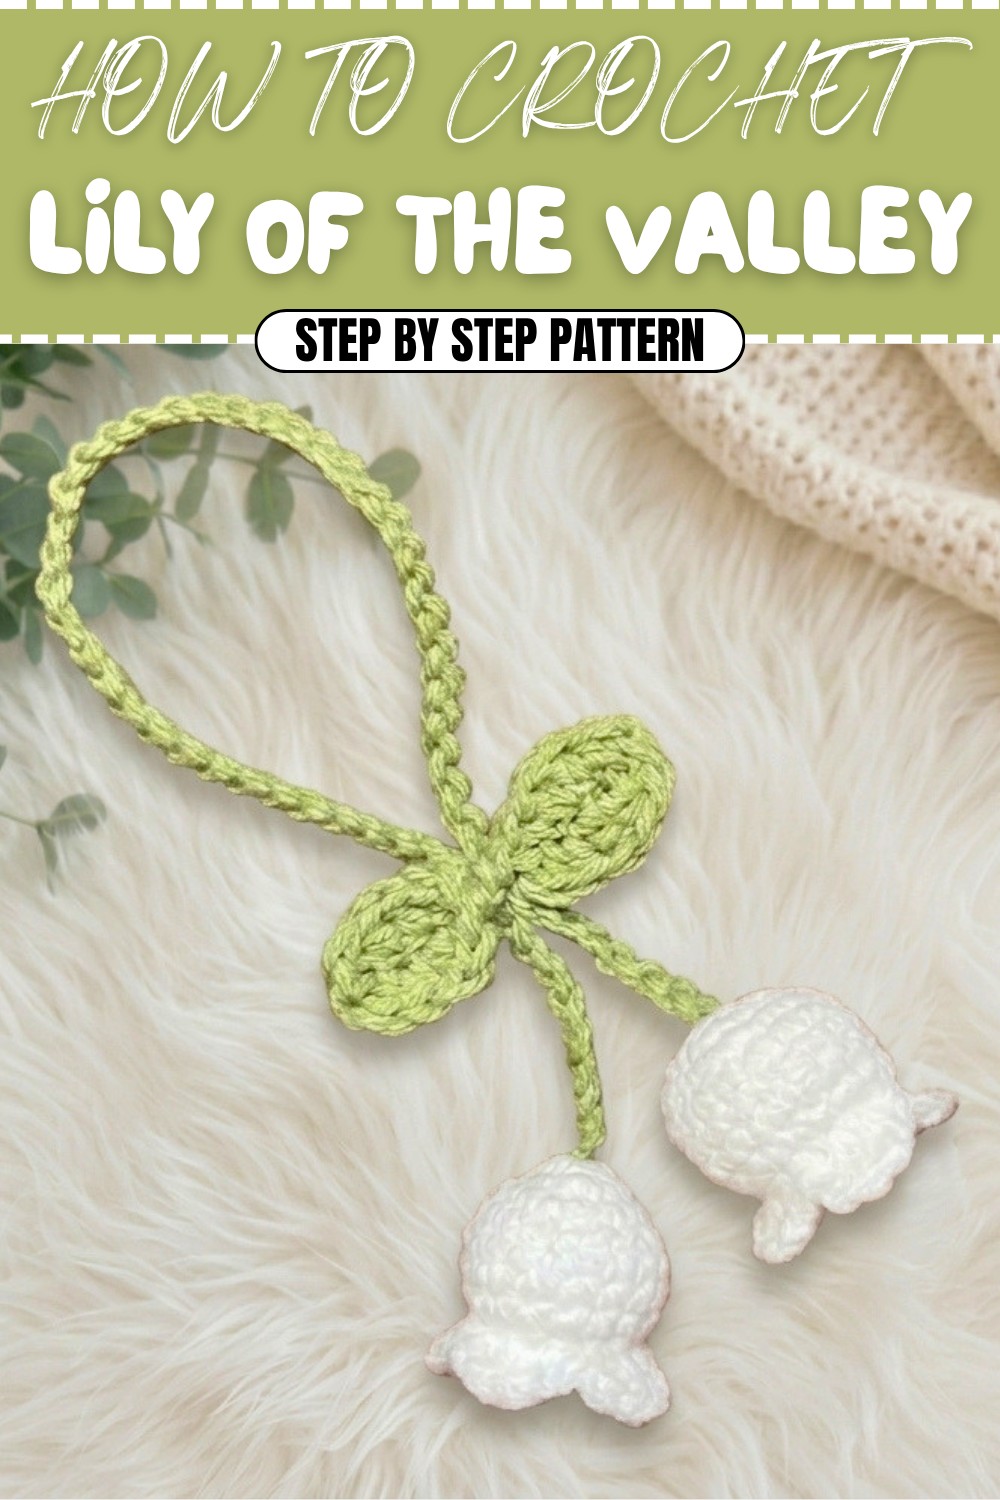
Hanging Lily Flower Amigurumi Pattern
This pattern will guide you through creating a delicate Hanging Lily Flower Amigurumi. With elegant petals and graceful green leaves, this charming decor is ideal for hanging from windows, mirrors, or as a fresh accent to any room. Designed for crafters of all levels—especially beginners—this project provides an attractive introduction to basic amigurumi skills such as working in the round, simple increases/decreases, and basic crochet assembly. Personalize it with your favorite colors!
Skill Level & Terminology
- Skill Level: Beginner
- Terminology Used: US Crochet Terms
You will use straightforward stitches including single crochet, half double crochet, double crochet, slip stitch, and basic shaping techniques. If you’re just learning amigurumi, this pattern is an excellent foundation for building your crocheting confidence.
Materials & Tools
- Yarn:
- DK/light worsted cotton or acrylic yarn in two colors:
- Main flower: White (or your preferred color—yellow, pink, blue, etc.)
- Leaves/cord: Green
- DK/light worsted cotton or acrylic yarn in two colors:
- Crochet Hook: 3.5–5 mm (size 5 recommended for soft DK yarn)
- Yarn Needle: For sewing/weaving ends and assembly
- Scissors: For trimming ends
- Stitch Marker: Or a piece of contrasting scrap yarn to track rounds
Optional: Choose colors that match your decor or seasonal theme.
Gauge
Gauge is not critical for this project because sizing is flexible based on yarn and hook used. With DK yarn and a 4 mm hook, each flower bud measures approximately 3–4 cm in length, while each leaf is about 4–5 cm. Simply ensure your stitches are neat and the fabric is firm so that the stuffing does not show through.
Abbreviations List
| Abbreviation | Meaning |
|---|---|
| MR | Magic Ring |
| ch | Chain |
| sc | Single Crochet |
| hdc | Half Double Crochet |
| dc | Double Crochet |
| inc | Increase (2 sc in the same stitch) |
| dec | Decrease (sc2tog) |
| sl st | Slip Stitch |
| st(s) | Stitch(es) |
| FLO | Front Loop Only (if required, see pattern) |
Special Stitch Instructions
- Magic Ring (MR): Create a small ring with your yarn. Insert hook into the ring, pull up a loop, ch 1, then work stitches into the ring.
- Single Crochet (sc): Insert hook into st, yarn over, pull up a loop (2 loops), yarn over, pull through both loops.
- Half Double Crochet (hdc): Yarn over, insert hook into st, yarn over, pull up a loop (3 loops), yarn over, pull through all 3 loops.
- Double Crochet (dc): Yarn over, insert hook into st, yarn over, pull up loop (3 loops), yarn over, pull through first 2 loops, yarn over, pull through last 2 loops.
- Slip Stitch (sl st): Insert hook into st, yarn over, pull through stitch and loop on hook.
- Increase (inc): Work 2 sc into the same stitch.
- Decrease (dec / sc2tog): Insert hook into next st, yarn over and pull up loop, insert hook into next st, yarn over, pull up loop (3 loops), yarn over, pull through all 3 loops.
- Working into both sides of chain: For the leaf, after working on one side of the chain, rotate and work into the unused loops of the starting chain for a symmetrical result.
Finished Size
- Flower Bud: 3–4 cm (1.2–1.6") in length
- Leaf: 4–5 cm (1.6–2") in length
- Cord: Customizable; about 25–30 cm (10–12") in the sample
Pattern Overview
You’ll start with a magic ring and work a rounded cone for the lily buds, shape open petals at the tip with basic stitches, and then craft a pair of leaves using simple chain and back-and-forth rows. A long green chain forms the hanging cord, and all pieces are assembled using the yarn needle. Beginners will enjoy learning how to shape, connect, and finish their floral bouquet.
Pattern Instructions
LILY FLOWER BUD (Make 2)
With white or chosen flower color:
- Rnd 1: MR, 6 sc in ring. (6)
- Rnd 2: Inc in each st around. (2 sc in each st) (12)
- Rnd 3: [sc, inc] around (sc in next st, 2 sc in next st—repeat 6 times) (18)
- Rnd 4–7: Sc in each st around. (18 per round – 4 rounds)


At this point, you have a plump flower bud. Now you’ll shape the opening:
For beginners: Start with a magic ring, and use single crochet increases to grow your circle. Even rounds build the shape, resulting in a gentle cone perfect for a lily blossom.
Petal Shaping — Top of Bud
- Rnd 8: [sc, dec] around (12)
- Rnd 9: (Work petals as follows for four sets:)
a. In same st: sc, hdc, dc (all in first st)
b. In next st: dc, hdc, sc (all in second st)
c. Sl st in next st

Repeat a–c three more times (4 petals). Fasten off and weave in ends.
Each petal is created from a bracket of sc, hdc, dc stitches for a gentle, ruffled curve. Complete four petals by following the repeated set.
LEAVES (Make 2, Green)
- Ch 6.
- Row 1:
- Sc in 2nd ch from hook,
- Hdc in next ch,
- Dc in next ch,
- Hdc in next ch,
- Sc in last ch.

Rotate your work to crochet along the unused loops on the starting chain:
- Row 2 (other side of chain):
- Sc in first ch,
- Hdc in next,
- Dc in next,
- Hdc in following,
- Sc to end.
Fasten off, leave tail for assembly.
Make two leaves in green. Each is quick, symmetrical, and gives a classic arched leaf look!
HANGING CORD
With green yarn:
- Ch 60 (or desired length for your hanging).
Cut yarn, pull through to secure.
Simply make a long crochet chain. Adjust the length as needed for where you want to hang your decoration.
Assembly & Finishing
- Attach Cord to Buds:
- Use the yarn needle or hook to draw one end of the cord through the center hole (magic ring) of a flower bud.
- Tie several knots to secure. Repeat for the other bud at the other end of the cord if making a double lily. Trim tails or weave in.
- Attach Leaves:
- Position leaves behind the flower buds, threading the cord through or stitching them in place with the yarn needle.
- Sew or tie the leaf securely, weaving in any remaining ends.
- Finishing Touches:
- Weave in all loose ends with the yarn needle.
- Use your fingers to shape each petal and leaf for the most lifelike effect.
- Hang your flower from a window latch, wall hook, or rearview mirror for a cheerful handmade accent.

Each element comes together with simple sewing and weaving. Adjust the placement of buds and leaves so your display is attractive and balanced before securing them fully.
Concluding Tips
Congratulations! You have completed your hanging lily flower. This pattern is customizable—alter the colors, make a chain of multiple lilies and leaves, or add beads for extra sparkle. By mastering these simple construction techniques, you’ll gain basic amigurumi and assembly skills. Share your creation with friends, or brighten a special space with your imaginative craftwork.