
Easy Crochet Thermal Pot Holder Pattern for Everyday Cooking
Quick solution for busy cooks, the Free Crochet Thermal Pot Holder Pattern gives you thick, protective layers with a trendy touch.
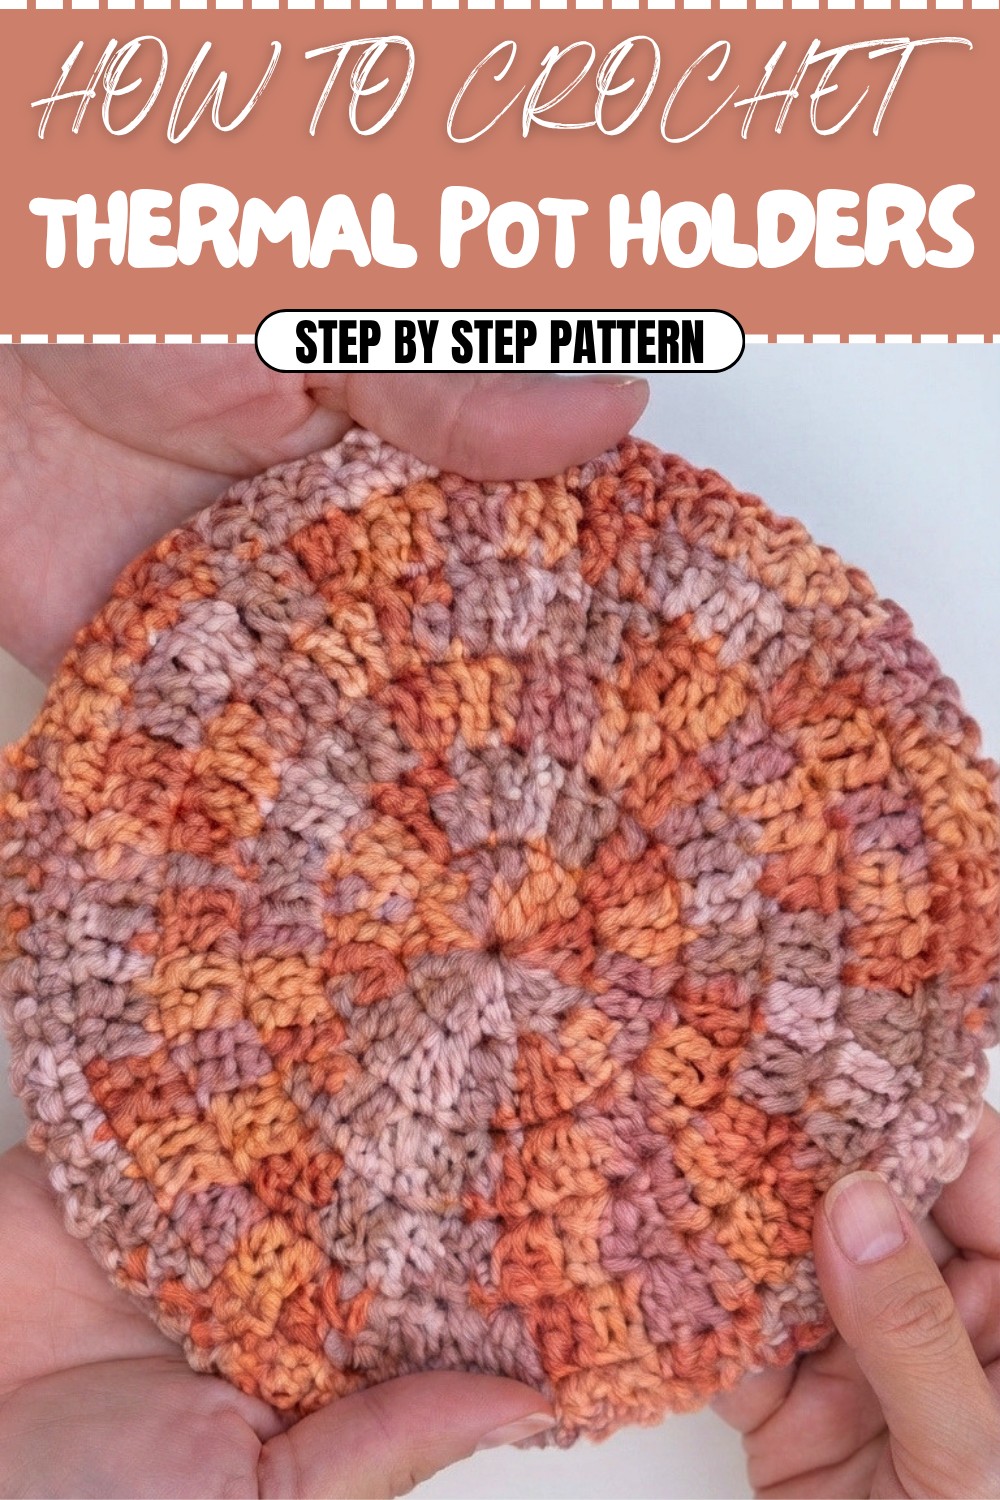
There’s something wonderfully satisfying about making your own kitchen accessories, especially when they are both practical and pretty. This pattern guides you through creating thick, sturdy rounds that offer excellent heat protection for your pots and pans. The magic begins with a simple magic ring, then blossoms as you work rounds of double crochet stitches, building a dense but flexible fabric. These stitches stack up neatly, making the pot holders extra cozy and durable.
Step by Step Free Crochet Thermal Pot Holder Pattern for Home Cooks

The pattern grows with increases in each round, doubling the stitches in smart, easy-to-follow sequences that shape a perfect circle. Each round adds more warmth and thickness, which helps protect your hands and furniture from heat. Finishing with a neat border of single crochet on the reverse side not only looks tidy but also prepares the edges for joining two pieces together. The joining technique uses a zigzag slip stitch method, which is both decorative and strong, giving the pot holder a polished look.
Beyond pot holders, this circle pattern can be adapted into coasters, trivets, or even hot pads in various sizes. By adjusting the rounds or colors, you can customize your kitchen set to match your décor or create thoughtful handmade gifts. Learning these stitches and joining methods also opens doors to many other crochet projects that use similar techniques, making this a wonderful step in your crochet adventure.
Crochet Pattern: Thick Pot Holders & Coasters
Learn how to crochet extra-thick, durable pot holders and coasters that will protect your furniture and kitchen surfaces in style! This step-by-step pattern covers every detail of the process, from creating the base circles to joining them together for added thickness. The result is a sturdy, reversible piece that is both functional and beautiful.
This Thick Pot Holder & Coaster Pattern makes for a practical addition to your home. Designed to be extra thick, these round pot holders and coasters not only prevent heat damage but also add a handmade charm to your kitchen or dining table. This project works up quickly and creates an elegant texture while providing excellent durability. You can use any cotton yarn and customize the colors to match your home decor.
What You’ll Learn from This Pattern
- How to create a flat circle by evenly increasing in rounds.
- Working single crochet and slip stitches to finish projects with clean edges.
- Techniques for securely joining layers for durability.
Skill Level & Terminology
- Skill Level: Beginner
- Terminology: This pattern uses US crochet terms.
If you're new to crochet, this project's repetitive nature and clear progression make it a great opportunity to improve your stitching consistency and circle work.
Materials & Tools
Here’s what you’ll need to create your thick pot holder and coaster:
- Yarn: 100% cotton yarn in your desired color(s) (worsted-weight yarn is ideal).
- Recommended Hook Size: Use the crochet hook size recommended for your chosen yarn. For the single crochet joining, switch to a hook one size larger.
- Notions:
- Scissors
- Yarn needle
- Stitch marker (optional, but useful for keeping track of stitches).
Gauge
Gauge is not critical for this pattern, but ensure your stitches are tight enough to create firm, heat-resistant pieces. For worsted-weight yarn and a 5 mm hook, the diameter of your finished circle will be approximately 6-7 inches.
Abbreviations
Familiarize yourself with the abbreviations used in this pattern:
- ch: Chain
- dc: Double Crochet
- sc: Single Crochet
- sl st: Slip Stitch
Special Stitch Instructions
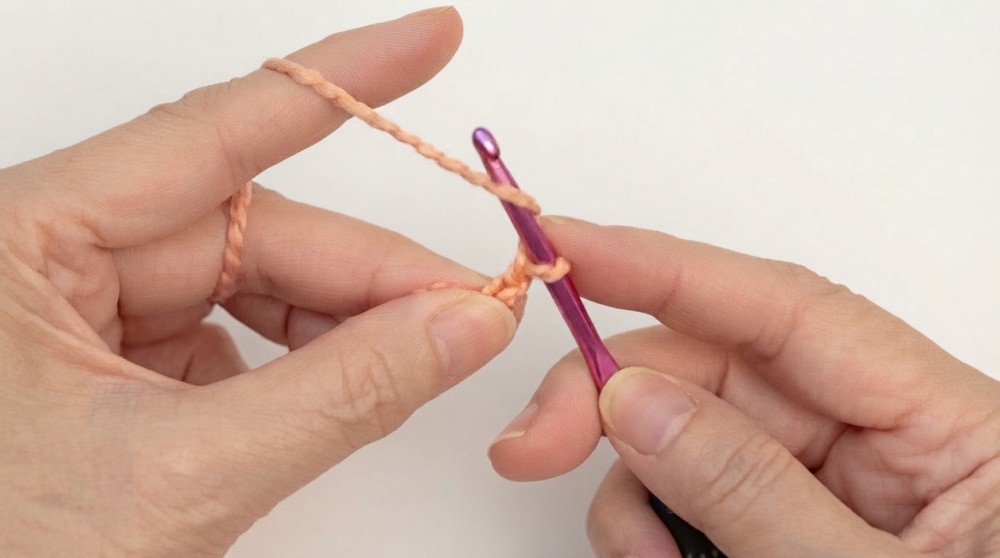
Magic Ring:
The magic ring creates a tight, secure center for the circular pattern.
- Wrap the yarn around your fingers to form a loop.
- Insert the hook into the loop, yo, and pull up a loop.
- Ch 1 to secure the ring.
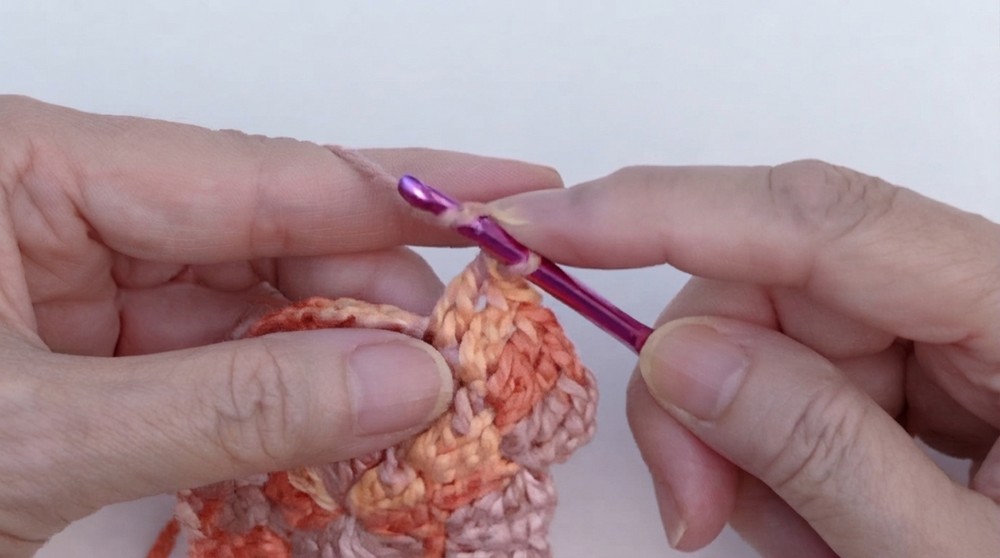
Zigzag Slip Stitch (for Joining):
This method joins two circles cleanly and securely while adding decorative detail.
- Insert the hook through the outer edge of both circles (front circle first, then back circle).
- Yo, pull up a loop, and sl st.
- Alternate between inserting your hook from the front and the back to create a zigzag effect.
Finished Size
- Diameter: Approximately 6-7 inches (for pot holders).
- Thickness: Approximately 0.5 inches (when two circles are joined).
The Pattern Itself
Step 1: Start the Magic Ring
- Create a magic ring: Wrap the yarn around your fingers to form a loop and insert the hook into the loop. Yo, pull up a loop, and ch 1 to secure the ring.
- Ch 2 more (these serve as turning chains).
Step 2: Round 1 – 14 Double Crochet Stitches
- Work 14 dc into the magic ring.
- Yo, insert your hook into the ring, yo, pull up a loop, yo, pull through two loops, yo, pull through the last two loops. Repeat 13 more times.
- Pull the tail tightly to close the magic ring, forming a neat circle.
- Mark the last dc with a stitch marker to keep track of the round's end.
- Join the round with a sl st into the top of the first dc. Pull the sl st tight to eliminate gaps.
At the end of this step, you’ll have a small, flat circle of 14 stitches forming the base.
Step 3: Round 2 – Increase to 28 Stitches
- Ch 2 (does not count as a stitch).
- Work 2 dc into each stitch around.
- Yo, insert your hook into the first st, yo, pull up a loop, yo, pull through two loops. Yo and pull through the last two loops. Repeat in the same st for the second dc.
- Continue this pattern (2 dc in each st) around the circle.
- Join the round with a sl st into the first dc and pull tight.
At this stage, your circle will double in size with 28 dc.
Step 4: Round 3 – Increase to 42 Stitches
- Ch 2.
- Work the following pattern:
- 1 dc in the first stitch, 2 dc in the next stitch.
- Repeat this pattern (1 dc, 2 dc) around the circle.
- Join the round with a sl st into the first dc and pull tight.
The incremental increases keep the circle flat as it gets larger. Your circle now has 42 stitches.
Step 5: Round 4 – Increase to 56 Stitches
- Ch 2.
- Work the following pattern:
- 1 dc in the first stitch, 1 dc in the second stitch, 2 dc in the third stitch.
- Repeat this pattern (1 dc, 1 dc, 2 dc) around.
- Join the round with a sl st into the first dc and pull tight.
Your circle will expand further with 56 stitches.
Step 6: Round 5 – Increase to 70 Stitches
- Ch 2.
- Follow the pattern:
- 1 dc in each of the first 3 stitches, 2 dc in the fourth stitch.
- Repeat (1 dc, 1 dc, 1 dc, 2 dc) around.
- Join with a sl st into the first dc.
By the end of Round 5, your circle will have 70 stitches.
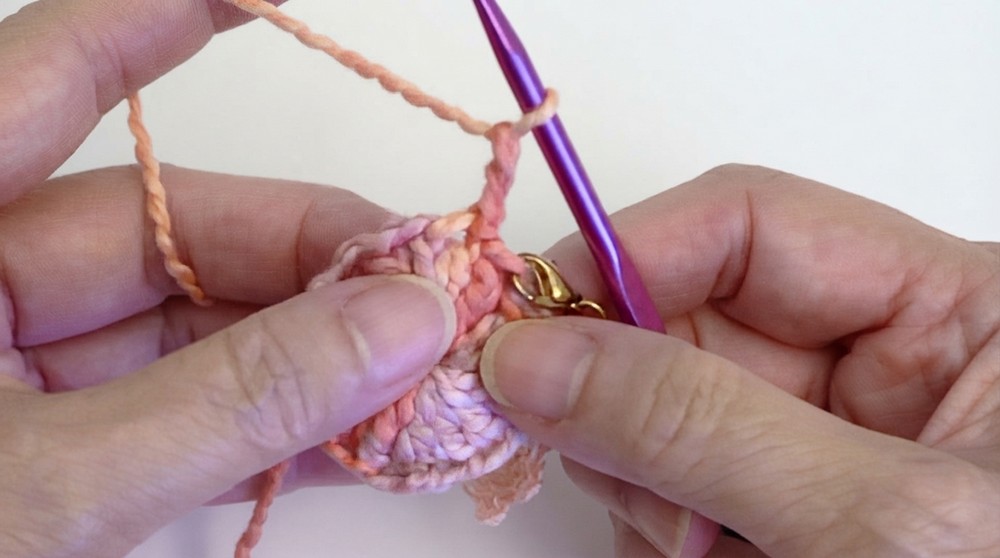
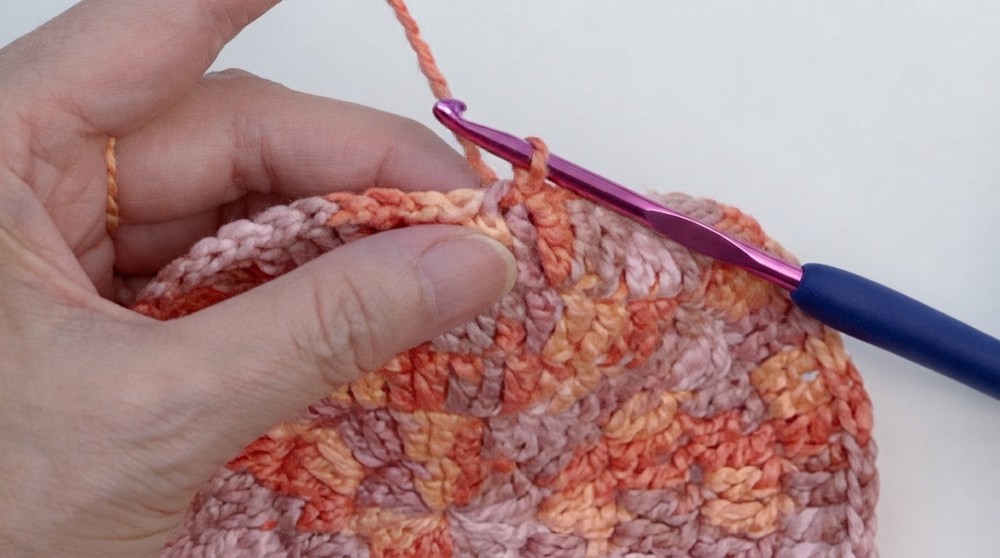
Step 7: Round 6 – Final Round (Single Crochet Edge)
- Switch to a crochet hook that is one size larger for this round.
- Ch 1 and turn the work to the wrong side. This helps align the edges for an easier join later.
- Work 1 sc into each stitch around the circle, starting from the last dc of Round 5.
- Mark the last sc and work until the end of the round, ensuring you have 70 stitches.
- Join with a sl st into the first sc and fasten off.
At this point, you’ll have one complete circle. Make a second identical circle for joining.
Step 8: Join the Circles with Zigzag Slip Stitches
- Hold the two circles together with right sides facing out.
- Insert the hook through the edge of both circles (front circle first, then back circle).
- Ch 1 and work slip stitches in an alternating zigzag pattern:
- Insert the hook through the outer edge of the front circle. Pull up a loop and sl st.
- Insert the hook through the outer edge of the back circle. Pull up a loop and sl st.
- Continue this zigzag sl st pattern around the circle.

This creates a decorative edge while securely joining the layers together.
Step 9: Finishing Touches
- Weave in all loose ends using a yarn needle.
- For added durability, tie off the center yarns at the back and weave them in securely.
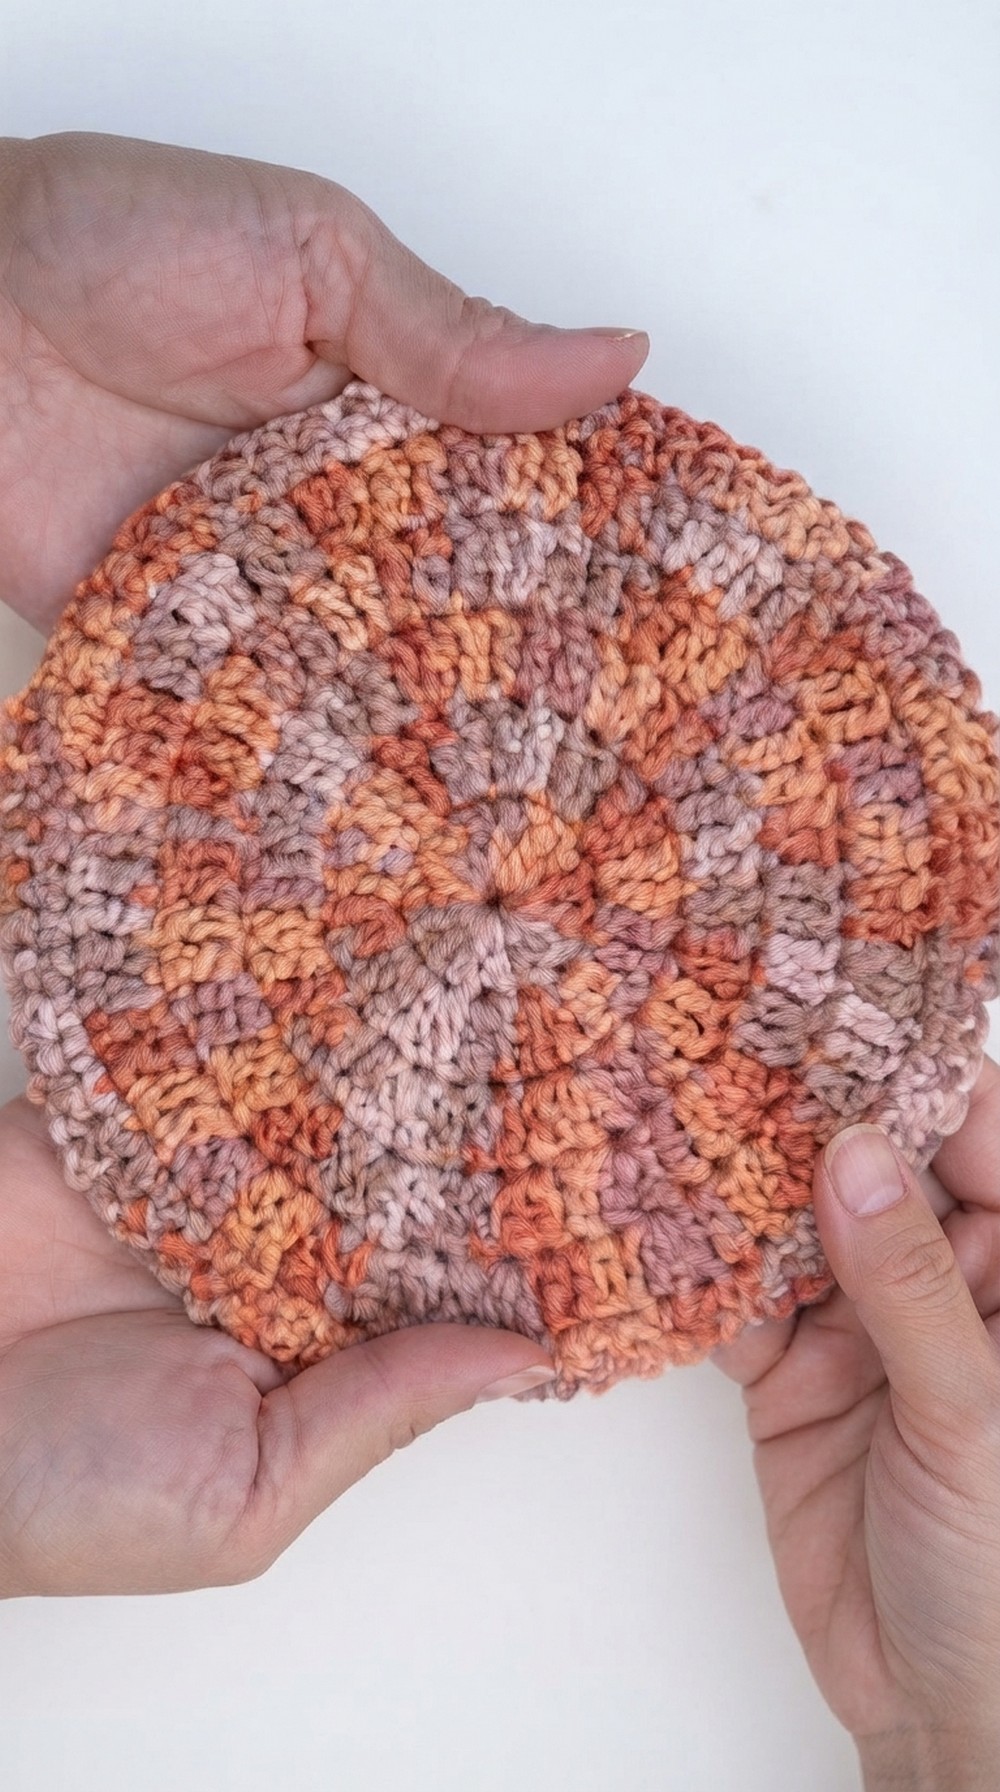
Your thick, double-layered pot holder or coaster is complete!
Why You’ll Love This Pattern
This pattern combines a durable design with simple, meditative stitches, allowing for quick results and great satisfaction. Ideal for home use or as a thoughtful handmade gift, these pot holders and coasters are as functional as they are beautiful. Customize the colors to suit any occasion or season and enjoy your stylish, cozy creations!