
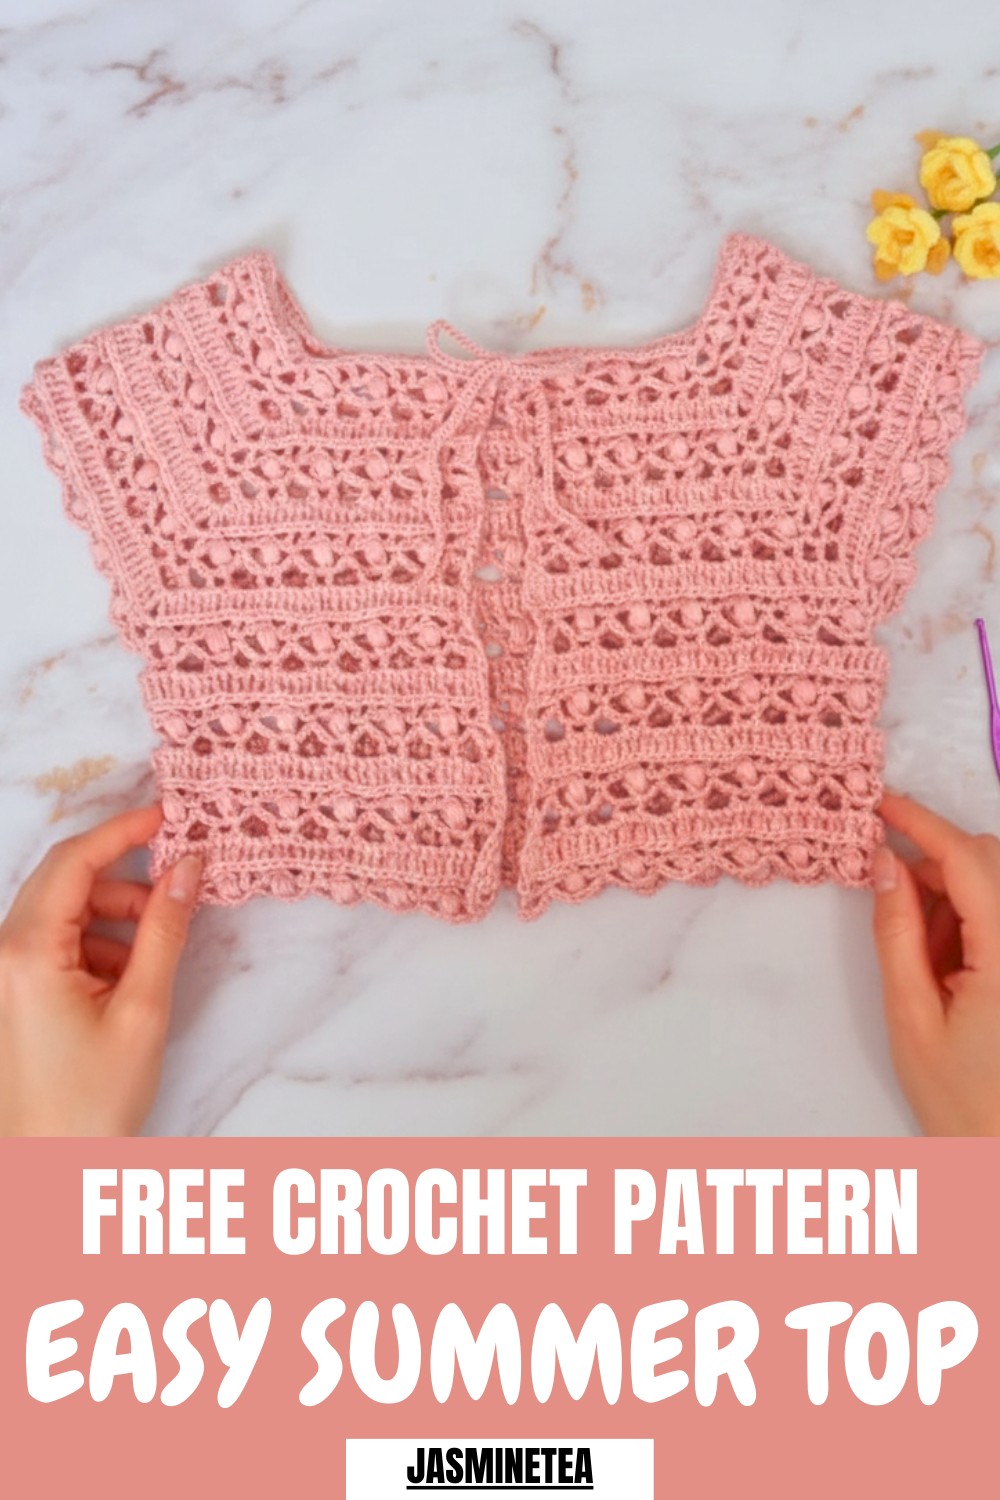
Feel fresh and stylish with this Crochet Summer Top Pattern, featuring a lightweight design that keeps you comfortable and chic all season.
Delicate stitchwork and airy patterns give this top a graceful and refreshing appeal, perfect for warmer days. Its Crochet Summer Top Pattern gently accentuates the waist while offering a comfortable, flowing fit, making it ideal for casual outings, beach trips, or relaxed city strolls. The breathable texture keeps you cool and allows freedom of movement, while the lightweight construction adds to its effortless charm.
Fresh Crochet Summer Top Pattern That Feels Easy to Style
Versatile in styling, it pairs beautifully with skirts, shorts, or jeans, transitioning seamlessly from day to evening wear. The pattern offers opportunities for personalization through colors, stitch variations, and subtle embellishments, allowing each piece to reflect individual style.
Elegant details and soft textures create a polished look without sacrificing comfort. Combining visual appeal with functionality, this top is both stylish and practical, making it a timeless addition to any summer wardrobe. It balances modern fashion trends with classic crochet-inspired beauty.
Step-by-Step Details
Step 1: Gather Your Materials
- Use weight 3 acrylic yarn with a 3.5mm crochet hook. Ensure you also have scissors, a measuring tape, and stitch markers handy for accurate sizing and assembly.
Step 2: Determine Your Chain Numbers
- Take back-of-the-neck measurement to decide the length of your initial chain.
- Use an even multiple of 6 (e.g., 6x2 = 12, 6x4 = 24, etc.). For example, the tutorial uses “6 multiples of 6,” which equals 36 chains. This measurement determines how wide the neckline will be.
- Divide the chain count in this way:
- Divide the back multiple by 2 for front panels. For example, a chain of 36 becomes 18 for each front panel.
- Use a guide (provided in the video) to calculate shoulder and corner stitches. For 36 chains, shoulders require 24 chains each.
- Add 1 chain to each panel and 1 chain for every corner stitch (for a total of 4 corner stitches). Add all these values together to get the total required chain count. For instance:
- 36 (back) + 24 (left shoulder) + 24 (right shoulder) + 18 (front left) + 18 (front right) + 4 (corners) = 129 chains.
- 36 (back) + 24 (left shoulder) + 24 (right shoulder) + 18 (front left) + 18 (front right) + 4 (corners) = 129 chains.
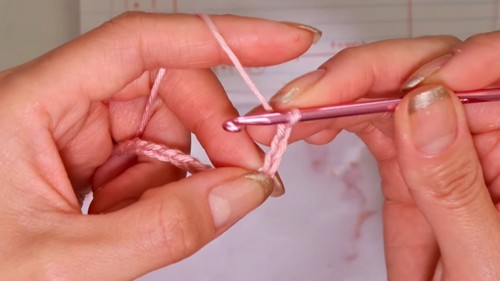
3: Create the Foundation Row
- Chain the calculated number (e.g., 129).
- Work double crochets across the foundation chain based on your panel calculations, starting with 19 (front panel), then adding 1 corner stitch (double crochet, chain 2, double crochet in the same stitch). Repeat for shoulders (25 stitches), back panel (37), and remaining panels.
- Always place corner stitches at transition points to allow the top to expand naturally into the raglan shape.
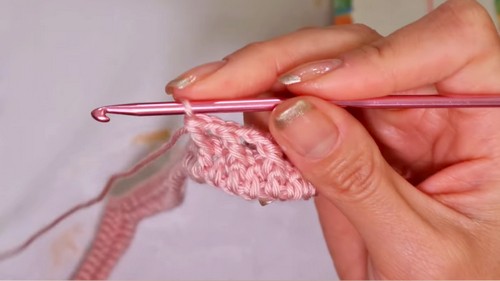
4: Begin the Raglan Pattern
The pattern repeats across four key rows to build the top's structure:
- Row 1:
- Chain 3 (counting as the first double crochet). Work front post double crochets (FPDC) with chain-1 spaces between stitches, skipping every other stitch.
- At every corner, work: 1 double crochet, chain 3, 1 double crochet in the corner chain space.
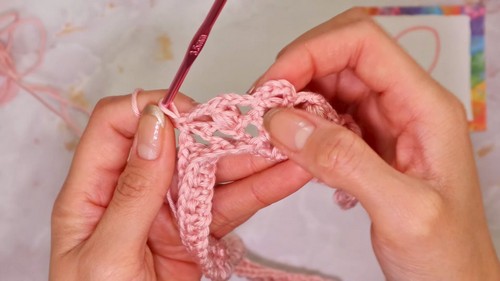
- Row 2:
- Start with a chain-up of three. Then, skip 1 stitch and work puff stitches into the next. Puff stitches involve pulling up five loops before completing.
- At every corner, single crochet into the chain-3 corner space, chain 4, and single crochet again in the same space.
- Row 3:
- Start with a chain-up of three. Work double crochets into the posts of puff stitches while placing chain-1 spaces over the top of each puff stitch. Add corner stitches: double crochet, chain 5, double crochet in each corner space.
- Start with a chain-up of three. Work double crochets into the posts of puff stitches while placing chain-1 spaces over the top of each puff stitch. Add corner stitches: double crochet, chain 5, double crochet in each corner space.
- Row 4:
- Start with a chain-up of four. Work treble crochets (yarn over twice, pull through) into each stitch.
- In corner chain spaces, work 3 treble crochets, chain 2, 3 treble crochets.
- Repeat this process for both sides of the corner.
5: Repeat Until Finished
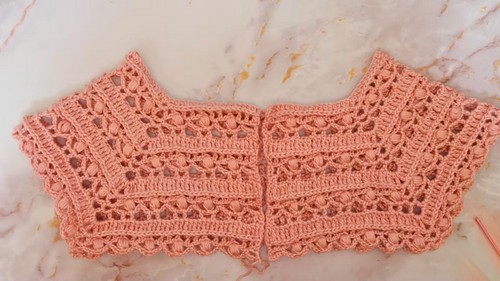
- Repeat Rows 1–4 to extend the top to your desired length. At first, continue working in raglan style where all panels are connected, but once the armholes are wide enough to fit your arms, stop working in the shoulder sections.
- To create the body of the top and leave openings for the sleeves, connect the front and back panels at the armholes by skipping the shoulder sections and resuming the pattern on the body panels. Continue working in rounds until the top is the desired length.
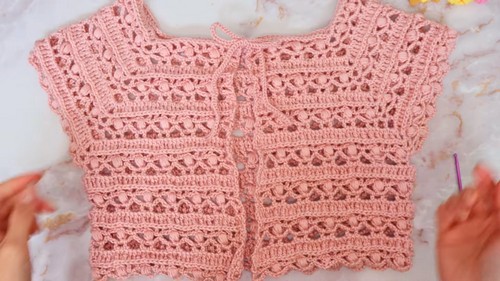
6: Add Straps
- Use a long chain tail (approximately your wingspan) to create straps:
- Begin with a slipknot and use a loop-over method: place the tail over the hook, pull the working yarn through, and repeat.
- Once you've used up the tail thread, cut the working yarn and secure the end.
- Attach the strap to the top by looping it through the fabric near the top edge or at any desired placement. You can tie these straps into bows for an added stylish touch.
Special Features
- Raglan Style Design: The project is worked seamlessly in a raglan style, producing clean lines and naturally forming armholes.
- Customizable Fit: The chain multiple system allows you to customize the size of the top based on your measurements.
- Four-Row Repeat Pattern: Easy-to-follow four-row repeat creates a textured, detailed design with manageable stitch techniques.
- Adjustable Straps: The tie-straps are entirely customizable, letting you decide on their placement and length.
Level of Difficulty
The project requires beginner to intermediate-level skill. While the stitches themselves (e.g., double crochet, front-post double crochet, puff stitch, and treble crochet) are relatively simple, the project demands careful counting and focus to ensure consistency across panels, making it slightly challenging for complete beginners.
Tutor’s Suggestions
- Be Precise with Measurements and Calculations: Ensuring an accurate multiple of 6 for chains and correctly placing corner stitches can make or break the overall fit and shape of your top.
- Mark Your Corners: Use stitch markers for corner stitches to maintain the raglan design and monitor increases easily.
- Stay Consistent in Technique: For a polished finish, stick to a single method when working into chains (either through chain spaces or the actual chains).
- Customize the Length: Adjust the length of the top and final rows based on your preference to suit your wardrobe or personal measurements.
Uses and Materials
Uses:
- As a trendy summer top that pairs well with high-waist skirts, jeans, or shorts.
- Can double as a light outerwear when paired with a strapless top underneath.
- Perfect for casual wear, beach vacations, or even as festival attire.
Materials:
- Weight 3 Acrylic Yarn: Lightweight and versatile for a breathable top.
- 3.5mm Crochet Hook: Ideal for the yarn weight, giving the fabric an airy yet sturdy finish.
- Basic Tools: Scissors, measuring tape, yarn needle (for sewing and weaving in ends), and optional stitch markers.
Tip
Use a lighter hand for tension: Rely on loose but even tension when chaining and working stitches to maintain the elasticity and lightweight quality of the yarn. Tight stitches may make the fabric too rigid to fit comfortably.
Conclusion
This crochet raglan top is the perfect project to explore creative customization while honing your skills with repetitive stitch techniques. Its airy design makes it ideal for warm seasons, and the multiple fit adjustments ensure it suits every body type. By following the pattern and repeating the easy four-row pattern, even beginners can achieve a stylish, functional garment in a short amount of time.


