
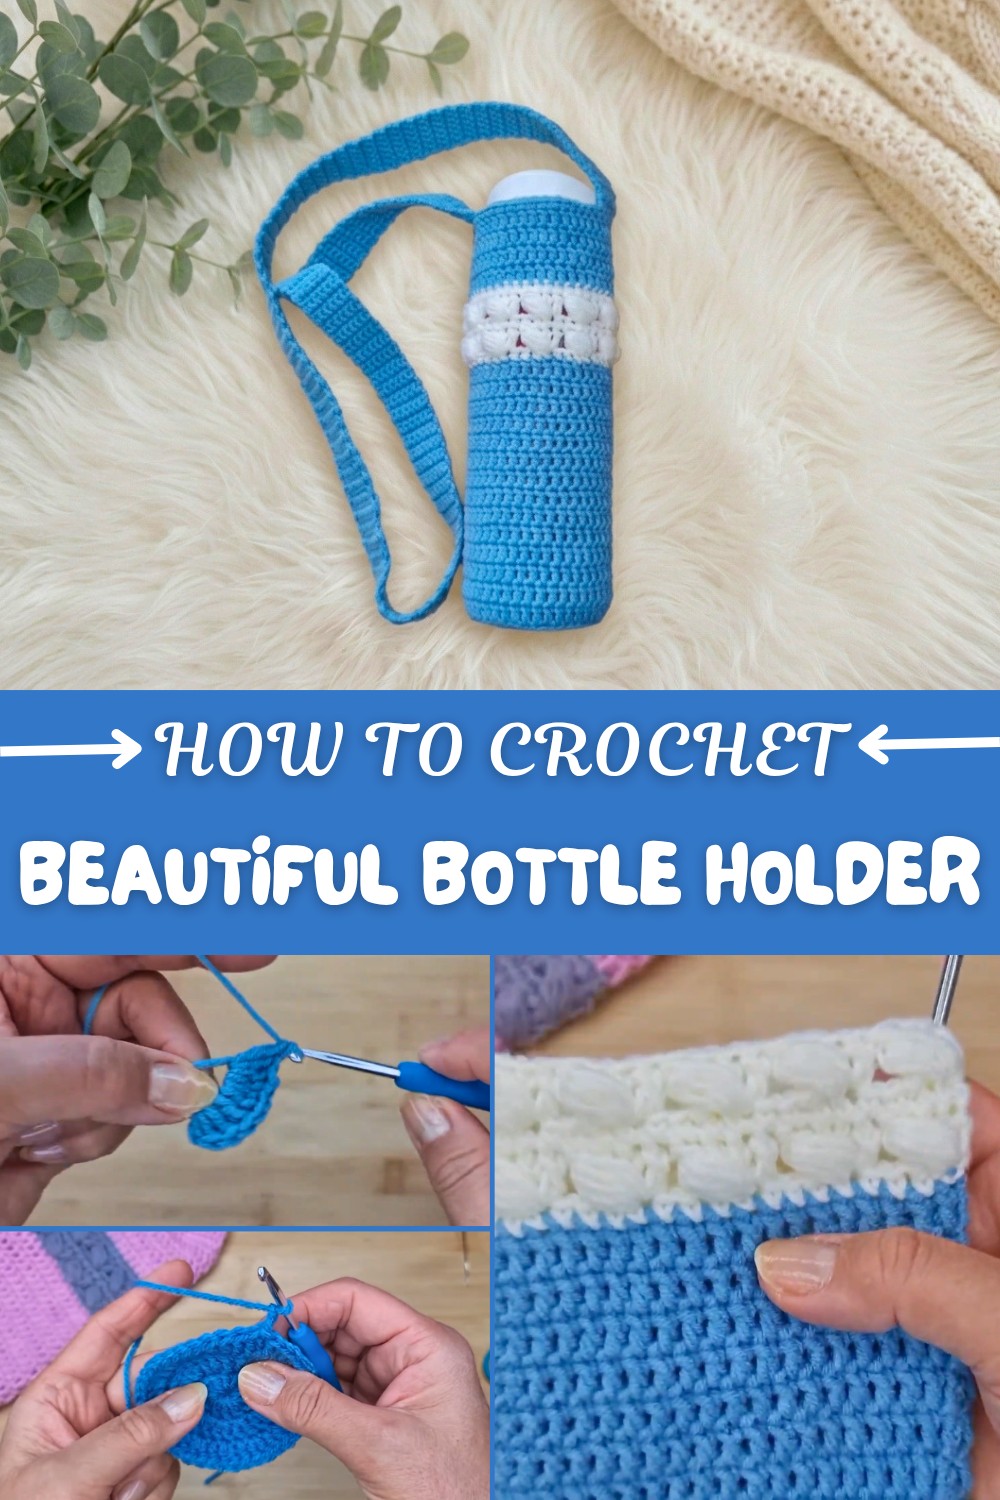
Crochet Bottle Holder with Strap – Free Pattern
Bringing practicality and charm together, the Free Crochet Bottle Holder Pattern offers a wonderful way to keep your favorite drink at hand while adding a personal, handmade touch to your day. Designed for ease and versatility, this bottle holder is ideal for staying hydrated on walks, carrying a stylish water bottle to yoga, or gifting a functional accessory to a friend.
The heart of this pattern lies in the beautiful interplay of stitches and colors. The base is created with rounds of double crochet, forming a solid foundation that safely cradles even a large bottle—roughly 3 inches in diameter and 9 inches in height. You can easily adjust the size for smaller bottles by reducing rows in the base or the sides.
Easy & Functional Crochet Bottle Holder (Free Pattern)
After building the sturdy cylinder with straightforward double crochet rounds, the design introduces a lovely puff stitch section. The puff stitch, while a bit more intricate, adds delightful texture and visual interest. By yarning over and pulling up multiple loops into one stitch, puffs create a plush, raised effect that really makes the holder stand out. This detail is a joy to work and gives the bottle holder its unique flair.
An appealing feature is the ability to play with color. Using a bold blue for the base, a soft cream for the puff stitch panel, or combining shades for a look that’s entirely personal. Any worsted-weight yarn works beautifully, but options like soft milk cotton bring both durability and comfort to the finished piece.
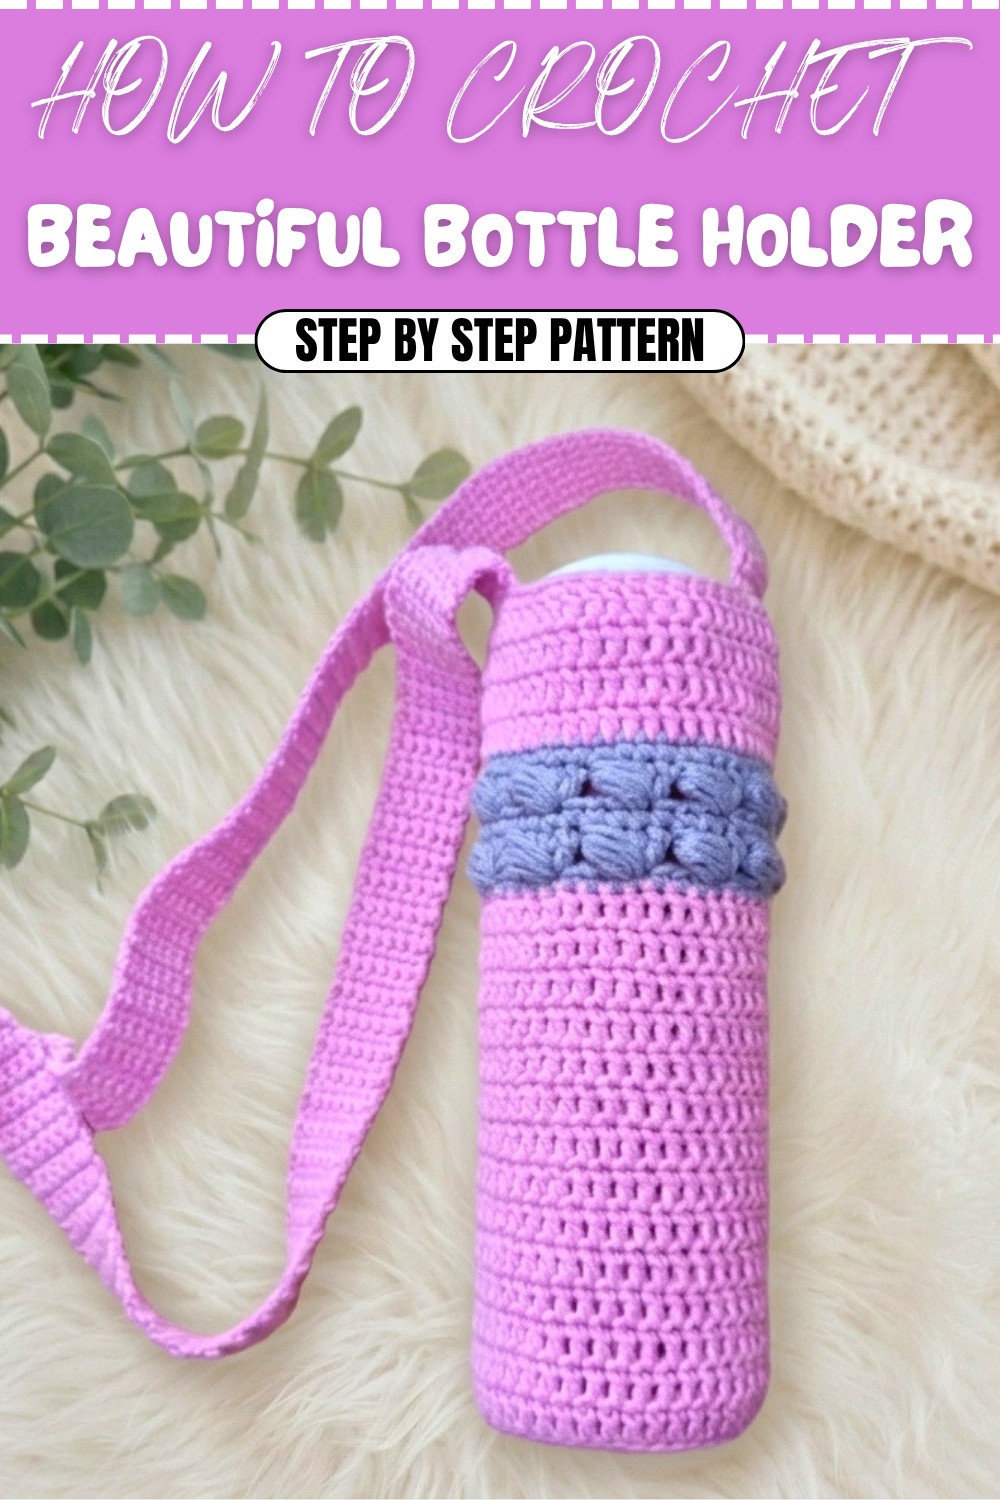
Finishing touches include a single crochet round for neatness, and a customizable strap. The sturdy single crochet strap can be made any length, so the holder sits just where you prefer—across your body or hanging at your side. Secure seaming and careful end-weaving ensure your bottle holder stays strong and attractive, use after use.
The Free Crochet Bottle Holder Pattern gently encourages creativity, blending simple stitches with thoughtful details for a result that’s as beautiful as it is useful. Let your yarn and inspiration guide you in making this everyday essential truly your own.
Puff Stitch Bottle Holder Crochet Pattern
Skill Level & Terminology
Skill Level: Confident Beginner/Intermediate
Terminology: US crochet terms used throughout.
Materials & Tools
- Yarn: Milk cotton yarn (DK or light worsted weight; sample uses “Milk Cotton” from AliExpress; two contrasting colors recommended)
- Hook: 4.0 mm crochet hook
- Notions:
- Scissors
- Tapestry needle (for sewing ends)
- 2 stitch markers (for strap placement)
- Optional: Measuring tape (to check strap length).
Gauge
Gauge is not critical, but for reference with Milk Cotton DK yarn and 4mm hook:
- Base: Three rounds of double crochet should yield a circle about 3” in diameter.
Check your base against your bottle—adjust round/repeat numbers if needed.
Abbreviations
| Abbreviation | Meaning |
|---|---|
| ch | chain |
| sc | single crochet |
| dc | double crochet |
| sl st | slip stitch |
| st | stitch |
| BLO | back loop only |
| puff st | puff stitch |
Special Stitch Instructions
Puff Stitch (puff st):
Yarn over, insert hook in stitch and pull up a loop. Repeat this step (yarn over, insert, pull up a loop) 3 more times (total 4 times), so you have 9 loops on your hook. Yarn over, pull through 8 loops leaving 1 on hook. Yarn over again, pull through remaining 2 loops.
Finished Size
- Base Diameter: ~3” (7.5cm)
- Height: ~9–9.5” (23–24cm)
- Strap Length: ~43” (109cm); adjustable to preference
Fits most reusable bottles or flasks. Adjust height/diameter for smaller bottles.
The Pattern
1. Base (Foundation Rounds)
Start with main color.
- Magic Ring:
- Form a magic ring.
- Round 1:
- Ch 2 (counts as first dc), 13 dc into ring (14 dc total).
- Pull to tighten.
- Sl st in top of first dc to join.
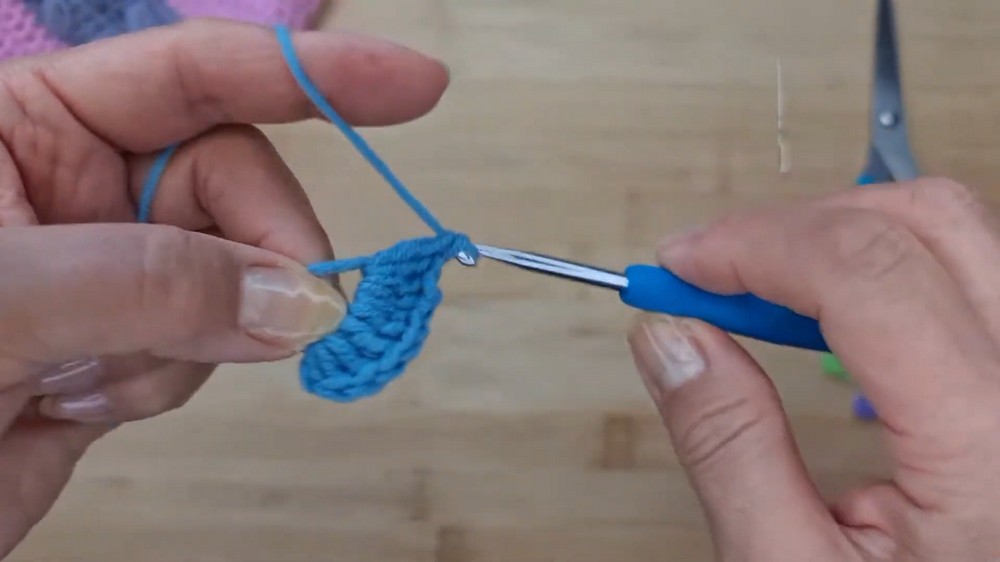
Create a tight circle with 14 double crochets; this forms the bottom of the holder.
- Round 2:
- Ch 2.
- 2 dc in each st around (28 dc total).
- Sl st to first dc to join.
Work two double crochets into each stitch all the way around. The circle will grow larger and maintain a flat shape.
- Round 3:
- Ch 2.
- Pattern: 1 dc in first st, 2 dc in next st.
- Repeat [1 dc, 2 dc] around (42 dc total).
- Sl st to first dc to join.

Repeat one and two double crochets alternately to keep the circle flat. Your base will be about 3" in diameter.
2. Side Walls
- Round 4:
- Ch 2.
- Work dc in back loop and third loop only of each st (the 3rd loop is just below the BLO)—this raises the sides.
- Repeat around; sl st to first dc.
Use back loop and third loop for each double crochet. This creates a strong “ridge” and begins to build up the sides vertically.
- Rounds 5–18 (or up to desired height):
- Ch 2.
- Dc in each st around.
- Sl st to first dc.
- Repeat until you have 14 rounds (about 9–9.5” tall).
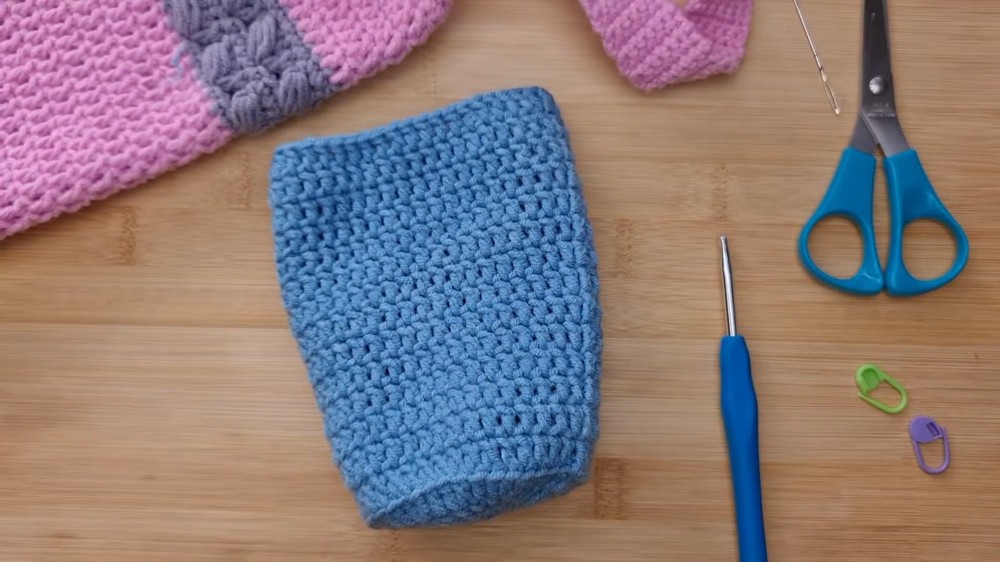
Continue working double crochets in each stitch. The holder will grow upward like a cylinder.
3. Puff Stitch Band
Switch to contrast color.
- Round 19:
- Join new color with standing sc (or ch 1, sc in same st).
- Sc in each st around.
- Sl st to first sc.
Single crochet all around; this row separates the sides from the puff band and gives a foundation for puffs.
- Round 20:
- Ch 2.
- Dc in same st as joining and next two sts (3 dc).
- Puff Stitch: In first dc base, work puff st.
- Skip next st, dc in following three sts.
- Work puff st into first dc of the group.
- Continue [skip 1 st, 3 dc, puff st] around.
- Sl st to first dc.
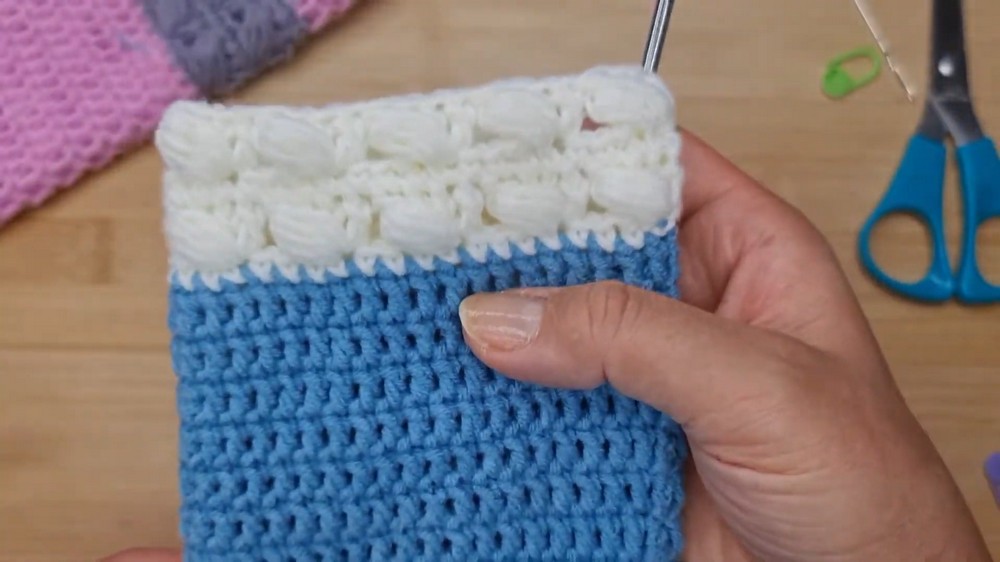
Alternate groups of three double crochets with one puff stitch into the base of the first dc in each group. Skip a stitch between each group.
- Round 21:
- Ch 1.
- Sc in each st around.
- Sl st to first sc.
Work a round of single crochet over the puff stitches for a neat finish.
- Round 22:
- Slip st to position over first puff.
- Ch 2.
- 3 dc over next 3 sts.
- Work puff st in first dc of the 3 dc group.
- Continue around; sl st to join.
Mirror placement so puff stitches stack in neat columns. Puff rows add a decorative accent and thickness.
- Round 23:
- Ch 1.
- Sc in each st around.
- Sl st to join.
Repeat single crochet round for structure.
4. Upper Band
Switch back to main color.
- Rounds 24–27:
- Join with standing dc (or ch 2, dc in same st).
- Dc in each st around.
- Sl st to join.
Make 3–4 rounds of double crochet in main color for top band. Adjust number of rounds for bottle height.
- Round 28 (Edging):
- Ch 1.
- Sc in each st around.
- Sl st to join.
- Fasten off, weave in ends.
Add a single crochet round for a sturdy finished edge.
5. Strap
- Strap Placement:
- Fold bag flat—identify center front/back for strap.
- Place 6 sc-wide markers on each side, at desired placement.
Mark where you want the strap to start; align opposite sides for symmetry.
- Strap Construction:
- Join yarn at marker with standing sc or ch 1, sc.
- Sc across 6 sts.
- Ch 1, turn.
- Sc in each st across.
- Repeat until strap reaches desired length (~43”/109cm or as preferred).

Work in simple single crochet rows. The strap width is easy to adjust if you want a broader or narrower handle.
- Strap Attachment:
- Secure strap to opposite marker using sl st or sewing.
- Work from inside for neat finish.
- Use tapestry needle to sew down ends for extra security.
- Weave in ends.
Make sure the strap is straight and not twisted before sewing. Use slip stitch or whip stitch for a strong join.
Assembly & Finishing
- Weave in all loose ends with tapestry needle.
- Check for any gaps and tighten stitches or joins as needed.
- Pop your bottle in and enjoy your new holder!
The pattern is simple: base, sides, puff stitch band, top band, and a basic strap. Adjust stitch counts or row repeats to fit smaller bottles.
Conclusion & Tips
- Make the strap longer or shorter for personal preference.
- Adjust base diameter and row counts for different bottle sizes.
- Use standing stitches/invisible joins for a seamless finish.
- Puff stitches create extra thickness—ideal for protecting bottles.
This practical and decorative bottle holder uses easy stitches and a bold puff stitch accent. Perfect for both beginners wanting a challenge and intermediate crocheters. Enjoy gifting or using your customized bottle holder!