
Cat Harness Free Crochet Pattern With Step-by-Step Instructions
Watching your cat enjoy the outdoors, or simply lounging in style at home, becomes even more special with a homemade cat harness. The free crochet cat harness pattern is both easy and enjoyable, even for those new to crochet. With a 3.5 mm hook and soft, durable cotton yarn (medium weight), you’ll craft a harness that’s gentle on your cat's fur and comfortable to wear. This harness features a shell stitch for charming texture and cuteness.
Free Crochet Cat Harness Pattern Using Soft Cotton Yarn
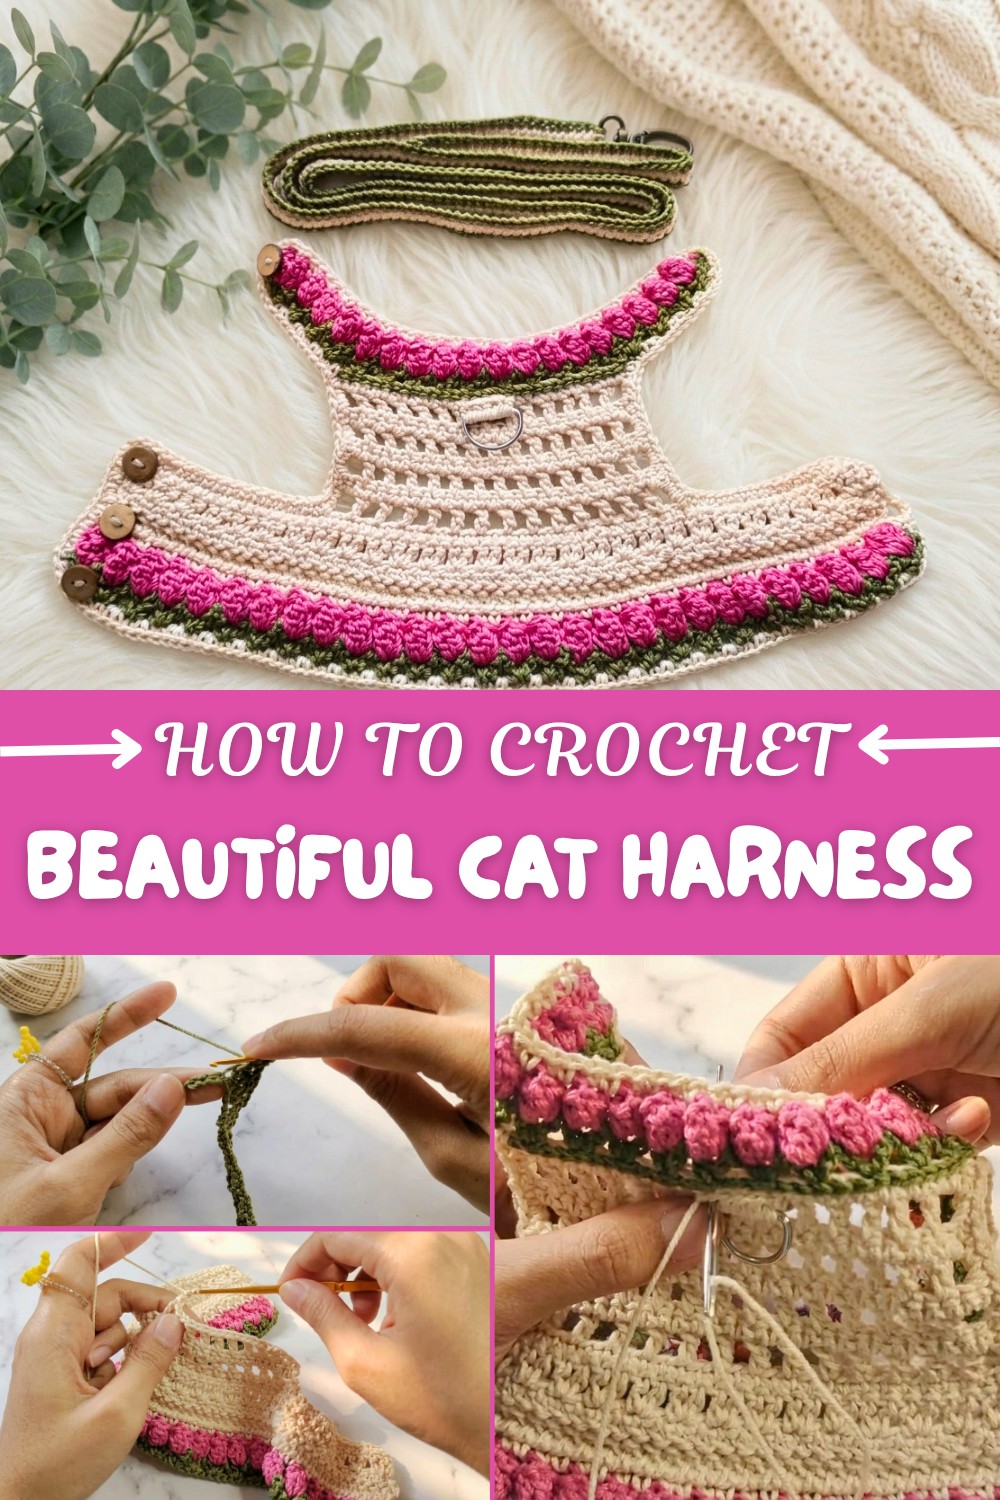
On this project, you’ll also crochet a little flower attachment, which measures about 5 cm across when finished, and can be customized in different colors for extra flair. The beauty of this harness is not just in its appearance, but also in how it offers your cat a gentle, snug fit, letting you spend time outside together safely.
You can make this pattern because it's simple, practical, and gives you a chance to learn several crochet skills all at once. Here’s what you gain from working with the cat harness pattern:
- Practice adjusting the size for a custom fit
- Master the shell stitch for future projects
- Build confidence working with small accessories
- Learn to crochet closures for safe and easy use

Cat Harness Vest – Step-by-Step Crochet Pattern
Introduction
This pattern guides you in creating a comfortable, secure, and stylish harness vest for your cat, complete with a detachable leash. The vest features a button-up neck, sturdy D-ring for the leash, and easy fastening for walks or indoor lounging. The instructional format is detailed for all intermediate crocheters and includes tips for following along if you’re not used to pattern reading.
Skill Level & Terminology
- Skill Level: Intermediate
- Terminology: US crochet terms are used throughout.
Materials & Tools
- Yarn: Poly Kiwi Yarn (or similar worsted weight acrylic/cotton yarn), three colors—Color A (base), Color B (contrast for flower rows), Color C (optional, for leash/leash accent).
- Hook: 3.0mm crochet hook
- Other Notions: Yarn needle, stitch markers, scissors, 2–3 flat buttons (fit ½” diameter holes), 1 D-ring (for leash), measuring tape
Gauge
Make a gauge swatch: 18 stitches and 12 rows of double crochet = 4x4 in (10x10 cm). Adjust hook size as necessary to achieve this gauge.
Abbreviations List
- ch: chain
- sl st: slip stitch
- sc: single crochet
- dc: double crochet
- hdc: half double crochet
- rep: repeat
- st(s): stitch(es)
- yo: yarn over
Special Stitch Instructions
- Double Crochet Herringbone (HBdc): Yo, insert hook, yo, pull up a loop (3 loops on hook), pull first loop through the second loop, yo, pull through remaining 2 loops.
- Tulip Stitch (V-st with dc): (dc, ch 1, dc) in same st or space.
- Buttonhole Space: (sc, ch 3, sc) all in same st.
Finished Size
Adjustable:
- Waist: To fit 31cm (12.25 in)
- Neck: To fit 21cm (8.25 in)
- Body length: Vest as shown is approximately 12–13 rows tall, leash about 120 cm long, but adjust as needed to fit your cat. See "Pattern Itself" for customizable foundation row.
The Pattern Itself
1. Cast On & Waist Band
- Measure your cat’s waist just behind the front legs.
- With Color A, Ch a multiple of 3 sts to match the measurement (sample: 81 ch for 31cm).
- Check actual length by holding foundation chain to your cat’s waist.
Row 1:
- Ch 2 more for turning.
- Skip 2 ch from hook, in next st: (dc, ch 1, dc) all in same st, skip 2 ch, rep (dc, ch 1, dc) every third ch to end.
- In last ch, dc once.
- Ch 1, turn. Fasten off Color A.

If you’re new to patterns: Start with a chain to match your cat’s size. Work a V-stitch (dc, ch 1, dc) every third stitch across.
2. Tulip Row (Petals)
- Attach Color B in any ch-1 sp (between 2 dc of a V-st).
- Ch 3 (counts as dc), 3 dc in same sp (4 dc total in sp).
- Remove hook, insert into top of beg ch-3, pull through loop to close “tulip.”
- Ch 2, skip to next ch-1 sp, work 4 dc, close tulip, ch 2, rep to end.
- Fasten off Color B.
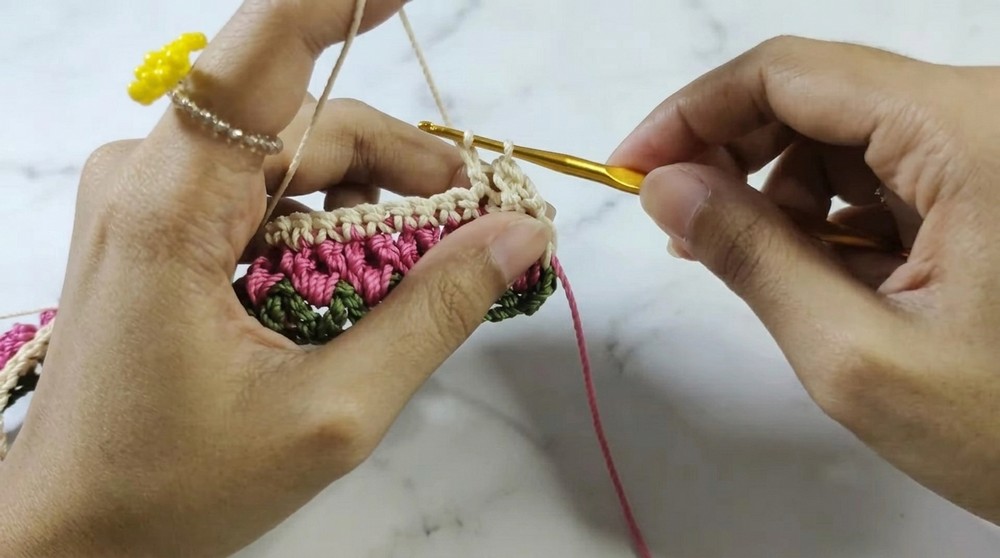
This row creates raised “flowers” for the vest. Each tulip is 4 dc closed together in one space, then chained to the next.
3. Single Crochet Stabilizer Row
- Attach Color A at start of row one.
- Ch 3, sc in each dc of previous row across.
- At end, dc in beg ch-3 of row below.
- Ch 3, turn.
Here you’re making a solid support row to help the vest keep its shape.
4. Herringbone Section
Rows 4–5 (using Color A):
- Ch 3, turn.
- In each st across, work HBdc (herringbone double crochet). Repeat for two rows.
These rows provide flexible structure and texture. Use the special HBdc technique for extra firmness.
5. Body Shape Increases
Row 6:
- Ch 3, turn.
- (2 dc in next st, skip 1 st) across, ending with 1 dc in last st.

Row 7:
- Ch 1, turn. Sc in each st across.
You’ve made the vest a little wider at the top for comfort, and stabilized with single crochets.
6. Chest/Neck Shaping
- On Row 8: Use stitch markers to leave 16 sts free at each side (center ⅓ of vest for chest piece).
- Join Color A at right marker.
- Ch 4, skip 1 st, dc, ch 1, dc in same st, rep to left marker.
- Ch 1, turn.
Row 9:
- Sc across to end (at left marker).
The chest section ties the vest together at front, with open V-sts as before, sc row for stability.
7. Continue for Chest Section
- Repeat Rows 8 and 9 (“tulip stitch row” and “sc row”) until you have a total of 8 chest rows (approx. Row 15).
You’ll have a slightly narrower band for the neck that will button around your cat’s front.
8. Neck Band/Buttonhole Closure
- Measure your cat’s neck
- Ch a multiple of 3 st to equal neck circumference (sample: 21cm).
- Ch about 10 extra for overlap.
- Join foundation chain to left side of vest (RS facing) with a sl st, then sl st back across vest edge to secure.
This makes a loop that will wrap with buttonholes to fasten securely but comfortably at your cat’s neck.
9. Replicate First Row Pattern At Neck
- With Color A (or Color B for contrast), work (dc, ch 1, dc) in third ch from the hook, skip 2, rep across new neck band.
- Turn and repeat tulip flower row as before (see Step 2).
- Fasten off.
10. Buttonhole Band
- At one edge of the neck band, sc, ch 3, sc for buttonholes, with 2–3 evenly spaced along the side.
- Sc evenly around outer edge, ch 6 at side edge to create leash attachment base, continue sc around vest.
You can adjust the buttonhole placement for the best fit on your cat.
11. D-Ring Harness Attachment
- Secure D-ring with yarn at center back of vest.
- Sc around D-ring for several stitches (approx. 8 sc).
- Leave long yarn tail, sew D-ring base securely to vest center back.

12. Leash
- With Color C (or A/B), ch to 120cm (for leash length).
- Sc in each ch across for a sturdy, flat cord.
- At one end, join to D-ring with sl st, weave in ends securely.
- Optionally, make a second leash with a decorative contrast color using the same process.
Assembly & Finishing
- Sew on buttons for closure.
- Weave in all loose yarn ends.
- Try the vest on your cat to check fit and comfort.
- Block flat if desired for best appearance.
Once buttons and D-ring are attached, your vest is complete and ready for outdoor or indoor use with quick leash removal!
Pattern At-a-Glance & Tips
- How to start: Measure your cat, and begin with a chain matching the chest/waist measured.
- Stitches used: ch, sl st, sc, dc, HBdc, (dc, ch 1, dc) V-stitch, tulip (4 dc joined), buttonhole (sc, ch 3, sc).
- Pattern correction: If neck/circumference doesn't fit, simply increase or decrease the starting chain.
- Tips: Test fit often. Use tight stitches for security. Don't skip the single crochet rows—they stabilize the vest.