
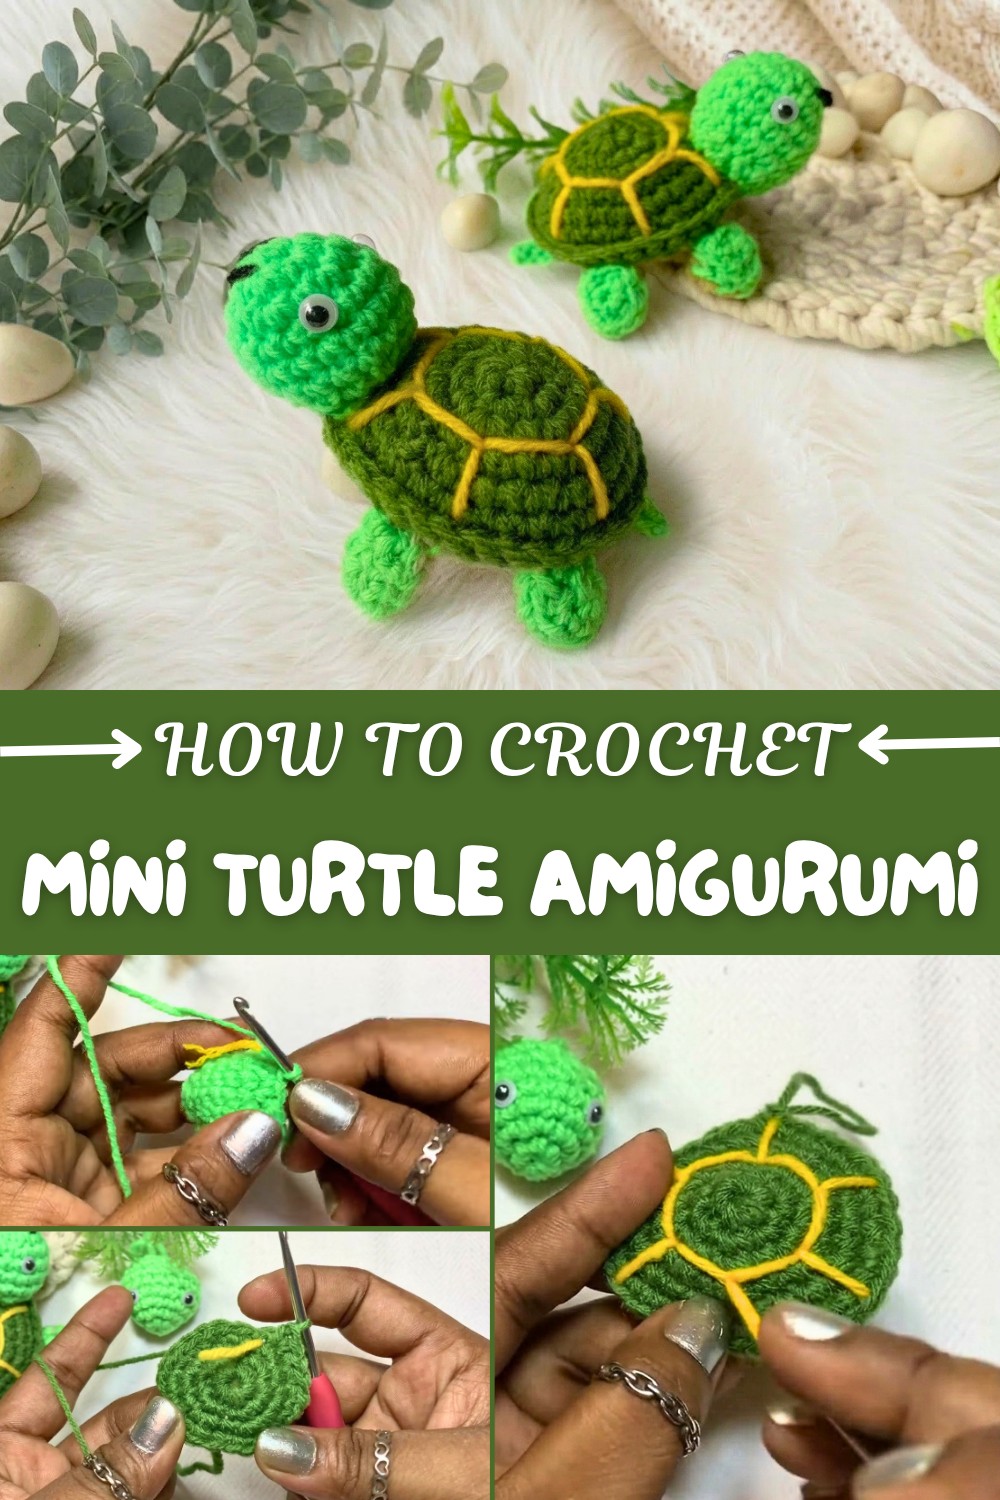
Free Crochet Mini Turtle Amigurumi Pattern for Tiny Toys
Jump into the joy of making an adorable mini turtle with this Free Crochet Mini Turtle Amigurumi Pattern, perfect for beginners and sweet, thoughtful gifts.
This crochet project is perfect for anyone who loves quick and simple makes. You'll be surprised at how fast it comes together—even if you have just a bit of time, you can finish one in about an hour. The instructions are clear and easy, so beginners will feel comfortable, and more experienced crocheters will enjoy how smoothly everything works up.
Free Crochet Mini Turtle Amigurumi Pattern - Step-by-Step
The finished turtle is small and cozy, with a round shell and tiny head that give it a lot of personality. The bright shell stands out, and you can choose any colors you like to make it extra special. Its gentle shape and neat stitches make it a truly charming little creation.
One of the nicest things about this mini turtle is how thoughtful it is as a gift. It's just the right size to be carried around, so it makes a perfect good luck charm for someone to keep in their bag or on their desk. Making one shows you put care into your present, and it will bring a smile to someone you care about.
This project offers quick results and a simple, joyful crocheting experience. When finished, you'll have a delightful soft keepsake that’s both cute and meaningful, just right for sharing or brightening a friend’s day.

Cute Mini Tortoise Amigurumi Pattern
Creating these adorable mini tortoises (or turtles) that bring smiles to any face and make lovely gifts or playful desk buddies. Using basic stitches, colorwork, and easy shaping, you’ll crochet your new friends step by step. The instructions are clear, friendly, and include supportive notes after each section for easy understanding, even if you’re not comfortable with standard pattern format.
Skill Level & Terminology
Skill Level: Confident Beginner
Terminology: US Crochet Terms
This pattern uses standard stitches and shapes. If you know how to crochet a magic ring, single crochet, increase, decrease, slip stitch, and are comfortable assembling simple amigurumi, you’ll have no trouble.
Materials & Tools
- Yarn: Acrylic 4-ply in three colors (shell, head & legs, belly)
- Hook: 3mm crochet hook (or 3.5mm for slightly looser work)
- Eyes: Safety eyes, beads, or yarn for embroidered eyes
- Embroidery thread: Yellow (for shell details), black (for face and smile)
- Fiberfill: Synthetic stuffing
- Stitch marker or U-pin, or scrap yarn (for marking rounds)
- Scissors
- Tapestry/darning needle
- Optional: Glue for attaching eyes
Gauge
Gauge is not essential. Aim for firm stitches so the stuffing does not show.
Your finished tortoise should fit in your palm (approx. 6–8 cm long, depending on yarn/hook/tension).
Abbreviations List
| Abbreviation | Meaning |
|---|---|
| MR | Magic Ring |
| sc | Single Crochet |
| inc | Increase (2 sc in one st) |
| dec | Decrease (sc2tog) |
| sl st | Slip Stitch |
| ch | Chain |
| st(s) | Stitch(es) |
Special Stitch Instructions
- Magic Ring (MR): Loop yarn, insert hook, pull yarn through, chain 1. Make sc into ring, pull tail to tighten.
- Increase (inc): 2 sc in same stitch.
- Invisible Decrease (dec): Insert hook into front loop of next 2 sts, yarn over, pull through both loops, yarn over, pull through 2 loops on hook.
- Slip Stitch (sl st): Insert hook into stitch, yarn over, pull through both the stitch and loop on hook.
Finished Size
- Length: 6–8 cm
- Height: 4–5 cm
- Width: 6 cm
Adjust size by altering yarn or hook.
Pattern Notes & Starting Advice
This tortoise is made in pieces: head, shell (including belly), four legs, and a tail. The shell is decorated with embroidered details, and the face adds charm. The pattern is worked in rounds. A stitch marker is very helpful for keeping count.
Stitches used: Magic ring, chain, single crochet, increase, decrease, slip stitch
The Pattern Itself
HEAD
Round 1:
MR, 6 sc (6)
Start with a magic ring and make 6 single crochet stitches into the ring. Tighten the ring.
Round 2:
2 sc in each st around (inc in each st) (12)

In this round, increase every stitch. You’ll double the number to 12. Count after each round to stay accurate.
R3:
sc in next st, inc in next st around (18)
This creates a round shape for the head. Alternate single crochet and increase for a total of 18 stitches.
R4:
sc in each st around (18)
No increases here—work one sc in each stitch for a round head. Use a marker or scrap yarn to mark start of each round.
Rounds 5–6:
sc in each st around (18 per round)

Continue working even; this builds up the head's height.
Round 7:
sc in next st, dec over next two around (12)
Begin shaping the head by alternating single crochet and invisible decreases, reducing to 12 stitches.
Finishing Head:
Sl st in next st, fasten off leaving a long tail for sewing. Stuff firmly.
Finish the head with a slip stitch, leave a long yarn tail, and stuff. Attach safety eyes between rounds 3 and 4, spaced as you like. If you don’t have safety eyes/beads, embroider eyes later.
SHELL
Round 1:
MR, 6 sc (6)
Round 2:
2 sc in each st around (12)
R 3:
sc in next st, inc in next st around (18)
R 4:
sc in next 2, inc in next st around (24)

Round 5:
sc in next 3, inc in next st around (30)
Round 6:
sc in each st around (30)
For the shell, increase gradually to create a hexagonal shape. Round 6 is worked evenly for height.
BELLY
Work same as shell, but only up to Round 5.
Result should be slightly smaller than the shell.
Round 1: MR, 6 sc (6)
Round 2: 2 sc in each st (12)
Round 3: sc, inc around (18)

Round 4: sc in next 2, inc in next st around (24)
Round 5: sc in next 3, inc in next st around (30)
Fasten off, leaving a long tail.
Create the belly as a flat circle, stopping at round 5.
Shell Design (Optional)
Using yellow embroidery thread or yarn, stitch six rays dividing the shell into sections. Start at the center of round 1 and stitch to each corner.

Embroider shell lines after the shell is finished, referencing the increases, for a classic tortoise look.
Joining Shell and Belly
- Place belly inside shell, stuffing lightly.
- Sl st or sc around through both shell and belly edges, sandwiching stuffing inside.
- When four stitches remain, stuff fully and finish stitches for a flat edge.
Join both parts, inserting stuffing for a soft, plush body. Close the final stitches neatly to create a flat side for attaching the head.
LEGS (Make 4)
Leg Base:
ch 4
Row 1: sc in 2nd ch from hook, sc in next, 3 sc in last ch
Now work on the opposite side: sc in next, sc in next.
Fasten off, leaving long tail.
The legs are tiny ovals. Work a chain, single crochets, increase at end, and work across the underside of the chain.
Tail
Attach yarn to shell at the back section.
ch 3
Row 1: Skip first ch, sl st in next, sc in last.
Fasten off, weave tail into shell.
The little tail is simply a small chain with a slip stitch and sc, then attached to the shell.
ASSEMBLY
- Sew Head:
Attach head to flat section of shell using yarn tail. Stitch securely. - Sew Legs (4):
Position legs at corners under shell. Sew through both belly and shell. Add small stitch in middle for “claw” detail. - Sew Tail:
Attach tail to rear of shell.
Assembly is straightforward: sew head first, then legs, then tail. Make sure all parts are sturdy and secure.
FACE & EYES DETAILS
- Embroider smile using black yarn or thread in an arc between the eyes.
- If desired, use yarn to create 3D eyes by knotting and securing, then shaping and stitching lashes.
Embroider details for personality. If you don’t have safety eyes or beads, yarn works well for expressive eyes!
Conclusion
Congratulations! Your mini tortoise is ready to charm everyone. This project combines simple stitches, gentle shaping, and cute details for maximum effect. Try switching colors for different shells, add extra details like blush with embroidery, or vary the size for a family of tortoises.
Summary:
- Start with magic rings for each piece, build with increases, join flat parts with single crochet or slip stitch.
- Finish with assembly and embroidery for a unique, friendly face.