
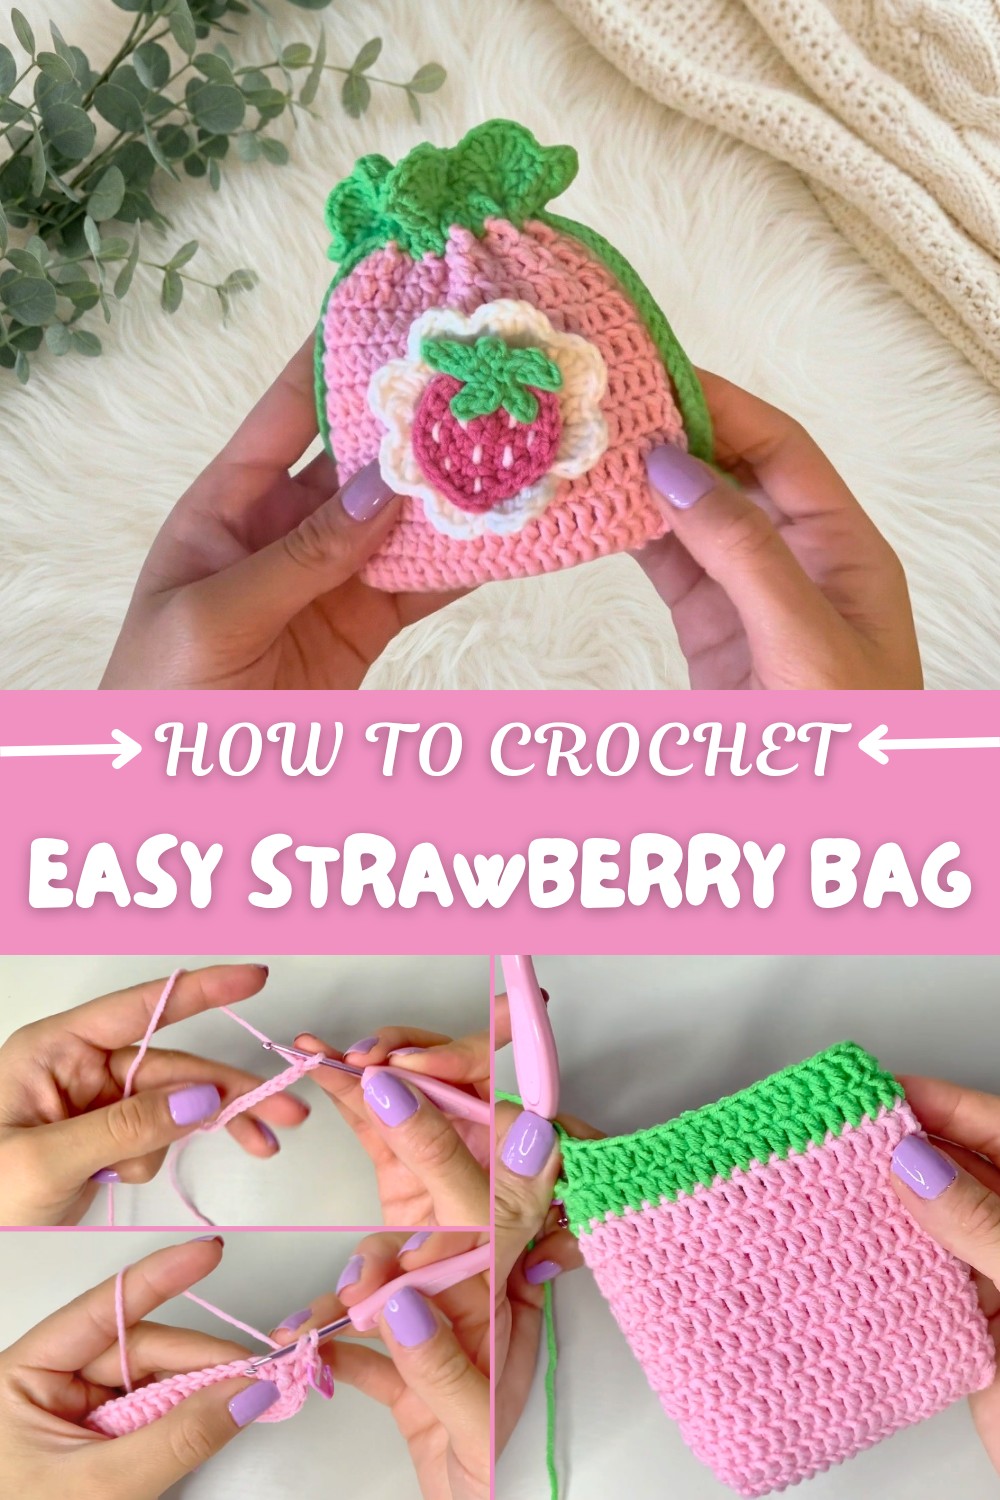
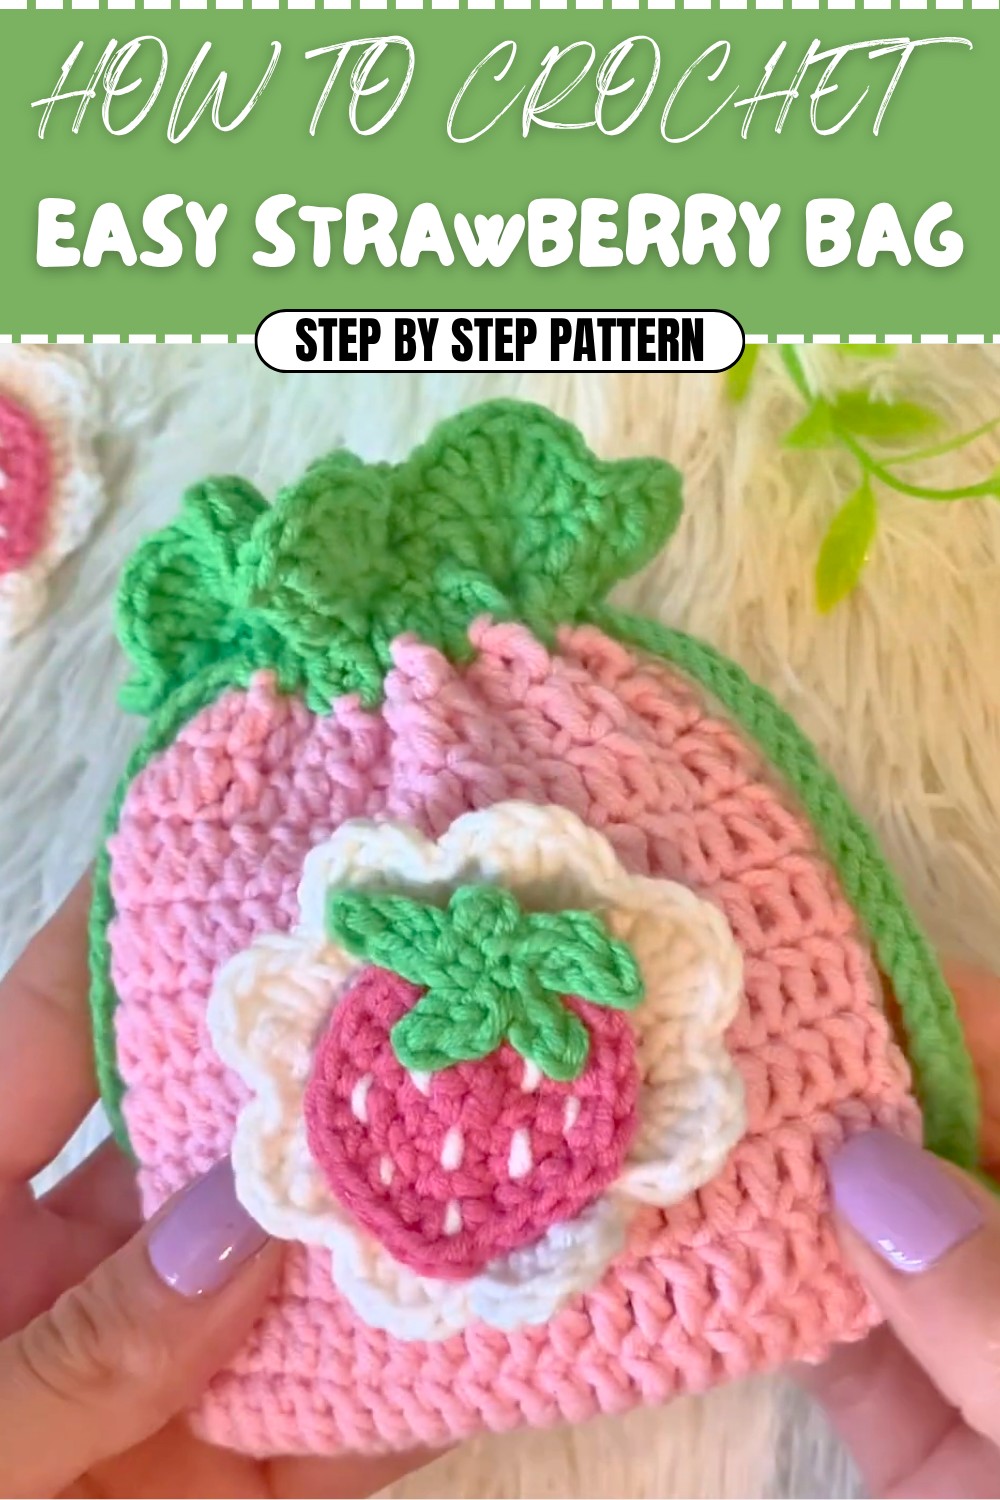
Adorable Crochet Strawberry Bag Free Pattern White Seed Details
Carry your daily things in a cute, fruit-shaped tote made with this easy Free Crochet Strawberry Bag Pattern, a quick project that looks great on anyone.
No one wants to carry a boring, plain backpack when they could have a giant, juicy piece of fruit swinging from their shoulder instead. Putting together this free crochet strawberry bag pattern is a fun way to change plain string into a bright, happy sack that looks exactly like a fresh berry. The look is so sweet because you get a bright red base with little white dots, topped with a big green leaf section that acts like a drawstring lid.
Easy Crochet Strawberry Bag Pattern Using Thick Cotton Yarn Loops
To keep the shape nice and sturdy, you stitch it up using thick chunky cotton yarn and a 6mm hook so the project goes incredibly fast. The most important technique here is the bobble stitch, which creates little raised bumps all over the surface to mimic real berry seeds. Right at the top, you can attach a little five-petal white flower that measures about 5 centimeters wide to make it look like a real plant.
This little pouch is very useful for keeping your belongings safe. You can toss your lunch money inside to use it as a coin purse, keep your markers organized as a pencil pouch, or add a long strap to make a mini shoulder bag. Swapping the colors is a total breeze, so you can easily switch the bright red for a pastel pink strawberry or a deep purple wild berry.
You can even use thin thread instead to make a tiny strawberry keychain for your school backpack. Since the rounds are very easy to count, it is a great project for anyone wanting to practice making bumps. Making these is SO FUN and they make awesome birthday gifts for classmates.
Crochet Strawberry Pouch/Bag – Step-by-Step Pattern
Create a delightful strawberry-themed pouch, perfect for storing headphones, chargers, or small treasures. This step-by-step, clearly formatted pattern includes written guidance and simple explanations for each portion, making it easy to follow even for those less familiar with crochet pattern reading.
Skill Level
Intermediate to Advanced
(Suitable for those comfortable working in the round, changing colors, and creating decorative/motif pieces)
Materials & Tools
- Yarn
- Fingering/Sport weight acrylic or cotton (e.g., Reginel brand or similar)
- Pink or Red for main bag
- Green for leaves and accents
- White for flower and motif base
- Fuchsia for strawberry decoration
- Fingering/Sport weight acrylic or cotton (e.g., Reginel brand or similar)
- Crochet Hook: 3 mm
- Scissors
- Yarn Needle (Tapestry Needle)
- Stitch Marker
- Liquid silicone glue or fabric glue (optional) – for attaching motifs
- Polyester stuffing (optional, for embellishment only)
Key Abbreviations
| Abbreviation | Meaning |
|---|---|
| ch | chain |
| sc | single crochet |
| dc | double crochet |
| sl st | slip stitch |
| MR | magic ring |
| inc | increase (2 sts in same) |
| st(s) | stitch(es) |
| rep | repeat |
Special Note:
All terminology is in US crochet terms.
Special Notes
- Chains made at the start of rounds for height do not count as stitches unless otherwise stated.
- Mark the first stitch of every round for easier counting (especially for beginners).
- Join rounds with a slip stitch unless otherwise noted.
Pattern
1. Main Bag Body
Base & Rounds 1
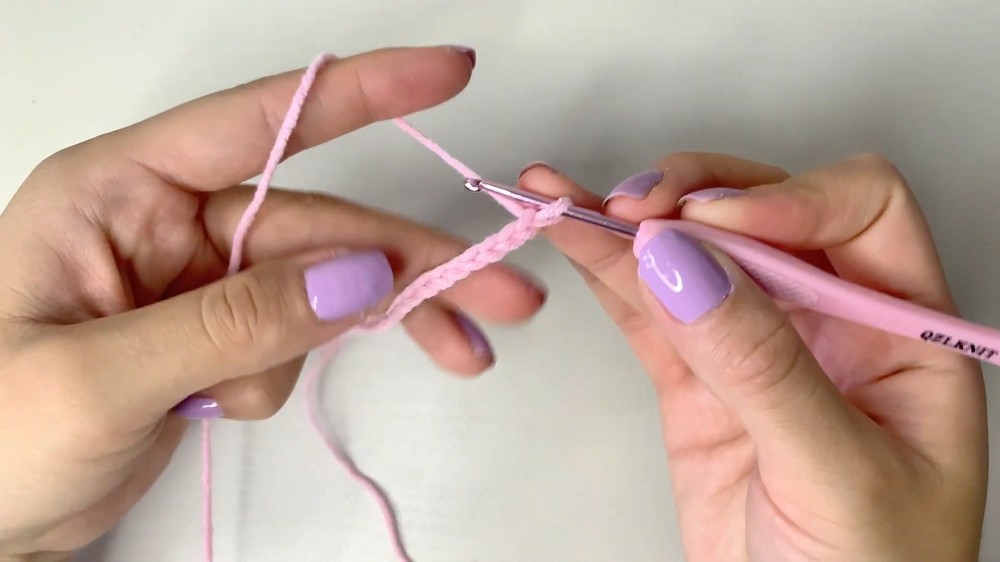
- Make a slip knot.
- Ch 21.
- Row 1:
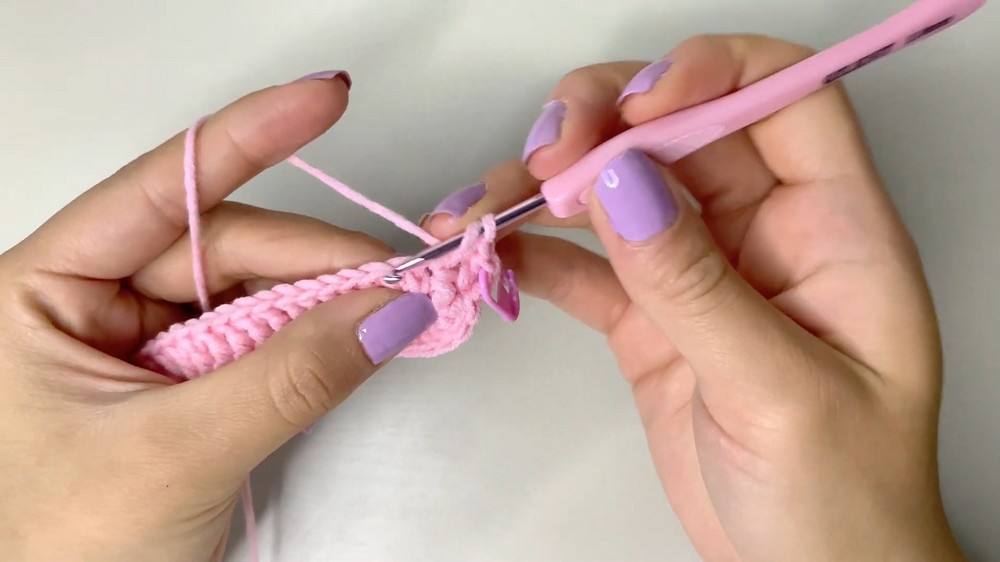
- Yarn over, skip 2 ch. In 3rd ch from hook, make 1 dc. (Mark this dc.)
- Dc in next 17 ch. (You'll have 18 dc total to this point)
- In the final ch: 3 dc in same ch (work all 3 dc in the last chain).
- Continue along the opposite (underside) of starting ch:
- Dc in next 17 ch.
- In the last ch: 2 dc in same ch (increase for curve).
- Join round with a sl st to your marker.
Round 1 complete: 40 dc in total around your oval base.
Explanation:
You’ve worked along both sides of your starting chain, which creates a sturdy rounded base (like a long oval). This technique gives your pouch a neat, shaped bottom rather than a flat rectangle.
Rounds 2–10: Build Bag Sides
- Ch 2 (does not count as a dc, height only).
- Dc in the same st. Mark this st.
- Dc in each st around (work 40 dc in each round).
- Join with a sl st to marked st.
- Rep Rounds 2 to 10 exactly as above.
Explanation:
Work stitch-for-stitch for 9 additional rounds. This method builds up the depth of the pouch, forming a seamless tube of even thickness.
Rounds 11–12: Color Change (Green)
- Attach green yarn at join, fasten pink off if not continuing.
- Ch 2 (height only).
- Dc in same st, mark this st.
- Dc in each st around (40 dc total).
- Join with sl st.
- Rep for one more round.
- Fasten off pink; continue working with green.
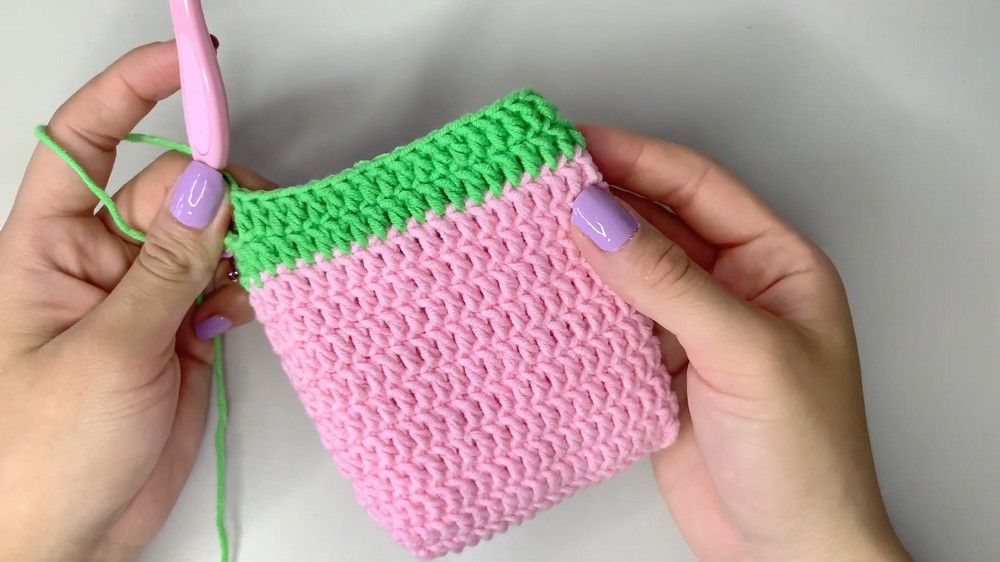
Explanation:
The green rounds create an accent “top” band at the mouth of your pouch, making it look like a strawberry.
Round 13: Sc & Fan Edging
- Ch 1 (height only).
- Sc in same st, mark this st.
- (5 dc in next st, sc in next 2 sts) – this forms “fan, sc, sc” repeat.
- Repeat from (*) around the bag opening.
- After last fan: sc in final 2 sts; join with sl st to first sc.
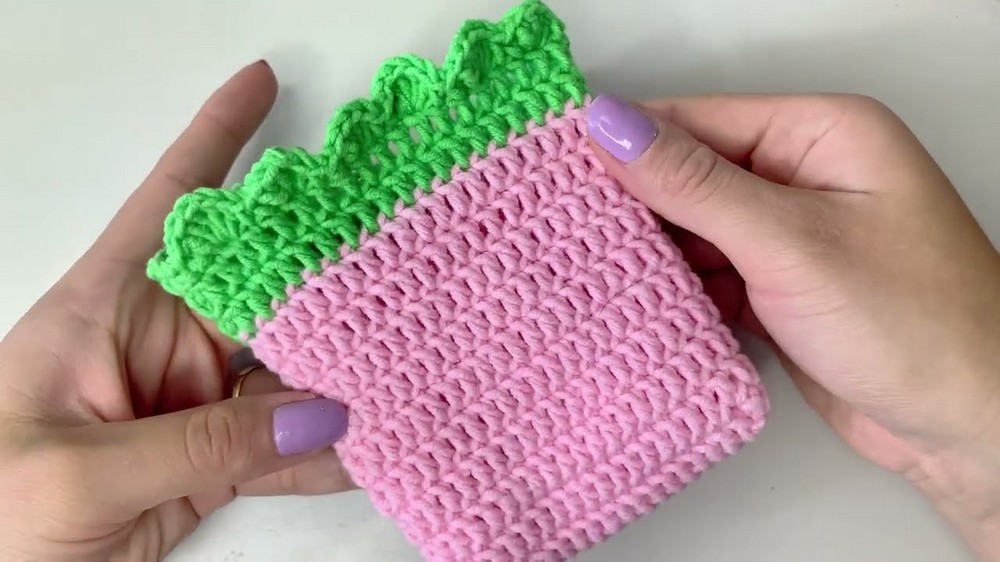
Explanation:
This gives a decorative, slightly ruffled edge that finishes your pouch with style.
2. Decor Leaves (Make 2)
- With green yarn, make a MR.
- Ch 2 (for height; do not count).
- Work 4 dc into MR.
- Ch 2, sl st into base of last dc.
- (Work 4 dc into MR. Ch 2, sl st) x 1 to create 2 sides.
- After both halves, sl st in MR, ch 1, fasten off.
- Weave in ends, trim excess.
- Repeat for a second leaf.
Explanation:
You are forming a symmetrical double leaf motif which is glued or sewn onto the pouch as an accent.
3. Drawstring Loops (Make 2)
- With green (or color of choice):
- Leave a long tail for threading.
- Ch 60; fasten off, leaving another long tail.
- Thread Loop 1:
- Use a needle to weave the chain through every other pair of dc around Round 12, starting beside join.
- Thread Loop 2:
- Start from the opposite side; weave through open spaces not used by Loop 1.
- Tie ends of each loop, knot and trim excess.
Explanation:
The double drawstrings allow the pouch to open and close tightly by pulling both ends—great for secure storage.
4. Main Flower Motif (White Base)
- With white:
- Begin with a MR.
- Ch 1, 6 sc into MR. Tighten.
- Round 2:
- Inc in each st around (12 sc; mark 1st st for joining).
- Round 3:
- (Sc in next st, inc in next) x 6 around (18 sc).
- Round 4:
- (Sc in next 2 sts, inc in next) x 6 around (24 sc).
- Round 5 (Creating Fan Petals):
- (Sc in next 2 sts, 4 dc in next st, sc in next 2 sts), repeat from * around, ending with a fan (4 dc) before last 2 sc.
- Join with sl st, ch 1 to fasten off, weave in ends.
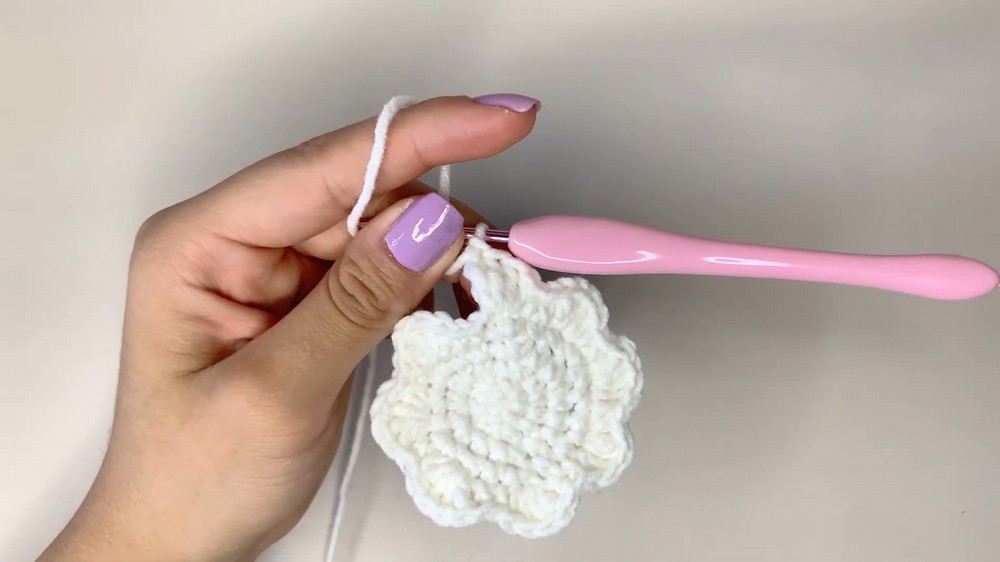
Explanation:
This forms the white base for your strawberry motif, resembling a stylized blossom or accent.
5. Strawberry Motif
- With fuchsia thread:
- Start with MR, ch 1, 5 sc in ring. Tighten MR.
- Round 2:
- Inc in each st (10 sc).
- Round 3:
- (Sc in next st, inc in next) x 5 (15 sc).
- Round 4:
- (Sc in next 2 sts, inc in next) x 3, (sc in next 2 sts), (inc in next), (sc in next 2 sts), (inc in next) [total 21 sts]
- At the final inc, ch 2, sc in the same st (for the tip).
- Finish round, join with sl st, ch 1, fasten off.
- Use white thread and a needle to embroider random “seeds” over strawberry.
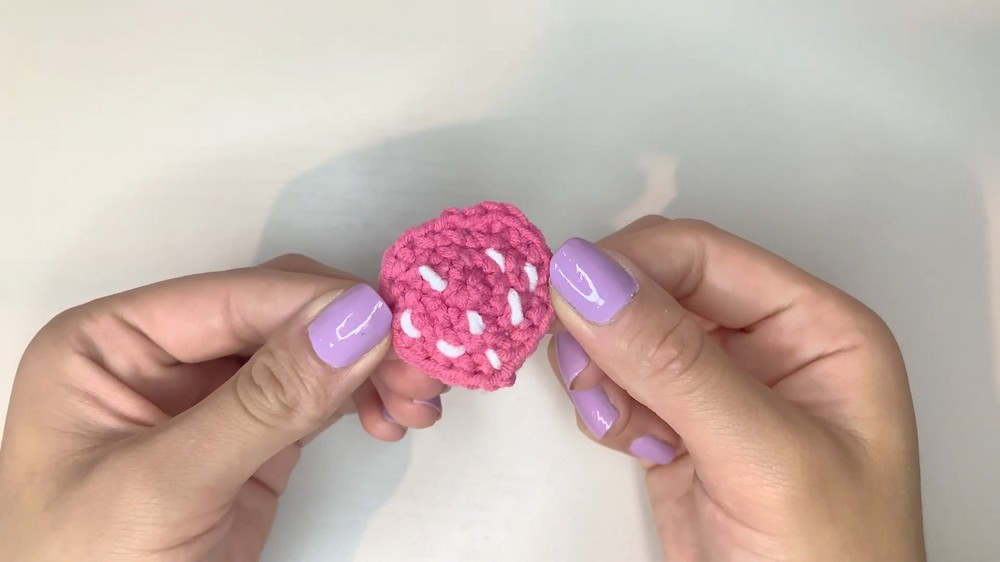
Explanation:
The strawberry is worked as an applique. The seeds are simply little embroidered dashes. This will be glued or sewn atop the white flower base.
6. Strawberry Leaf Topper
- With green, MR, ch 3.
- (Sl st in 2nd ch from hook, sc in next ch), sl st in MR — this forms a point.
- Repeat (ch 3, sl st, sc, sl st in MR) 3 more times to make 4 points.
- For one larger leaf: ch 4, sl st, sc in next 2 ch, sl st in MR.
- Finish with ch 2, sl st and fasten off. Secure, knot, and trim threads.
Explanation:
These points replicate a little strawberry’s leafy hull.
7. Assembly & Finishing
- Attach Drawstring Leaves:
- Use glue or sew the two leaves securely at the top opening of the pouch, covering the spot where the drawstrings emerge.
- Motif Assembly:
- Glue/sew the strawberry onto the white flower.
- Attach the green strawberry hull on top.
- Let all pieces dry securely if using glue.
- Attach Motif to Bag:
- Position the finished motif in the center of the pouch.
- Glue or sew in place, pressing firmly.
Final Steps & Guidance
- Weave in all yarn ends for a neat finish.
- Pull drawstrings to ensure the pouch closes completely.
- Allow all glue to dry thoroughly before use.
Conclusion
You have completed a charming, functional Crochet Strawberry Bag with elegant details and a secure closure. This bag is ideal for gifting, organization, or personal use. It combines basic rounds, thoughtful motifs, and a useful structure for intermediate to advanced crocheters.
Pattern Corrections & Tips
- Pattern Correction:
- Count stitch totals at the end of every round, especially increases, to avoid “drifting” stitch counts.
- Mark your starting stitch each round to preserve alignment.
- Tip:
- If new to motif work, pin pieces in place before gluing or sewing.
- Tighter stitches create a firmer pouch—adjust hook size if needed.