
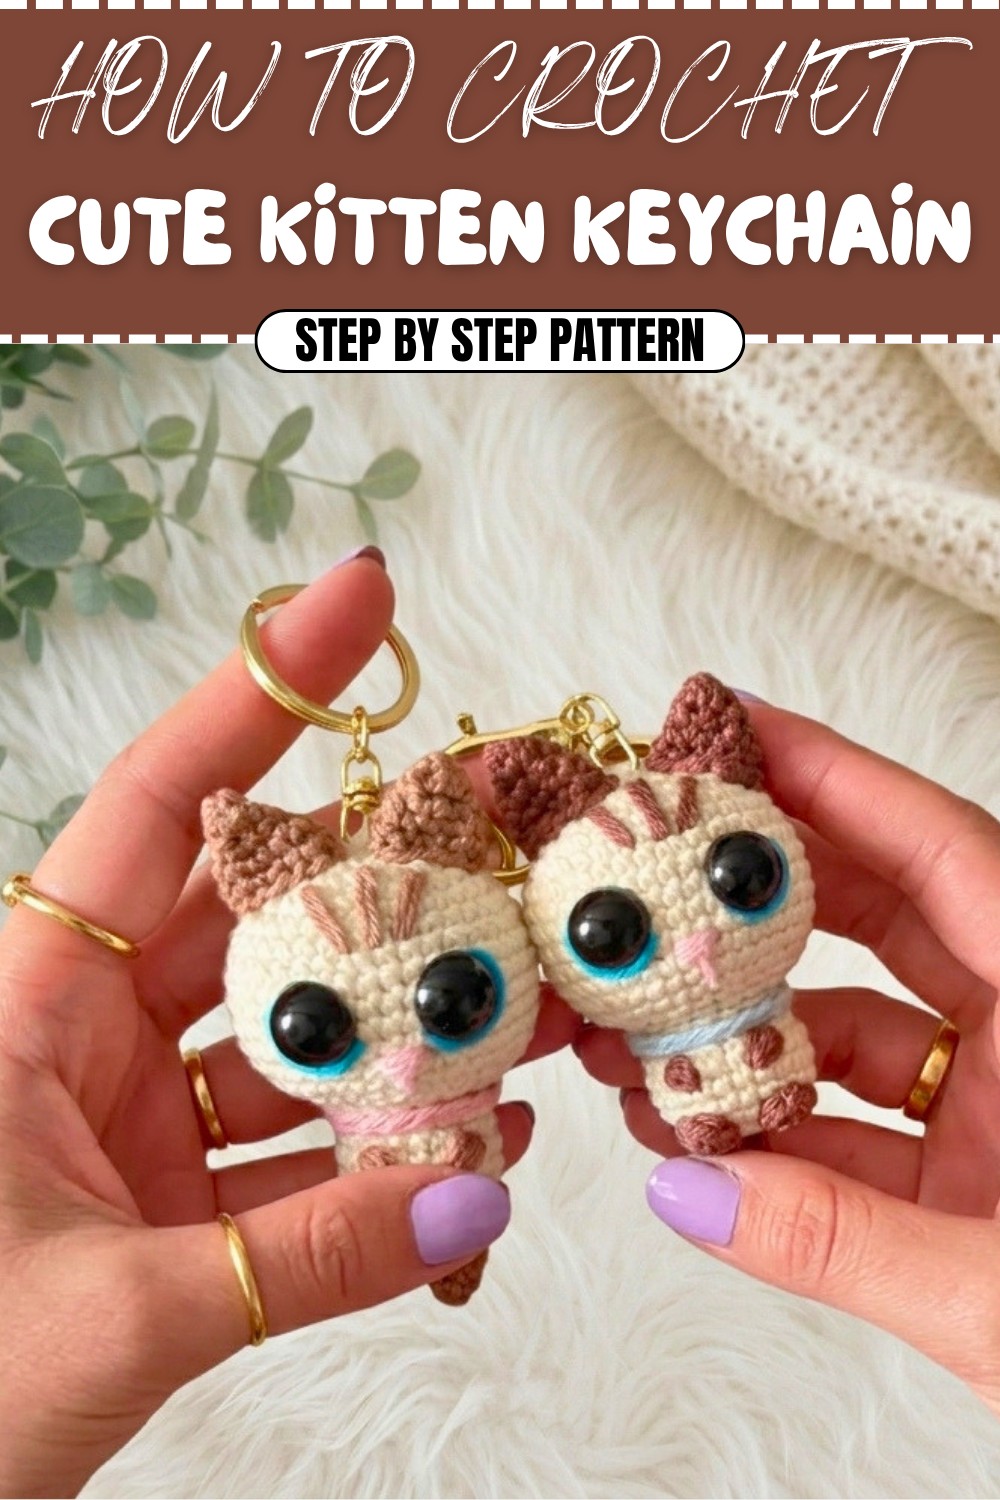
Crochet Kitten Keychain Free Pattern for Playful Accessories
Master this free crochet kitten keychain pattern that's an easy and fun way to craft a cute accessory for your keys or thoughtful handmade gifts.
A small, soft kitten is ready to follow wherever you go. This tiny friend has sweet, rounded ears and a gentle face, making it a happy companion on any bag or keyring. Its plump shape and playful tail add even more charm.
Crochet Kitten Keychain Pattern for Purrfect Handmade Gifts
Soft, medium-weight cotton yarn brings out lovely textures. Bright and pastel shades all look wonderful—maybe a gentle pink with a green collar, or a classic grey with a sky-blue accent. The finished kitten fits easily in your hand, shining with adorable detail without being bulky or heavy. While its main purpose is for keychains, it also works nicely as bag charms, backpack buddies, or cheerful ornaments.
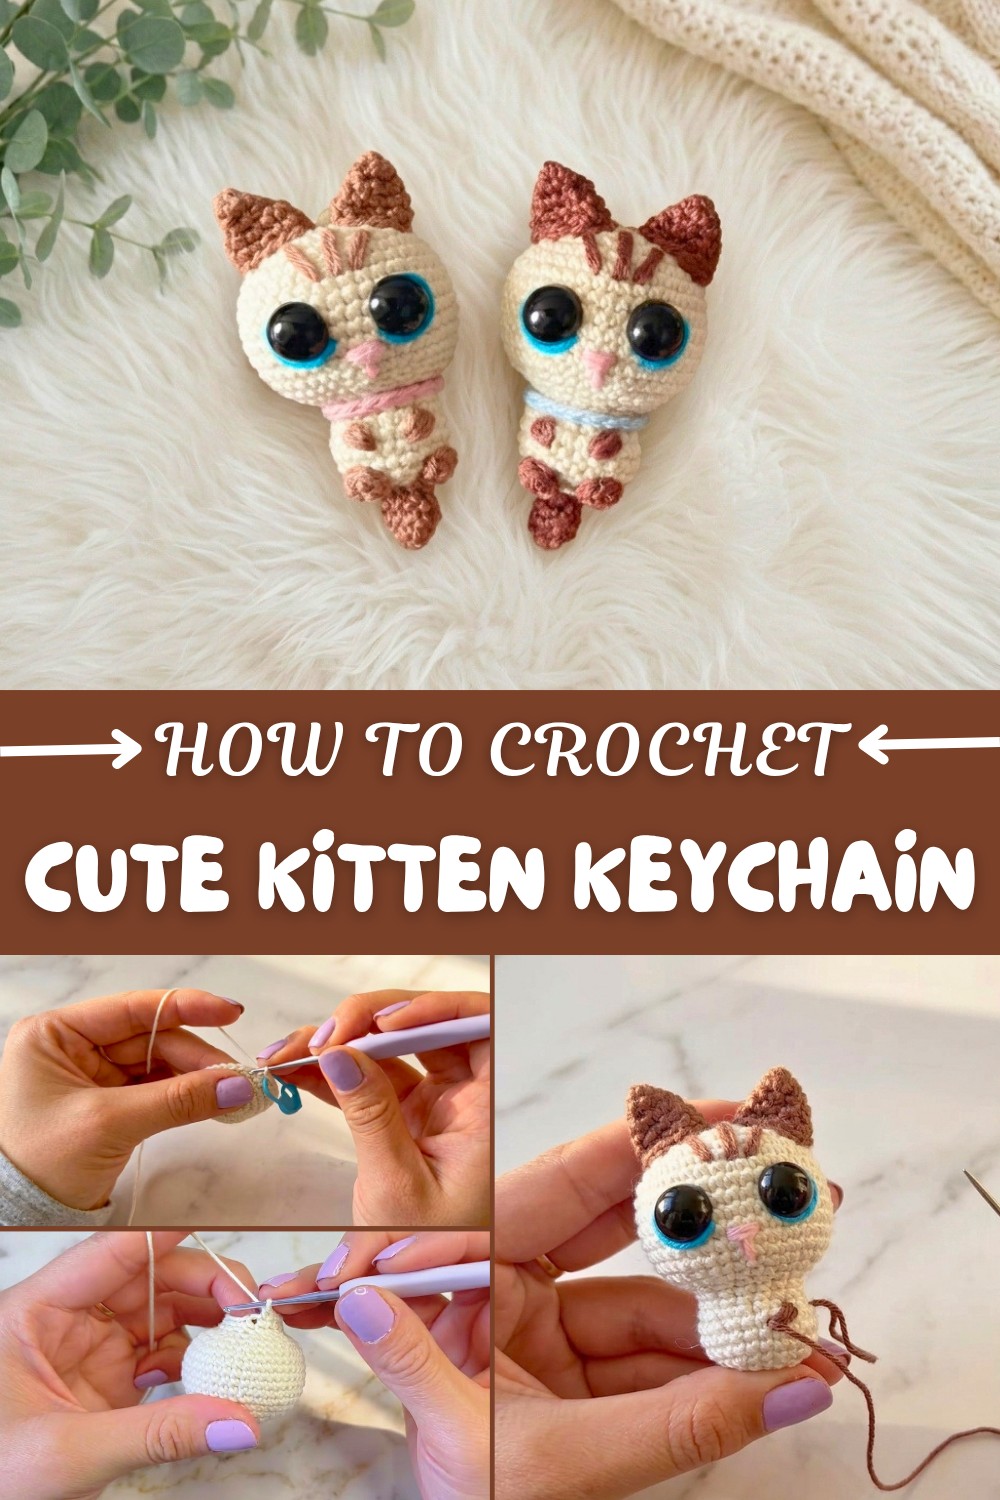
Personal touches can be added, such as a striped pattern, a flower, or different colored ears and tails, so each kitten can look a little different.
Special Crochet Aspects to Enjoy
- Uses a 3.0 mm crochet hook for snug, tidy stitches
- Works best with medium-weight cotton yarn for a soft and sturdy feel
- The magic ring is an important stitch, making the head and body round and even
- Finished size is about as small as a crochet flower, just right for a cute and portable friend
Fun to assemble, easy for anyone to try, and lets each person’s favorite colors and custom details shine. End up with a sweet companion that travels anywhere with you!
Amigurumi Kitten Keychain Crochet Pattern
Create a charming amigurumi kitten that doubles as a plush keychain or a small gift. This step-by-step pattern guides you through every phase, from crocheting the body to adding expressive facial details and the finishing touches. Whether you wish to make a pocket pet, ornament, or adorable gift, this project combines the joy of crafting with easy-to-follow techniques.
Skill Level & Terminology
- Skill Level: Beginner to Confident Beginner
- Terminology: US Crochet Terms
Materials & Tools
- Yarn:
- Worsted weight acrylic or cotton yarn in three colors:
- Main (kitten body): cream or any desired shade
- Contrast (ears/tail/paws): brown or chosen accent color
- Details (collar, nose, embroidery): blue, pink, and brown thread/yarn
- Worsted weight acrylic or cotton yarn in three colors:
- Hook: 2.5 mm–3 mm crochet hook
- Safety Eyes: 12 mm black or suitable color
- Stuffing: Polyester fiberfill
- Tapestry Needle: For sewing and embroidery
- Scissors
- Pins (optional): For positioning parts
- Keyring: For attaching to finished cat (optional)
- Liquid glue: Optional, aids assembly
Gauge
Gauge is not critical for amigurumi. However, use a smaller hook than usual for your yarn to ensure a tight fabric that prevents stuffing from showing.
Sample gauge: 8 sc x 8 rows = 1.5 x 1.5" (4 x 4 cm) in the round.
Abbreviations List
- MR – Magic Ring
- ch – chain
- sc – single crochet
- inc – increase (2 sc in same stitch)
- dec – decrease (single crochet two together)
- sl st – slip stitch
- st – stitch(es)
- FLO – front loop only
- R# – Round number
Special Stitch Instructions
- Increase (inc): Work 2 sc in the same stitch.
- Invisible Decrease (dec): Insert hook into front loops only of next two sts, yarn over, pull through both, yarn over and pull through both loops on hook.
- Magic Ring (MR): Wrap yarn around fingers to form ring, crochet into center as instructed, then tighten.
Finished Size
- Approximately 3.5–4" (9–10 cm) tall (variable per yarn/hook combination).
Stitches Used in This Pattern
This pattern uses only basic stitches:
Single crochet (sc), increase, decrease, magic ring, slip stitch, chain.
How to Start
Begin by making the kitten’s body and head as a continuous shape in the round. Progress through structured rounds with increases and decreases. Add details (ears, tail, arms, collar, embroidery) separately and attach or sew for a lively amigurumi finish. Provided step-by-step notes ensure easy comprehension even for beginners.
Pattern Instructions
BODY & HEAD
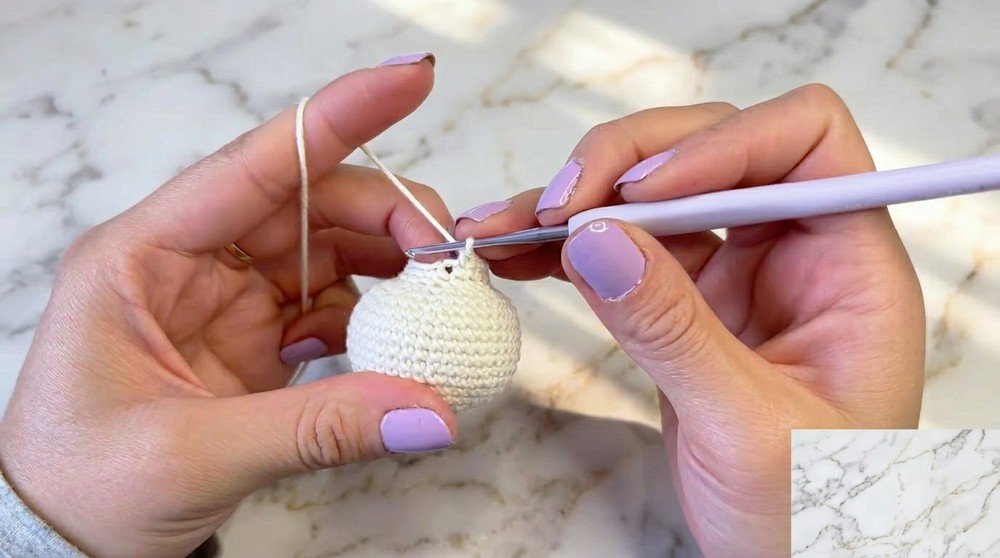
R1. Start with Main Yarn (cream):
- Make a magic ring (MR)
- ch 1, 8 sc into ring
- Pull tight to close.
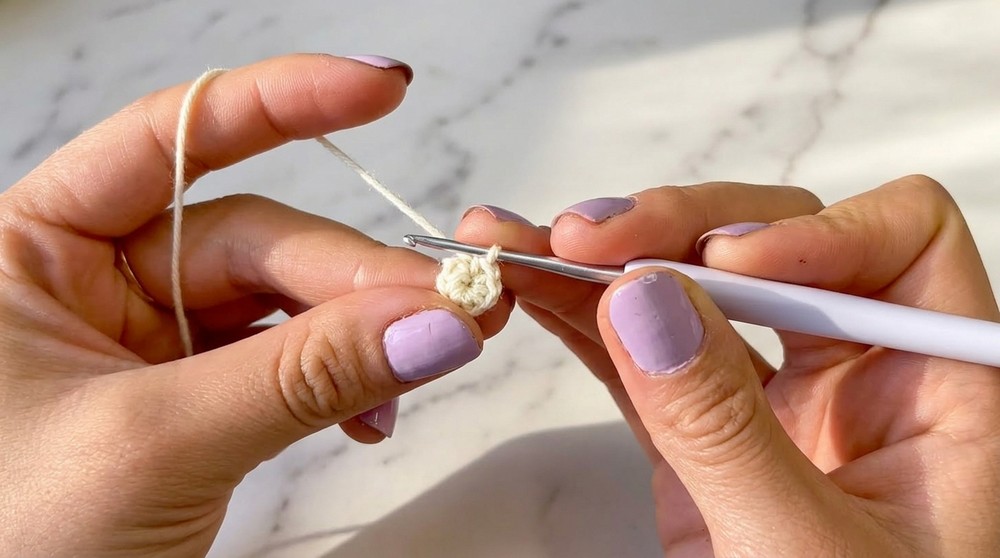
You are starting at the kitten's base. This tiny circle forms the bottom of your kitten.
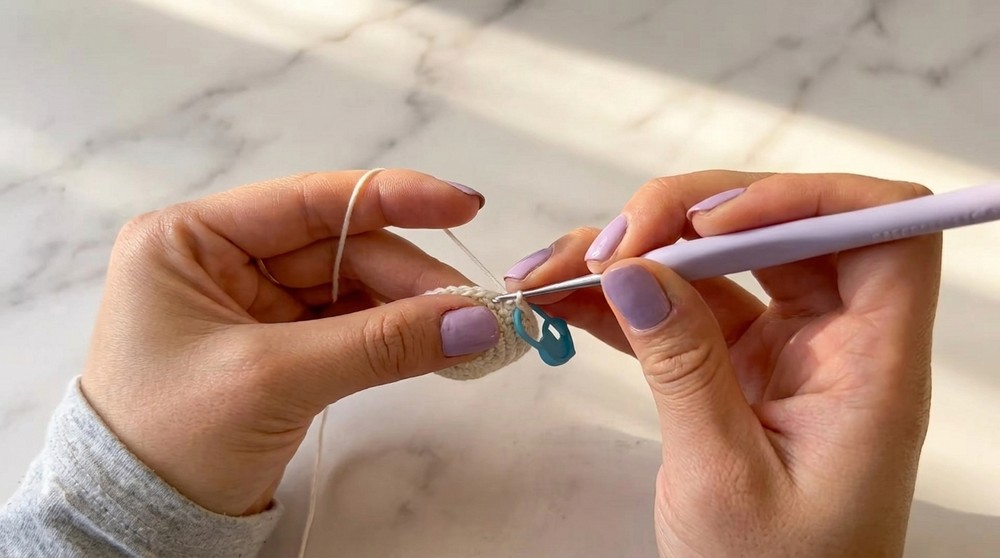
R2.
- 2 sc in each st around (inc in every st) – (16 sts)
This round doubles the base size. Always mark your first stitch for easier counting.
R3.
- [1 sc, inc] x 8 – (24 sts)
Alternate a single crochet and an increase stitch. This helps shape the base smoothly.
R4.
- [3 sc, inc] x 6 – (30 sts)
Now the base grows with a longer single crochet sequence before each increase, keeping the shape round.
R5.
- 6 sc, [inc] x 3, 12 sc, [inc] x 3, 6 sc – (36 sts)
This placement creates natural shaping for where your kitten’s cheeks/face will emerge.
R6.
- sc in each st around – (36 sts)
No increases. The kitten’s body starts to rise.
R7.
- 3 sc, inc, 9 sc, inc, 3 sc, inc, 3 sc, inc, 9 sc, inc, 3 sc, inc – (42 sts)
A more complex sequence, but just follow the count. The head and body are merging.
R8–R13. (6 rounds)
- sc in each st around – (42 sts per round)
These rounds form the "barrel" of the kitten.
Eye Marking (after R13):
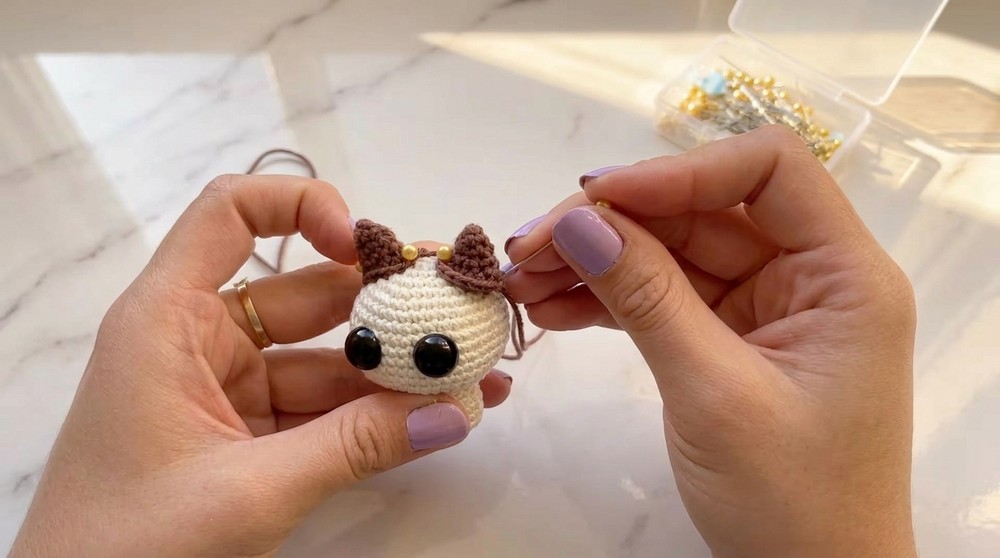
Mark between R9 and R10 for both eyes, spaced six stitches apart. Widen the holes and insert 12 mm safety eyes.
Marking ensures cute, symmetrical placement. Check before securing!
R14.
- 3 sc, dec, 9 sc, dec, 3 sc, dec, 3 sc, dec, 9 sc, dec, 3 sc, dec – (36 sts)
This round begins to reduce for the top of the head.
R15.
- [2 sc, dec] x 9 – (27 sts)
Alternating decreases and singles closes the head further.
R16.
- [1 sc, dec] x 9 – (18 sts)
Now the head nearly closes. Time to stuff.
Add Stuffing
Fill body and head firmly, but do not overstuff.
R17. (FLO)
- sc in front loop only (FLO) of each st around – (18 sts)
Working in the front loop only forms a neat base for the head’s closure and next shaping.
R18.
- sc in each st around – (18 sts)
Body remains fully closed.
R19.
- [2 sc, inc] x 6 – (24 sts)
A gentle shaping round for the neck/shoulder section.
R20–R22.
- sc in each st around – (24 sts, 3 rounds)
Keeps the fabric firm under the head.
R23.
- [2 sc, dec] x 6 – (18 sts)
Add Stuffing
Fill the neck area.
R24.
- [1 sc, dec] x 6 – (12 sts)
Final Close
Cut long tail, thread through front loops of all sts, pull tight to close. Weave and trim yarn.
Congratulations—the body base is done! Now you have a plump, stuffed kitten form ready for details.
EARS (Make 2, Contrast Color)
R1.
- MR, ch 1, 4 sc into ring.
R2.
- [1 sc, inc] x 2 – (6 sts)
R3.
- [2 sc, inc] x 2 – (8 sts)
R4.
- [1 sc, inc] x 4 – (12 sts)
R5.
- sc in each st around (12 sc)
Cut a long tail for sewing. Weave in or trim center ring tail.
Ears should be a neat triangle. Make two!
TAIL (Contrast Color)
R1.
- MR, ch 1, 6 sc into ring
R2.
- [2 sc, inc] x 2 – (8 sts)
R3.
- sc in each st around (8 sc)
R4.
- [2 sc, dec] x 2 – (6 sts)
R5–R6.
- sc in each st around (6 sc)
Cut a long tail.
BOTTOM PAWS (Make 2, Contrast Color)
R1.
- MR, ch 1, 5 sc into ring. Join with sl st to first st.
Cut, weave ends.
ASSEMBLY & FINISHING
- Ears:
Sew or glue one ear between Rounds 1–2 (top), with other end at Rounds 5–6. Pin for alignment. - Tail:
Attach to back at Rounds 21–22 and sew securely. - Bottom Paws:
Place 2 paw pieces at base, skipping two stitches from the top paw. Sew or glue in place. - Collar:
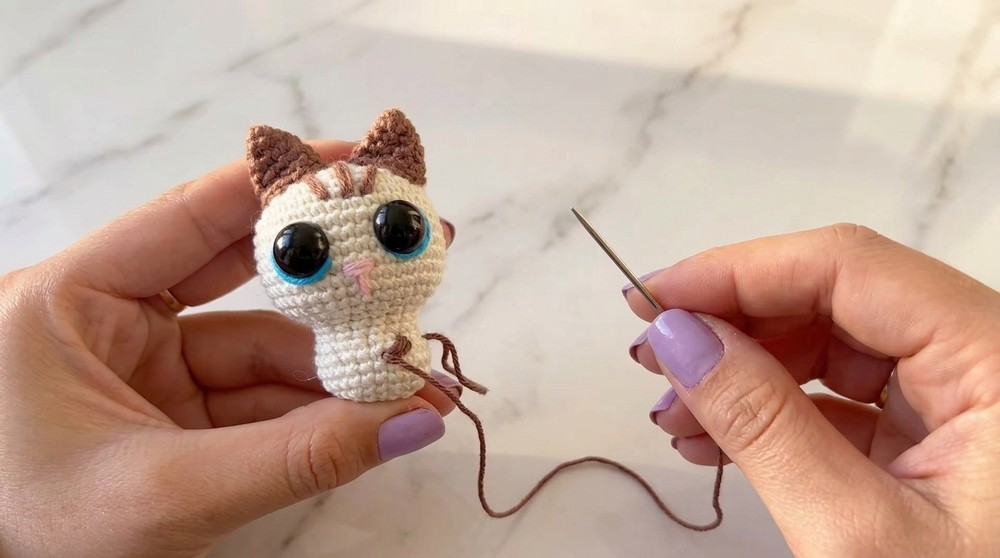
Chain 20 in blue, thread behind neck and stitch ends to secure. - Face Embroidery:
- Light blue: thread under safety eyes, from one side to the other.
- Pink: vertical/triangle nose between R11–12.
- Brown: facial lines, whiskers, and legs between R19–20 with short, duplicate stitches.
- Keyring (optional):
Attach keyring through magic ring on top with extra yarn, making several passes to secure. - Final Touches:
Weave in all ends and trim excess.
Carefully sew, glue, or embroider each detail as shown for a neat, finished kitten. Try on the ring for a secure fit and gift or use as a keychain!
Conclusion
This pattern is simple, cute, and highly customizable. With clear rounds, beginner-friendly stitches, and the option to add or skip embroidered details, you can easily make a kitten in any color or style—perfect for gifts, keychains, or just for fun!