
Experience the joy with this Crochet Daisy Flower Pattern offering simple and classic floral beauty for decor pieces and gifts all today.
A small handmade flower can instantly brighten any project, and Crochet Daisy Flower Pattern are especially loved for their fresh and joyful look. This type of crochet flower is lightweight, soft, and quick to complete, making it perfect for beginners and busy crocheters alike. It works beautifully as a decorative accent on hats, bags, baby items, blankets, and even wall hangings.
Must-Have Crochet Daisy Flower Pattern for Seasonal Makes
Once finished, the daisy flower can be used in many creative ways. It can be sewn onto clothing, attached to hair accessories, joined into garlands, or layered into larger crochet projects. Its versatility, easy steps, and charming appearance make it a fun and satisfying pattern to try.
The pattern allows you to play with colors, use leftover yarn, and create long-lasting flowers that never fade or wilt. Its simple structure and neat shape make it a favorite choice for both learning and creative expression.
To make this flower, the pattern usually begins with a magic ring or a small chain loop to form the center.
Several double crochet stitches are worked into the ring to create a solid base. After closing the center, the yarn color is changed for the petals.
Each petal is formed by chaining a few stitches, working tall stitches like treble crochet, and securing them back into the same space with a slip stitch.
This process is repeated evenly around the center until all petals are complete.
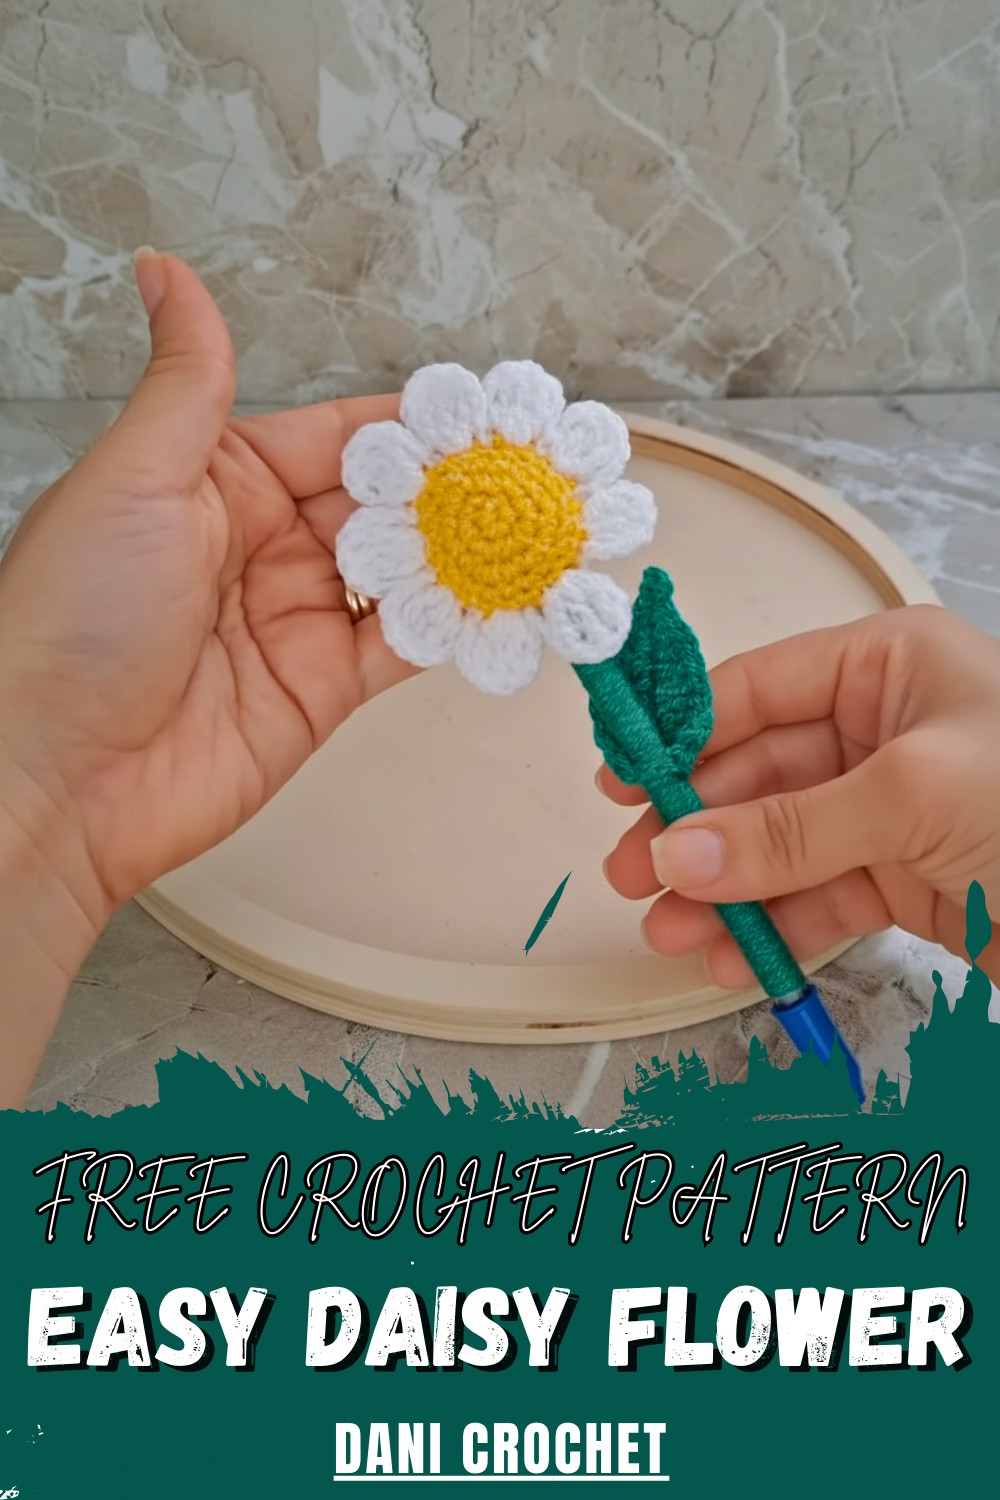
This tutorial provides a comprehensive guide to creating a trendy Crochet Daisy Pen, an excellent project for gifts or small business sales. Here are the specific details, features, and steps to complete this project.
Introduction
In this video, Dani Crochetpa demonstrates how to transform a standard pen into a beautiful decorative piece featuring a crochet daisy. This project is part of a series on decorated pens and focuses on creating a quick, "in-trend" item that is both functional and aesthetically pleasing.
Materials
-
Yarn: Omega Cris (acrylic yarn with a shine), 1mm thickness, used in double strands. Colors: Yellow and White.
-
Hook: 2.5 mm crochet hook.
-
Pen: A refillable ballpoint pen (previously wrapped in green yarn).
-
Stuffing: A small amount of fiberfill for the flower center.
-
Adhesive: Cold silicone glue (or hot glue).
-
Accessories: A stitch marker, scissors, and a crochet leaf.
-
Finishing: A lighter to remove excess fuzz from the yarn.
Step-by-Step Details
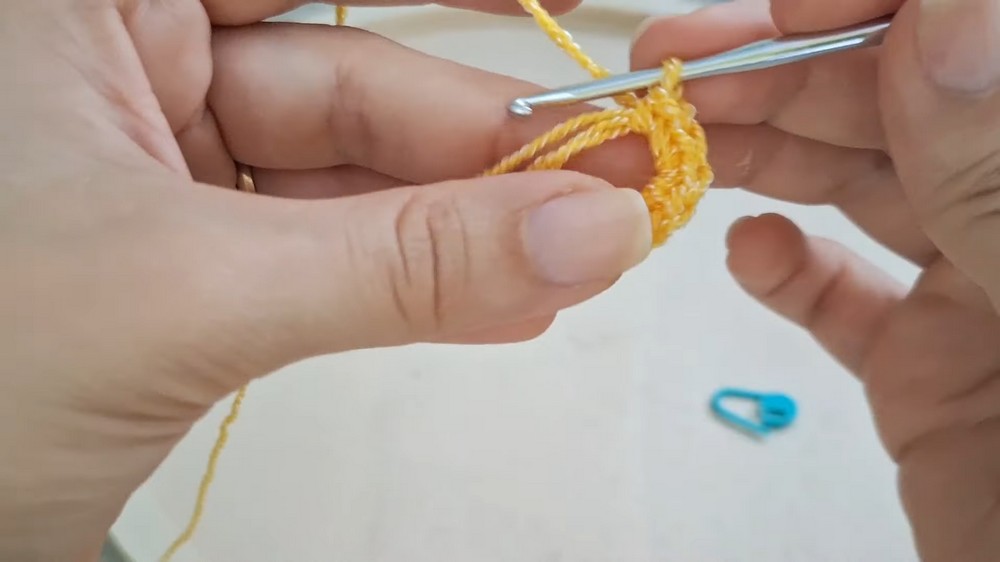
1. Create the Flower Center (Make 2)
-
Start with a magic ring and work 6 single crochets (sc).
-
In the second round, work an increase in every stitch to reach 12 sc.
-
In the third round, follow a pattern of 1 sc followed by 1 increase to reach 18 sc.
-
Work two additional rounds of plain sc (18 stitches) to give the center depth and volume.
-
Finish the first piece and cut the thread; keep the second piece attached to begin the petals.
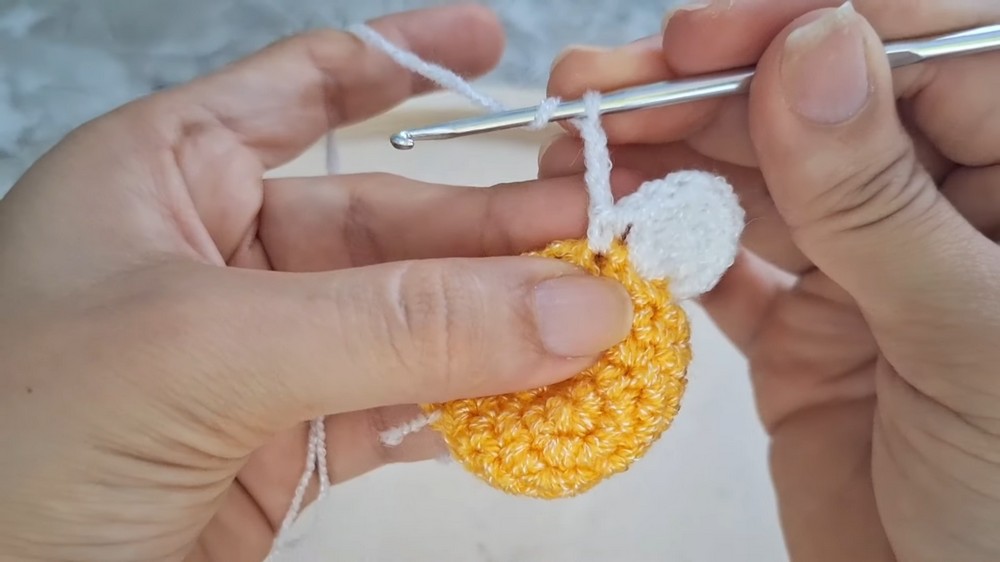
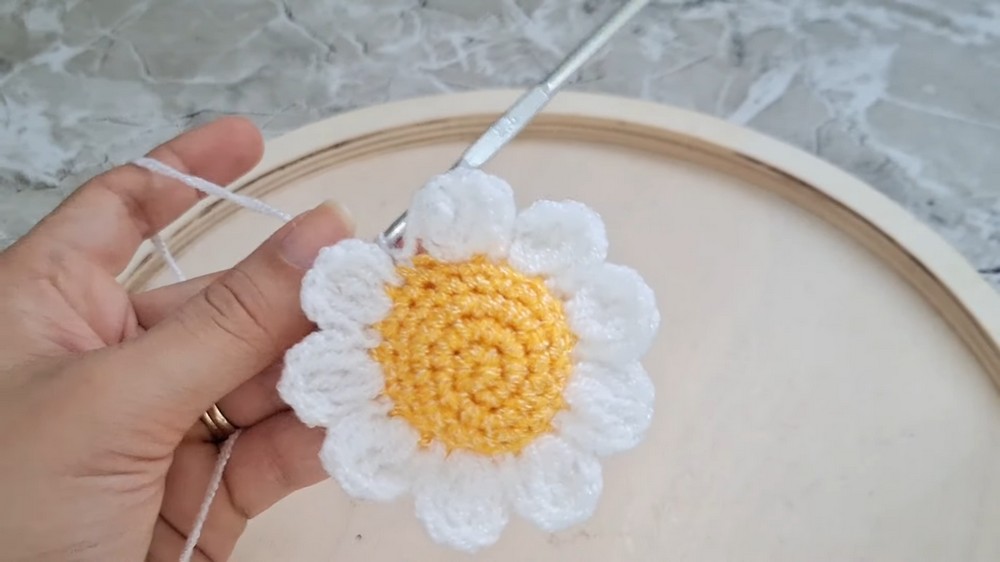
2. Form the Petals
-
Place the two yellow circles together with the wrong sides facing inward.
-
Join the white yarn by inserting the hook through the stitches of both layers simultaneously.
-
Chain 3, then work 3 extended double crochets (or triple crochets) into the next stitch.
-
Chain 3 and slip stitch into the following stitch to complete the first petal.
-
Repeat this sequence around the circle.
3. Assembly and Stuffing
-
Before closing the final petals, insert a small amount of stuffing to make the daisy "plump."
-
Leave a small gap at the base of the flower. To do this, crochet the final petal only through the front layer so the bottom remains open for the pen.
-
Secure the yarn and hide the tails inside the flower.
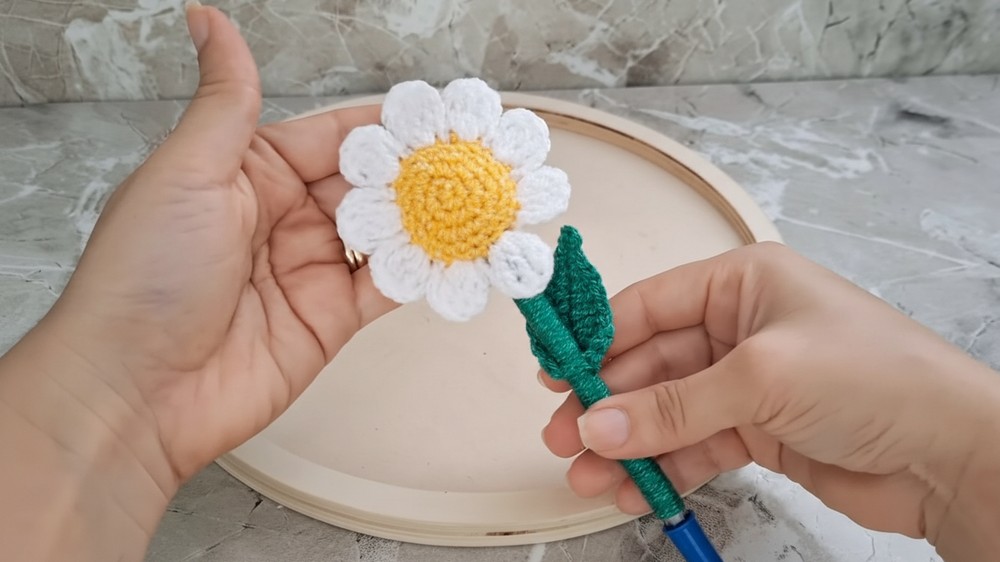
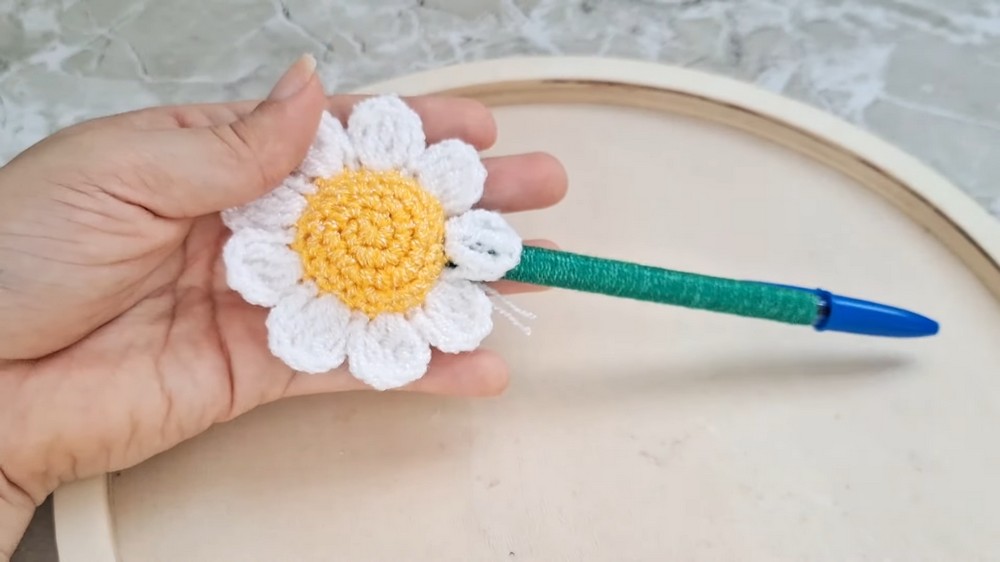
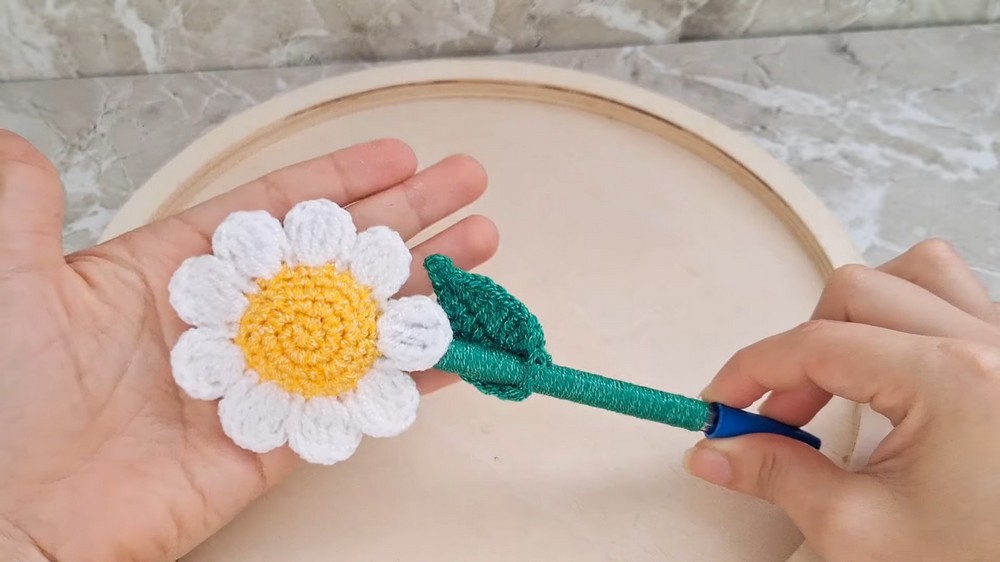
4. Attach to the Pen
-
Apply cold silicone glue to the top of the wrapped pen.
-
Insert the pen into the opening at the base of the flower.
-
Glue the crochet leaf onto the pen body, positioning it high enough so it does not interfere with your hand while writing.
Special Features & Information
-
Special Features: The use of double-strand thin yarn provides a sturdy structure with a professional sheen. The 3D stuffed center makes the flower look realistic from all angles.
-
Level of Difficulty: Beginner. It uses basic stitches and simple geometric shapes.
-
Uses: These pens serve as perfect party favors, teacher gifts, or inventory for craft markets.
-
Tutor’s Suggestions:
-
Use refillable pens so the user can replace the ink without throwing away the crochet work.
-
Position the leaf carefully to ensure the pen remains ergonomic.
-
Hide all yarn tails before applying glue to keep your tools clean.
-
Pro-Tip
To achieve a high-end boutique finish, lightly "toast" the finished flower with a lighter. Quickly passing a flame over the acrylic yarn removes the tiny fuzzy hairs (pilling), giving the daisy a crisp, clean, and professional appearance.
Conclusion
This crochet daisy pen is a fast and rewarding project that adds a touch of nature to everyday stationery. By following these steps, you create a durable, reusable accessory that is as practical as it is charming.
Would you like me to find a tutorial for the matching crochet leaf or the pen-wrapping technique mentioned in the video?


