
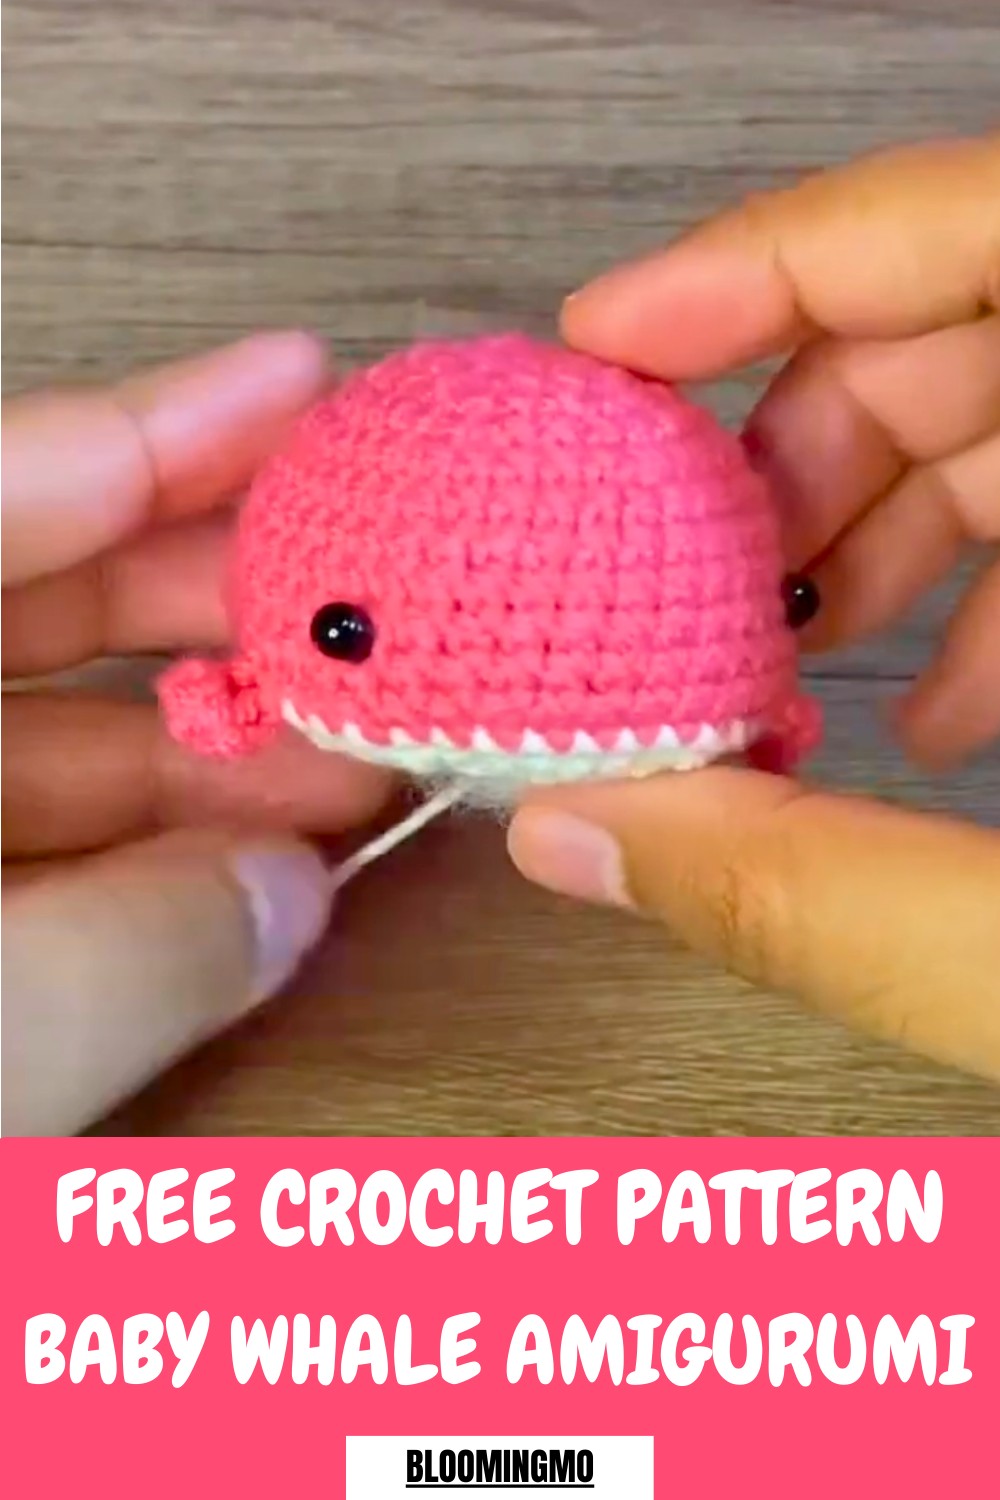
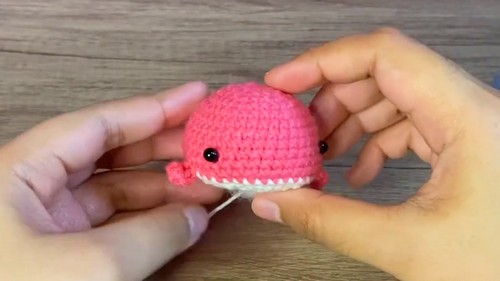
Delight little ones with this Crochet Baby Whale Pattern, featuring a cute, soft design perfect for toys, nursery decor, and playful gifts.
Soft shapes and charming details bring this adorable creation to life, making it a delightful addition to nurseries and play areas. The Crochet Baby Whale Pattern features a rounded, huggable form with gentle curves and sweet accents, perfect for little hands to hold and cuddle. Its lightweight design makes it safe and easy for babies to interact with, while the textured stitches add visual interest and a handmade feel that enhances its appeal.
Little Crochet Baby Whale Pattern That Adds Ocean Vibes
Ideal as a nursery decoration, a comforting toy, or a thoughtful handmade gift, it combines practicality with whimsical charm. The pattern allows for creative customization through colors, yarn types, and subtle embellishments, giving each whale a unique personality.
Durable and soft, it withstands gentle play while maintaining its shape and charm. Blending functionality, comfort, and aesthetic appeal, the Crochet Baby Whale Pattern transforms simple materials into an enchanting, timeless piece that delights both children and adults alike.
Introduction
The video tutorial introduces viewers to the step-by-step process of creating a cute and easy baby whale using amigurumi crochet techniques. While the video is not explicitly designed for beginners, it is ideal for those who want to build confidence and enhance their amigurumi skills. The tutor offers detailed explanations, demonstrates clearly, and encourages pausing the video when needed to ensure success. This charming little whale can be used as a keychain, decorative piece, or part of other crochet projects.
Step-by-Step Details
Materials Needed
To create the baby whale, gather the following:
- Two colors of yarn: One for the body and one for the underside/tail (milk cotton yarn 3-ply, approximately 1.55 mm).
- Hook size: 3 mm crochet hook (suitable for the milk cotton yarn).
- Darning needle: For weaving in ends and closing gaps.
- Stitch marker: To identify the start of each round.
- Scissors: For cutting yarn tails.
- Stuffing material: Fiberfill or similar stuffing to shape the whale.
- Safety eyes: 5 mm eyes to add personality to your creation.
Crochet Process
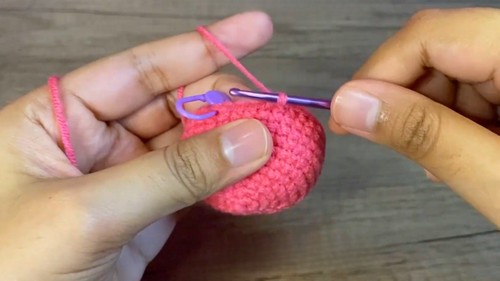
- Starting the Baby Whale:
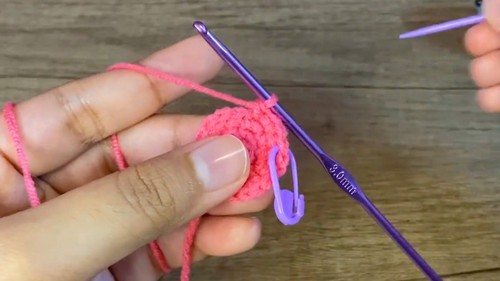
- Create a magic ring: Wrap the yarn around your finger, form an X-shape, and pull through a loop to start.
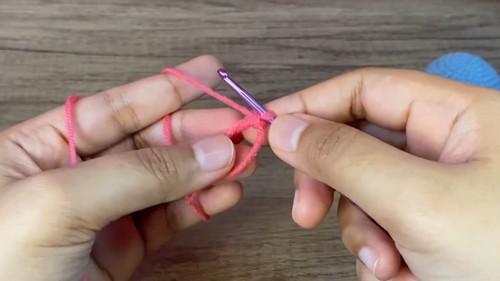
- Crochet 6 single crochets into the magic ring and pull the tail to close the ring securely. This completes Round 1.
- Create a magic ring: Wrap the yarn around your finger, form an X-shape, and pull through a loop to start.
-
Increasing Stitches:
- Round 2: Crochet 6 increases (2 single crochets into each stitch) to double the stitch count to 12.
- Round 3: Work one single crochet followed by one increase, repeating this pattern 6 times to reach 18 stitches.
- Round 4: Use the pattern one single crochet, one increase, one single crochet, repeating 6 times for a total of 24 stitches.
-
Shaping the Body:
- Round 5: Crochet three single crochets, followed by one increase for 6 repetitions to reach 30 stitches.
- Round 6: Work the pattern two single crochets, one increase, two single crochets, repeated 6 times for 36 stitches.
- Rounds 7–11: Work one single crochet into each stitch across the rounds to maintain 36 stitches.
-
Adding Details (Tails and Fins):
- Round 12: Start creating the whale's fins and tail.
- For the tail, work into the front loops only:
- Slip stitch, chain 5, and crochet in the second chain from your hook using single crochet, half double crochet, and double crochet.
- Repeat for symmetrical detail.
- For the fins, use front loops and chain 4, followed by double crochets to form rounded edges.
- For the tail, work into the front loops only:
- Add 8 single crochets between fins and tail, repeating the entire process to complete the round.

- Round 12: Start creating the whale's fins and tail.
-
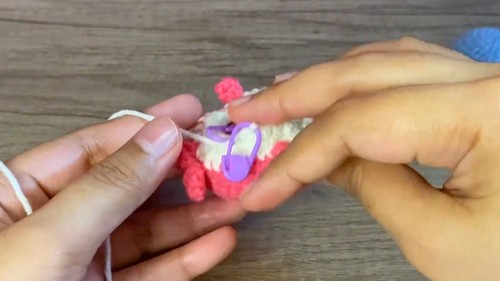
Changing Yarn Color:
- Switch to a different yarn color (such as cream or white) for the whale’s underside:
- Undo the last stitch of Round 12 and complete it with the new yarn color.
- Continue with Round 13: Crochet one single crochet in each stitch (36 single crochets) using only back loops around fins/tail for smooth transitions.
- Switch to a different yarn color (such as cream or white) for the whale’s underside:
-
Decreasing Stitches:
- Round 14: Work two single crochets followed by one decrease for 9 repetitions. This reduces the count to 27 stitches.
- Round 15: Use the pattern one single crochet followed by one decrease, repeated 9 times, reducing the count to 18 stitches.
- Round 16: Crochet 9 decreases to close the base, leaving only 9 stitches in total.
-
Final Touches:
- Stuff the whale with fiberfill, ensuring the shape is even and firm.
- Use a darning needle to weave through the remaining loops for closing the gap. Pull tight to finish the underside cleanly.
- Add safety eyes before final stuffing, securing them at 3 stitches apart (or wherever looks best).
Special Features
- Detailed shaping options: The tutorial demonstrates how to add fins, tails, and smooth transitions with front and back loop techniques for realistic details.
- Customizable stuffing and size: Experiment with yarn thickness or hook size to vary the dimensions.
- Durable design: Perfectly formed stitches ensure a sturdy, polished look for the finished piece.
Level of Difficulty
While the project is not beginner-friendly, the instructor provides a clear walkthrough suitable for those at an intermediate level or beginners seeking a challenge. The use of detailed techniques (magic ring, increases, decreases, loops) enhances skill-building opportunities.
Tutor’s Suggestions
- Don’t rush: Pause the video whenever necessary to follow the instructions at your own pace.
- Use stitch markers to track the start of your rounds, especially during shaping.
- For fins and tails, work slowly on the front and back loops to avoid missed stitches, as this can affect symmetry.
Uses
- Keychain: Turn the baby whale into a portable accessory.
- Decorations: Use it as part of room or desk décor.
- Gifts: Crochet multiple whales in various colors for gifting to loved ones.
- Your crochet project: Incorporate the whale design into larger creations like oceanscape-themed displays.
Tip
To ensure smooth transitions when changing yarn colors, complete the last stitch with the new yarn instead of tying knots. This creates a polished and seamless look for the underside.
Conclusion
The baby whale crochet project is a charming way to improve your amigurumi skills while creating a versatile and adorable piece. With detailed instructions covering shaping, color changes, and finishing techniques, this tutorial equips viewers with the confidence and skills to create their own unique crochet decorations.


