
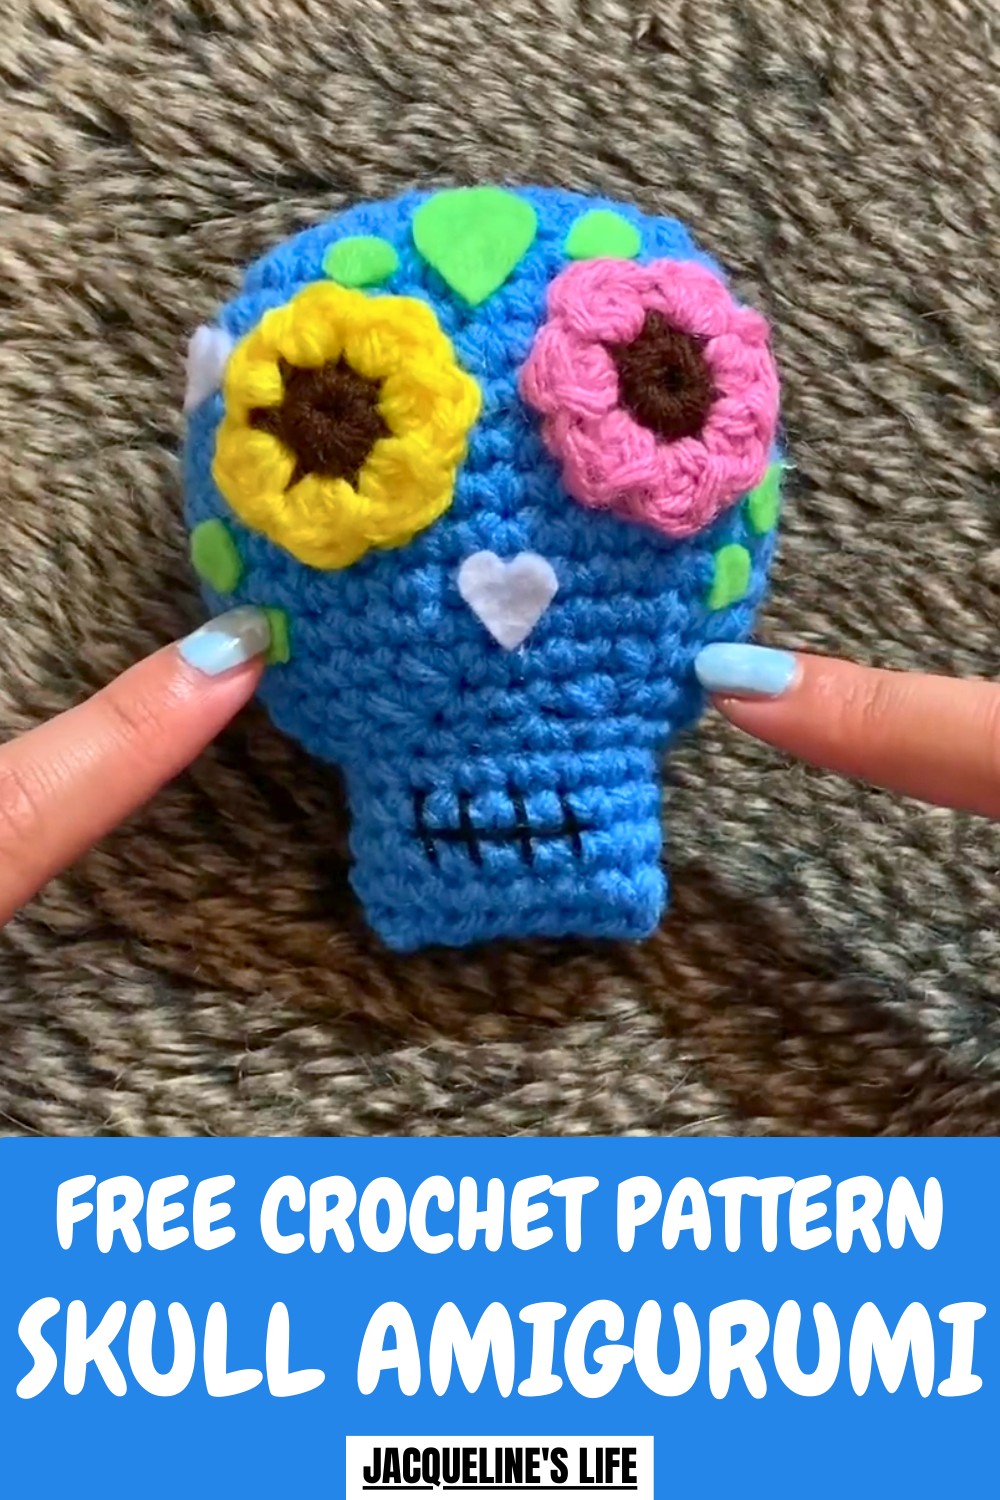
Give Halloween a playful twist with the Free crochet Skull Amigurumi Pattern, turning yarn into a fun skull perfect for decor, spooky fun, or quirky gifts.
Not spooky has to be scary, and this little skull proves just that. With its rounded shape, hollow-like eye details, and smooth stitching, it gives off a playful, quirky vibe that is both fun and approachable. Perfect for decorating shelves, desks, or even Halloween displays, it adds personality and charm wherever it’s placed.
Spooky Fun Crochet Skull Amigurumi Pattern You’ll Love
Its compact size and lightweight design make it easy to carry, display, or gift to friends who enjoy a touch of spooky whimsy. Making this piece is as enjoyable as it is satisfying, offering a hands-on activity that helps improve focus, stitch control, and patience.
Neat finishing details ensure the skull holds its shape while maintaining a polished look. With its balance of charm, humor, and creativity, this tiny skull brings fun, handmade personality to everyday spaces or festive celebrations, turning a simple accessory into a delightful conversation starter.
Materials Needed
For this project, you’ll need the following:
- Yarn (Weight 4):
- Base color of your skull (yellow, white, or any color you prefer).
- Additional yarn colors for details like flower eyes (yellow, pink, brown, etc.).
- Crochet Hooks:
- 5mm crochet hook (for the main skull).
- 4.5mm crochet hook (recommended for finer details like the eyes).
- Felt: For features like the eyes and nose (if not crocheting them).
- Embroidery Thread (Black): For stitching facial details (e.g., the mouth).
- Stuffing: Fiberfill or yarn scraps for eco-friendly stuffing.
- Yarn Needle: For sewing the bottom closed and working other details.
- Hot Glue Gun: To attach felt features securely.
- Scissors: For cutting yarn and felt.
- Stitch Marker: To mark the end of each round while crocheting.
Uses
This versatile crochet skull can be used for:
- Halloween Décor: Display them around your home or event space.
- Gifts: Handmade, unique gifts for friends, family, or children.
- Stress Toys: Their round, soft design makes them great for squeezing to relieve anxiety or stress.
- Charity Projects: They can be donated to patients or used in craft fairs.
- Custom Art: Use felt and embroidery to create sugar skulls or other unique designs.
Special Features
- Custom Shape: The round design makes it soft, squeezable, and perfect for stress relief.
- Beginner-Friendly: The pattern only requires basic stitches like single crochet, increases, and decreases, making it ideal for crochet beginners.
- Two Eye Options: Choose between crochet flower eyes or felt cutouts for a unique touch.
- Detailed Embellishments: Options to add creative flourishes, including embroidered mouths or additional features.
- Adaptable Design: Suitable for experimenting with different colors or themes (e.g., sugar skull styles).
Level of Difficulty
Beginner Level to Easy-Intermediate
The project uses simple stitches such as single crochet, increases, and decreases. The most challenging parts are working with a magic circle (though the chain 2 method is demonstrated as an alternative) and adding details with felt or embroidery.
Tutor’s Suggestions
- Magic Circle vs. Chain 2 Method: The tutor prefers the magic circle for a neater, adjustable design but demonstrates the chain 2 method for beginners. If using the chain 2 method, a small gap will appear at the top, which can be covered with felt if desired.
- Hook and Yarn Adjustments: The patterns use different hook sizes (4.5mm and 5mm) depending on yarn type. Choose a hook size that matches your yarn thickness and crochet tension for consistent results.
- The Skull Shape: The round shape was chosen to make the skull squeezable and soft, suitable for stress toys or décor. This shape is easier to crochet than a flat or intricate skull design.
- Eyes and Embellishments: While flower eyes are more intricate (involving several stitches per petal), you can opt for felt cutouts for a faster, simpler finish.
- Prolonging the Skulls: Ensure tight stitches to prevent fiberfill from escaping. When stuffing, use yarn scraps if you run out of fiberfill.
Step-by-Step Instructions
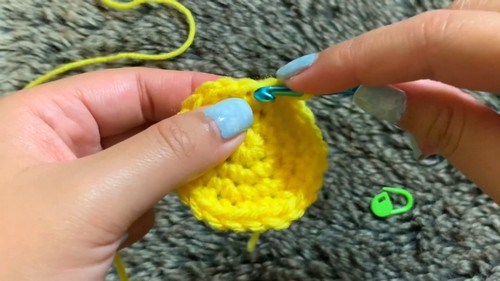
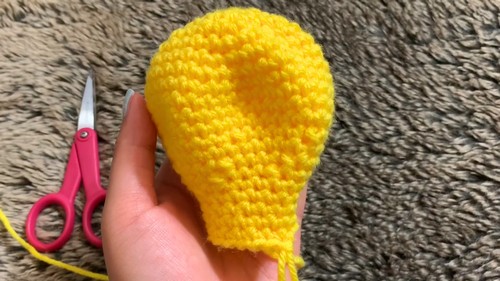
1. Skull Base (Rounds 1–21)
Round 1:
- Start with a magic circle or use the chain 2 method.
- Crochet 6 single crochets into the circle. If using the chain 2 method, crochet into the first chain instead.
- Close the circle and place a stitch marker to mark the last stitch of the round.
Round 2:
- Increase in each stitch by working 2 single crochets into each (12 stitches total).
Round 3:
- Alternate an increase with 1 single crochet in the next stitch (18 stitches total).
Round 4:
- Alternate an increase with 2 single crochets between increases (24 stitches total).
Round 5:
- Alternate an increase with 3 single crochets in between (30 stitches total).
Rounds 6–8:
- Follow the same pattern, adding 1 extra single crochet between increases each round until you reach 36 total stitches in Round 8.
Rounds 9–12:
- Work 4 rounds of single crochet with no increases. You’ll maintain 36 stitches per round. This creates the skull’s length.
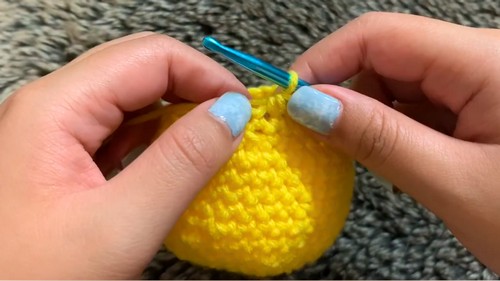
2. Decreasing to Shape the Bottom
Round 13:
- Single crochet into the next 4 stitches, then work an invisible decrease (crocheting two stitches together by working only in their front loops).
- Repeat this pattern until you have 30 stitches.
Round 14:
- Single crochet all around with no decreases.
Round 15:
- Single crochet into the next 3 stitches, then work a normal decrease (crocheting two full stitches together).
- Repeat this pattern until you have 24 stitches.
Round 16:
- Single crochet into the next 2 stitches, then work a normal decrease.
- Repeat until you have 18 stitches.
Round 17:
- Start with a normal decrease, then single crochet into the next 7 stitches.
- Repeat once more, ending with 16 total stitches.
Rounds 18–21:
- Work 4 rounds of single crochet with no increases or decreases.
3. Adding Details
Mouth Embroidery
- Use black embroidery thread to stitch the mouth with simple horizontal and vertical lines for a classic skull design. Start sewing from the inside of the skull for cleaner edges.
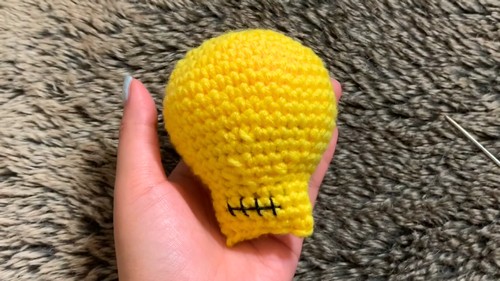
Stuffing
- Before closing the bottom, stuff the skull with fiberfill or yarn scraps for a rounded shape. Adjust the firmness to your liking.
Closing the Bottom
- Thread a yarn needle with leftover yarn and sew the open stitches together, pulling the edges tight. Secure the end with a knot and tuck it inside the skull.
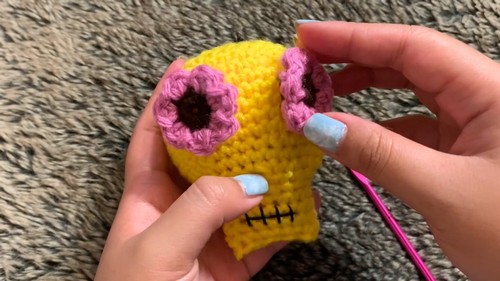
4. Customize the Eyes and Nose
Felt Eyes and Nose
- Use black felt for the eyes (oval or round) and a triangle for the nose. Experiment with colorful felt for sugar skull designs.
- Attach the felt with a hot glue gun.
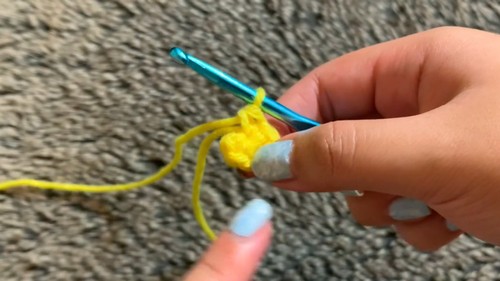
Crochet Flower Eyes
- Use a 4.5mm crochet hook.
- Create a magic circle with brown yarn and crochet 6 single crochets into the circle to form the base.
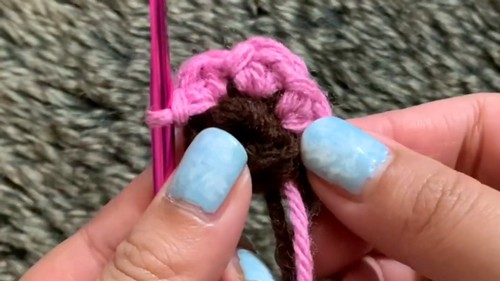
- Switch to petal colors and create half-double crochets, double crochets, and slip stitches in each stitch to form petals.
- Make two flowers, then attach them with hot glue.
Conclusion
The crochet skull is a quick and fun project, perfect for Halloween or as a creative décor piece. Its soft, rounded shape makes it versatile for stress toys or cute gifts, while its customization options with felt and embroidery allow for endless creativity. Whether you leave your skull simple or embellish it with intricate details, it’s sure to stand out as a charming handmade craft.
Pro Tip
When stuffing your skull, avoid overfilling—it’s better to keep the shape slightly soft so the edges are easier to close and maintain the round shape.


