
Learn how to make a festive Free Crochet Pumpkin Coaster Pattern that's stylish, practical, beginner-friendly, and perfect for adding autumn charm.
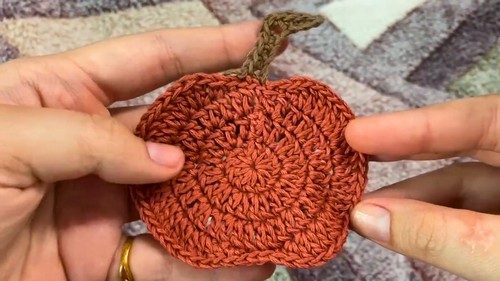
This charming autumn piece brings warmth and seasonal charm to your home. The crochet pumpkin coaster is a small yet impactful accessory, offering both practicality and decoration. Made with soft, colorful yarns, it features a beautifully rounded shape and a cute stem that make it ideal for adding a fall-inspired touch to any table or setting. These coasters provide a valuable layer of protection for your furniture while doubling as cheerful accents for coffee tables, dining areas, or gift baskets.
Cozy Crochet Pumpkin Coaster Pattern for Fall Drinks

They’re especially delightful for fall gatherings, Halloween decorations, or Thanksgiving celebrations. Their simple construction makes them an excellent choice for both seasoned crocheters and beginners looking to practice their technique. Soft textures and playful seasonal colors bring a touch of coziness wherever they’re placed. Add a personal touch with color variations and watch as this small project turns into a thoughtful item you'll be proud to share or use repeatedly.
How to Crochet a Pumpkin Coaster: Step-by-Step Guide
Materials Needed
To make your pumpkin coaster, you’ll need the following:
- Yarn: Orange for the pumpkin body and brown (or green) for the stem.
- Hook: A crochet hook (size not specified in the video, but likely between 4.0–5.5 mm depending on the yarn used).
- Scissors: For cutting the yarn.
- Darning Needle: To weave in the ends.
Uses
These pumpkin coasters are both decorative and functional. You can use them as:
- Coasters for cups, mugs, or small plates.
- Festive table decorations for Halloween or Thanksgiving.
- Charming handmade gifts for friends or family.
Special Features
- Shaped Design: These coasters mimic the iconic shape of pumpkins, complete with a textured body and a small stem.
- Customizable Colors: Use any color scheme you like. Classic orange works well, but green, yellow, or other seasonal tones can make your coasters unique.
- Beginner-Friendly Stitches: The tutorial uses basic crochet techniques like magic rings, double crochets, and single crochets, making this a great project for beginners to practice.
Level of Difficulty
Beginner to Intermediate:
The project is beginner-friendly if you're already familiar with basic stitches (e.g., chains, double crochets, slip stitches). However, it involves some shaping and the use of a magic ring, which may require a bit more attention for absolute beginners.
Step-by-Step Instructions
Step 1: Create the Base (Round 1)
- Start by making a magic ring. Wrap the yarn around your fingers, create a loop, and pull the working yarn through.
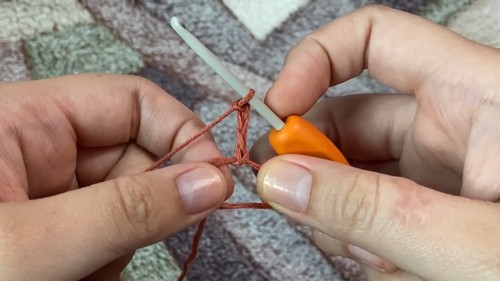
- Chain 3. This counts as your first double crochet (DC).
- Work 11 more double crochets into the magic ring, making a total of 12 double crochets (including the initial chain 3).
- Pull the string of the magic ring tightly to close the circle.
- Slip stitch into the third chain of the starting chain 3 to close the round.

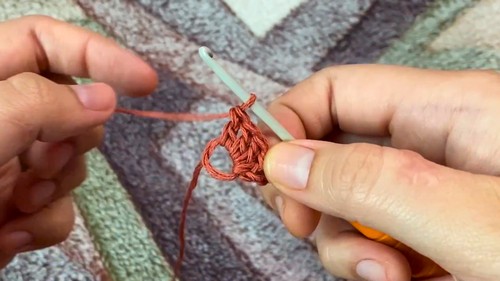
Step 2: Increase for Round 2
- Chain 3 again (counts as the first double crochet).
- Work 2 double crochets in every stitch around, creating a total of 24 double crochets.
- Slip stitch into the third chain of the starting chain 3 to close the round.
Step 3: Shape the Pumpkin (Round 3)
- Chain 3 (first double crochet of this round).
- Work 1 double crochet in the next stitch, then 2 double crochets in the following stitch (alternate every other stitch).
- Repeat this pattern (1 DC, 2 DC in same stitch) across the round. You’ll end up with a total of 36 double crochets.
- Slip stitch into the third chain of the starting chain 3 to close the round.
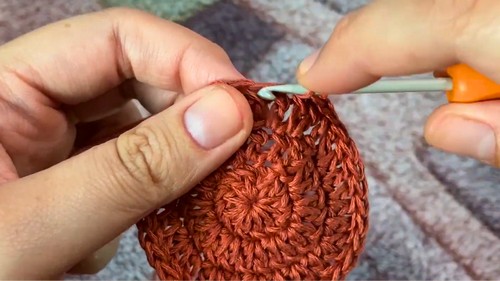
Step 4: Add the Pumpkin Curves (Final Round)
- Slip stitch into the next stitch, and then into the stitch after that.
- In the next stitch, work 1 single crochet (SC).
- In the following stitch, work 1 half double crochet (HDC).
- For the next 11 stitches, work 2 double crochets in each stitch (total of 22 DCs).
- Repeat the following pattern on the other side of the pumpkin:
- Work 1 HDC, then 1 SC, then several slip stitches to shape the top.
- Continue shaping until the pumpkin outline is complete.
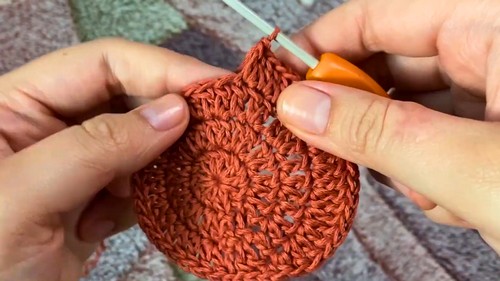
Step 5: Attach the Stem
For the stem:
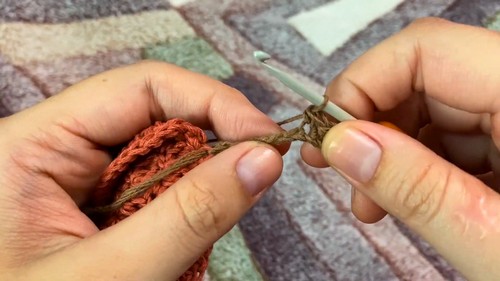
- Switch to the brown (or green) yarn. Insert your hook into the second slip stitch at the top of the pumpkin. Pull through the yarn.
- Chain 9 to create the stem's length.
- Skip the first chain. Begin single crocheting (SC) back into each chain, starting from the second chain.
- Once halfway, add 3 SCs in a single chain to create the "tweak" in the stem. Finish by single crocheting back to the base.
- Secure the stem by slip stitching into the pumpkin and cut off the yarn. Weave in all the ends.
Tutor’s Suggestions
- The tutor emphasizes pulling the magic ring tightly for a clean, round base.
- She recommends sewing in all the loose ends and cutting any excess yarn to give the coaster a polished look.
- You can experiment with different colors for the stem or body to match your decor.
Conclusion
Congratulations! You’ve just crocheted a festive and functional pumpkin coaster. This charming project is perfect for Halloween, fall decor, or as a handmade gift. Customize it with various colors or add your personal touch to make it even more unique. Show off your creativity while keeping your surfaces safe from spills!
Pro Tip
When handling larger rounds, use a stitch marker to keep track of your starting point. This ensures consistent, even stitches and helps avoid losing your place.


