
Celebrate autumn with the Free crochet Pumpkin Amigurumi Pattern, featuring easy steps, quick stitching, and a cute pumpkin perfect for decor or gifts
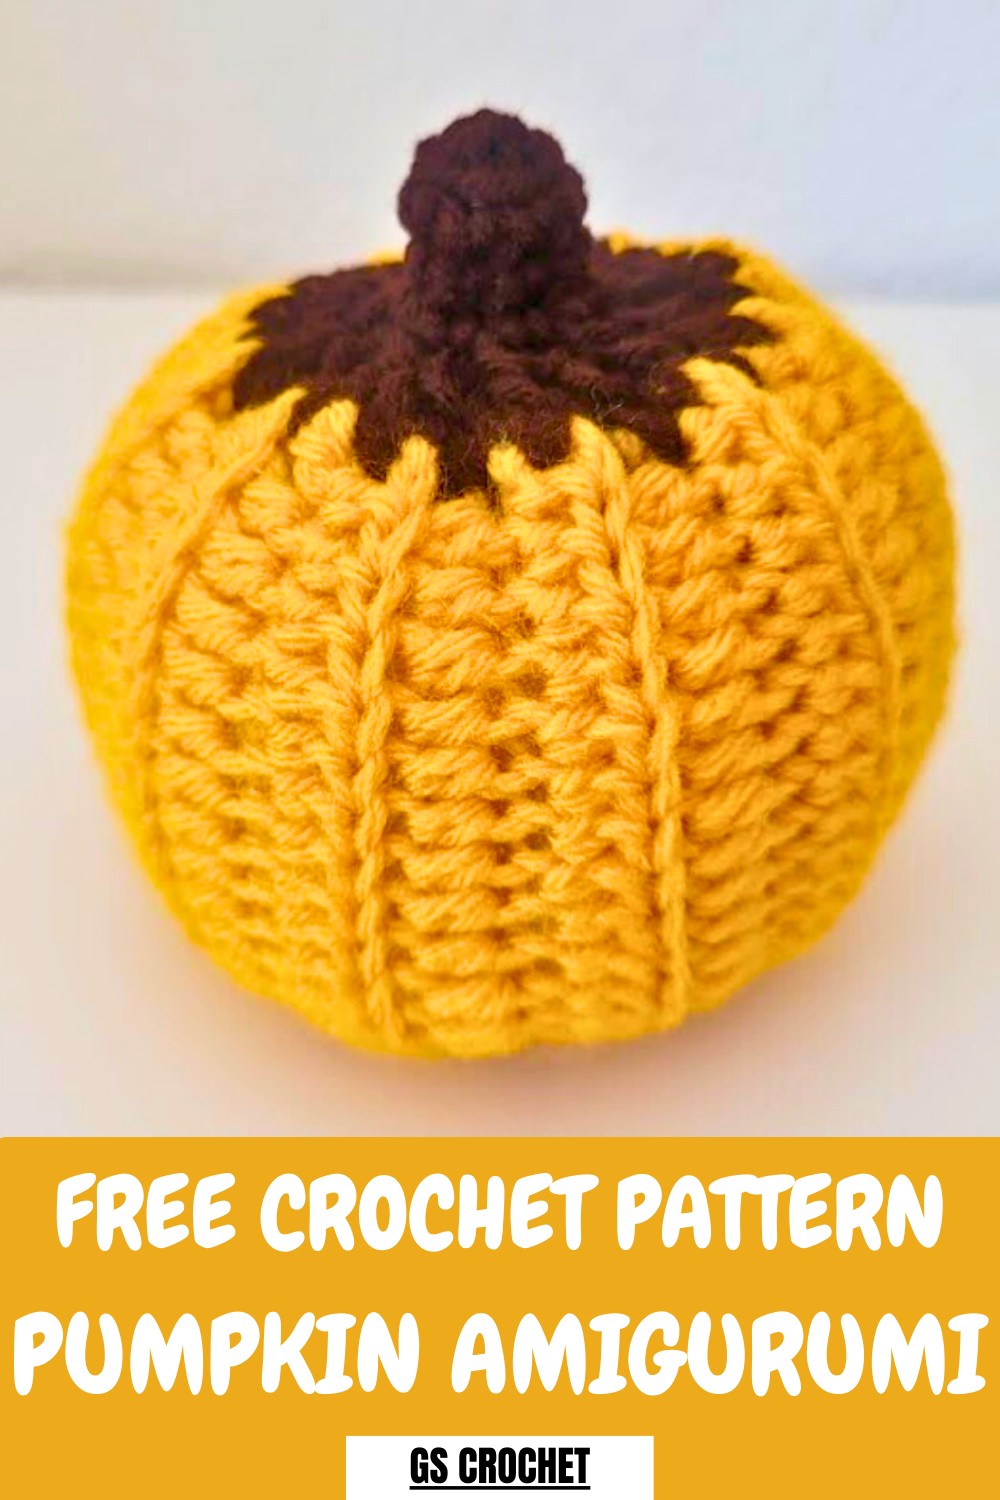
A tiny pumpkin can instantly spark joy and add a cozy autumn vibe wherever it’s placed. This Crochet Pumpkin Amigurumi Pattern is simple enough for beginners while still giving experienced crafters a satisfying project. Its rounded body, defined ridges, and little stem make it look playful yet realistic, perfect for decorating shelves, desks, or even as a fun gift accent.
Cute & Cozy Crochet Pumpkin Amigurumi Pattern Perfect for Fall
Beyond looking cute, it’s surprisingly practical—use it as a soft toy, keychain charm, or table ornament to brighten up any space. Lightweight and easy to handle, it’s a small piece that makes a big impression. Making this pumpkin is also a calming activity, helping improve focus and stitch skills while giving a sense of accomplishment. With its cheerful design and versatile use, it’s a little handmade treasure that adds warmth, personality, and a touch of seasonal charm to everyday life.
Step-by-Step Crochet Tutorial: Crochet Pumpkin
Materials:
To make the crochet pumpkin, you will need:
- Yarn: Orange yarn for the main body and brown yarn for the stem (category 4 yarn is used in the tutorial).
- 4mm crochet hook.
- Darning needle: For sewing and weaving in yarn ends.
- Scissors.
- Polyfill stuffing (or alternatives): Stuffing materials such as yarn scraps, old fabric, or t-shirt cuttings can also be used.
Uses:
- Seasonal Décor: A cute addition to your fall, Halloween, or Thanksgiving decorations.
- Gifts: Handmade crochet pumpkins can make wonderful seasonal gifts.
- DIY Craft Projects: A fun craft to make for relaxation or to sell at craft fairs.
Special Features:
- Realistic Texture: The back loop-only stitches create a ribbed texture resembling a real pumpkin.
- Customizable Design: Adjust the size by altering the number of chains and rows or using different yarn thicknesses.
- Beginner-Friendly Pattern: A simple combination of half double crochets, decreases, and slip stitches is used.
Level of Difficulty:
This project is beginner-friendly, suitable for crochet enthusiasts who know basic stitches such as chains, half double crochets, and single crochets. The tutorial also introduces back loop-only stitching, which adds an extra textured effect.
Step-by-Step Instructions
1. Starting the Pumpkin Body
- Create a Magic Ring: Using 4mm hook and orange yarn, begin with a magic ring. This creates the base for your pattern.
- Chain 20: Create a chain of 20 stitches.
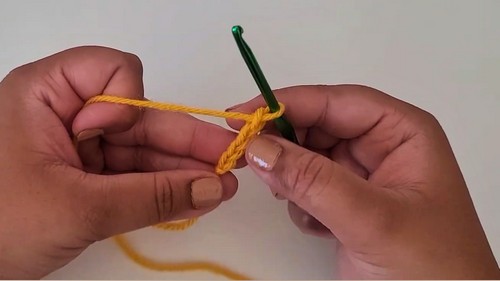
- Work Half Double Crochets (HDC):
- Skip the last two chains and insert your hook into the third stitch.
- Yarn over, pull up a loop, and pull through all three loops. Repeat this process along the rest of your chain.
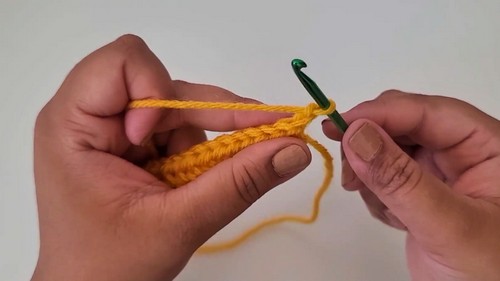
- Continue in Rows:
- At the end of each row, chain 2 and turn your work.
- Work only into the back loops of each stitch and continue with half double crochets across the row.
- Repeat this process until you reach the desired length of the pumpkin. (The tutorial suggests 21 rows of stitches.)
- Finish the Base:
- Create a chain stitch and cut a long strand of yarn.
- Pull the yarn through the last loop and tighten.

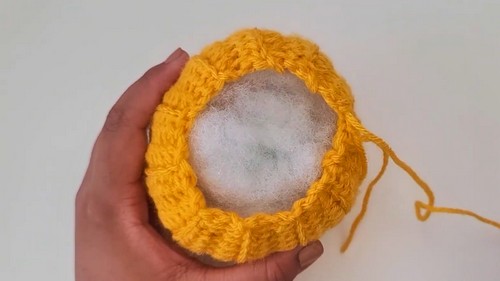
2. Sewing the Pumpkin Together
- Fold the Crochet Piece in Half: Align both edges so they meet evenly.
- Sew the Sides:
- Use the darning needle and the long yarn strand you just cut.
- Sew the edge by inserting the needle into the back loop of one side and the front loop of the other side. This ensures a neat seam.
- Continue sewing until the edge is fully closed.
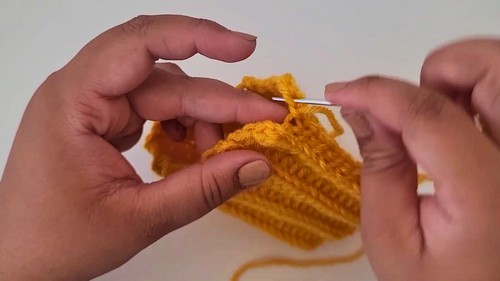
- Secure the end by tying a knot, and weave in any remaining yarn.
3. Attaching the Pumpkin Top and Closing the Bottom
- Add the Top:
- Using the brown yarn, make a slip knot and attach it to the top of the pumpkin using your crochet hook.
- Single crochet around the top edge. Since there are no defined stitches, work as evenly as possible.
- Slip stitch to the first stitch to close the round and chain one.
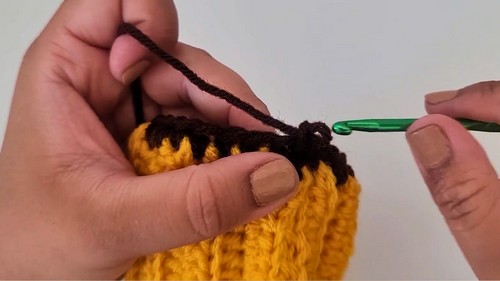
- Work decrease stitches in the next round by crocheting two single crochets together until the top begins to close.
- Repeat the process with another round of decreases or until the top hole is small enough to start the stem.
- Close the Bottom:
- Cut a long strand of orange yarn and attach it to your needle.
- Weave the yarn in and out along the bottom edge, creating a drawstring effect.
- Before tightening, stuff the pumpkin with polyfill (or alternative stuffing) until it reaches the desired plumpness.
- Pull the drawstring tight to close the bottom, knot the yarn, and secure it.
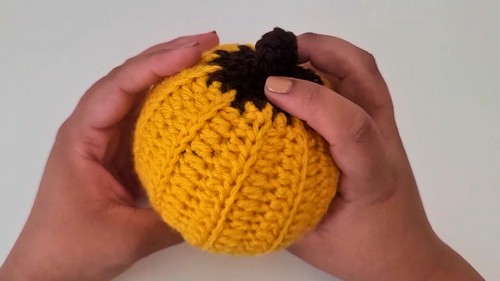
4. Creating the Stem
- Shape the Stem:
- Single crochet in the remaining stitches at the top without increasing or decreasing.
- Continue for 2-3 rounds or until the stem is the desired length.
- Finish the Stem:
- Slip stitch, chain one, and cut a long strand of yarn.
- Weave the needle in and out along the stem’s inner loops, creating a drawstring effect.
- Tighten the drawstring and secure it with a knot.
 Tidy Up the Ends:
- Weave any remaining yarn into the pumpkin to hide it.
- Snip off excess yarn carefully, ensuring the project remains intact.
Tutor’s Suggestions:
- Gauge Your Stitches: Don’t stress about having an exact stitch count—this is a forgiving project!
- Experiment with Stuffing: If you don’t have polyfill, use old fabric or yarn scraps to stuff the pumpkin.
- Take Your Time: Pause the video and work at your own pace, especially while sewing and shaping.
- Customize Your Pumpkin: Adjust the size or texture by changing your yarn, hook size, or number of rows.
Conclusion:
Creating this crochet pumpkin is a fun and creative way to celebrate the season. You can adjust the size, color, and texture for various uses. This DIY craft brings a cozy touch to any space and can be a lovely handmade gift for loved ones. With this beginner-friendly project, you’ll sharpen your crochet skills while making something beautiful and functional.
Tip:
When working on the pumpkin body, use a stitch marker to mark the starting and ending points of your rows. This will ensure cleaner edges and make sewing easier later on.


