
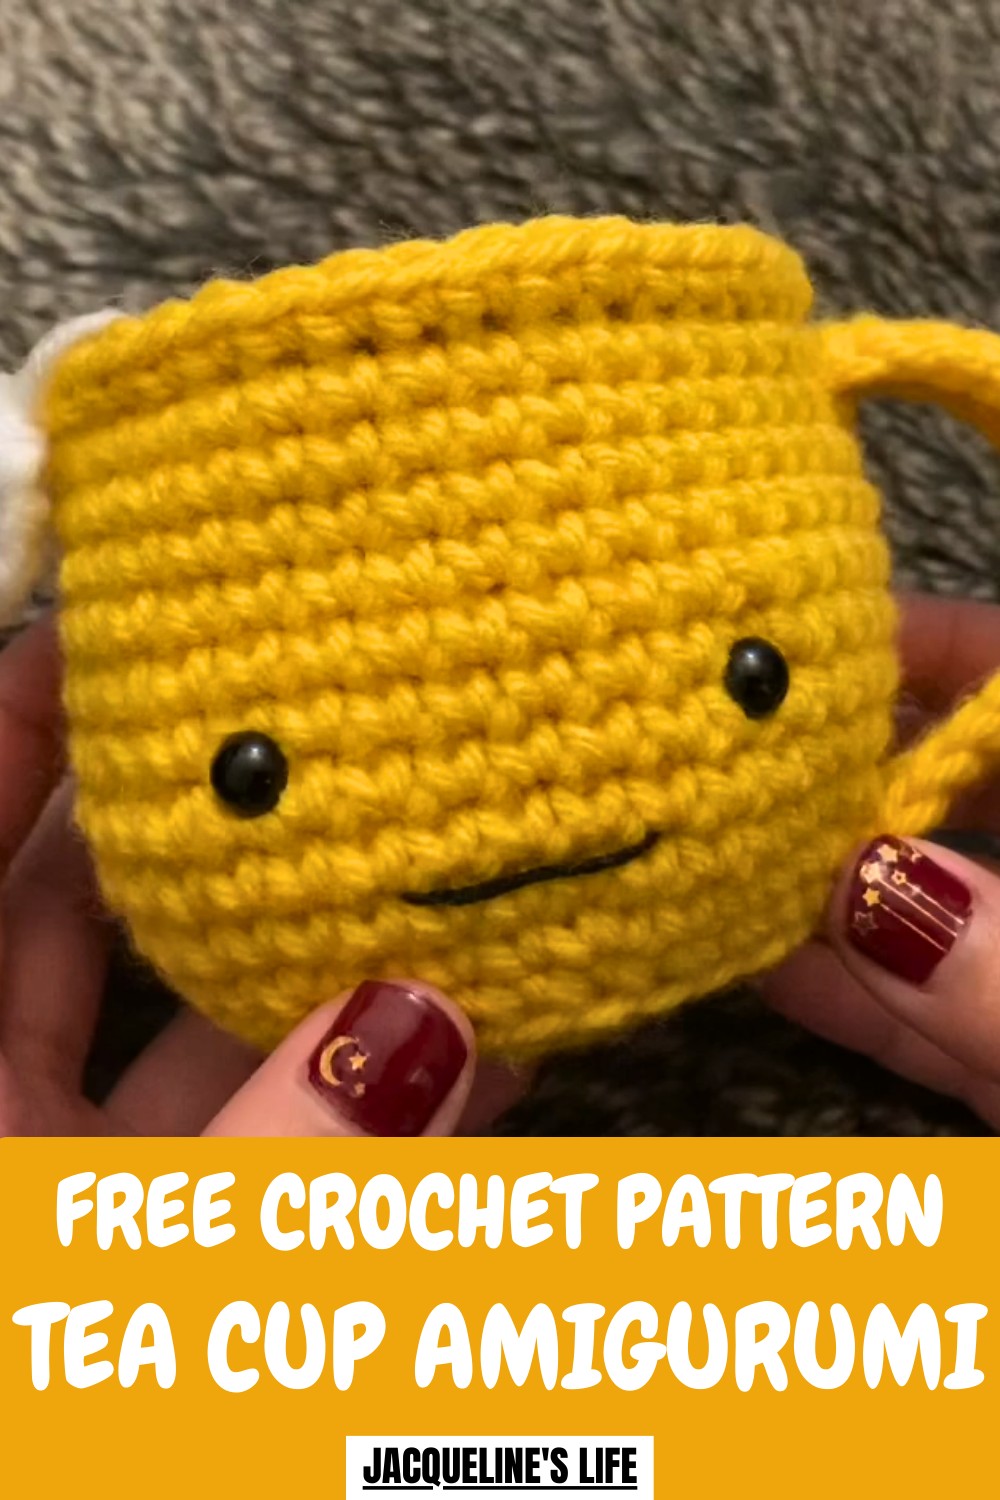
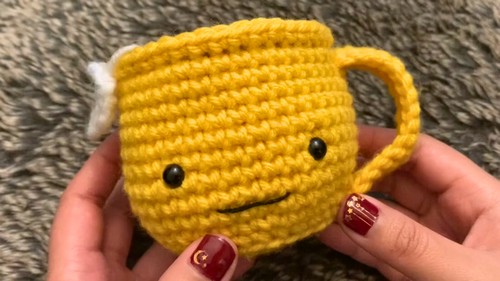
Sip on cuteness with this Free Crochet Tea Cup Amigurumi Pattern, adding a charming touch to your décor, desk, or playful handmade collection.
This tea cup amigurumi brings a touch of whimsy and warmth to any space. Perfect for home décor, gifts, or dollhouse displays, its delicate handle and cozy yarn texture make it both playful and eye-catching. Making it is not only fun but also a relaxing activity that helps improve crochet skills through shaping, stitching, and finishing techniques.
Adorable Crochet Tea Cup Amigurumi Pattern for Tiny Charm
Each cup carries personality, offering a small but meaningful addition to collections or as a thoughtful present for friends and family. Its compact size makes it versatile for shelves, desks, or as part of a larger handmade scene.
With easy-to-follow instructions, even beginners can enjoy crafting this cute piece, turning simple yarn into a delightful keepsake full of charm and character. Fun, engaging, and satisfying, this tiny tea cup shows how small handmade items can brighten any space.
How to Crochet a Teacup Amigurumi – Step-by-Step Guide
Materials Used
To create this teacup, you will need:
- Yarn:
- Main Color (Yellow): For the cup.
- Brown Yarn: For the drink (tea or coffee).
- White Yarn: For the tea bag.
- Tools and Accessories:
- Crochet Hook: Size 5mm.
- Stitch Marker: To keep track of rounds.
- Scissors: To cut yarn as needed.
- Embroidery Thread: For adding the smile/mouth.
- Safety Eyes: 8mm size (you can use other sizes based on preference).
- Stuffing/Fiberfill: To stuff the teacup and give it shape.
- Threading/Yarning Needle: To sew pieces together and weave in ends.
Uses of the Crochet Teacup
- Decor Piece: Use it as a cozy, handmade addition to home decor or as part of a themed centerpiece.
- Personalized Gift: A wonderful gift idea for tea-lovers, coffee enthusiasts, or anyone who loves handmade items.
- Skill-Building: A way to improve crochet techniques such as single crochets, increases, decreases, and assembly.
- Customizable Keepsake: Swap out colors for coffee cups, match the recipient’s favorite drink, or add fun finishing touches.
Special Features of the Crochet Teacup
- Fully Functional Shape: Crocheted with a raised body and defined rim for a realistic teacup look.
- Customizable Handle & Tea Bag: Allows for personalization with different proportions and lengths.
- Adorable Smile & Safety Eyes: Adds a playful element, great for gifting or stylizing.
- Seamless Beverage Section: Drink surface is crocheted to fit perfectly into the cup shape.
Level of Difficulty
Beginner-Friendly with Intermediate Elements
- Most of this project uses foundational stitches (single crochet, increase, decrease) combined with simple assembly.
- Slightly more advanced techniques include working in front and back loops, invisible decreases, and attaching small parts like the handle and tea bag.
- Beginners should follow along carefully during the shaping and assembly steps but will find it achievable with patience.
Tutor’s Suggestions
- Mark Your Rounds: Always use a stitch marker, especially when working in continuous rounds, to keep your stitches consistent.
- Stuff Gradually: Start stuffing the teacup as you go; don’t wait until the opening becomes too small.
- Personalize the Handle: You can adjust the length of the chain for the handle if you want a larger or smaller loop.
- Pull Strings Tight: Ensure tight stitching in the magic circle to avoid gaps in the base.
- Go Slow on Assembly: Attaching smaller parts (like the handle or tea bag) can be tricky but creates a polished look when done carefully.
- Experiment with Proportions: If your cup seems too wide or narrow, adjust the number of increase rounds to customize the teacup body.
Step-by-Step Instructions
Step 1: Crochet the Bottom of the Teacup
- Magic Circle:
- Create a magic circle by wrapping your yarn and pulling through using your 5mm crochet hook.
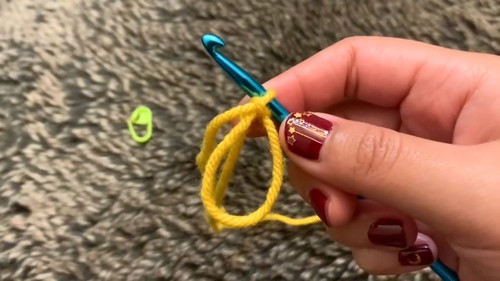
- Make 8 single crochets (SC) into the circle. Pull the loose end to close the loop tightly and slip stitch into the first stitch.
- Create a magic circle by wrapping your yarn and pulling through using your 5mm crochet hook.
- Round 2:
- Work 2 single crochets (SC) into each stitch (increase). End with 16 stitches.
- Work 2 single crochets (SC) into each stitch (increase). End with 16 stitches.
- Round 3:
- Create an increase in the first stitch, followed by 1 SC in the next stitch. Repeat around the circle. End with 24 stitches.
- Round 4:
- Single crochet (SC) into every stitch around without increasing, keeping a total of 24 stitches.
- Single crochet (SC) into every stitch around without increasing, keeping a total of 24 stitches.
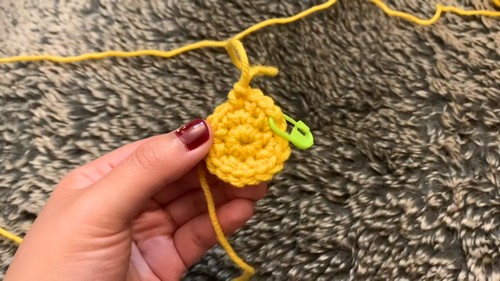
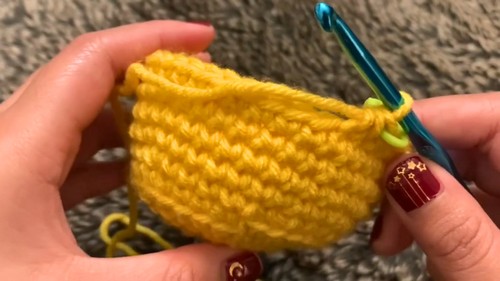
Step 2: Begin Shaping the Cup
- Rounds 5–7:
- Alternate increases and single crochets to expand the circumference:
- Round 5: Increase into the first stitch, then SC into the next two stitches (end with 32 stitches).
- Round 6: Work into the back loops only to raise the cup walls. Single crochet (SC) around for a total of 32 stitches.
- Round 7: Increase into the first stitch, then single crochet into the next three stitches (end with 40 stitches).
- Alternate increases and single crochets to expand the circumference:
- Rounds 8–10:
- Single crochet into every stitch (SC) and maintain 40 stitches for three rounds.
- Single crochet into every stitch (SC) and maintain 40 stitches for three rounds.
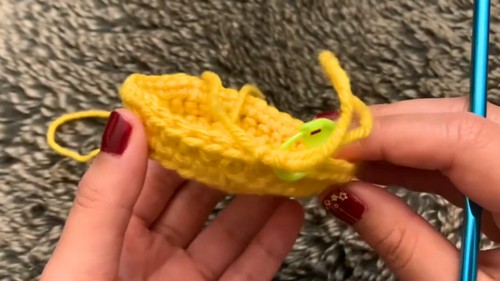
- Round 11: Invisible Decrease Round
- Single crochet into the first 18 stitches.
- Perform an invisible decrease by going through the front loops of the next two stitches. Continue SC for 18 more stitches, and perform one final invisible decrease. End with 38 stitches.
- Rounds 12–16:
- Continue single crocheting (SC) around, maintaining 38 stitches for 5 consecutive rows.
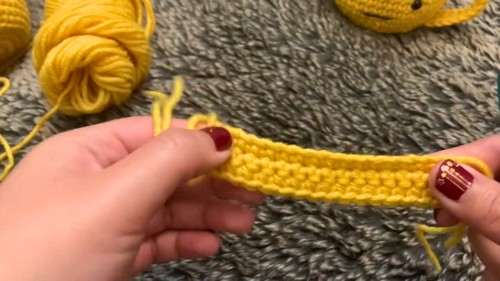
Step 3: Crochet the Handle
- Chain & Rows for Handle:
- Start with a slip knot and chain 17 stitches.
- Turn and single crochet into each chain stitch to the other side. Repeat for 3 more rows, chaining 1 at the start and turning your work each time.
- Attach the Handle:
- Line up the handle on the teacup body and attach by threading yarn and tying it to the inside of the cup. (Alternatively, you can sew the handle for added security.)
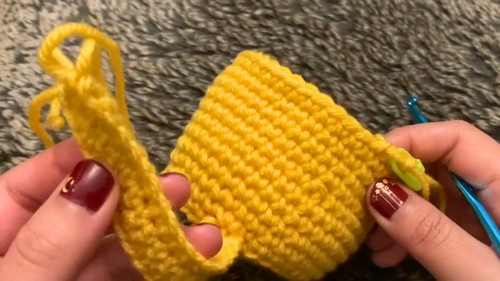
- Line up the handle on the teacup body and attach by threading yarn and tying it to the inside of the cup. (Alternatively, you can sew the handle for added security.)
Step 4: Make the Tea Bag
- Chain & Rows for Tea Bag:
- With white yarn, chain 5 stitches to start and turn. Single crochet for 4 rows, reducing the width each time until the tea bag forms a rectangular shape.
- Leave a long tail for attaching the tea bag inside the teacup.
Step 5: Add Facial Features
- Safety Eyes:
- Insert the 8mm safety eyes on the raised wall of the teacup. Position them a bit farther apart for a cute look.
- Smile/Mouth:
- Use embroidery thread to sew a small smile between and slightly below the eyes.
- Use embroidery thread to sew a small smile between and slightly below the eyes.
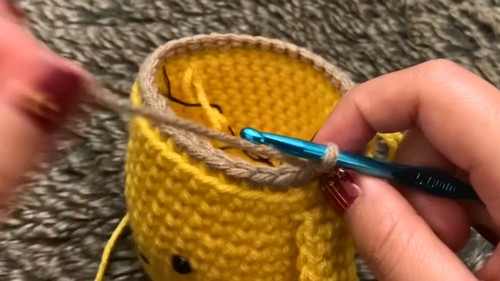
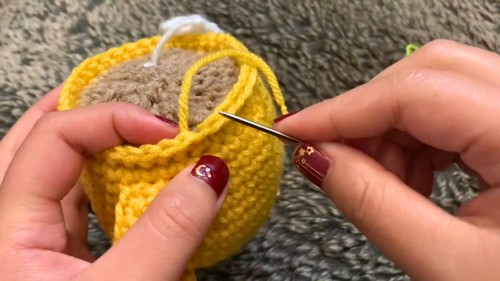
Step 6: Add the Drink Surface
- Attach Brown Yarn:
- Insert the brown yarn into the back loops around the top edge of the cup and single crochet around, working decreases to form a slightly domed surface.
- Finish Off:
- Stuff the teacup lightly before closing the top to create a realistic “filled” look.
- Optional Rim:
- Use yellow yarn to single crochet into the front loops for an additional outer rim for the teacup.
- Use yellow yarn to single crochet into the front loops for an additional outer rim for the teacup.
Conclusion
Congratulations! You’ve successfully crocheted your very own teacup amigurumi. This project showcases your ability to balance creative crochet techniques with precision and patience. Whether you keep it as a decor piece, gift it to someone special, or use it as a skill-building project, your handmade teacup is sure to be cherished. The added touches, such as the tea bag, drink surface, and cute face, make it uniquely your own!
Pro Tip
When working with the magic circle or invisible decreases, pull your stitches tight to avoid gaps. For a more polished look, weave in all loose ends securely after finishing each section.


