
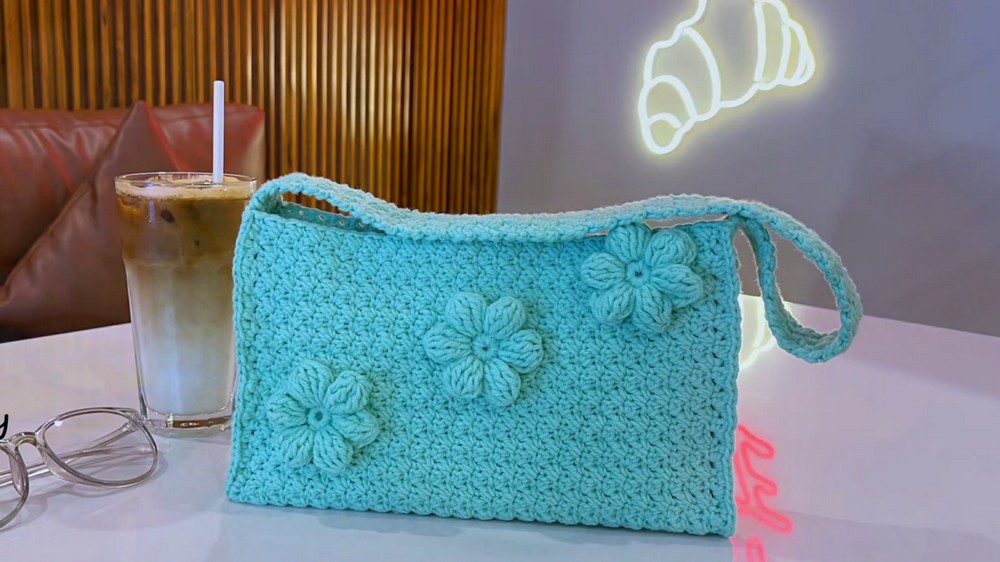
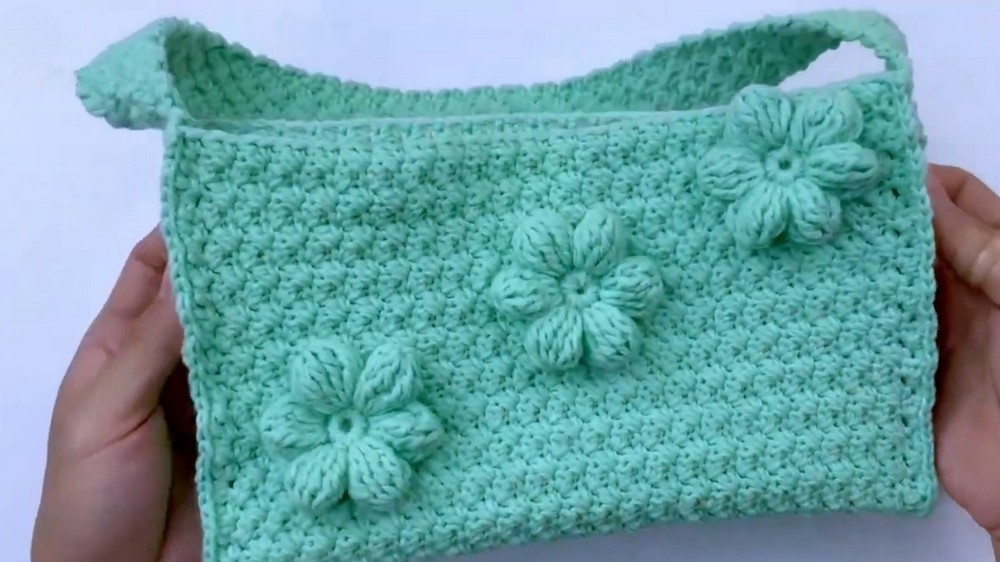
Carry cheerful style with this Crochet Daisy Shoulder Bag Pattern for roomy, textured bags that add playful charm and casual summer flair.
Delightfully stylish and inherently timeless, the Crochet Daisy Shoulder Bag Pattern effortlessly blends practicality with charm. Inspired by blooming daisies, this bag radiates a cheerful and whimsical aesthetic perfect for enhancing everyday fashion. Its handmade nature not only showcases intricate craftsmanship but also allows crochet enthusiasts to infuse personalization into their work.
Chic Crochet Daisy Shoulder Bag Pattern for Everyday Style
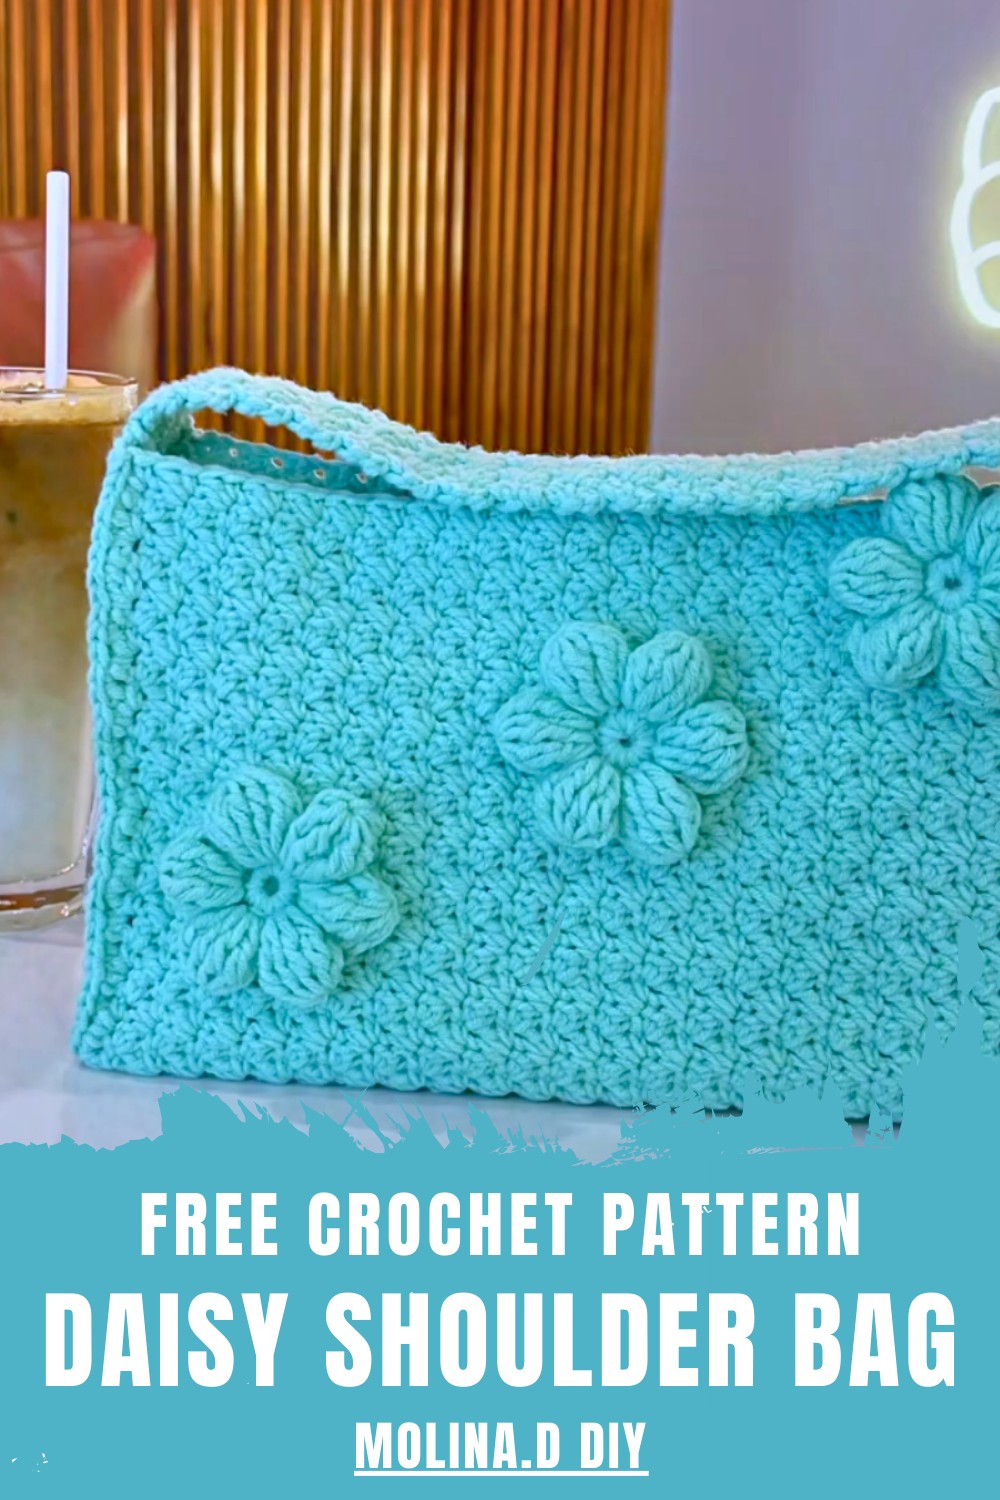
Whether used as an accessory for casual outings, a thoughtful gift, or a light tote for essentials, this bag serves multiple purposes while staying trendy. The structured design ensures durability, while the daisy embellishment adds a unique touch, making it a standout piece for spring and summer wardrobes.
Crocheting this bag offers an excellent opportunity to explore foundational stitching techniques while creating something both functional and fashionable. With its eco-friendly appeal and customizable size and colors, this shoulder bag embraces the elegance of artistry while elevating your style with a playful yet sophisticated flair.
How to Crochet the Daisy Shoulder Bag: Step-by-Step Guide
Materials Required
To create the Daisy Shoulder Bag, gather the following materials:
- Milk Cotton Yarn (125g, 5-ply)
- 3.5mm Crochet Hook
- Scissors
- Needle (for weaving in ends)
- Measuring Tape
- Stitch Markers
- Plastic Canvas (for bag structure)
Step-by-Step Instructions
Part 1: The Bag Body
- Create a Slip Knot and Foundation Chain:
- Begin with a slip knot, and chain 49 stitches.
- Row 1:
- Skip 2 chains from the hook.
- In the third chain, make 1 Single Crochet (SC) and 1 Double Crochet (DC) in the same chain.
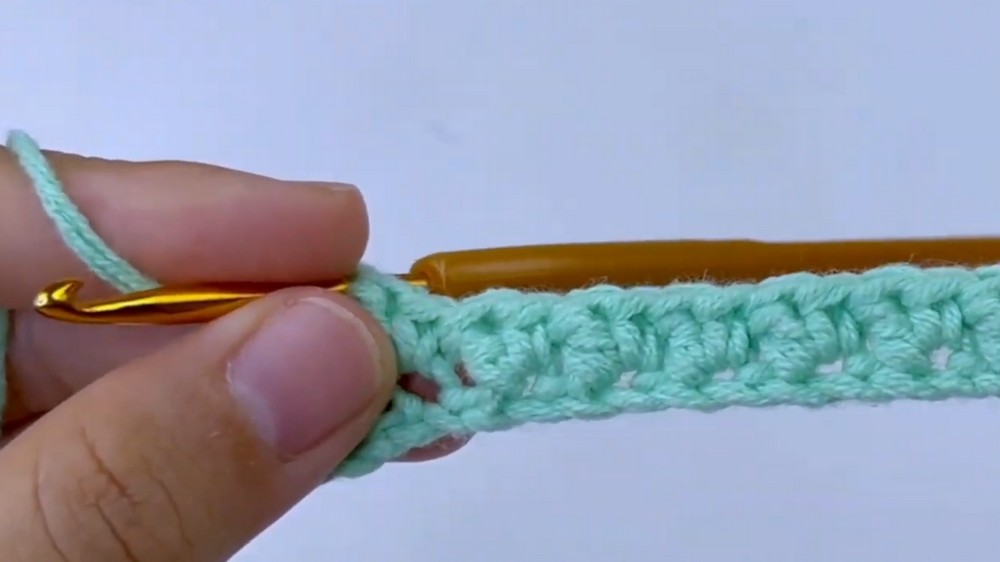
- Skip 1 chain, then repeat
(SC, DC)into the next chain. - Continue this pattern
(SC, DC)into every alternate chain until the last chain. Use a stitch marker to mark your starting point for the next row.
- Row 2:
- Chain 1, turn your work.
- Skip the first stitch, and work
(SC, DC)into the next stitch. - Important Tip: Begin working only on the Single Crochet stitches from here onwards, skipping all Double Crochet stitches.
- Repeat
(SC, DC)into the Single Crochet stitches of the row below until the last stitch.
- Row 3 to Row 51:
- Continue the same pattern
(SC, DC)by chaining 1, skipping the first stitch, and working into the next stitch. - Crochet until the bag body measures 30 cm or 51 rows.
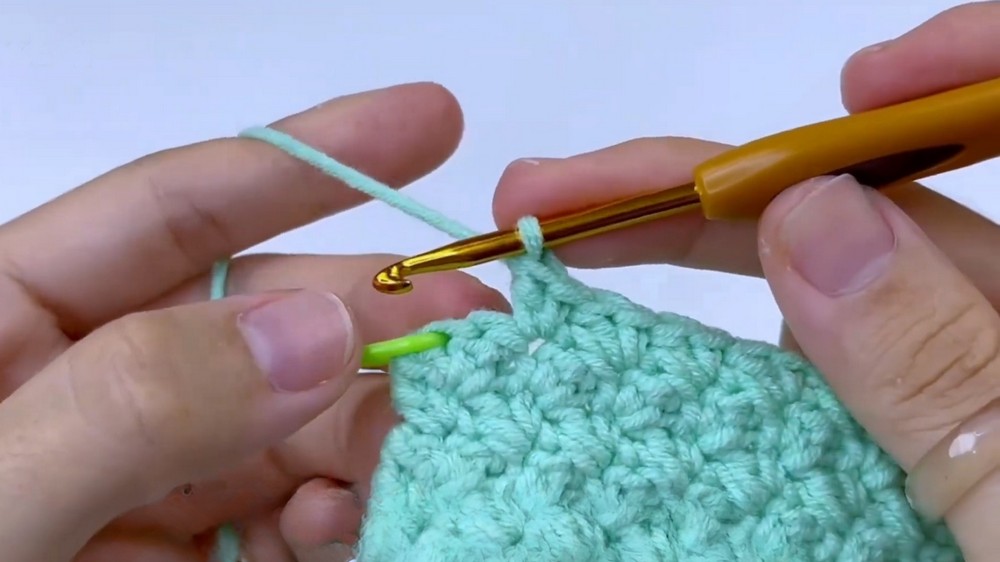
- Continue the same pattern
Part 2: Bag Strap
- Start with a Chain:
- Create a slip knot and chain 7 stitches for the strap base.
- Row 1:
- Skip 2 chains from the hook.
- Into the next chain, work
(SC, DC)in the same stitch. - Skip 1 chain, and repeat
(SC, DC)in the next chain until the last chain.
- Row 2:
- Chain 1 and turn your work.
- Skip the first stitch, and make
(SC, DC)into the second stitch. - Continue skipping 1 stitch and alternating
(SC, DC)until the end of the row.
- Repeat Until Desired Length:
- Repeat the above steps until the strap measures 71 cm in length.
- Ensure the strap is sturdy enough by maintaining even tension throughout the rows.
3: Crochet the Daisy Flower
- Magic Ring Base:
- Make a magic ring, chain 1, and crochet 12 Single Crochets (SC) into the ring.
- Close the ring with a slip stitch.
- First Petal:
- Chain 3, then work 3 incomplete Triple Crochets (TR) into the first stitch.
- Work another 3 Triple Crochets (TR) into the next stitch.
- Slip stitch into the same stitch, chain 3, and slip stitch into the following stitch.
- Make the Remaining Petals:
- Continue crocheting petals by working into the subsequent stitches. Repeat the same incomplete triple crochet process for each petal until the flower is complete.
4: Assembly
- Attach the Plastic Canvas:
- Cut the plastic canvas to fit snugly inside the bag’s body. Insert it and secure it by sewing it into place to ensure a sturdy structure.
- Join the Strap:
- Attach the strap to the sides of the bag using Single Crochets (SC) for a strong and clean connection.
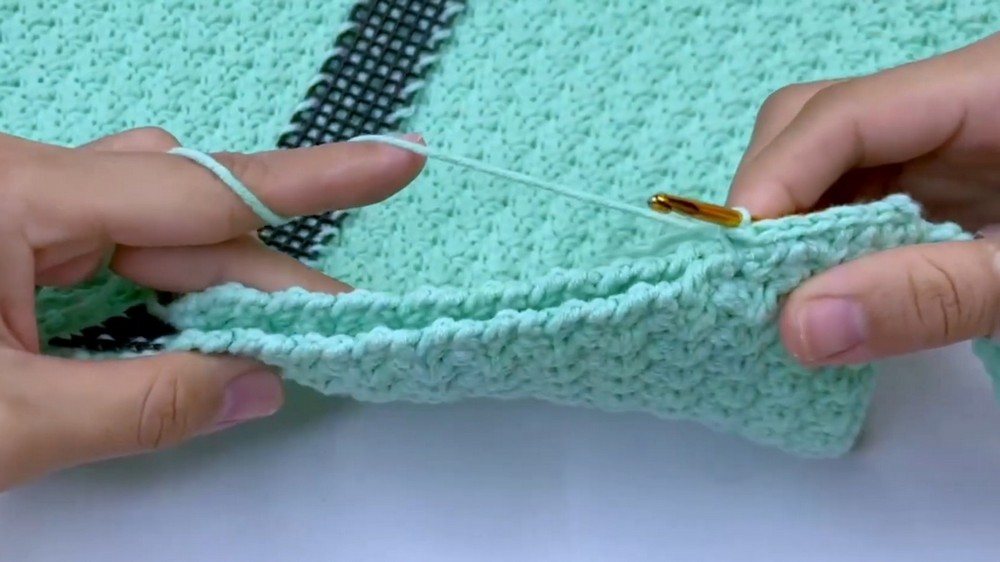
- Attach the strap to the sides of the bag using Single Crochets (SC) for a strong and clean connection.
- Sew in the Flower:
- Using a needle, sew the daisy flower onto the bag wherever you prefer. Adjust the positioning for symmetry.
- Finalize:
- Secure all loose ends by sewing or weaving them in properly.
- Check the bag for any gaps or unfinished areas, and ensure everything is tightly secured.
Special Features
- Beginner-Friendly: The project uses basic stitches like SC, DC, and TR, making it accessible for beginners while still being a creative and satisfying project.
- Unique Design: The daisy embellishment adds a pop of personality and a handmade charm to the bag.
- Structured and Durable: The addition of a plastic canvas inside offers structure and sturdiness, making the bag reliable for everyday use.
- Customizable: You can easily adjust the bag size, strap length, or flower design based on your preferences.
Level of Difficulty
This project is beginner-friendly, as the video breaks down each step in a clear and straightforward manner. While familiarity with basic stitches like the slip knot, magic ring, SC, DC, TR, and slip stitch is required, these techniques are thoroughly explained, making the pattern approachable for all levels.
Tutor's Suggestions
- Use Stitch Markers: To ensure accuracy, use stitch markers to mark the starting points for your rows. This helps maintain even rows and ensures a consistent shape for your project.
- Maintain Even Tension: Work on keeping your tension consistent throughout the bag and strap to avoid uneven sections.
- Handle the Plastic Canvas Carefully: When cutting and sewing the canvas into the bag, ensure it's the exact size to keep the bag structured while avoiding any poking or jagged edges.
- Attach Securely: When sewing the flower or strap, make sure they are tightly secured to avoid wear and tear with usage.
Uses for the Daisy Shoulder Bag
- Everyday Use: A stylish option for carrying small essentials like your phone, wallet, and keys.
- Seasonal Accessory: Perfect for spring or summer outfits due to its floral theme.
- Gift Idea: A handmade bag makes a lovely and thoughtful gift for friends or family members.
- Skill Practice: Improve your skills in stitch variations, working with structured materials, and assembling crochet projects.
Tip
When crocheting the strap, measure it against your own shoulder or crossbody length before completing it. This ensures that the strap fits perfectly for the intended user!
Conclusion
This charming Daisy Shoulder Bag combines simplicity, style, and functionality. The project is perfect for crochet enthusiasts keen to produce something both practical and creative. Thanks to the clear instructions, even beginners can create the bag with ease. By mastering basic techniques and following this step-by-step guide, you’ll complete a durable, personalized bag that’s great for any occasion.


