
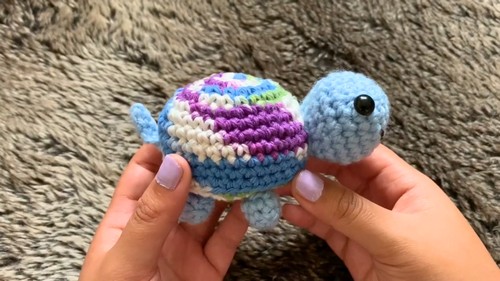
Shell up some fun with this Free Crochet Turtle Amigurumi Pattern, adding a cute, playful touch to your décor, desk, or handmade collection.
In a quiet corner of a cozy room, a tiny turtle rests, bringing instant smiles with its soft legs, rounded shell, and gentle face. Its charming proportions and delicate details make it visually appealing, while the soft texture adds a touch of warmth and comfort. The Crochet Turtle Amigurumi Pattern transforms this little creature into a versatile piece that shines as décor, a desk companion, or a playful keepsake for children.
Adorable Crochet Turtle Amigurumi Pattern for Handmade Cuteness
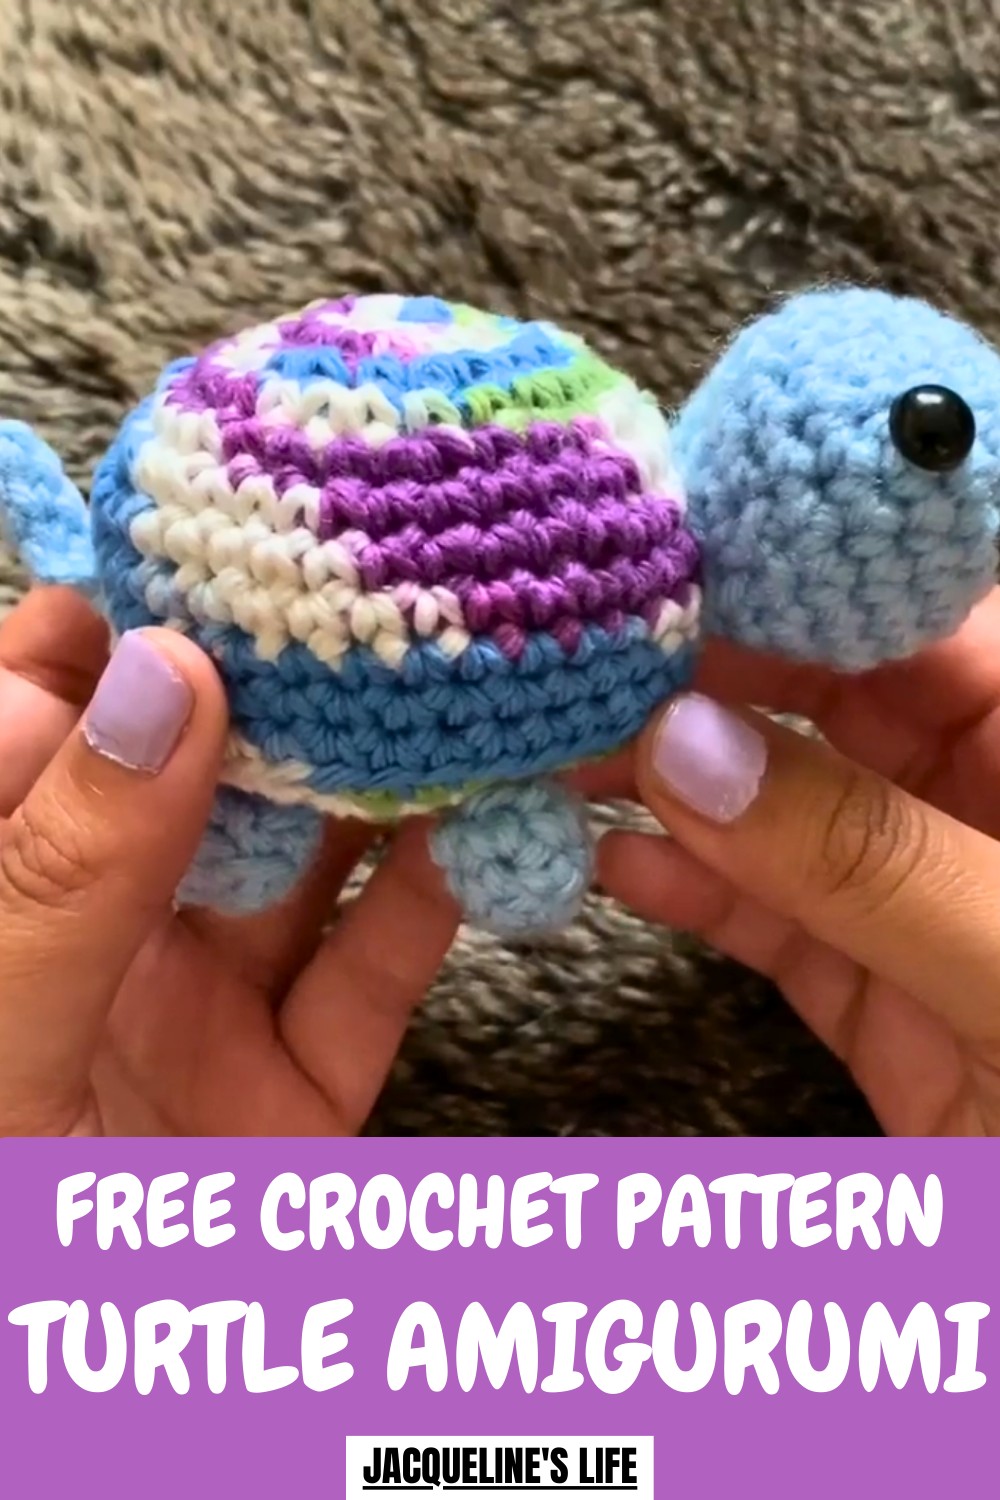
Beyond its cuteness, it carries the charm of handmade craftsmanship, making it a thoughtful gift or a collectible treasure. Its compact size allows it to fit easily on shelves, tables, or nightstands, and the patterned shell and tiny limbs add character without overwhelming its simplicity. It combines aesthetic charm, practical use, and heartwarming appeal, creating a delightful handcrafted figure that brightens any space and brings joy wherever it sits.
How to Crochet a Little Turtle – Step-by-Step Guide
Materials Used
- Yarn:
- Green yarn (One Pound Yarn) for the body, head, and tail.
- Variegated yarn (Sugar and Cream) for the shell. If you use multiple yarn types, ensure they are of the same weight.
- Crochet Hook: 5mm size hook.
- Fiberfill: For stuffing the turtle.
- Safety Eyes: 8mm size for adding lively details to the face.
- Embroidery Yarn: Optional for stitching a little smile.
- Glue Gun: Used to attach the head, legs, and tail instead of sewing.
- Stitch Markers: To mark the end of each round.
- Scissors: For cutting excess yarn and threads.
Uses for the Crocheted Turtle
- Decorations: Place the turtle on shelves or desks for quirky home decor.
- Gifts: Perfect for birthdays or other special occasions as a handmade present.
- Playful Toys: Child-friendly design ideal for imaginative play.
- Trinket Accents: Great addition to your crochet animal collection or themed designs.
Special Features
- Customizable Proportions: Adjust the stuffing and dimensions of the shell and head to make different-sized turtles.
- Variegated Shell Yarn: Provides a unique multicolor effect on the turtle’s shell.
- Glue Assembly: For ease, components like the head, legs, and tail can be attached with hot glue instead of sewing, making assembly quick.
- Compact and Cute Design: Small, lightweight finished product is ideal for carrying or displaying.
- Adjustable Tail Length: Add charm by shortening or lengthening the tail based on preference.
Level of Difficulty
Beginner to Intermediate
- The tutorial is beginner-friendly with clear explanations of the magic circle, single crochet, and decreases.
- Some components (small legs, tail) and decreasing in tight spaces may challenge beginners slightly.
Tutor’s Suggestions
- Don’t Overstuff the Shell: The instructor suggests keeping the stuffing moderate to ensure balance between the shell and head size. Overstuffing may make the turtle wobbly.
- Switch Increases for Balanced Shell: Alternating increase patterns in the shell prevents it from being lopsided and ensures an even shape.
- Glue Instead of Sewing: For simpler assembly, use a hot glue gun to attach the smaller parts instead of sewing them; this speeds up the process without compromising the design.
- Experiment with Placement: Adjust the positioning of the feet, tail, and head before gluing to achieve a consistent and pleasing look.
- Add a Neck (Optional): If desired, add two or three rounds of single crochet to the head to give the turtle a neck.
Step-by-Step Instructions
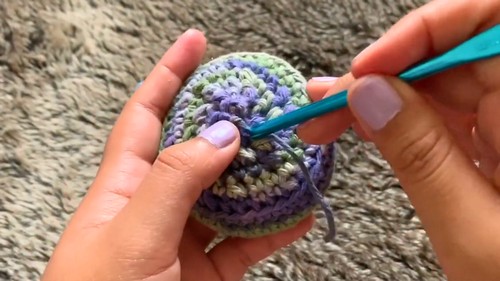
Step 1: Make the Turtle Shell
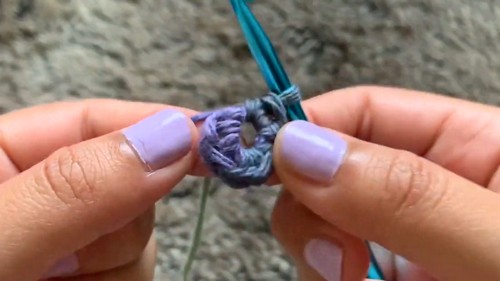
- Round 1: Magic Circle
- Use variegated yarn to create a magic circle. Wrap yarn around two or three fingers, insert the hook into the loop, pull yarn through, and chain to secure.
- Single crochet six times into the magic circle. Pull the tail to close the circle tightly. Slip stitch into the first stitch to complete the round and add a stitch marker to the last stitch.
- Round 2: Increase in Each Stitch
- Single crochet twice in each stitch (SC 2) for a total of 12 stitches.
- Round 3: Alternate Increases
- Single crochet into the first stitch, then increase into the next stitch (SC, 2 SC). Repeat the pattern to end up with 18 stitches.

- Single crochet into the first stitch, then increase into the next stitch (SC, 2 SC). Repeat the pattern to end up with 18 stitches.
- Round 4: Switch Increase Position
- Begin with single crochet into the first two stitches (SC, SC), then increase into the third stitch. Repeat this sequence across the round for a total of 24 stitches.
- Round 5:
- Single crochet into three stitches (SC x 3), then increase into the fourth stitch. Repeat to end with 30 stitches.
- Round 6:
- Single crochet into four stitches (SC x 4), then increase into the fifth stitch. Repeat for a total of 36 stitches.
- Single crochet into four stitches (SC x 4), then increase into the fifth stitch. Repeat for a total of 36 stitches.
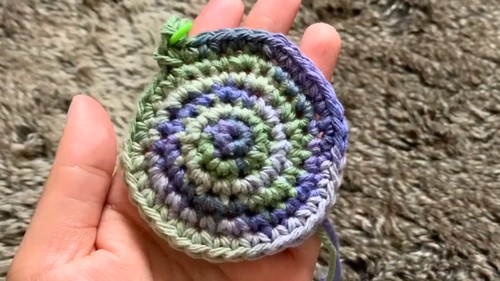
- Rounds 7–11 (Shell Depth)
- Single crochet into each stitch without increasing or decreasing to create depth for the shell.
- Back Loops Only (Round 12)
- Work into the back loops only. Begin with a decrease, then single crochet into the next four stitches. Repeat the pattern across the round for a total of 30 stitches.
- Work into the back loops only. Begin with a decrease, then single crochet into the next four stitches. Repeat the pattern across the round for a total of 30 stitches.
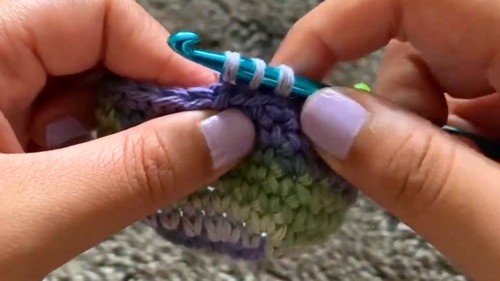
- Rounds 13–14 & Closure
- Decrease and single crochet (alternating patterns as described) until the stitch count is reduced to 18.
- Stuff the shell lightly or fully, depending on your desired size, and close the bottom by weaving in excess yarn securely.
Step 2: Make the Head
- Round 1: Magic Circle
- Use green yarn for the head. Create a magic circle and work 5 single crochets into it. Slip stitch into the first stitch and add a stitch marker.
- Rounds 2–4: Increase
- Round 2: Increase in each stitch (SC x 2 per stitch, 10 total).
- Round 3: SC into one stitch, then increase into the next (SC, 2 SC; 15 stitches total).
- Round 4: SC into two stitches, then increase into the third (SC x 2, 2 SC; 20 stitches total).
- Rounds 5–7
- Single crochet into each stitch without increasing (20 stitches per round).
- Round 8: Invisible Decrease
- Begin with a decrease using the front loops only and single crochet into the next two stitches. Repeat until you have 15 stitches.
- Round 9
- Alternate SC and invisible decreases, reducing to 10 stitches.
- Finalize Details
- Insert safety eyes and sew a smile with embroidery yarn, then lightly stuff the head.
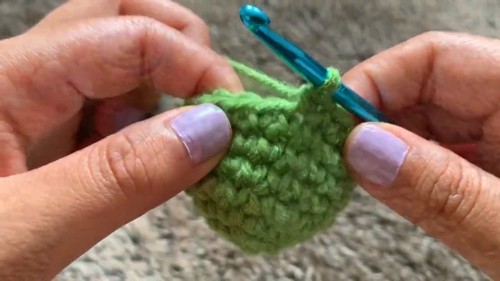
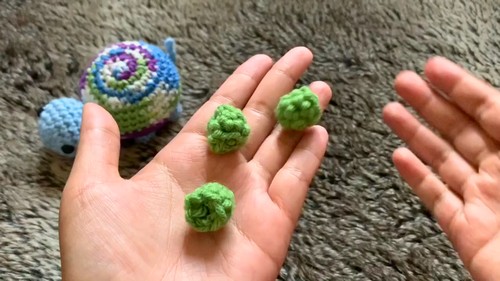
Step 3: Make the Legs and Tail
- Legs:
- Magic circle with green yarn, SC 6 into the circle.
- Work two more rounds of single crochet, struggling through the tight spaces but ensuring consistency in stitch tension.
- Stuff slightly, secure the excess yarn, and repeat to create four legs.
- Tail:
- Chain 5 to begin. Single crochet back into the chain for a shorter, firm tail.
- Adjust chain length if you want a longer tail. Tie off the excess yarn securely and fluff slightly.
Step 4: Assembly
- Attach the head to the shell first, ensuring proper placement before gluing or sewing.
- Glue on the legs around the edge of the shell for a balanced appearance, adjusting slightly for aesthetics.
- Tighten and tie on the tail at the back of the shell.
Conclusion
Your crochet turtle is finally complete! This adorable creation makes for a wonderful gift or charming decoration. The video walks you through each component with clarity, making it easy to follow for beginners while leaving room for customization. The turtle’s proportions, stuffing, and glue assembly give freedom to experiment and create variations.
Pro Tip
When working on small, tight pieces such as the legs, hold them gently from the outside and use loose tension. This prevents frustration and ensures smoother stitching.


