
Bring effortless elegance with this Crochet Cardigan Pattern, featuring soft, gentle drape, and versatile warmth suited for daily styling.
A refined balance of warmth and versatility defines this wardrobe essential, making it suitable for both casual moments and polished looks. The Crochet Cardigan Pattern presents a thoughtful design that offers gentle coverage without feeling heavy, allowing it to be worn comfortably across seasons. Its structured yet relaxed shape creates a flattering drape that complements different outfits, from simple tops to flowing dresses.
Relaxed Crochet Cardigan Pattern With Beautiful Drape

Clean stitch transitions and subtle texture add visual interest while maintaining an elegant appearance. This pattern supports flexibility in length, fit, and color choice, helping each finished piece reflect personal style. Ideal for layering during cool mornings or evenings, it provides comfort while keeping the overall look light and graceful.

Beyond its visual appeal, the cardigan serves as a practical staple that adapts easily to everyday wear. Overall, this pattern blends function and style, delivering a timeless garment that feels polished, cozy, and effortlessly wearable.
Step-by-Step Instructions
Materials Needed:
- Yarn: The creator used Robin 100% acrylic yarn, doubled up for thickness.
- Hook: 3.5 mm crochet hook (or any size appropriate for your yarn).
- Others: Scissors for trimming ends and a measuring tape for tracking your work's size and fit.
- Optional: A book or an item to help measure fringe evenly.
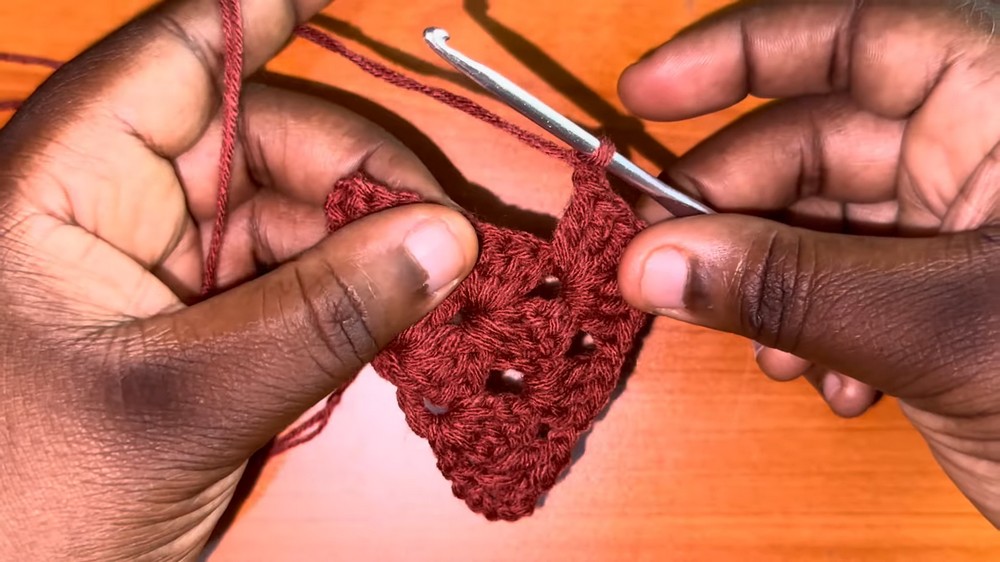
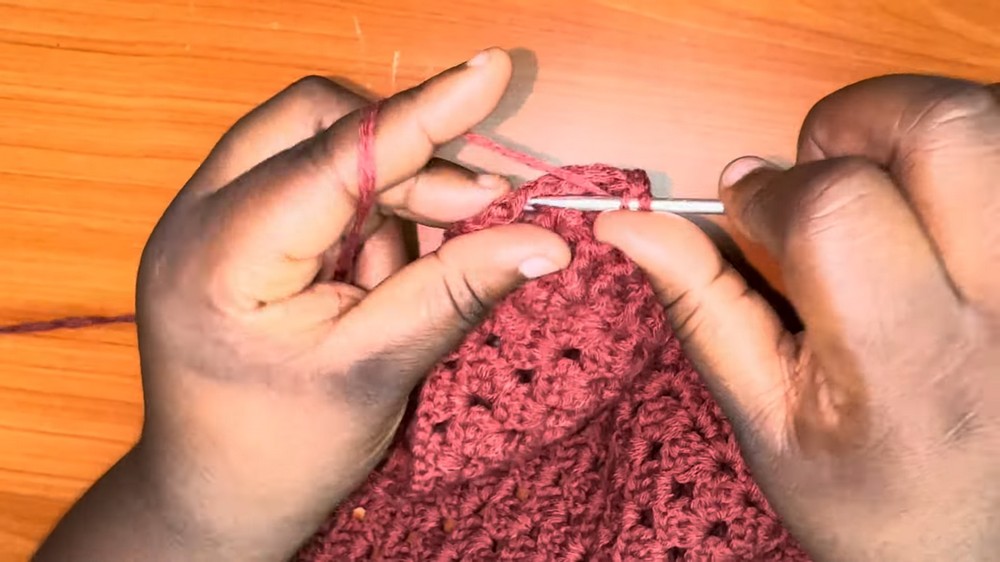
1. Begin with the Triangle Base:
- Start with a Slip Knot: Join two balls of yarn together (doubling the yarn) and create a slip knot.
- Create Foundation Circle:
- Chain four, then slip stitch into the first chain to form a circle.
- First Row:
- Chain four (this acts as a double crochet and a chain one).
- Work three double crochets into the circle.
- Chain two (this forms the corner).
- Work another cluster of three double crochets into the circle.
- Chain one, then complete the row with one final double crochet.
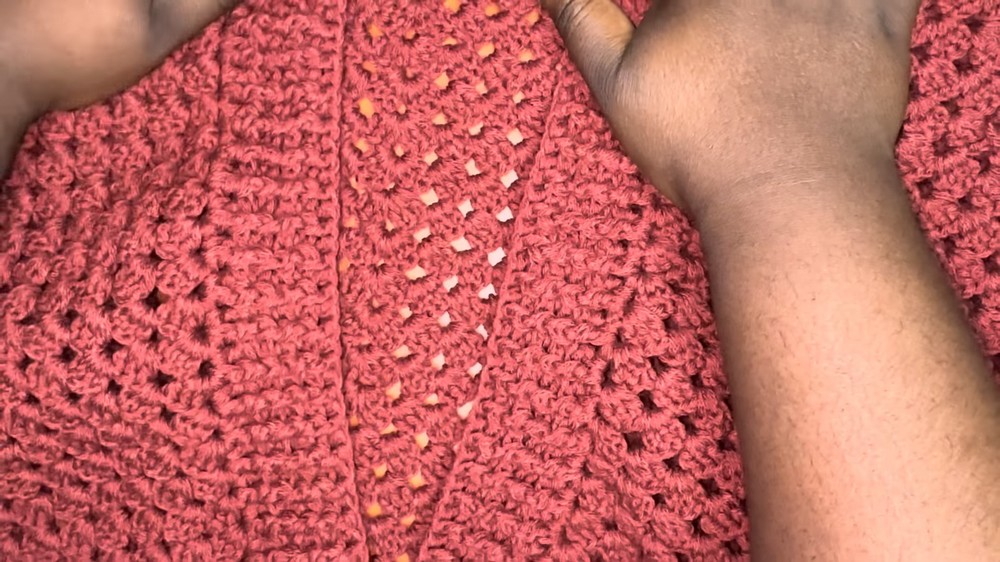
- Subsequent Rows:
- At the beginning of each row, chain four (counts as one double crochet and chain one).
- Turn your work and crochet three double crochets in the chain one space.
- Work clusters of three double crochets in each chain space with a chain one between clusters.
- At the corner stitch, always work a cluster of three, chain two, then add another cluster into the same space (to grow the triangle evenly).
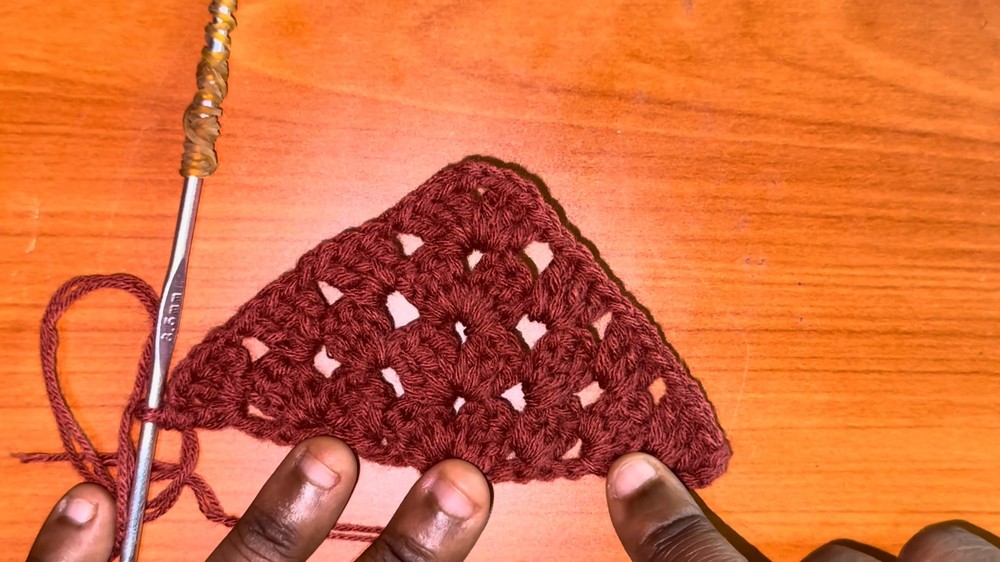
- Finish each row mirroring the work on the other side with a final double crochet at the edge.
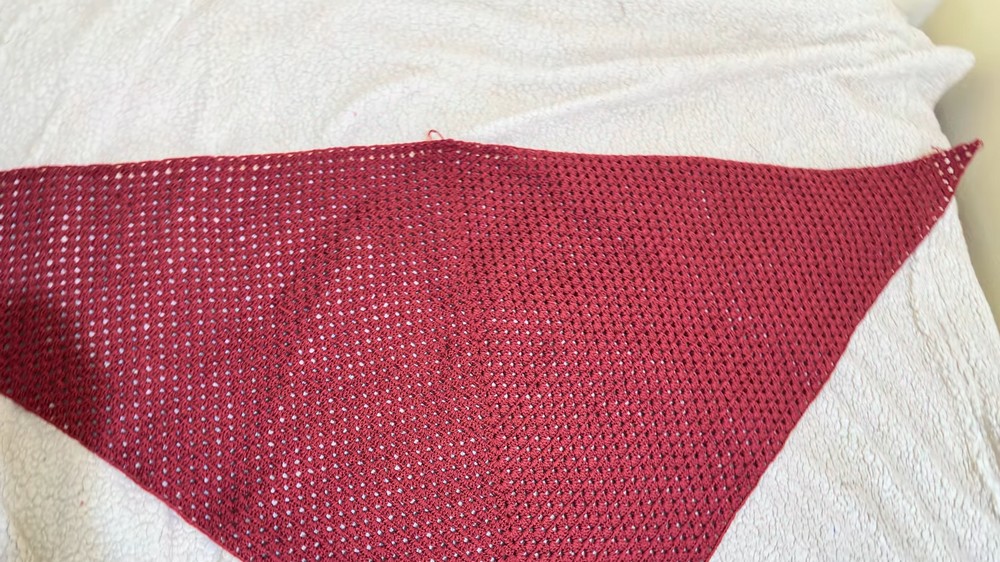
- Grow the Triangle: Repeat this pattern until it reaches 35 inches from the center to the side corners and a total base length of 70 inches.
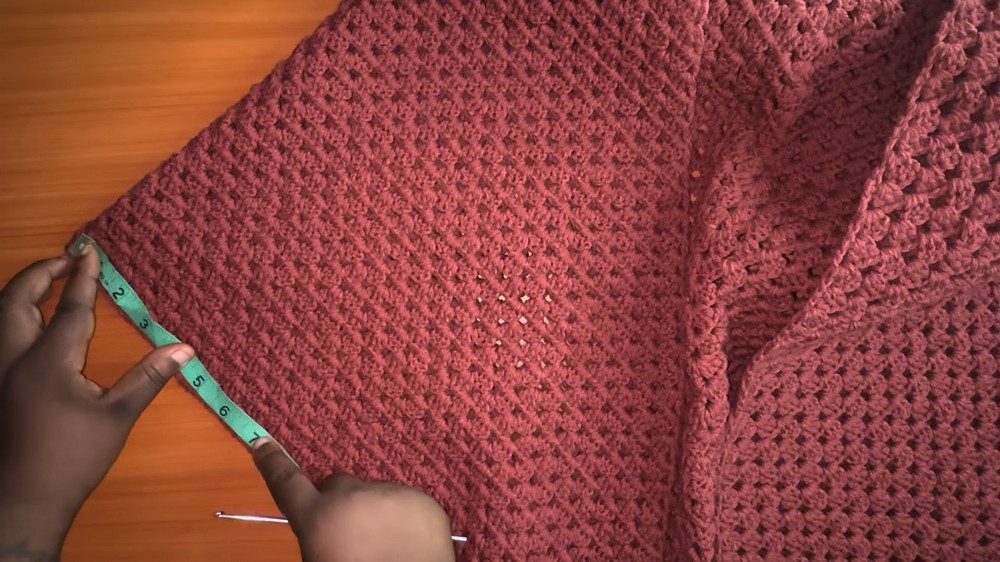
2. Fold the Triangle and Create Armholes:
- Fold the Triangle: Fold the triangle symmetrically to prepare for the cardigan body.
- Measure Armholes:
- With a measuring tape, designate 7-inch armholes. Use stitch markers to mark the points on both sides of the folded triangle.
- With a measuring tape, designate 7-inch armholes. Use stitch markers to mark the points on both sides of the folded triangle.
3. Work on the Sleeves:
- Start Row 1:
- Attach yarn at the stitch marker for the armhole.
- Chain four, then work clusters of three double crochets in each chain space around the armhole.
- Slip stitch at the end of the row to close the round.
- Subsequent Rows:
- At the start of each row, chain four and continue crocheting clusters of three double crochets in the chain spaces with a chain one between clusters.
- Repeat this until you reach the desired sleeve length (the tutorial used a sleeve measurement of 9 inches).
- Ribbing for Sleeves:
- Work ribbing by alternating front post double crochet (FPDC) and back post double crochet (BPDC) stitches for two rows.
- Ensure consistency by working FPDC on FPDC stitches and BPDC on BPDC stitches from the previous row.

4. Add Ribbing to the Cardigan Body:
- Attach Yarn at the Front Opening Edge:
- Chain two and work two double crochets into each space around the cardigan opening (the middle where the cardigan folds open).
- This ensures an even base for the ribbing.
- Work Ribbing Rows:
- Work alternating FPDC and BPDC stitches, similar to the sleeves.
- The creator completed four rows of ribbing for the body, but you can customize based on your preference.
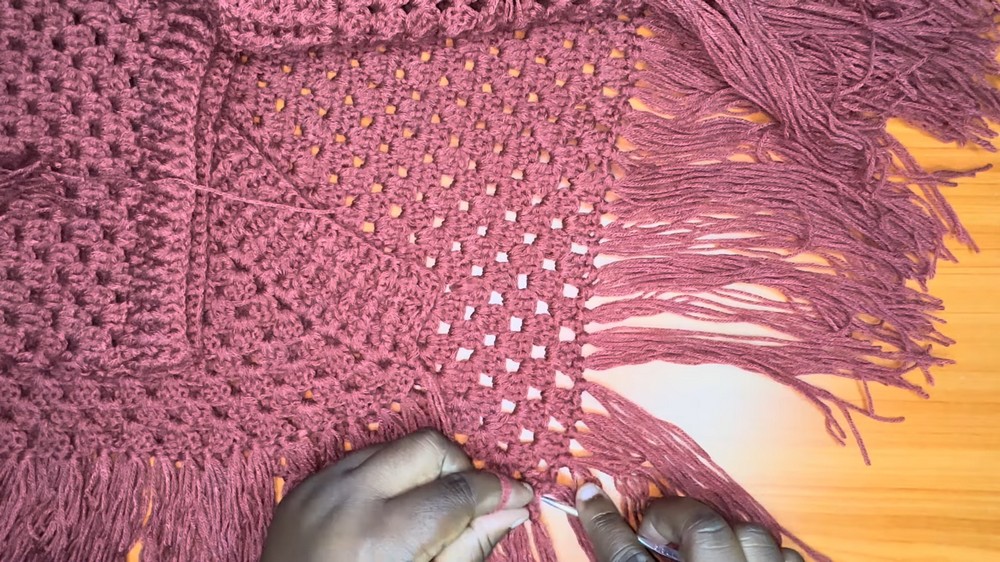
5. Add Decorative Fringe:
- Prepare the Fringe:
- Use a book or object to wrap yarn and create even lengths of fringe. Cut multiple strands of equal length.
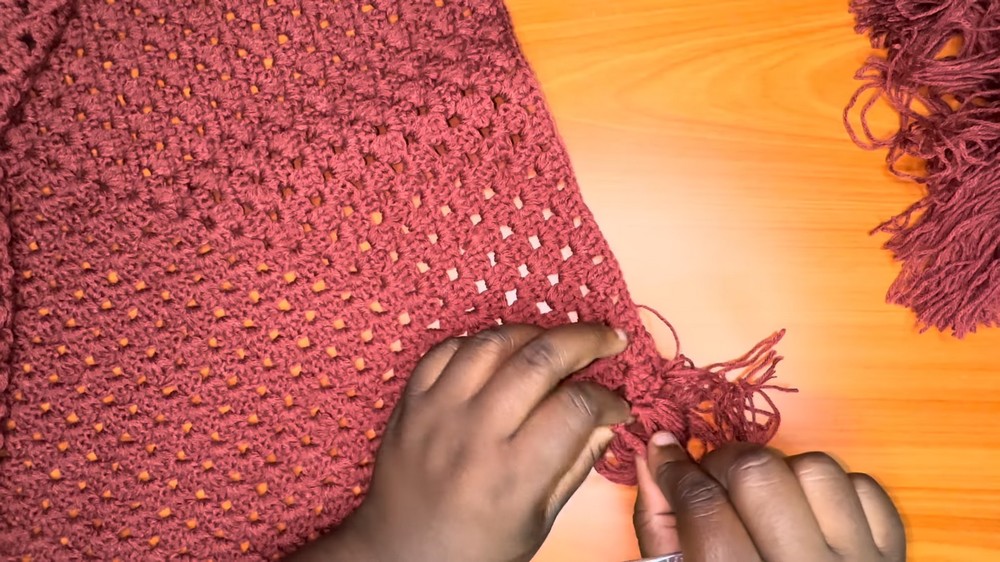
- Use a book or object to wrap yarn and create even lengths of fringe. Cut multiple strands of equal length.
- Attach the Fringe:
- Group four strands of yarn together and attach them evenly along the baseline of the cardigan.
- The creator placed fringes every alternate stitch for a dense yet balanced look.
Special Features
- One-Triangle Design: The cardigan's structure revolves around crocheting just one large triangle.
- Ribbing Details: Front post and back post stitches create professional-looking, polished edges on the sleeves and body.
- Customizable Sizing: You can adjust the triangle size, sleeve length, or ribbing width based on your measurements.
- Fringe Finish: The added fringe detail enhances the final look, giving it texture and movement.
Level of Difficulty
This project is beginner-friendly to intermediate. While the triangle base uses straightforward stitches (chains, double crochets), the ribbing and post stitches may require some practice for beginners unfamiliar with these techniques. However, the repetitive nature of the pattern ensures it’s easy to grasp.
Tutor's Suggestions
- Ensure Consistency: Pay close attention to stitch counts, particularly at the corner chain spaces, to maintain the triangular shape.
- Customize Armholes: Carefully measure and mark the armholes for a comfortable fit, then adjust as needed.
- Practice Ribbing Stitches: If you're new to FPDC and BPDC, take some time to practice on a scrap piece to ensure clean results.
Uses
- A stylish layering piece for casual or semi-formal outfits.
- Makes an excellent handmade gift.
- Perfect for cooler weather as a warm yet breathable garment.
Materials Recap
- 100% acrylic yarn (Robin or equivalent) doubled up.
- 3.5 mm crochet hook.
- Scissors.
- Measuring tape.
- Stitch markers.
Helpful Tip
When attaching fringes, take your time to position them evenly along the base. You can create a professional and polished look by grouping and spacing them consistently.
Conclusion
This gorgeous cardigan, built from a single triangle, is an excellent project to enhance your crochet skills. Its customizable design ensures it fits all sizes, while the ribbing and fringe add a beautiful finishing touch. The step-by-step process makes it easy to follow, and the final result is a functional and fashionable addition to your wardrobe.


