
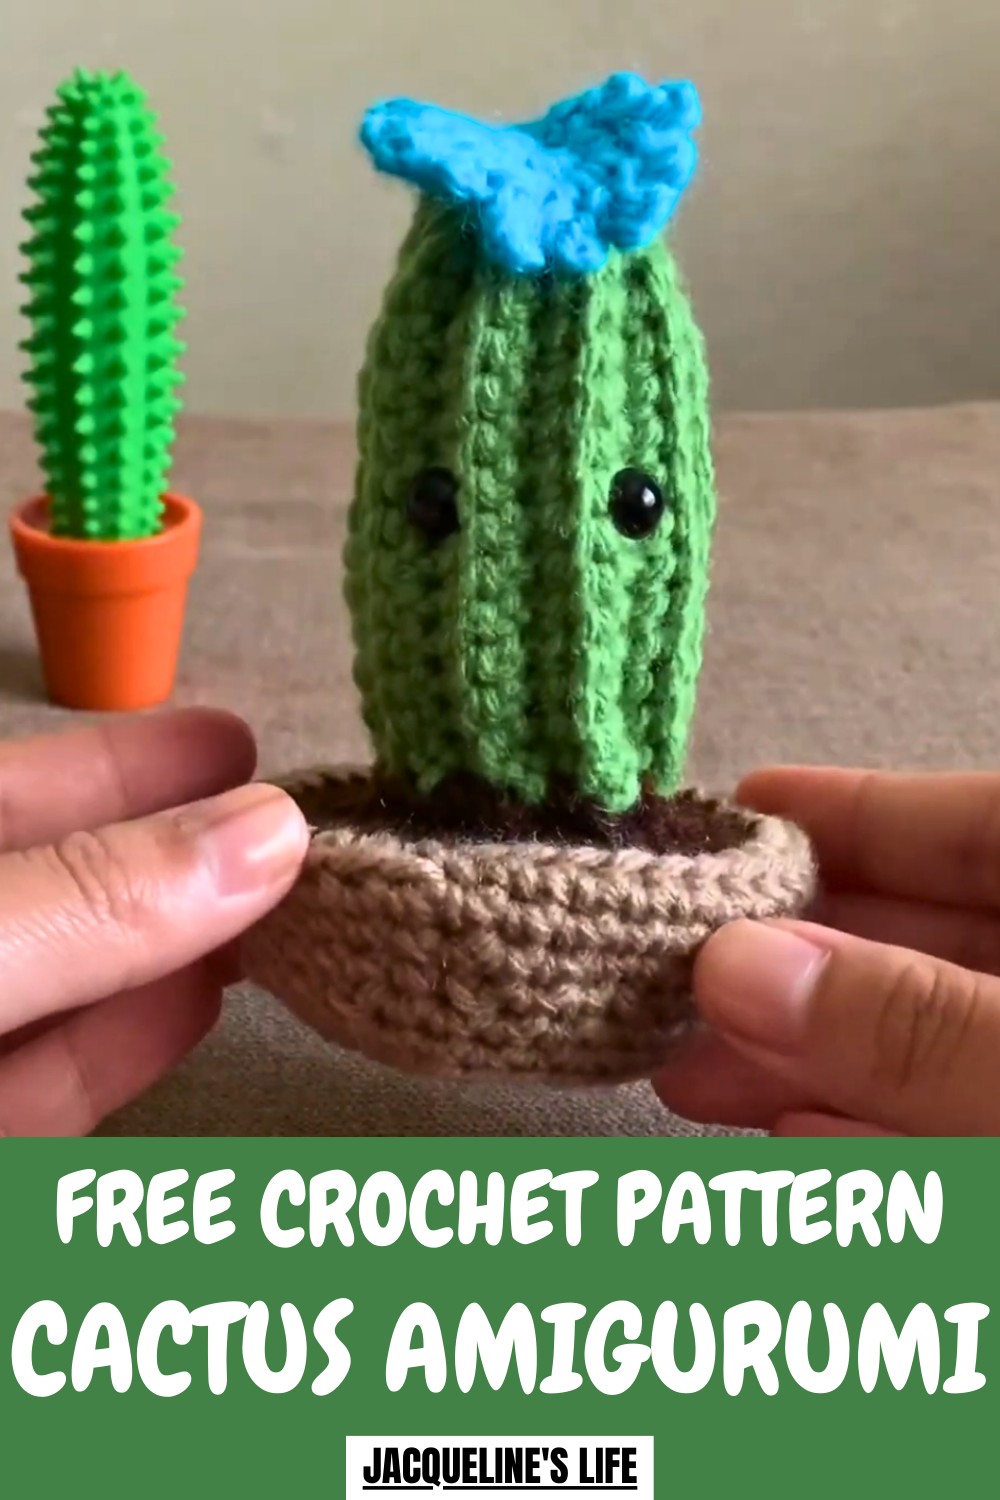
Sprout some fun with this Free Crochet Cactus Amigurumi Pattern, adding a playful touch to your desk, shelves, or cute handmade décor.
Bringing greenery into indoor spaces can be fun and stress-free with handmade decor. A Crochet Cactus Amigurumi Pattern allows you to create a charming, low-maintenance cactus that never needs watering but still adds life and character to any room. This amigurumi piece is perfect for desks, shelves, or gifts, giving you full control over size, color, and design details to match your personal style.
Adorable Crochet Cactus Amigurumi Pattern That Lasts Forever
Working on it encourages creativity, patience, and focus, transforming simple yarn into a detailed, tactile object. Unlike real plants, it is durable, allergy-free, and long-lasting, making it ideal for any space or lifestyle. Using a crochet cactus amigurumi pattern is not only relaxing and rewarding but also a way to make a unique, meaningful decorative item. It combines artistry, practicality, and playfulness, offering a small but delightful addition that brightens your home or workspace.
How to Crochet a Mini Cactus – Step-by-Step Guide
Materials Needed
To crochet the mini cactus, you’ll need the following materials:
- Yarn:
- Green yarn for the cactus.
- Brown yarn for the dirt layer.
- Lighter brown yarn for the pot base.
- Optional yarn for the flower (tutorial for the flower provided in a separate video).
- Hook and Tools:
- 4.5mm crochet hook (used throughout the project).
- Fiberfill stuffing to give structure to your cactus and pot.
- Scissors to trim excess yarn.
- Stitch Marker (optional) for tracking rounds.
- Yarn needle for weaving and securing loose ends.
Uses of the Mini Cactus
- Desk Decoration: Use the finished cactus as a charming decorative item for your workspace.
- Removable Pen Holder: Insert a pen into the cactus to create a fun, functional design.
- Gift: It works wonderfully as a handmade gift for friends and family.
- Crochet Practice: Ideal for mastering texture, shaping, and color changes.
Special Features of the Mini Cactus
- Textured Stitching: The use of back-loop-only single crochet creates a unique ribbed effect for the cactus.
- Layers and Curves: Switching colors and adjusting stitches lets you shape the dirt layer and pot accurately.
- Customizable Design: Modify sizes, colors, or add eyes and embellishments to personalize the cactus.
- Beginner-Friendly Construction: The project is all single crochet – suitable for those familiar with basic stitches.
Level of Difficulty
Beginner to Intermediate
- It’s simple enough for beginners and offers intermediate techniques such as working into back loops, invisible decreases, and color changes.
- Attention to detail is required when sewing parts together and shaping the pot.
Tutor’s Suggestions
- Practice the Back Loop Technique: The ribbing effect for the cactus relies on single crocheting into back loops. Get comfortable with this technique before continuing.
- Customize Stuffing Levels: The tutor recommends adjusting the amount of stuffing to alter the cactus’s shape. Using less stuffing creates a flatter look while more stuffing makes it firm and rounded.
- Safety Eyes: Add decorative eyes to make the cactus more playful. Position them before stuffing and finishing the piece.
- Secure Color Changes: Always tie knots between different yarn colors to avoid unraveling.
- Weave and Pull for Clean Closure: Use weaving techniques to close the top and bottom neatly before working on additional details like flowers.
- Use a Stitch Marker: To help track your progress, especially during rounds with increases or decreases.
Step-by-Step Instructions
Step 1: Crochet the Cactus
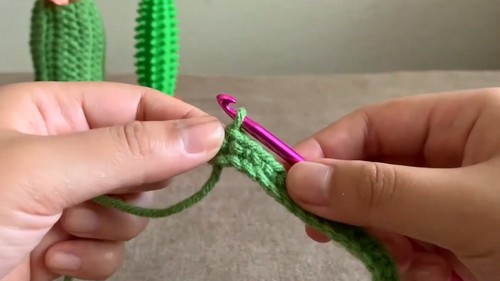
- Create a Slipknot and Chain:
- Start with a slipknot and chain 16 stitches.

- Start with a slipknot and chain 16 stitches.
- Single Crochet Along the Chain:
- Insert your hook into the second chain from the hook and single crochet. Repeat until you reach the end of the row.
- Chain One and Turn:
- Chain one at the end of the row, turn your work, and start the next row.
- Chain one at the end of the row, turn your work, and start the next row.
- Back Loop Single Crochet:
- Work single crochets into the back loops only for texture. This will create the ribbed cactus effect. Continue this process (chaining one, turning, and crocheting into back loops) for 19 rows to create the cactus body.
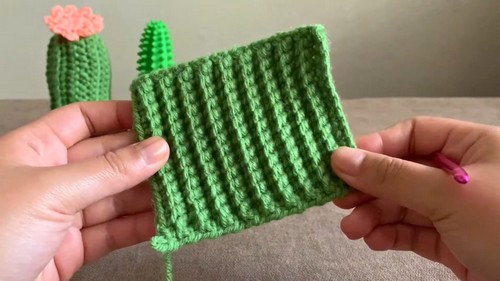
- Work single crochets into the back loops only for texture. This will create the ribbed cactus effect. Continue this process (chaining one, turning, and crocheting into back loops) for 19 rows to create the cactus body.
- Sew the Edges Together:
- Fold the cactus piece in half and single crochet along the edges to secure. Flip the piece inside out once the edges are sewn, hiding the seam.
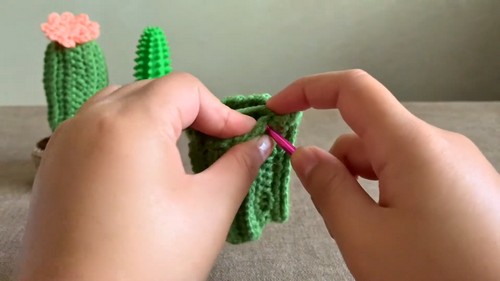
- Fold the cactus piece in half and single crochet along the edges to secure. Flip the piece inside out once the edges are sewn, hiding the seam.
Step 2: Close the Top and Add Stuffing
- Weave the Top Closed:
- Use a yarn needle or hook to weave the top stitches tightly together. Pull the yarn to close the top and secure with knots inside.
- Stuff the Cactus:
- Begin adding fiberfill stuffing before the bottom is closed to make it firm and rounded.
Step 3: Crochet the Dirt Layer
- Attach Brown Yarn:
- Insert your hook into the bottom stitches, pull through brown yarn, and tie a knot to secure.
- Single Crochet Around:
- Single crochet along the bottom edge. For the first round, create a total of 20 stitches.
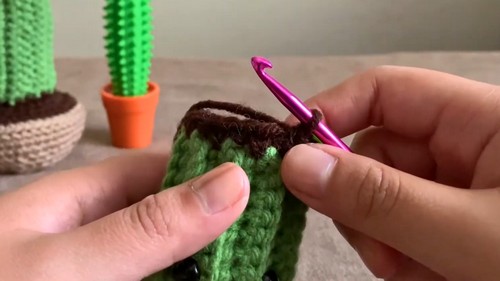
- Single crochet along the bottom edge. For the first round, create a total of 20 stitches.
- Curve the Dirt Layer:
- On the second round, single crochet into the front loops only to make the dirt layer curve outward slightly.
- Increase for Shape:
- On the next round, alternate between an increase (2 single crochets in one stitch) and a standard single crochet. Repeat to reach 30 stitches.
- Fill and Secure:
- Continue increasing and single crocheting as needed until the dirt layer is complete.
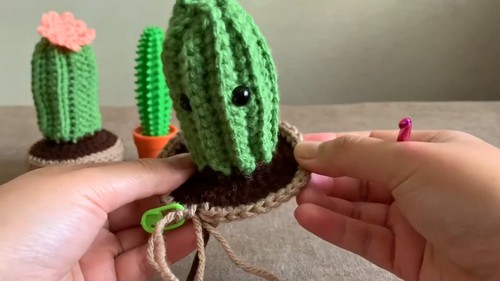
Step 4: Crochet the Pot Base
- Change Yarn Color:
- Switch to light brown yarn and secure the color with knots. Single crochet for 40 stitches to start the pot base.
- Back Loop Crochet for Curves:
- Work single crochets into the back loops only to make the pot curve downward. Complete 2 rows of back-loop-only single crochet for the shape.
- Work single crochets into the back loops only to make the pot curve downward. Complete 2 rows of back-loop-only single crochet for the shape.
- Decrease to Shrink the Opening:
- Use invisible decreases to curve the pot inward. Alternate decreases with single crochets along the back loops.
- Stuff and Close:
- Add fiberfill and decrease until the opening becomes small enough to close completely.
- Add fiberfill and decrease until the opening becomes small enough to close completely.
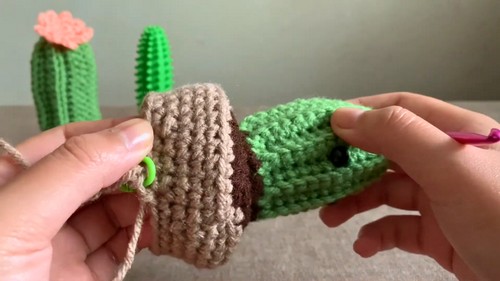
Step 5: Add Final Touches
- Secure the Bottom:
- Weave the remaining yarn through the bottom stitches and pull tight to secure. Tuck excess yarn inside.
- Optional Flower:
- Attach a crocheted flower to the top of the cactus for added flair (a separate tutorial for the flower is available).
- Personalize with Eyes:
- Add safety eyes or decorative details based on preference.
- Add safety eyes or decorative details based on preference.
Conclusion
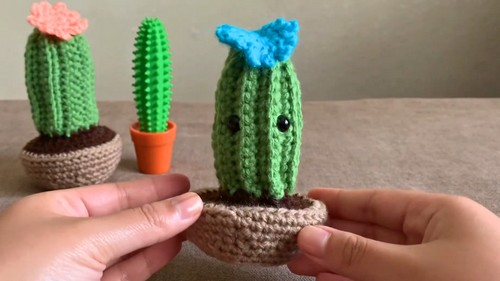
You’ve successfully crocheted a mini cactus! This project combines simplicity and creativity, allowing you to practice fundamental stitches while crafting something unique. The cactus’s layered design makes it a versatile item for decoration or gifting, and you can easily customize it by experimenting with colors, sizes, or stuffing levels.
Whether you keep it as a decorative item or gift it to someone special, the mini cactus is guaranteed to brighten up any space!
Pro Tip
When switching colors for the dirt layer and pot, pull the new yarn tightly to eliminate gaps. Tie secure knots between the previous and new colors to keep your transitions smooth and polished.


