
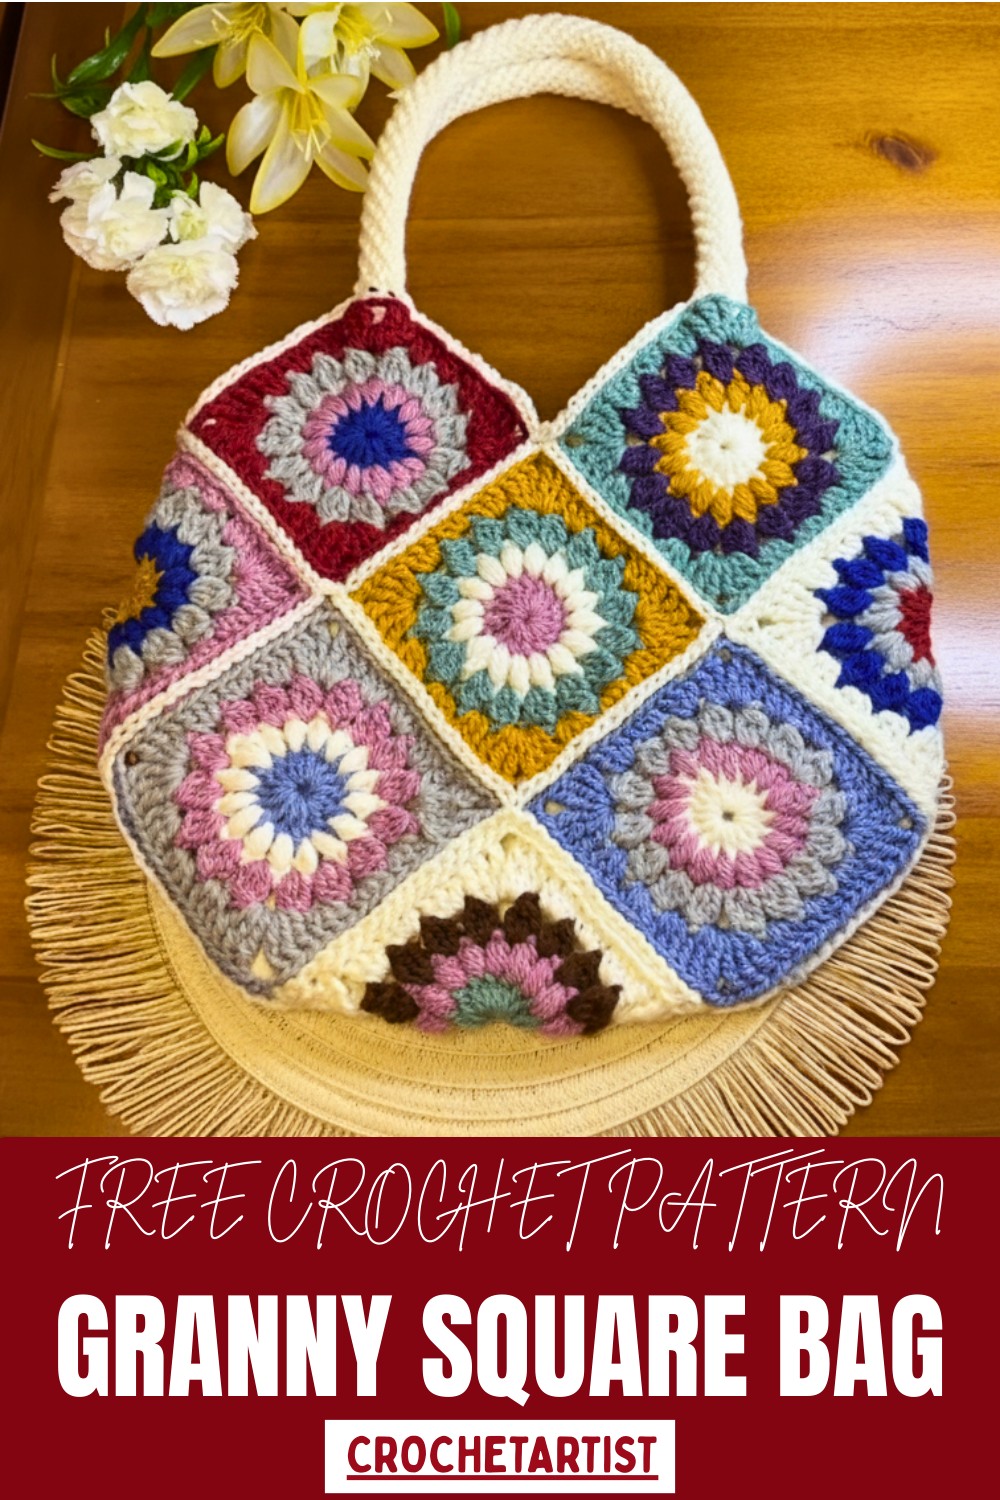
Carry handmade charm with this Free Crochet Granny Square Bag Pattern, perfect for crocheting a stylish, colorful, and versatile bag effortlessly.
Brimming with charm and timeless style, the Crochet Granny Square Bag Pattern transforms simple outfits into standout looks full of personality. Its unique design combines practicality with a handcrafted aesthetic, making it perfect for daily errands, casual outings, or as a stylish companion for market trips and coffee dates. Lightweight yet sturdy, it balances functionality and elegance effortlessly.
Step-by-Step Instructions
Materials Required:
- Yarn: Aran-weight yarn (any color combination).
- Hook: 5.5 mm crochet hook.
- Additional Tools: Scissors, darning needle (for sewing), and optional fabric lining (if desired).
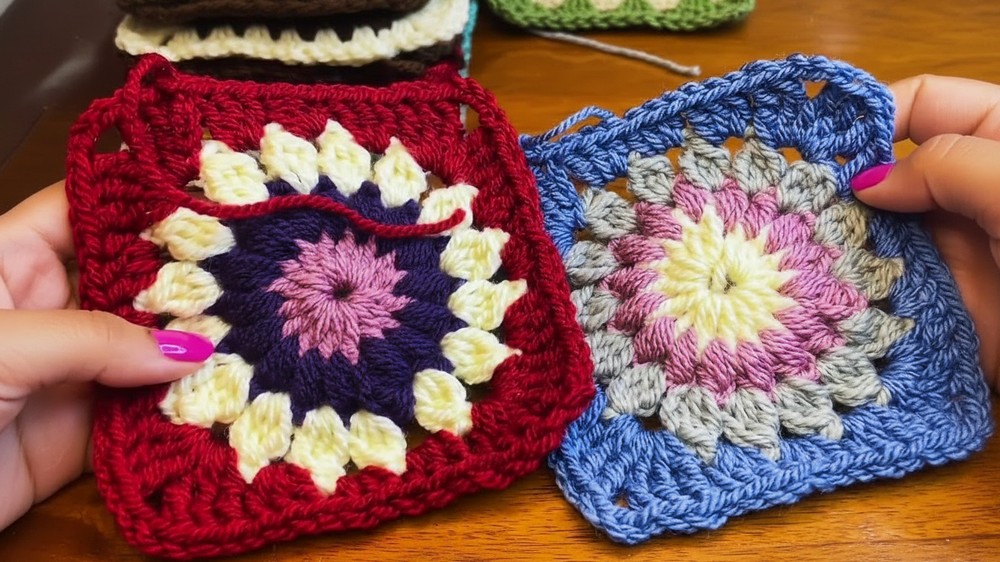
Step 1: Create the Granny Square
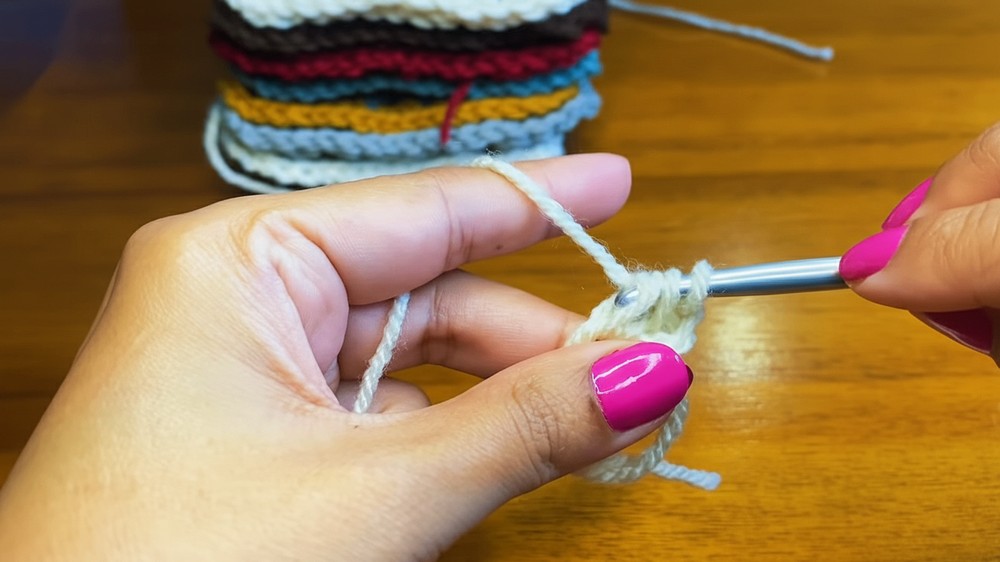
1. Magic Circle or Foundation Ring:
- Start with a magic circle by wrapping yarn around your fingers and pulling up the back loop. Alternatively, chain 4 and slip stitch into the first chain to form a loop.
- Chain 3 (counts as the first double crochet), then work 16 double crochets into the ring.
- Join with a slip stitch on the top of the starting chain 3 and chain 1 to secure the round.
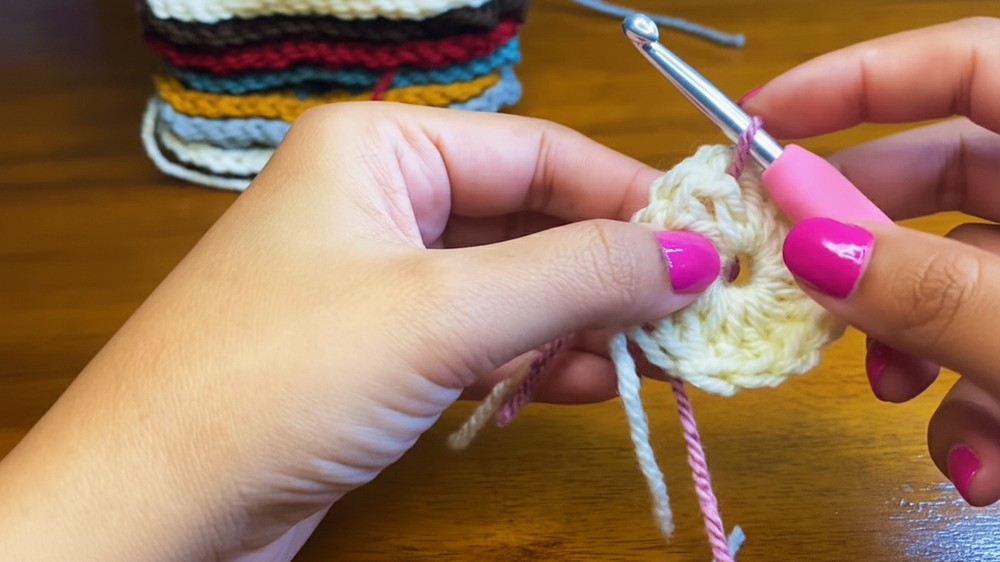
2. Round 2 – Adding Puff Stitch Rows:
- Switch to a different yarn color. Insert the yarn into a chain space to begin.
- Chain 3 (counts as the base for a puff stitch). Yarn over and insert your hook into the same space, pull through a loop, and repeat three times until you have seven loops on your hook.
- Yarn over and pull through all seven loops, chain 1 to close the puff. Work a puff stitch in each space around.
- Slip stitch into the chain 3 at the beginning of the round, chain 1, and fasten off.
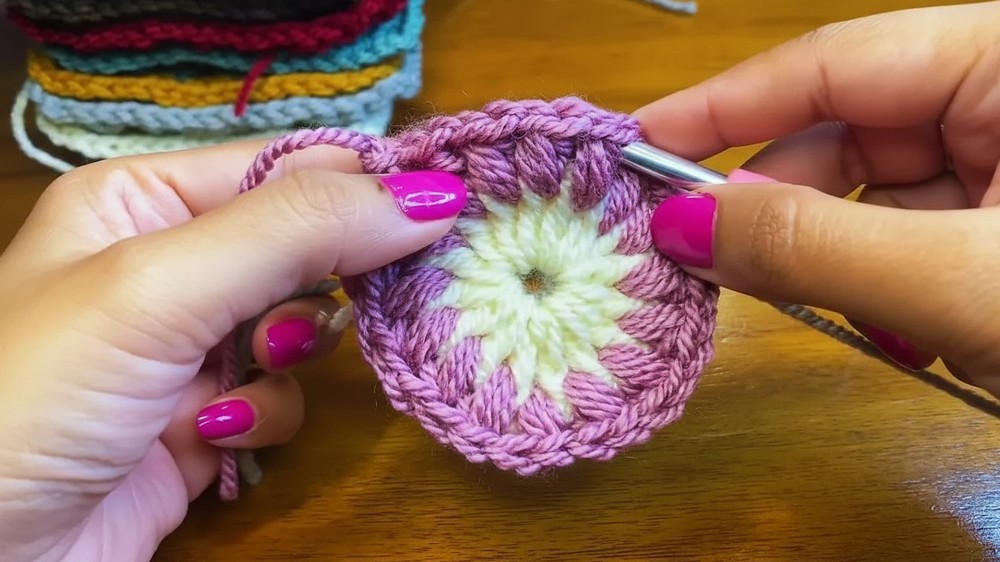
3. Round 3 – Slight Modification to Puff Stitches:
- With a new yarn color, insert into any chain space.
- Chain 3 (counts as the start for a cluster). Yarn over, insert the hook into the same space, and pull through 2 loops at each step, leaving the remaining loops on the hook. Repeat three times until you have 4 loops on the hook. Yarn over and pull through all four loops, then chain 2.
- Repeat this modified cluster-puff stitch in each space, followed by chain 2, across all spaces.
- Slip stitch into the top of the starting chain 3, chain 1, and fasten off.
4. Round 4 – Creating a Square Shape:
- Insert a new yarn color into any chain space. Chain 4 (counts as the first triple crochet). Work 2 additional triple crochets into the same space, chain 3 (for the corner), and crochet 3 triple crochets again in the same spot to form a corner.
- Move to the next space: Crochet 3 double crochets, then in the following space, work 3 half-double crochets. For the next, crochet 3 double crochets again, returning to the pattern.
- At the next space, work a corner: 3 triple crochets, chain 3, and 3 triple crochets.
- Repeat this pattern (corners and corresponding stitches) around the square until a full square is formed. Slip stitch into the starting chain and fasten off.
- Make 13 granny squares total for the bag.
2: Joining Granny Squares
1. Lay out the squares:
- Arrange the 13 squares in your desired layout for the front, back, and side sections of the bag.
2. Join Squares Using the Back Loop Method:
- Place two squares with their back sides facing each other. Use the outer back loop of each square to join them together with slip stitches.
- Insert your hook into the back loop of the first square, then do the same for the second square. Yarn over, pull through both loops, and chain to secure.
- Continue slip stitching through all loops to attach squares. This method creates a chain-like edge finish on the outside of the bag.
3. Connecting rows:
- Without cutting your yarn, attach the next square by inserting the hook into its back loop and repeating the process. Work through all squares systematically until assembled.
3: Add the Handles
1. Create Handle Loop Base:
- Start with a slip knot and chain 5.
- Slip stitch into the first chain to form a ring.
2. Single Crochet Base Rounds:
- Work 8 single crochets into the ring. Instead of slip stitching to end the round, begin working continuously into the back loops of the stitches.
- Identify the back loop (a small loop at the bottom of each stitch) and single crochet into it.
3. Form Rope-Like Pattern:
- As you work into the back loops, you’ll notice a twisting rope-like texture forming.
- Continue working in rounds until the handle reaches the desired length.
4. Finish and Make the Second Handle:
- Once the handle is long enough, slip stitch to finish and cut the yarn. Repeat the process to make another handle.
4: Attach Handles and Finishing Touches
- Sew the handles to the top of the granny square bag using a needle and thread or yarn and a darning needle.
- Optionally, add a lining to the interior of the bag for added durability and structure. Ally provides a separate tutorial for this (linked in the description of the video).
Fashionable Crochet Granny Square Bag Pattern That Turns Heads
This Crochet Granny Square Bag Pattern showcases classic granny squares arranged into a cohesive, eye-catching design that radiates vintage-inspired beauty. Each square adds texture, color, and a touch of individuality, allowing endless possibilities for creative color combinations or contrasting patterns. Its soft yet durable construction makes it versatile enough to pair with both casual jeans and chic summer dresses, offering a stylish boost to any ensemble.
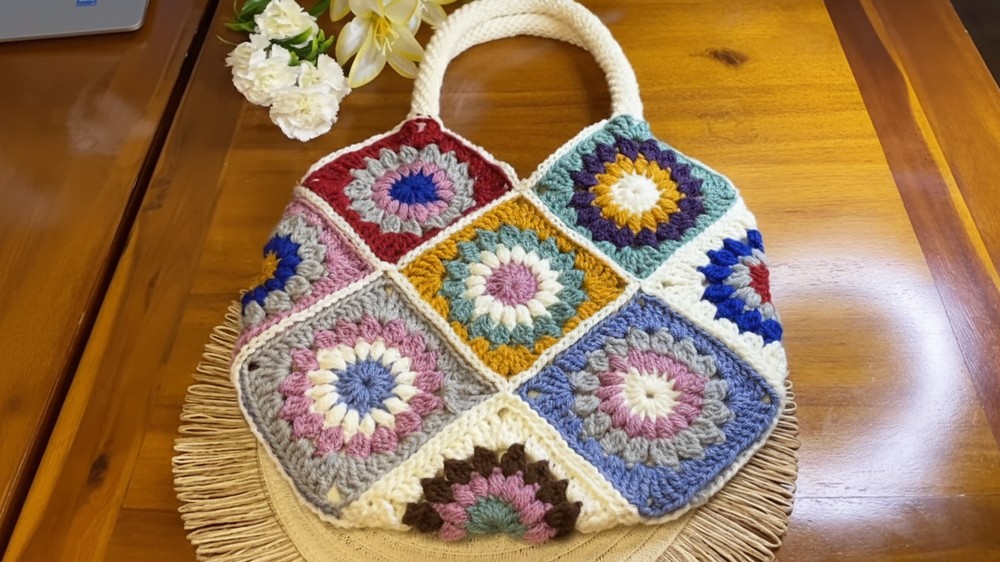
Beyond its aesthetic appeal, this pattern provides a rewarding stitching experience, creating a polished, ready-to-use accessory with every finished bag. Perfect as a handmade gift or a personal wardrobe staple, the design combines practicality, creativity, and charm seamlessly. With its vibrant textures, playful patterns, and functional design, this bag is more than just an accessory—it’s a statement piece that highlights individuality, style, and timeless handmade elegance in everyday fashion.
Special Features
- Beginner-Friendly: The granny square and puff stitches are straightforward, and Ally’s instructions make them accessible to new crocheters.
- Customizable: Use any color combination to match your style and easily modify the square layout or handle length.
- Unique Rope-Like Handles: The bag handles have a twisted design for added texture and sturdiness.
- Optional Lining: Adding a lining can increase the bag’s strength and give it a polished finish.
Level of Difficulty
This project is beginner-friendly, but familiarity with basic stitches such as double crochet, slip stitch, chain, and puff stitches will be helpful. Beginners may need practice with joining squares and working into back loops, but the project is manageable.
Tutor’s Suggestions
- Granny Square Mastery: Practice the granny square pattern first to achieve uniformity in size and shape.
- Stretch and Block Squares: If your squares are uneven, consider blocking them before assembling for a cleaner look.
- Patience with Handles: The twisted-loop method for handles can be tricky at first, but it gets easier with practice.
- Optional Lining: Adding lining is not required but improves the bag’s functionality for heavier items.
Uses and Applications
- Everyday Accessory: A stylish bag for carrying small items while running errands or casual outings.
- Gift Idea: A thoughtful handmade present for friends and family.
- Customizable Design: You can crochet larger or smaller bags by adjusting the number of granny squares.
Tip
When working into back loops for the handles, take your time! The loops may be difficult to identify initially, but with consistent practice, you’ll spot them easily as the pattern develops a clean, rope-like texture.
Conclusion
The granny square crochet bag pattern is an excellent project for beginners and more experienced crocheters alike. It’s customizable, easy to follow, and creates a functional, chic accessory. Ally’s step-by-step instructions will take you through the entire process—from granny squares to adding handles and optional lining. With the right materials and a little practice, you’ll have a stylish, handmade bag in no time.


