
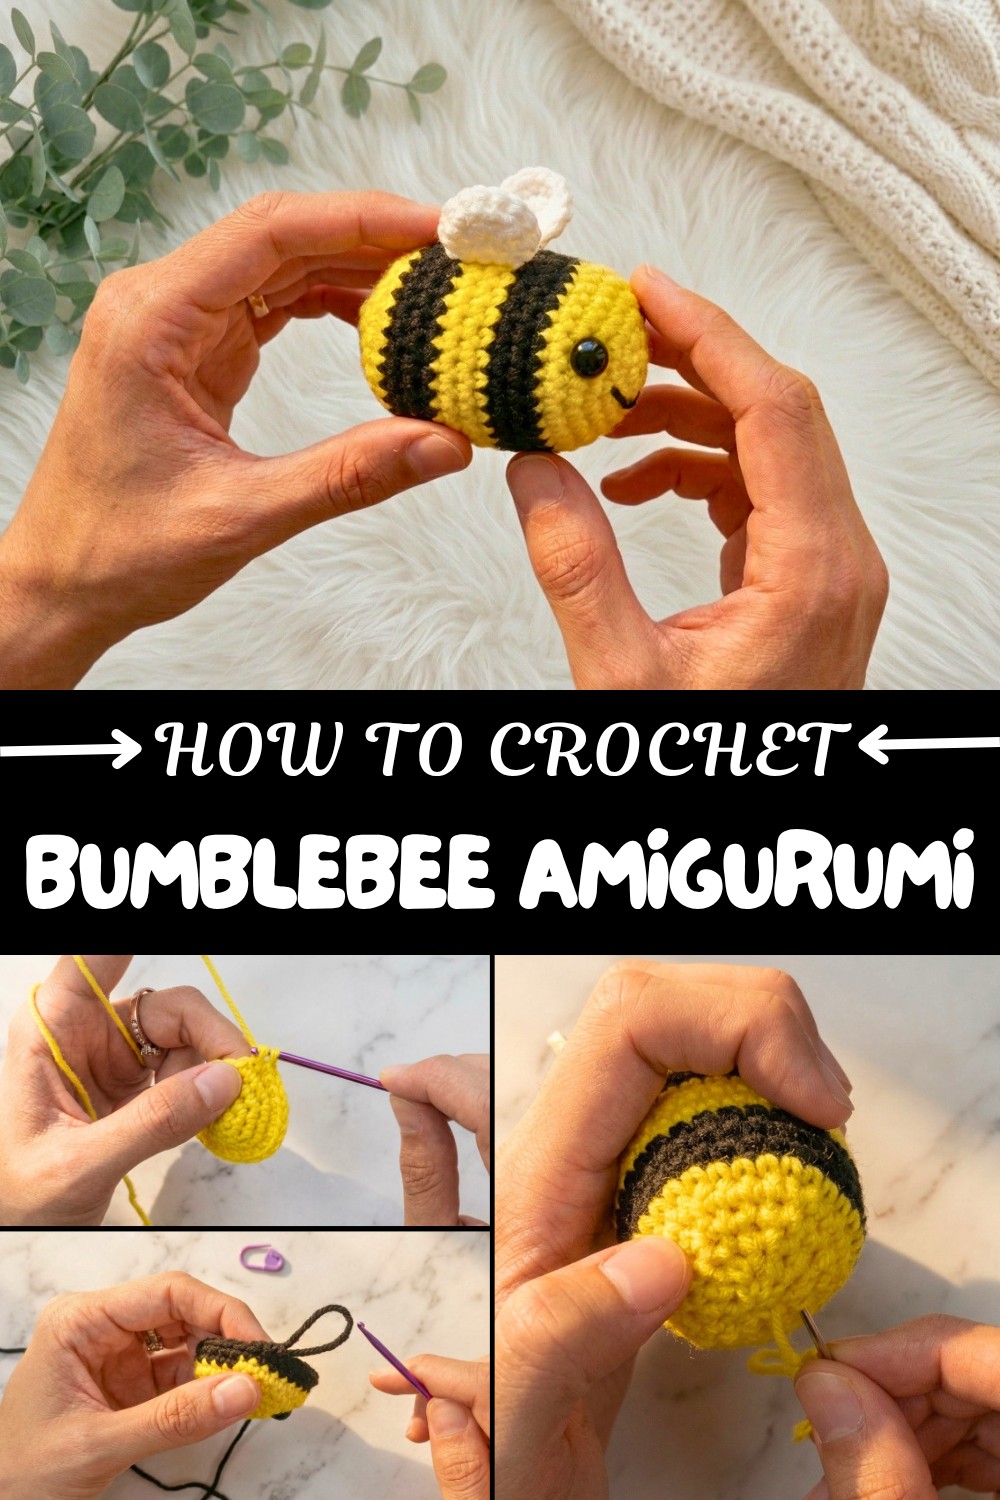
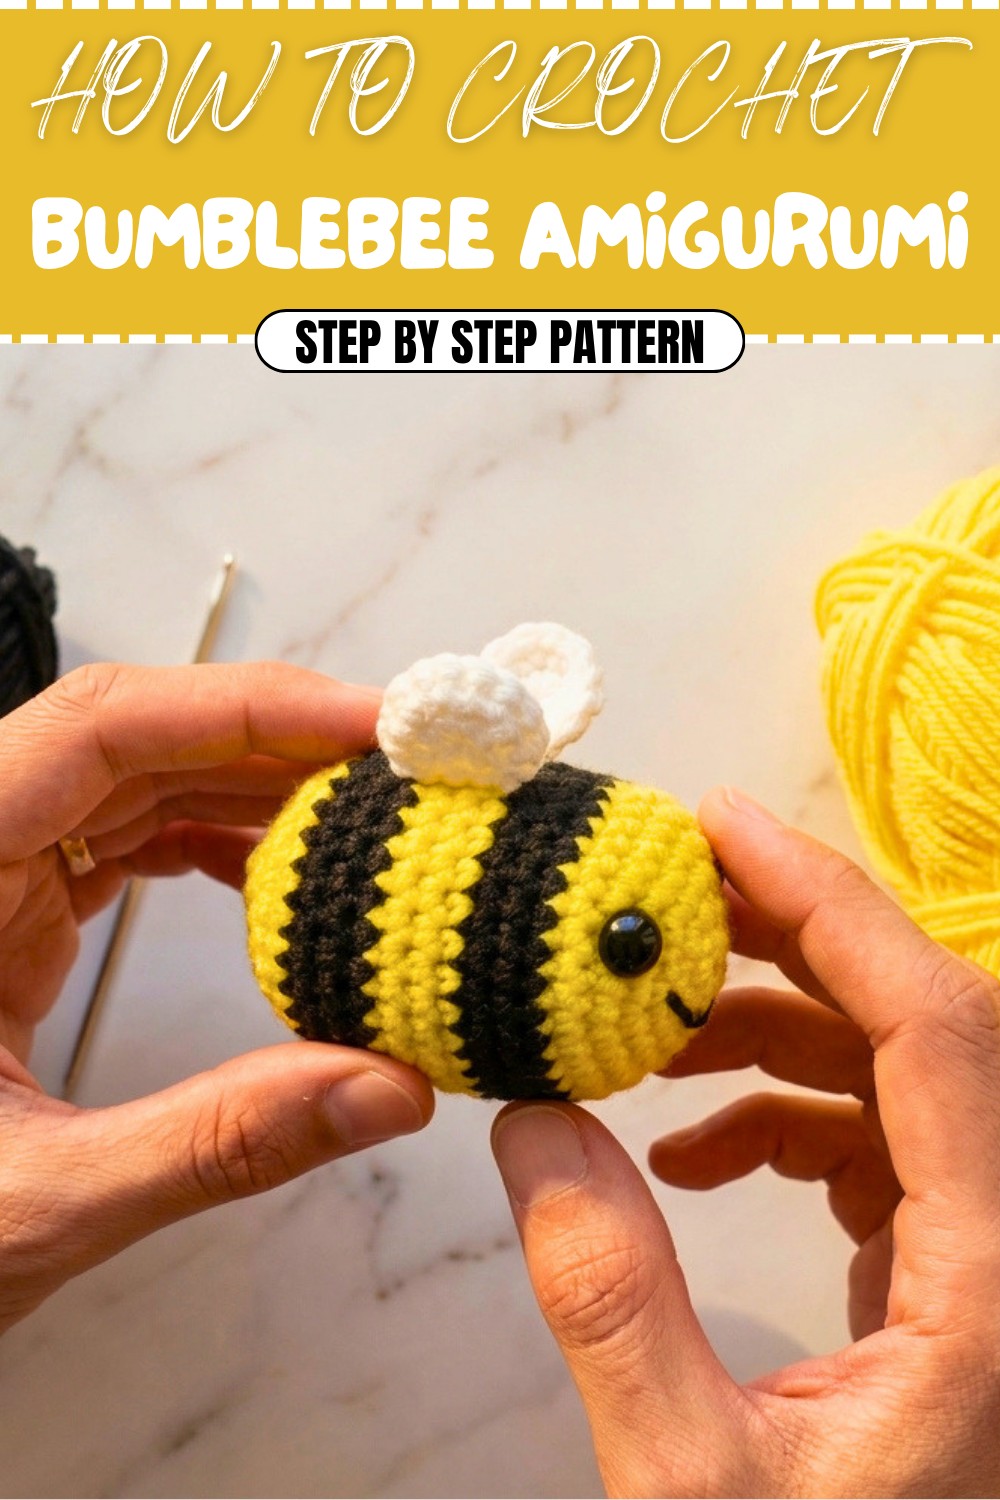
How to Free Crochet Bumblebee Pattern for Handmade Gift
Refresh your project list with the Free Crochet Bumblebee Amigurumi Pattern and create a tiny bee that's fun, fast, and beginner-friendly.
There’s something absolutely delightful about crocheting a tiny bumblebee that buzzes its way directly into your heart! With its cheerful stripes of yellow and black, accented by white wings, this crochet bumblebee pattern is an adorable project for beginners and a quick, satisfying make for experienced crocheters. The best part is that it fits perfectly in the palm of your hand and can be used as a cute desk companion, a playful keychain, or even a whimsical gift for friends and loved ones!
Free Crochet Bumblebee Amigurumi Pattern for Spring Projects
This tiny bee pattern is created using simple stitches, such as the magic ring, single crochet, increases, and decreases. These foundational stitches, worked in continuous rounds, allow the body to take shape seamlessly. The color changes between yellow and black give it its characteristic “stripes,” while the little wings are quick and easy to make. Using these same stitches, you can adapt the pattern to create other fun amigurumi shapes like a ladybug, a butterfly, or even a caterpillar!
What Else Can You Crochet Using These Skills
Once you become comfortable with these skills, the possibilities for crochet creations are endless! Here are some fun ideas:
- Insects: Ladybugs, caterpillars, or colorful butterflies.
- Mini Animals: Tiny bears, bunnies, or kittens using the same techniques for shaping bodies.
- Ornaments & Keychains: Fruits, smiley balls, and seasonal decorations like pumpkins or stars.
- Handmade Gifts: Create personalized amigurumi sets for loved ones, like mini farms or jungle animals!
Why You'll Enjoy This Project:
- A perfect mix of creativity and simplicity.
- Great for leftover yarn in your stash!
- Ideal for beginners to practice amigurumi basics without feeling overwhelmed.
So, grab your hook, pick some gorgeous yarn, and let’s crochet this cheerful bumblebee that is guaranteed to make everyone smile!
Skill Level & Terminology
- Skill Level: Beginner
- Terminology: US crochet terms
You only need to know a few basic stitches and how to work in continuous rounds. The pattern is written clearly so you can follow the rounds one by one.
Materials & Tools
- Yarn:
- Yellow 5-ply milk cotton (for body)
- Black 5-ply milk cotton (for stripes and body)
- White 5-ply milk cotton (for wings)
- Thin black yarn or thread (for mouth)
- Hook: 3.0 mm crochet hook (or size suitable for your yarn)
- Notions:
- Stitch marker
- Tapestry needle
- Scissors
- Stuffing (polyester fiberfill)
- Optional: Keychain ring
You can substitute any similar-weight yarn; the size of the bee will change slightly depending on yarn and hook size.
Gauge
Gauge is not critical for this bee, but you should crochet tightly enough that the stuffing does not show between stitches.
To check gauge (optional):
- Work a small swatch in single crochet (sc) in the round.
- Approximate gauge: 7–8 sc per 2.5 cm (1 in) and 8–9 rounds per 2.5 cm (1 in).
If your stitches are too loose, use a smaller hook.
Abbreviations
All in US terms:
- MR – Magic ring (magic circle)
- sc – Single crochet
- inc – Increase (2 sc in the same stitch)
- dec – Decrease (single crochet two stitches together)
- sl st – Slip stitch
- ch – Chain
- st / sts – Stitch / stitches
- rnd – Round
Special Stitch Instructions
- Magic Ring (MR):
Wrap yarn into a loop, insert hook under the loop, yarn over, pull up a loop, ch 1 (if desired), then work the required number of sc into the ring. Pull the tail to close. - Increase (inc):
Work 2 sc into the same st. - Decrease (dec):
Insert hook into next st, yarn over, pull up a loop, insert hook into the following st, yarn over, pull up another loop (3 loops on hook), yarn over and pull through all 3 loops.
These basic stitches are used to shape the bee’s body and wings. Knowing them will also allow you to make many other amigurumi like animals, fruits, or mini toys.
Finished Size
- Approximate size with 5-ply milk cotton and 3.0 mm hook:
- Height: about 7–9 cm
- Width: about 5–6 cm
Size will vary slightly based on yarn, hook, and personal tension.
Pattern Overview (How to Start & Stitches Used)
You begin by making the body in yellow with a magic ring, increasing to form a round top. Then you add black stripes by changing colors while maintaining 30 stitches around. After building the cylinder-like body, you shape the bottom by working decreases. Finally, you crochet two simple white wings using MR, sc, and inc, and sew them onto the bee’s back, then embroider the mouth with thin black yarn.
Stitches used throughout the pattern:
- Magic ring (MR)
- Single crochet (sc)
- Increase (inc)
- Decrease (dec)
- Slip stitch (sl st)
- Chain (ch)
The Pattern Itself
Part 1: Bee Body (Worked in the Round, Top to Bottom)
Body – Yellow Start
- Rnd 1: In MR, work 6 sc. [6]
- Rnd 2: 6 inc (2 sc in each st around). [12]
- Rnd 3: (1 sc, inc) repeat 6 times. [18]
- Rnd 4: (2 sc, inc) repeat 6 times. [24]
- Rnd 5: (3 sc, inc) repeat 6 times. [30]
- Rnd 6: 1 sc in each st around. [30]
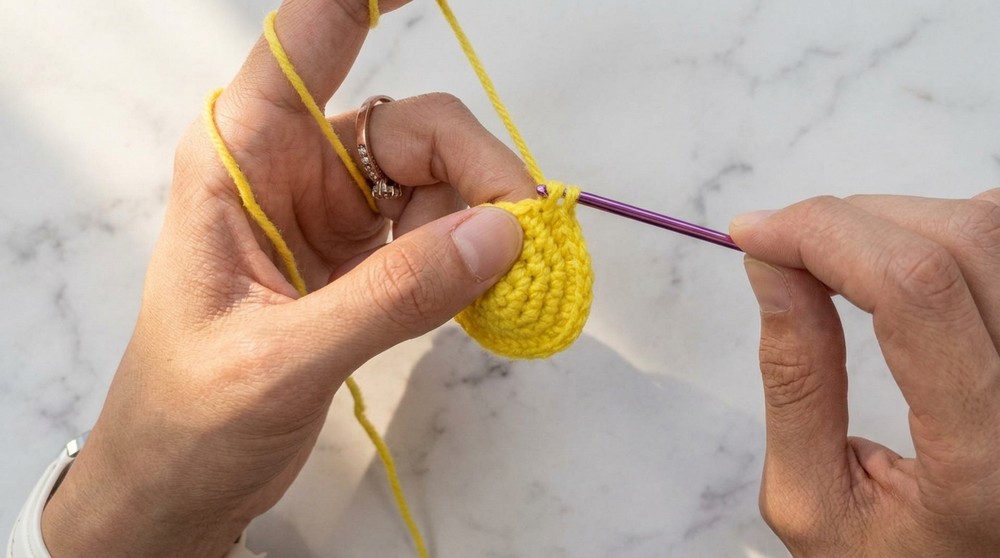
You now have a small rounded top in yellow. Keep your stitch marker in the last stitch of each round to track where each round ends.
For readers who prefer simple text:
You start from a small magic ring with 6 stitches and keep increasing evenly until you reach 30 stitches in a round. After that, you work one round of 30 single crochets with no increases. This creates the rounded top of the bee’s body.
Part 2: First Black Stripe
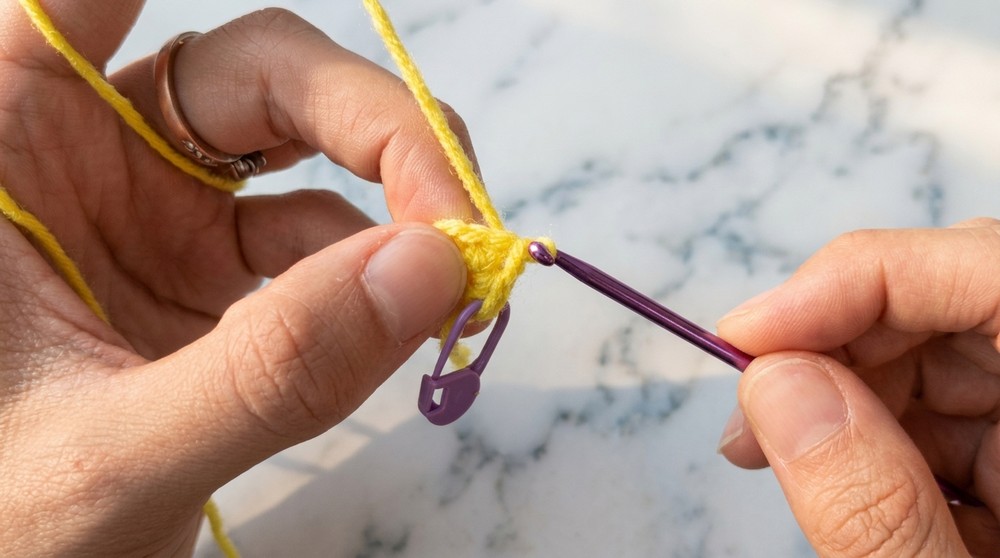
Color Change to Black
On the last sc of Rnd 6, do not finish with yellow:
- Insert hook into last st, yarn over with yellow, pull through, then yarn over with black and pull through both loops to complete the stitch in black.
- Gently tighten both yellow and black tails.
- Rnd 7: With black, 1 sc in each st around. [30]
- Rnd 8: 1 sc in each st around. [30]
- Rnd 9: 1 sc in each st around. [30]

Secure color change: after starting Rnd 8, pause and cut the yellow tail, tie yellow and black ends in 2 knots, and tuck them inside.
For non-pattern readers:
You switch from yellow to black on the last stitch so the stripe looks neat. Then you crochet three full rounds of black single crochets with 30 stitches in each round. This forms the first black stripe around the bee’s body.
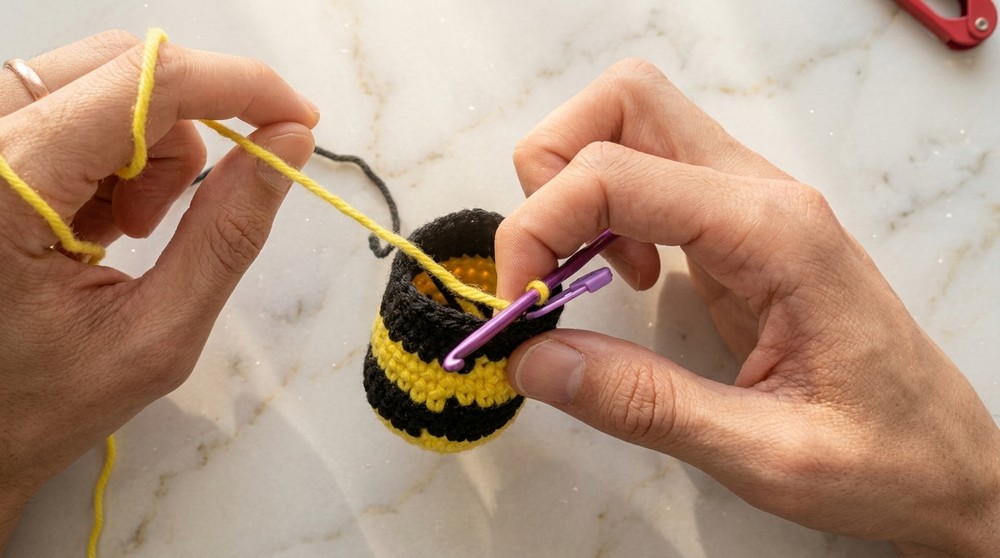
Part 3: Insert Safety Eyes
Place eyes before continuing with more rounds:
- Pause after Rnd 8 or 9.
- Count rounds from the top: the first MR round is Rnd 1. Place safety eyes between Rnds 4 and 5.
- Leave about 8 stitches between the eyes. Insert the eyes, then attach the washers on the inside to secure.
For non-pattern readers:
Before you make the body longer, add the safety eyes. Insert them in the yellow area, between the 4th and 5th rounds from the top, and leave 8 stitches of space between them. Attach the plastic backs tightly so they stay secure.
Part 4: Second Black Stripe and Yellow Sections
Continue in Black
- Rnd 10: 1 sc in each st around (still black). [30]
Change back to yellow at the last stitch of Rnd 10:
- Work last sc until 2 loops on hook, yarn over with yellow, pull through both loops. Tighten both colors.
Yellow Section
- Rnd 11: With yellow, 1 sc in each st around. [30]
- Cut black yarn after the first yellow stitch, tie yellow and black tails together with 2 knots, and tuck them in.
- Rnd 12: 1 sc in each st around. [30]
- Rnd 13: 1 sc in each st around. [30]
Change to black again on the last st of Rnd 13.
Second Black Stripe
- Rnd 14: With black, 1 sc in each st around. [30]
- Secure yellow tail (cut and knot with black) as before.
- Rnd 15: 1 sc in each st around. [30]
Change back to yellow on the last stitch of Rnd 15.
Final Yellow Band Before Decreases
- Rnd 16: With yellow, 1 sc in each st around. [30]
You keep alternating between yellow and black to make stripes: a few rounds in black, then a few in yellow, then black again, and finally yellow before shaping the bottom. Always change color on the last stitch of a round, cut the old color, tie the ends, and tuck them inside so your stripes look clean and secure.
Part 5: Shaping the Bottom (Decreases)
From here, we start decreasing to close the body.
- Rnd 17: (3 sc, dec) repeat 6 times. [24]
- Rnd 18: (2 sc, dec) repeat 6 times. [18]
Pause here to stuff:
- Remove hook temporarily and firmly stuff the bee.
- Make sure the stuffing is even and not too tight to avoid gaps.
- Rnd 19: (1 sc, dec) repeat 6 times. [12]
- Rnd 20: 6 dec around. [6]
Finish off:
- Sl st in next st, ch 1, cut yarn with a long tail.
- Using a needle, weave the tail through the front loops of the remaining 6 sts, pull tight to close the hole, then weave and hide the yarn tail inside the body.
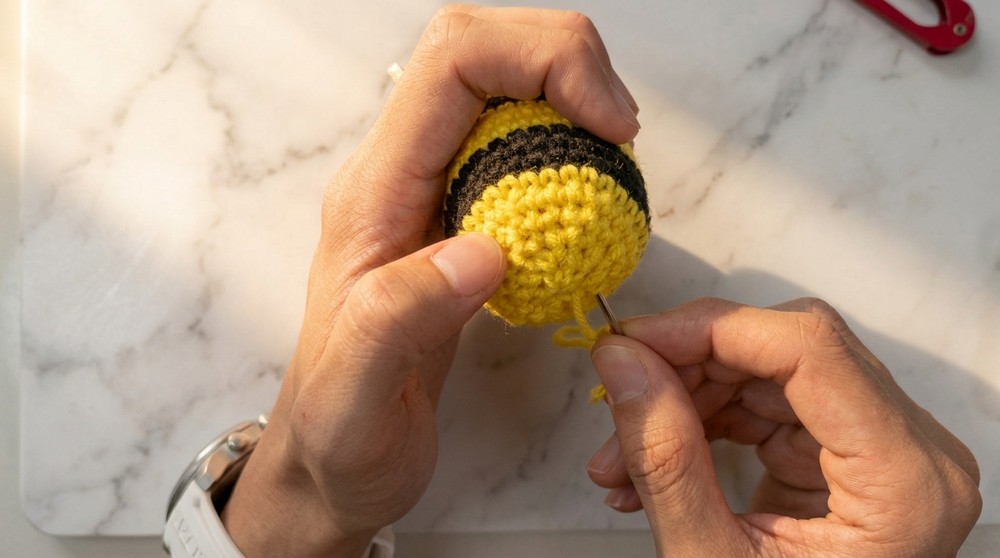
For non-pattern readers:
You now make the bee’s bottom smaller by working fewer stitches each round: first work 3 sc and then a decrease around, then 2 sc and decrease, then 1 sc and decrease. Finally, you do decreases all the way around to close most of the hole. After that, you use a needle and the yarn tail to pull the last opening tight and hide the yarn end inside.
Part 6: Wings (Make 2)
Work with white yarn.
- Rnd 1: In MR, 7 sc. [7]
- Rnd 2: 7 inc (2 sc in each st around). [14]
- Finish: Sl st into next st, ch 1, cut yarn leaving a long tail for sewing.
Hide the short magic ring tail by weaving it through the stitches of the wing and trimming. Make a second identical wing.
To make each wing, you start with a magic ring, do 7 single crochets into it, then make 2 single crochets in each stitch for the next round. This gives you a small flat circle. Finish with a slip stitch, cut the yarn, and leave a long tail for attaching the wing to the bee. Make two of these.
Assembly & Finishing
Attaching the Wings
- Thread the long tail of one wing onto a needle.
- Position wing on the yellow strip on top of the bee, centered between the eyes.
- Sew the wing to the body using small stitches around the edge, going in at the color change line between yellow and black to hide seams.
- Bring the yarn tail to the back of the bee and leave it for now.
- Attach the second wing next to the first in the same way.
- When both wings are attached and both tails exit near each other at the back, tie them together in two knots, trim, and hide the tails inside the body with the needle.
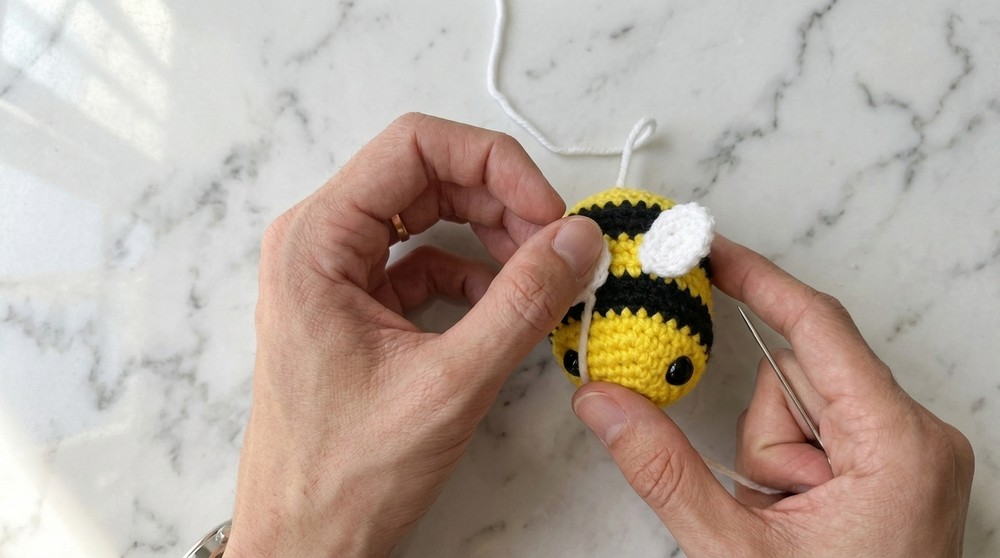
Place the wings side-by-side on the top of the bee, centered between the eyes. Sew each wing carefully onto the yellow stripe, bringing the yarn tails to the back and tying them together. Hide the knots and ends inside the body so everything looks neat and secure.
Embroidering the Mouth
- Thread thin black yarn or thread on a needle.
- Decide on the mouth position under the eyes.
- Bring the needle out at one corner of the mouth, then in at the opposite corner, forming a small line.
- Bring the needle out at the center below this line to create a gentle curve (smile), adjust tension until you like the shape.
- Take the needle back to the initial entry point, keeping the stitch curved.
- Tie two small knots with both ends at the back, trim, and hide the tails inside.
For non-pattern readers:
Use black thread to add a simple smile under the eyes by sewing a small curved line. Start from one side of the mouth, sew to the other side, then bring the needle up from the middle below to shape the curve. Tie the ends together at the back and hide them inside the bee.
What You Will Learn From This Pattern
- How to start amigurumi with a magic ring and build round shapes.
- How to increase and decrease neatly in continuous rounds to shape bodies.
- How to change colors cleanly to make stripes.
- How to attach small pieces like wings and embroider facial details for character.
By mastering these steps, you can easily adapt this pattern to create other striped animals, mini toys, and amigurumi characters.