
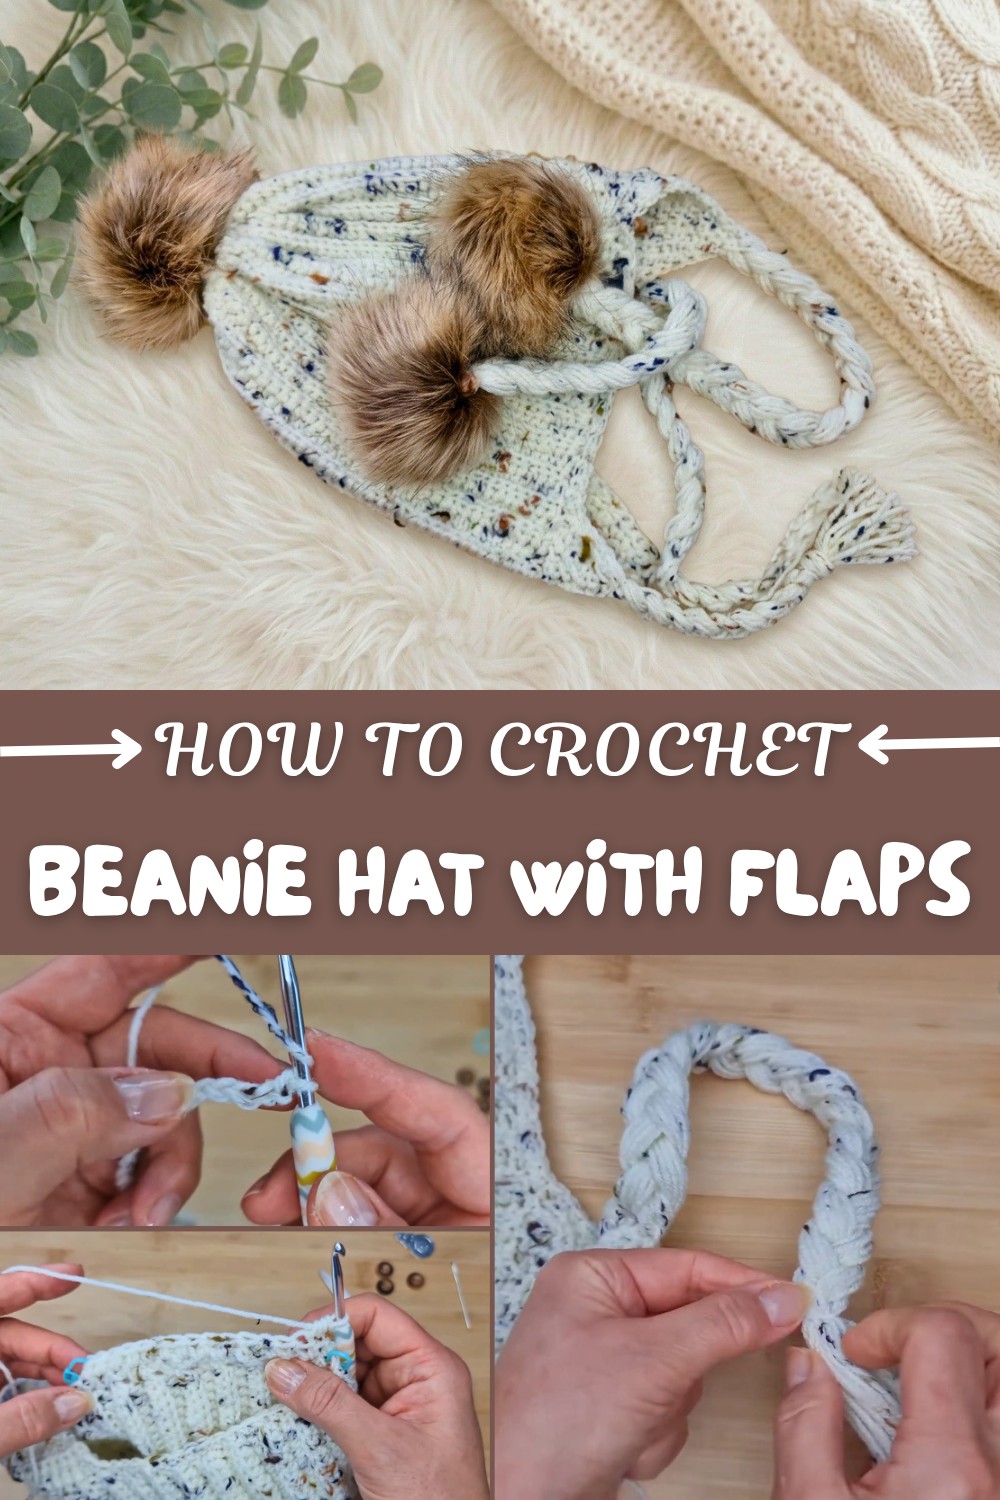
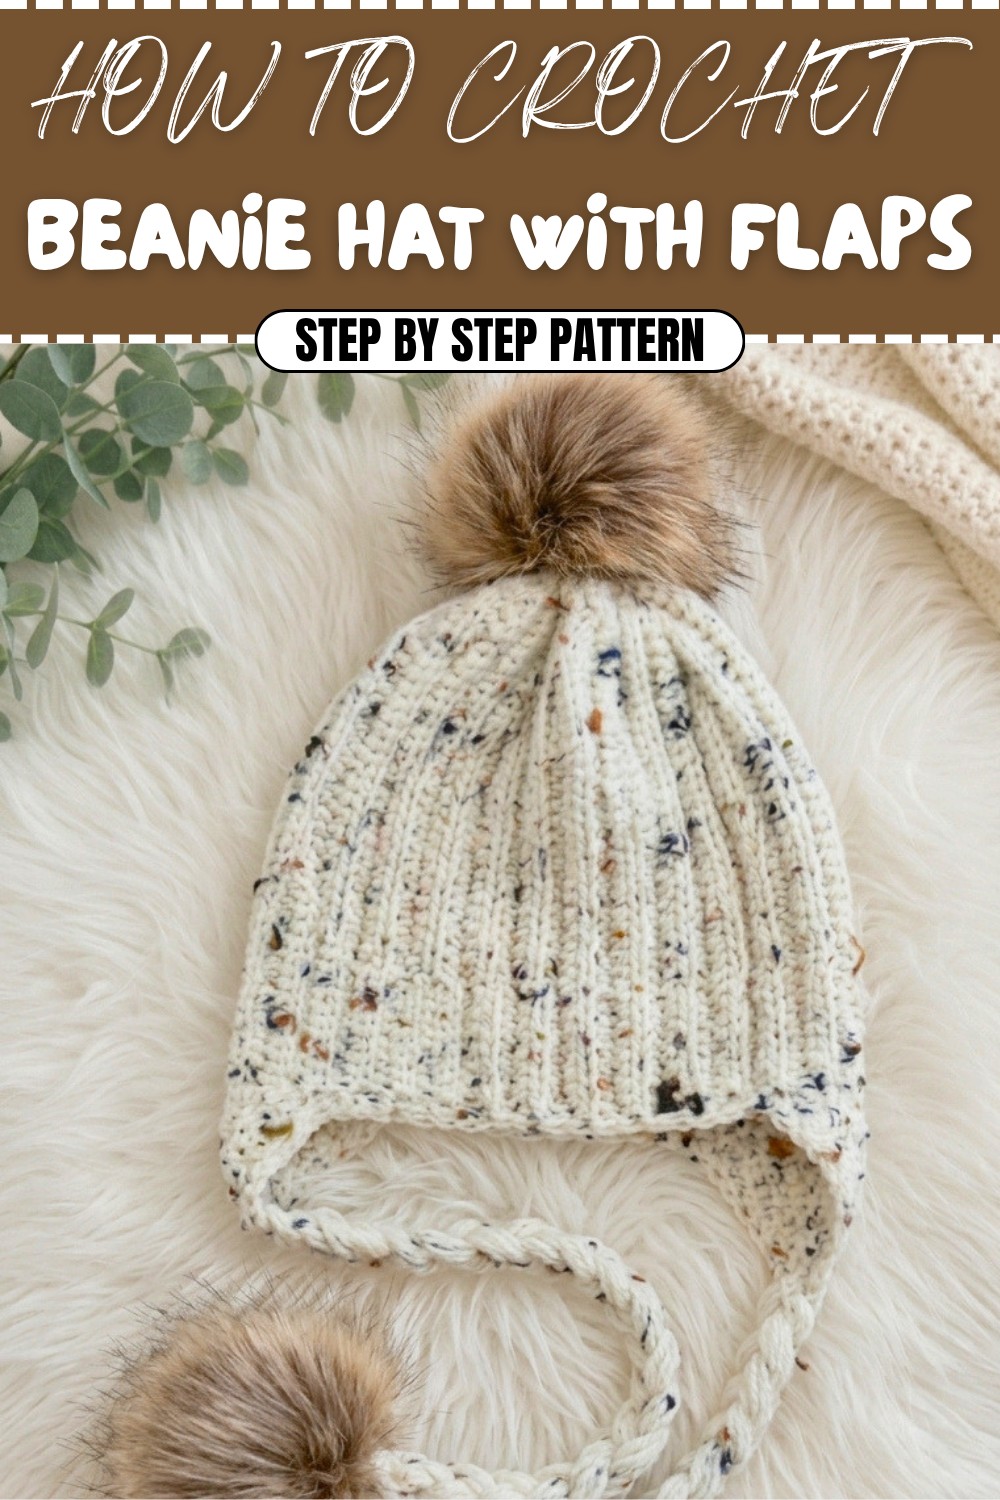
Crochet Beanie Hat With Flaps Pattern With Pom Poms
There’s a special kind of satisfaction that comes with pulling on a beautifully crafted hat—one that fits just right and keeps you warm no matter how chilly it gets. The Free Crochet Beanie Hat With Flaps Pattern captures this comfort, adding both flair and functionality with its signature flaps and playful plaits.
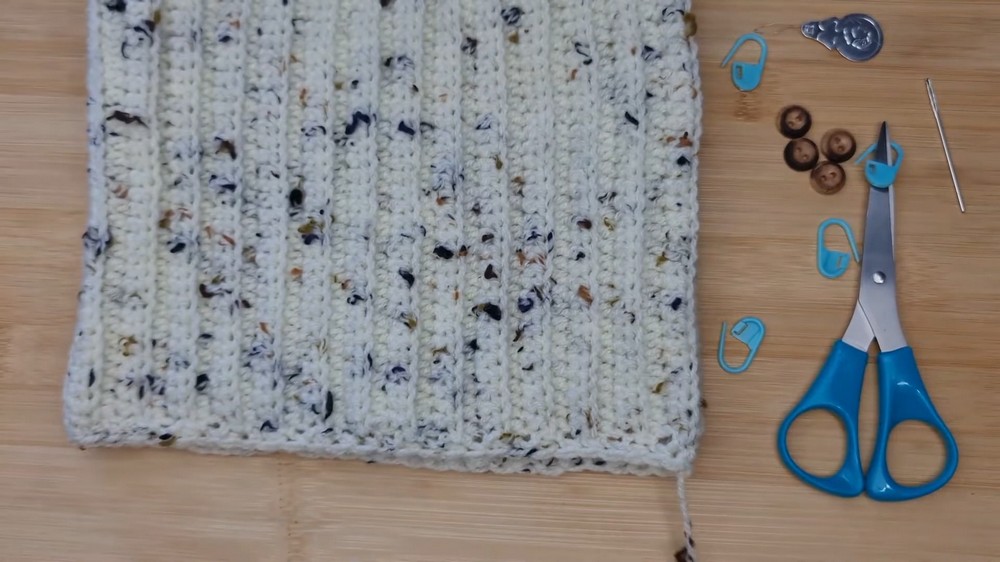
This beanie features a classic shape with thoughtful modern touches. The soft ear flaps are completed with braided ties and topped with adorable pom-poms, making the hat both whimsical and practical. The main body of the hat displays a gentle ribbed texture, which gives the beanie a snug yet stretchy fit for all-day wear.
Free Crochet Beanie Hat With Flaps Pattern in Playful Colors
Main Aspects & Features
- Warmth & Versatility: The side ear flaps protect against the cold and wind, while the plaits let you tie the hat snugly under your chin or let them hang loose for a relaxed look.
- Customizable Colors: Choose from neutral shades for a timeless winter look or go bold with bright, playful colors for children and teens—the pattern adapts to any palette.
- Removable Pom-Poms: Faux fur pom-poms attach with hidden buttons, allowing for easy removal when washing or for mixing up your style.
- Adjustable Sizing: The pattern is easy to resize, making it suitable for both adults and kids—just add or reduce the number of chains and rows.
- Easy Maintenance: Removable embellishments mean the hat can be washed with ease, preserving its freshness and shape.
The Key Stitch: Half Double Crochet in Back Loop
- The half double crochet (HDC) in the back loop only is central to the pattern, creating distinct vertical ribs and a stretchy, comfortable fabric.
- This stitch is simple to master, making the hat accessible even to those who are relatively new to crochet.
- The texture not only looks attractive but also adds a flexible fit that hugs the head comfortably.
The Free Crochet Beanie Hat With Flaps Pattern isn’t just warm and functional—it’s full of charm and custom possibilities. With its inviting fit, playful details, and adjustable options, it’s a must-try for anyone looking to add something cheerful and practical to their winter wardrobe.
Pom-Pom Ribbed Beanie Hat with Ear Flaps and Plaits
Skill Level & Terminology
Level: Confident Beginner/Advanced Beginner
Terminology: US crochet terms
Materials & Tools
- Yarn: DK weight (light worsted), approx. 120g (e.g., Hayfield Bonus DK, “Hedgehog” or similar speckled/neutral shades)
- Faux fur pom-poms: 3 with elastic loops (1 for top, 2 for plaits; “hedgehog” taupe preferred)
- Crochet hook: 4.5 mm (US 7)
- Buttons: 3 wooden, 1 cm diameter (for removable pom-poms)
- Stitch markers
- Yarn needle and scissors
- Needle threader or small-diameter needle
- Glue gun (optional, for plait ends)
- Optional: Personal tag/label
Gauge
16 stitches and 12 rows = 4" (10 cm) in half double crochet in the back loop only (hdc BLO).
Gauge ensures best fit. Adjust hook size as needed.
Abbreviations List
| Abbreviation | Description |
|---|---|
| ch | chain |
| st(s) | stitch(es) |
| sl st | slip stitch |
| hdc | half double crochet |
| BLO | back loop only |
| sc | single crochet |
| dec hdc | half double crochet decrease |
| rep | repeat |
Special Stitch Instructions
- Half Double Crochet (hdc): Yarn over, insert hook, yarn over, pull up loop (3 loops on hook), yarn over, pull through all loops.
- Back Loop Only (BLO): Work only into the loop at the back of the stitch.
- Half Double Crochet Decrease (dec hdc): Yarn over, insert in first st, yarn over, pull up loop, insert in next st, yarn over, pull up loop (4 loops on hook), yarn over, pull through all 4 loops.
Finished Size
- Circumference (unstretched): approx. 20–21" (51–53cm)
- Height (with brim, not including pom-poms): approx. 10–11" (25–28cm)
- Plaits: each approx. 12.5" (32cm) after braiding
- Fits average adult; adjust number of chains/rows for desired size
Pattern Notes
- The body is worked flat as a rectangle, then seamed for a stretchy vertical rib look.
- Decreases shape each ear flap for a pointed, neat finish; border is worked in the round.
- Removable pom-poms are added via elastic and button fastening for practical washing (or switch up your pom style!).
The Pattern
BODY OF BEANIE
- Foundation Row:
- Ch 40 (for adult; adjust for smaller heads).
- Row 1: In 3rd ch from hook, hdc, then hdc in each ch across (total: 38 hdc).
- Row 2:
- Ch 1, turn. Hdc BLO in each st to end (38 hdc).
- Rows 3–58:
- Rep Row 2 until you have 58 total rows (or measures head circumference, slightly stretched).
Create a long rectangle by working half double crochets into the back loop, which forms those cozy vertical ribs you see in the finished hat.
SEAMING THE BODY
- Fold rectangle with right sides together.
- Sl st (through both BLO of final row and foundation chain) down the length to seam into a tube.
Join your strip into a circle by slip stitching the last row and starting chain together, matching stitches for a seamless look.
CINCH TOP OF HAT
- With tapestry needle and a new length of yarn, weave through every second rib at the top edge.
- Cinch tightly, tie, and weave in yarn ends—but leave a small hole (enough to push a button through for the faux fur pom-pom attachment).
Gather the top edge by sewing in and out like a drawstring, then pull tight to form the beanie crown, making sure you leave a hole for the Pom–Pom button.
BOTTOM BORDER
- With RS facing, attach yarn at the seam.
- Round 1: Ch 1, sc evenly spaced around base (place approx. 1 sc per rib, about 58 sc), sl st to first sc to join.
- Fasten off.
Work single crochets evenly around the open end of the hat (the brim) to tidy up and prep for ear flaps.
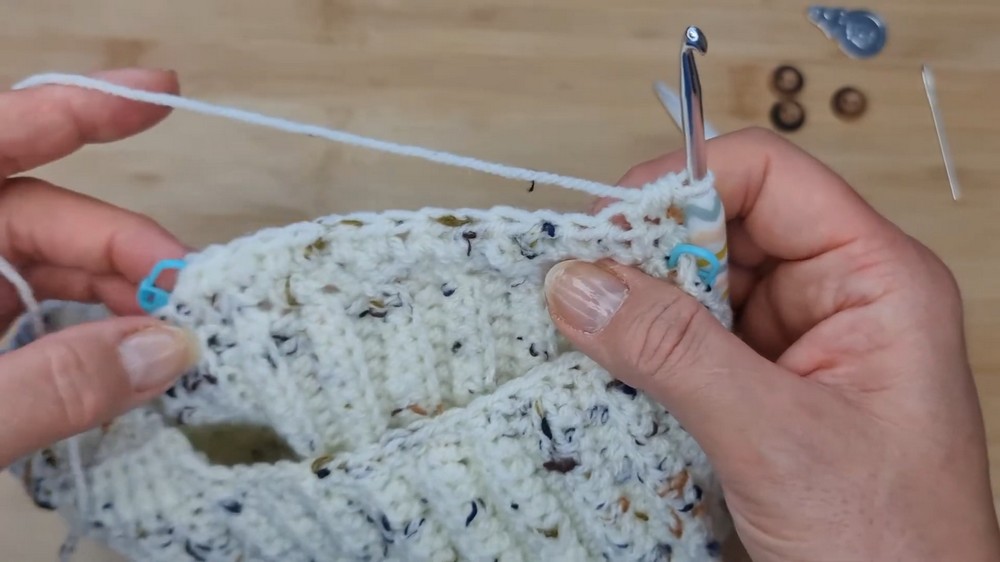
EAR FLAPS (MAKE 2)
Mark placement:
- Leaving the back seam centered, count forward from seam and use markers to designate 15 sts for each ear flap, placed symmetrically at the sides (see video/pattern for precise placement).
Flap (both flaps identical):
- Row 1: Join yarn at 1st marker, ch 1, hdc in same st, hdc in next 14 sts (15 hdc total).
- Row 2: Ch 1, turn, dec hdc over first 2 sts, hdc in next 11 sts, dec hdc over last 2 sts (13 sts).
- Row 3: Ch 1, turn, dec hdc, hdc in next 9 sts, dec hdc (11 sts).
- Row 4: Ch 1, turn, dec hdc, hdc in next 7 sts, dec hdc (9 sts).
- Row 5: Ch 1, turn, dec hdc, hdc in next 5 sts, dec hdc (7 sts).
- Row 6: Ch 1, turn, dec hdc, hdc in next 3 sts, dec hdc (5 sts).
- Row 7: Ch 1, turn, dec hdc, hdc in next st, dec hdc (3 sts).
- Row 8: Ch 1, turn, hdc in each of the 3 sts. Fasten off.
Work each ear flap by crocheting back and forth over 15 stitches with hdc, decreasing 1 at each edge each row until 3 remain, then work one more row plain.
TRIM & BORDER
- Attach yarn to corner of one flap.
- Sc evenly up edge of flap, around front brim, down second flap, and around entire hat for a neat finish.
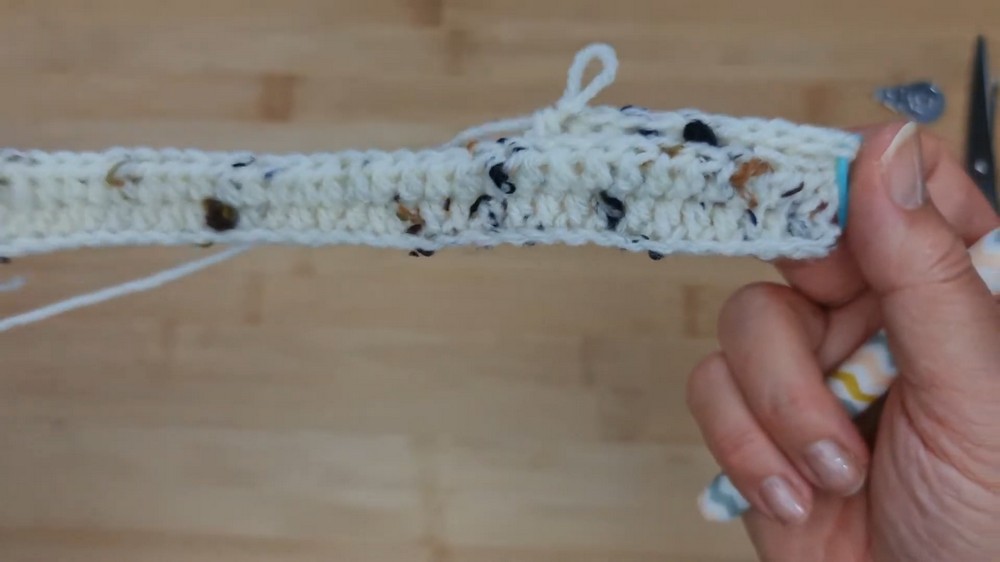
- Across the pointed tip of EACH ear flap, ensure you have 3 sc at top to later attach plait.
Single crochet neatly around all edges of the hat and flaps—especially making sure to fit 3 single crochets across the tip of each flap.
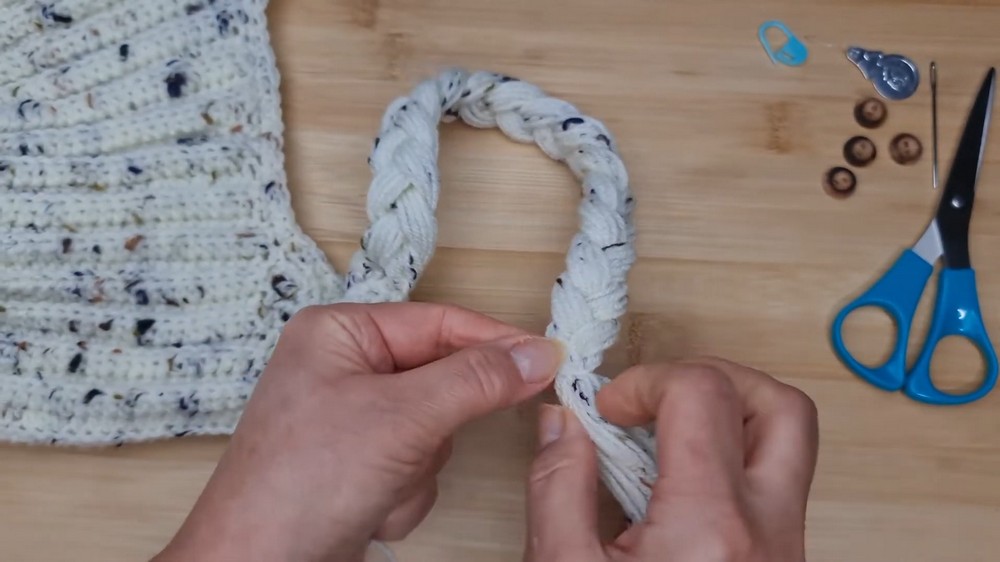
BRAIDED PLAITS (MAKE 2)
- Cut 18 lengths of yarn, each about 60"/150cm.
- For each flap tip:
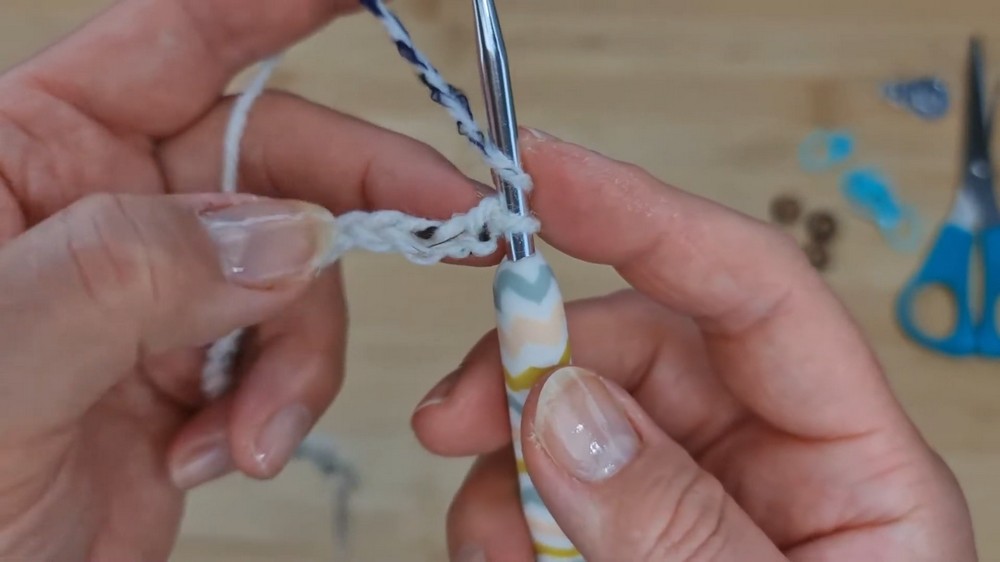
- Separate into 3 groups of 6 strands, fold in half, and loop each group through one of the 3 sc at tip of flap (pull through with hook, forming a double-thickness).
- Braid/Plait the strands to desired length (approx. 12.5"/32cm).
- Secure with tight yarn, then knot and trim ends.
- (Optional) Dab ends with hot glue for security.
- Sew/button pom-poms to ends of plaits.
Group and fold your strands, loop them through each flap tip, braid loosely for a chunky look, tie off the ends securely, and attach your faux fur pom–poms on the buttons!
ADDING REMOVABLE POM-POMS
- Sew a button securely at the end of each plait and inside at the inside/crown of the hat (by the cinched hole).
- Loop the elastic of each faux fur pom–pom over the button to attach (or remove for washing).
Just button on the pom–poms using their elastic loops—easy on, easy off for washing or for a new look.
OPTIONAL FINISHING TOUCH
- Sew on custom tag or label at desired location, using yarn and tapestry needle.
Assembly & Finishing
- Weave in all ends securely with the yarn needle.
- Attach name tag if desired.
- Fluff up all pom-poms and check all buttons are stable.
Secure all loose ends, add your label if you wish, fluff your pompoms, and check that all parts are safe for wear.
How to Start & Stitches Used
You begin by working a ribbed rectangle in half double crochet in the back loop only (hdc BLO)—the same basic stitch forms the band and body. The flaps and border use hdc, sc, and simple decreases (hdc2tog). Braids are easy and relaxing, and finishing is all about neat sewing and smart placement