
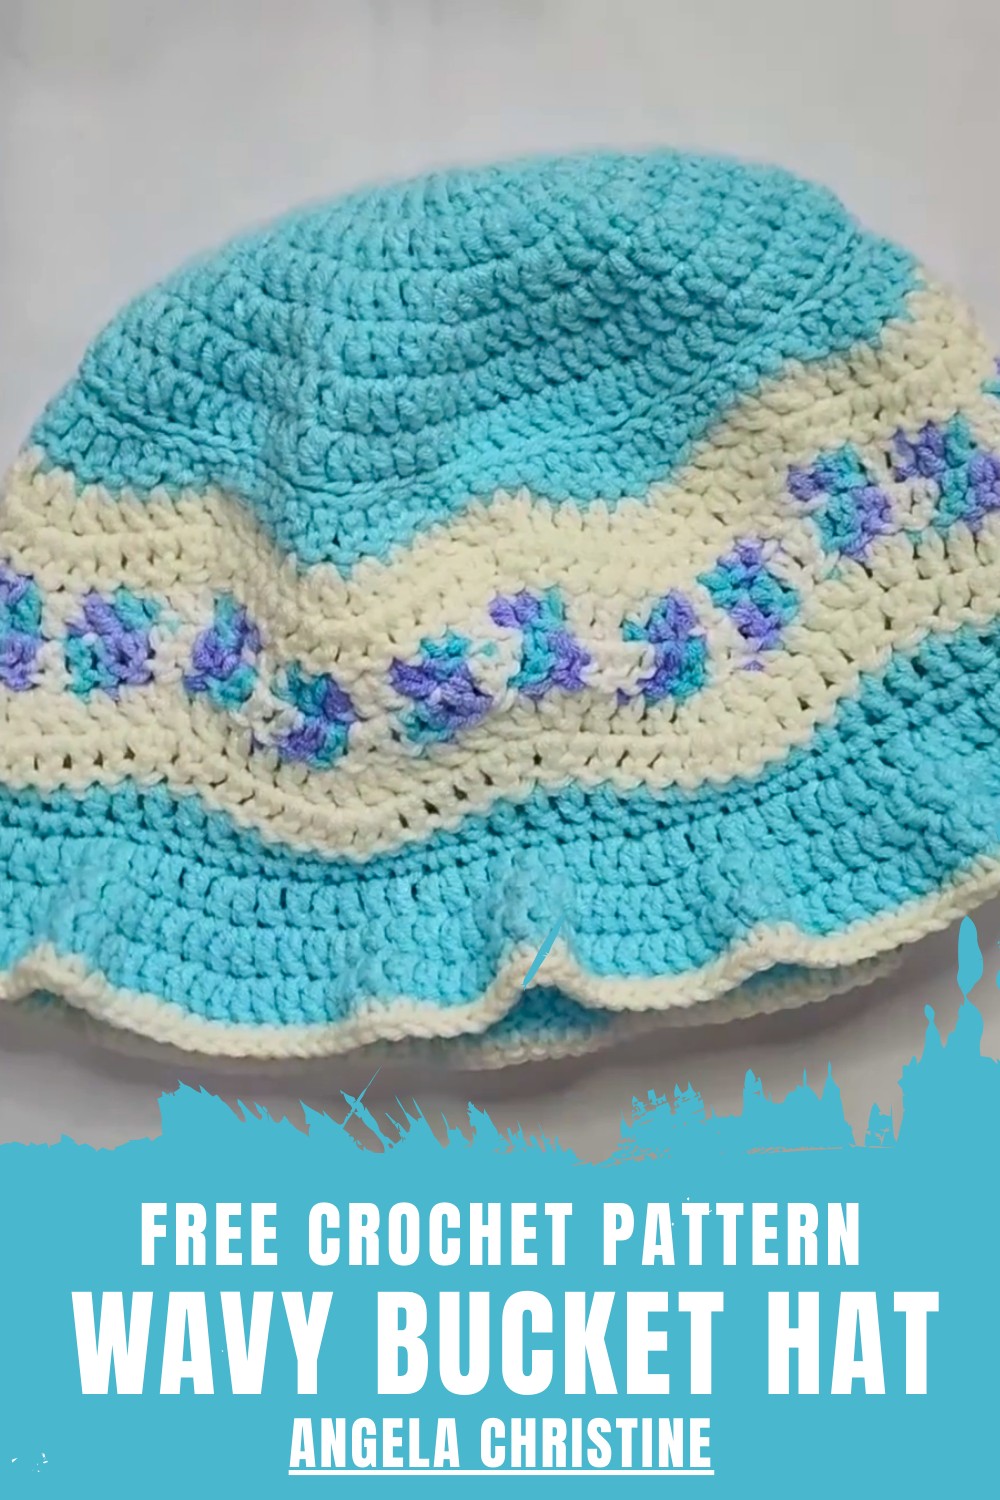
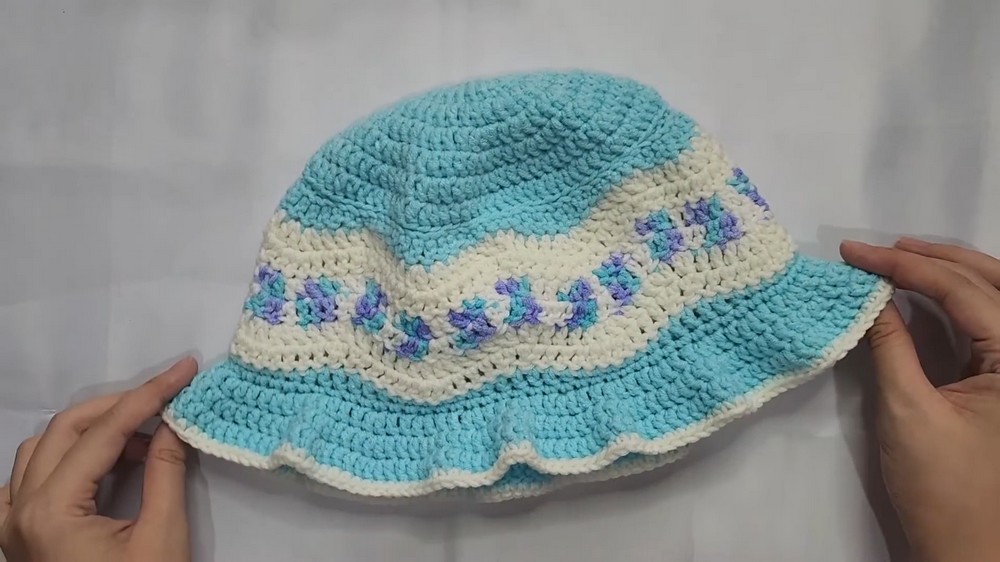
Cute Crochet Wavy Bucket Hat Pattern That Brings Instant Style
Step into summer with this Free Crochet Wavy Bucket Hat Pattern that's featuring wavy textures that add stylish flair and comfortable wear.
Perfect for sunny days and stylish outings this accessory from the Crochet Wavy Bucket Hat Pattern blends fashion with functionality seamlessly. Lightweight and breathable, it shields the face from sunlight while keeping the head cool, making it ideal for beach trips, casual strolls, or outdoor gatherings. Its wavy texture adds a modern, eye-catching dimension to the classic bucket hat shape, creating a flattering silhouette that pairs effortlessly with summer dresses, casual jeans, or relaxed tees.
Modern Crochet Wavy Bucket Hat Pattern Everyone Wearing
The design allows for personal touches with different colors and yarn choices, giving each hat a unique look that reflects individual style. Comfortable and versatile, it provides effortless wear throughout the day while maintaining a polished appearance.
Beyond practicality, it also serves as a thoughtful handmade gift with charm and personality. Combining style, creativity, and everyday functionality, this hat enhances outdoor moments with a chic and contemporary flair.
Step-by-Step Details
1. Materials You’ll Need
- Yarn:
- Main color yarn for the top and brim.
- Contrasting yarn for the wave design (as per your aesthetic preference).
- Optional extra colors for customization.
- Hooks:
- Smaller hook size (4mm recommended for the top of the hat).
- Larger hook size (5mm recommended for the base of the wave design).
- Other Supplies:
- Scissors.
- Darning needle for sewing and weaving ends.
2. Creating the Top of the Hat
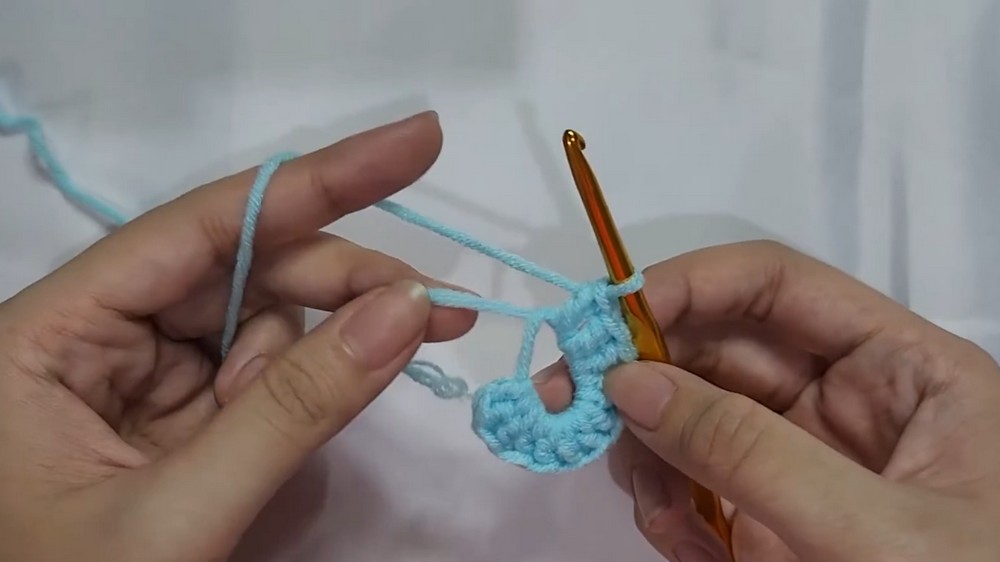
- Begin with a Magic Ring:
- Use your smaller hook and main color yarn to make a magic ring.
- Chain 2 (this doesn’t count as a stitch), then create 12 double crochets into the ring. Tighten the ring by pulling the tail.
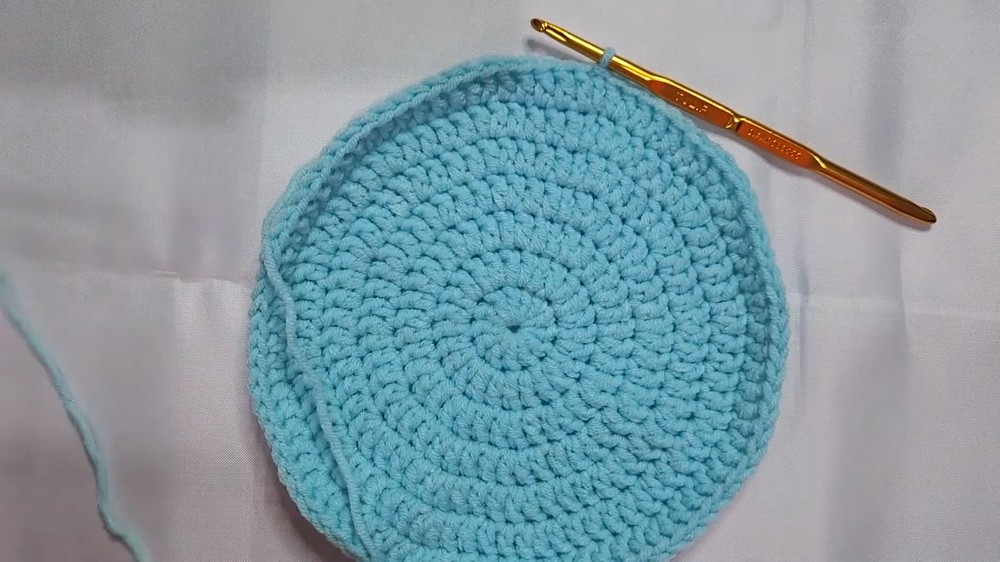
- Increase Rounds:
- Round 2: Chain 2, make 2 double crochets into each stitch (increase in every stitch). You’ll have 24 stitches.
- Round 3: Chain 2, make 1 double crochet in the first stitch and 2 double crochets in the next (increase in every second stitch). Total stitches: 36.
- Round 4: Chain 2, make 1 double crochet in each of the first two stitches, then 2 double crochets in the third stitch (increase every third stitch). Total stitches: 48.
- For subsequent rounds, continue increasing by following the formula: subtract 1 from the round number to determine the stitch where you increase (e.g., Round 5: increase every fourth stitch, Round 6: every fifth stitch).
- Continue until the top is large enough to fit the circumference of your head.
- Fasten Off:
- After completing the desired size (7 rounds give approx. 84 stitches), slip stitch into the first double crochet, fasten off, and leave a long tail for later assembly.
- After completing the desired size (7 rounds give approx. 84 stitches), slip stitch into the first double crochet, fasten off, and leave a long tail for later assembly.
3. Building the Sides of the Hat
- Foundation Chain:
- Switch to a larger hook and make a chain equal to the number of stitches in the last round of the top (e.g., if the top ends with 84 stitches, make a chain of 84). Keep your tension loose to avoid curling.
- Creating the Wave Base:
- Switch back to the smaller hook and work into the back bumps of the chain:
- Pattern: 3 double crochets → 1 half double crochet → 4 single crochets → 1 half double crochet → 6 double crochets. Repeat this until you reach the end and finish with 3 double crochets.
- Switch back to the smaller hook and work into the back bumps of the chain:
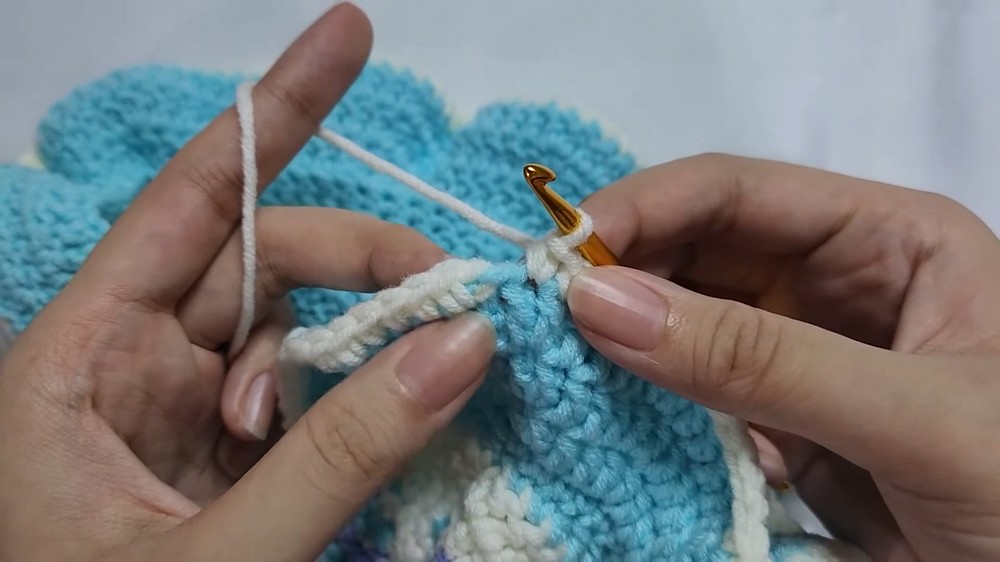
4. Adding the Ripple Waves
- Start the Ripple Stitch:
- Attach a new yarn color. Chain 3 to start and make a double crochet in the same stitch to increase.
- Continue with the pattern:
- 4 double crochets → 2 decreases (double crochet together) → 3 double crochets → 2 increases (two double crochets in one stitch).
- Repeat this sequence to form the wave pattern.
- Repeat Rows for Waves:
- At the start and end of the row, always increase to maintain symmetry.
- Change yarn colors every two rows (optional) to enhance the wave design.
- Continue adding rows until the side of the hat reaches the desired height.
- Flattening the Waves:
- For a flat edge, repeat this pattern:
- 3 single crochets → 1 half double crochet → 4 double crochets → 1 half double crochet → 6 single crochets.
- This creates a smooth transition for attaching the brim.
- For a flat edge, repeat this pattern:
5. Assembling the Hat
- Joining the Top and Sides:
- Align the top and side pieces with their right sides facing each other.
- Use a darning needle and the long tail from the top piece to sew the pieces together.
- Employ the invisible seam stitch or whip stitch technique, working with the outer loops of the stitches to ensure a clean finish.
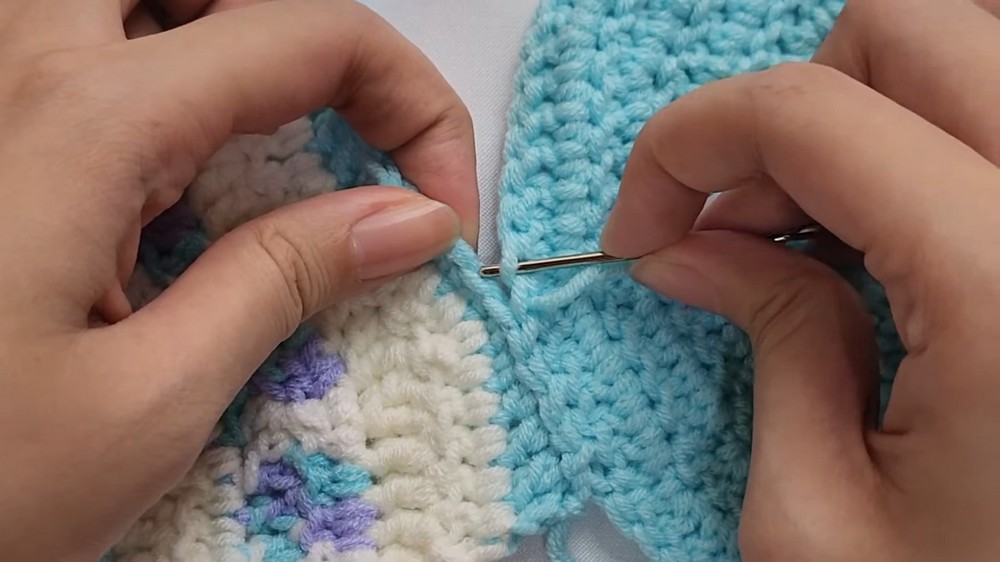
- Seaming the Sides:
- Match the wave edges at the side seam using the same method as the top.
6. Adding the Brim
- Single Crochet Foundation Round:
- Insert your hook into the working yarn from the edge of the waves. Make one single crochet into each stitch around to create a foundation for the brim.
- Wavy Brim:
- Chain 2 and work double crochets into the front loops only:
- Increase every 3rd stitch to achieve a flared, wavy brim.
- For less flair, increase every 4th or 5th stitch.
- Chain 2 and work double crochets into the front loops only:
- Subsequent Rounds:
- Stop working in the front loops and resume working in both loops. Align the increases with the V shapes from the previous round (or simply add 1 to the previous increase count to calculate).
- Add rows until your brim reaches the desired width.
- Final Edging:
- Switch to a contrasting yarn color, chain 1, and make single crochets all around to finish the brim neatly. Fasten off and weave in all remaining tails.
- Switch to a contrasting yarn color, chain 1, and make single crochets all around to finish the brim neatly. Fasten off and weave in all remaining tails.
Special Features
- Unique Wave Design: The ripple stitch creates beautiful textured waves around the hat, adding movement and style.
- Customizable Colors: You can change yarn colors to create unique patterns, such as a watermelon-inspired design.
- Adaptable Size: Both the top and brim can be adjusted to fit any size or preference.
- Seamless Finish: The invisible seam stitch ensures a clean, professional appearance.
Level of Difficulty
The bucket hat is rated beginner- to intermediate-friendly. Essential skills such as working a magic ring, double crochets, and ripple stitch are explained thoroughly, making it accessible for confident beginners. Attention to alignment and sewing techniques is slightly more advanced.
Tutor’s Suggestions
- Pay Attention to Tension: Loose tension on the foundation chain and ripple rows prevents curling and uneven edges.
- Follow the V-shapes: Use increases from previous rows to guide your stitches when expanding the brim.
- Be Creative: Experiment with colors and patterns to make unique designs like fruit-themed hats or bold color palettes.
- Weave Ends While Working: Minimize weaving later by crocheting over tails as you work.
Uses and Materials
Uses:
- A stylish accessory for sunny days, festivals, or vacations.
- Perfect as a handmade gift or a fun addition to your wardrobe.
- Can be customized for creative themes (e.g., watermelon-inspired or minimalist designs).
Materials Recap:
- Yarn (main color + contrasting colors), crochet hooks (4mm and 5mm), scissors, and darning needle.
Tip
When working the wavy brim, ensure your increases align with the previous round's V shapes to maintain the pattern's symmetry and avoid uneven flares.
Conclusion
This Simple Wavy Design Bucket Hat is both functional and fashionable. With its ripple stitch waves and flared brim, it’s a fun and versatile crochet project that lets you explore creativity through colors and textures. Whether you’re dressing up for summer or crafting for gifting, this hat design inspires limitless possibilities.