
Spark fun and creativity with this Free Crochet Star Keychain Pattern that adds charm and playful flair to keys or small accessories.
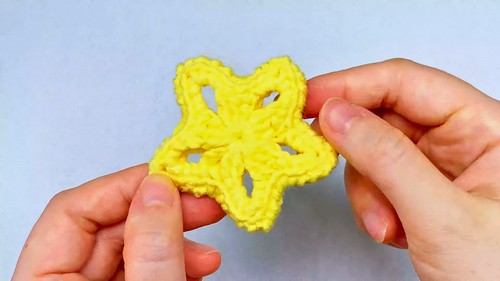
A bright and charming star adds a playful touch to everyday accessories, turning simple items into eye-catching and personalized pieces. The Crochet Star Keychain Pattern transforms yarn into a small, versatile creation that works beautifully as a keychain, bag charm, or decorative accent, making it perfect for gifts or personal use. Its well-defined points and symmetrical design give it a polished and visually appealing appearance, while its compact size ensures practicality without compromising style.
Sweetheart Crochet Star Keychain Pattern Gift That Shines

Working on this pattern enhances focus, patience, and fine motor skills, providing a relaxing and satisfying experience. The design allows for creativity through color choices, size adjustments, and finishing touches, making each keychain unique and tailored to personal taste. Combining charm, elegance, and functionality, the finished star brings personality and warmth wherever it is placed, turning a simple accessory into a delightful, handmade treasure that delights both the maker and the recipient.
Step-by-Step Details
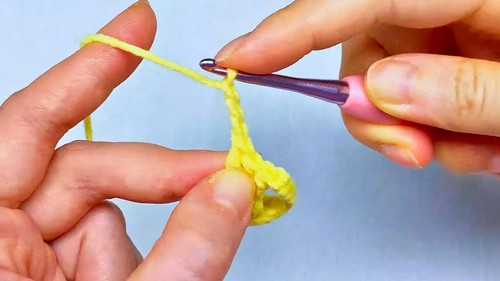
1. Creating the Magic Ring (Star Center)
- Wrap the yarn around your pinky and middle fingers.
- Insert your hook under the thread, pull up a loop, rotate the hook, and perform a chain. Pull through the loop to secure the magic ring.
- Once the magic ring is complete, add three chain stitches, which will count as one double crochet.

2. Forming Groups in the First Round
- Add a stitch marker at the chain three to mark the group’s beginning.
- Create two double crochets into the magic ring:
- Yarn over, insert the hook into the ring, pull up a loop, yarn over, pull through two loops, and yarn over again to pull through the last two loops.
- Repeat the process to complete the second double crochet.
- Make five chain stitches. Then create a second group:Crochet three double crochets followed by five chain stitches into the magic ring.
- Repeat the process to create five groups in total, forming the base of the star with five points.
- At the end of the round, close the group using a slip stitch between the chain three. Tighten the tail of the magic ring to close the center hole.
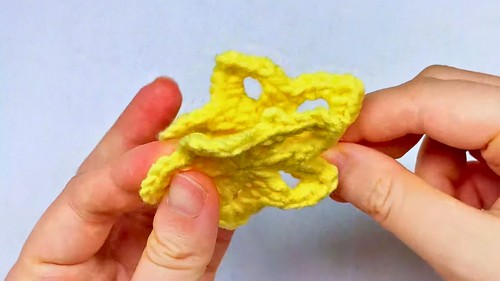
3. Crafting the Second Round (Star Points)
- Start the second round by adding a chain stitch.
- Insert your hook into the first "V" stitch (on top of a double crochet) and make a single crochet:
- Insert your hook, pull up a loop, yarn over, and pull through both loops.
- Add a stitch marker to track the beginning of this round.
- Skip one stitch and make another single crochet into the third stitch.
- In the chain space at the tip of a point:
- Make three single crochets.
- Add three chain stitches.
- Crochet three more single crochets in the same chain space. (This creates the sharp corner of the star point.)
- Continue the pattern (single crochet, skip one stitch, work three single crochets, three chains, three single crochets in chain spaces) to form each corner of the star.
4. Finishing the Round
- At the end of this round, create an invisible slip stitch to complete the shape.
- Leave a yarn tail about 20 inches (50 cm) long for sewing later. Use a needle to execute the invisible slip stitch neatly by inserting the needle into the first stitch and through the back loop of the last stitch.
- Pull the yarn tight and weave in the tail.

5. Creating the Second Star Piece
- Follow the exact same steps to make another identical star piece. This second piece will form the back of the star. Leave only a short tail for this piece, as it won’t be used for sewing.
6. Assembling the Star
- Place the two star pieces together. Use the long yarn tail from the first star piece to seam the edges together.
- Sew through the loops along the inner edges of the two pieces, making tight and neat stitches to ensure durability.
- At the end of the seam, tie a secure knot and weave the remaining yarn into the fabric to hide loose ends.
Special Features
- Hollow Points: The open spaces in the star design add an elegant and decorative touch.
- 3D Structure: Sewing two identical pieces together creates a sturdy star that holds its shape.
- Customizable: Change the yarn color or add embellishments (e.g., beads) for a personalized look.
- Versatile Use: You can turn it into a keychain, Christmas ornament, or other decorative accessories.
Level of Difficulty
This project is beginner to intermediate. The magic ring and double crochet techniques are beginner-friendly, while the invisible slip stitch and stitching together the two pieces add elements of intermediate-level finishing.
Tutor’s Suggestions
- Use a Stitch Marker: Add a marker to keep track of rounds and the starting stitches, especially in the second round.
- Tighten the Magic Ring: Pull the ring’s tail securely to remove any gaps in the center after crocheting the rounds.
- Work Neatly While Seaming: Ensure the edges align and sew through the inner loops to keep the star symmetrical.
- Take Your Time: Crocheting the points and corners of the star requires precision, so avoid rushing.
Materials Needed
- Yarn: Any yarn color of your choice, preferably medium-weight for beginners.
- Crochet Hook: Size suitable for your selected yarn (commonly 3.0–5.0 mm).
- Stitch Markers: To track the beginning of rounds.
- Yarn Needle: For weaving ends and stitching the edges.
- Scissors: To cut yarn.
- Optional Embellishments: Keyring, beads, or buttons for decoration.
Uses of the Crochet Star
- Keychain: Attach it to a keyring for a functional and cute accessory.
- Christmas Ornament: Add a string and hang it as tree décor.
- Bag Charms: Make it a decorative piece for backpacks or purses.
- Home Décor: Use it as a table or wall hanging decoration.
Tip
When working on the chain spaces for the star points, don’t hesitate to pull the stitches slightly to create enough room. This ensures that the points of the star remain well-defined and prevent the corners from looking cramped.
Conclusion
Crocheting this gorgeous star is fun, rewarding, and an opportunity to improve your skills. It’s a beginner-friendly project with room for creativity and customization, making it suitable for various decorative purposes. By following these detailed steps, you’ll crochet a stunning piece that can be cherished or gifted.