
Brighten your day with the Free crochet Sun Amigurumi Pattern, guiding you to stitch a cheerful sun perfect for gifts, decor, or spreading happiness.
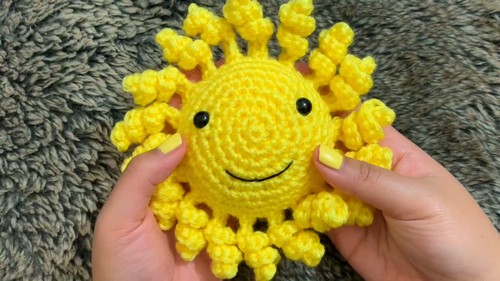
A tiny sun peeked out as if ready to light up the day, instantly adding a cheerful vibe wherever it sits. With its round, smiling face and radiating rays, this amigurumi brings playful charm to shelves, desks, nurseries, or cozy corners. Its soft texture and lively design make it both eye-catching and huggable, while the compact size makes it easy to display, carry, or gift.
Cozy Crochet Sun Amigurumi Pattern Handmade Happiness for Your Space

Working on it is just as enjoyable, offering a relaxing way to practice stitches, improve focus, and enjoy hands-on creativity. Bright, bold colors give it personality, and neat finishing ensures the sun keeps its cheerful shape over time. More than just decoration, this little sun adds warmth, fun, and a touch of whimsy to everyday life, turning ordinary spaces into spots that feel lively, inviting, and full of handmade charm.
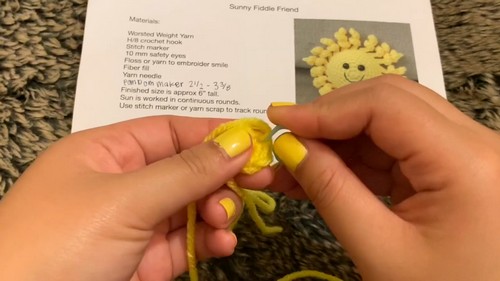
Materials Needed
Here is a list of materials required for the project:
- Yarn: Red Heart Super Saver yarn in bright yellow and a lighter yellow (for the pom-pom sun).
- Hook: 5mm Crochet Hook.
- Stitch Marker: To keep track of your rounds.
- Yarn Needle: To weave in ends and secure stitches.
- Embroidery Thread: Used for adding the smile to the sun.
- Safety Eyes: 10mm diameter (optional for facial features).
- Pom-Pom Maker by Clover: Size 2.5–3 ⅜ inches (for the pom-pom sun).
- Scissors: For cutting yarn and threads.
- Fiberfill or Stuffing: For stuffing the body of the sun.
Uses
- As a décor piece for kids’ rooms or nurseries.
- A charming and cheerful gift.
- A great option for donation projects, like hospice gifts or handmade items for charities.
Special Features
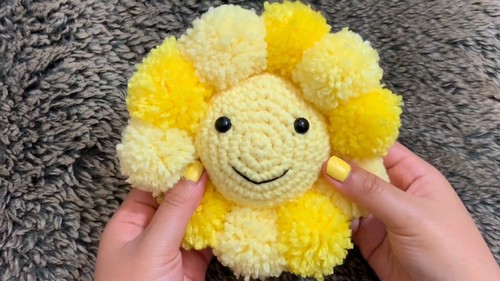
- Two Sun Variants: The tutorial allows you to choose between classic rays or a modern pom-pom border.
- Customizable Colors: You can experiment with different shades of yellow or other colors for a personalized charm.
- Beginner-Friendly Techniques: The tutorial uses basic crochet techniques including magic rings, single crochet, increases, decreases, and chains.
- Playful Design Options: The pom-pom sun stands out for its texture and cheerful flair, perfect for those looking for something unique.
Level of Difficulty
Beginner-Friendly
The tutorial assumes basic knowledge of crochet stitches (magic ring, single crochet, increases, and decreases). While the techniques are simple, working with final details, such as sewing pieces together or creating pom-poms, may require patience.
Tutor’s Suggestions
- Screen Grab the Pattern: For the traditional sun with rays, a written pattern is briefly shown. If you're familiar with reading crochet patterns, take a screenshot.
- Stuffing Advice: Avoid overstuffing the sun to maintain its shape, especially before closing the final rounds.
- Adjust for Pom-Pom Style: If you prefer the pom-pom sun, the tutorial advises where to skip ahead in the video.
- Ray Placement: Be consistent in placing stitches for rays to maintain symmetry.
- Clean Closures: Weave yarn ends securely to avoid unraveling after completing the sun.
Step-by-Step Process
1. Create the Body
Round 1: Magic Ring (6 Stitches)
- Make a magic ring and single crochet 6 times into the ring.
- Pull the yarn to close the circle partially (do not close it completely).
- Slip stitch into the first stitch to complete the round.
Round 2: Increase in Every Stitch (12 Stitches)
- Work 2 single crochet stitches into every stitch around.
- Use a stitch marker to mark the last stitch of the round.
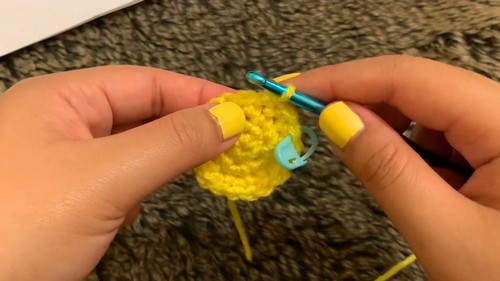
Round 3: Alternate Increase (18 Stitches)
- Work 1 single crochet into the first stitch and 2 single crochets in the next. Repeat this pattern around.
Round 4 - Round 6: Gradual Increases (24 - 36 Stitches)
- Gradually increase in each round by spacing the increases:
- Round 4: 1 sc, 1 sc, increase (repeat for 24 stitches).

- Round 5: 1 sc in the next 3 stitches, then increase (30 stitches).
- Round 6: 1 sc in the next 4 stitches, then increase (36 stitches).
- Round 4: 1 sc, 1 sc, increase (repeat for 24 stitches).
2. Add Rays or Work Toward Pom-Pom Version
- For the Ray Version:
- Chain 12 to create the first ray.
- Work 2 single crochets into each chain, which will naturally curl the ray.
- Once back at the base, move 2 stitches over before starting the next ray.
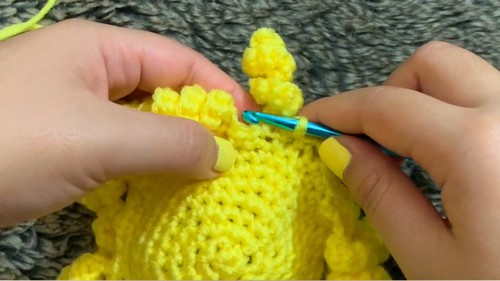
- Repeat until you’ve crocheted 18 rays.
- For the Pom-Pom Version:
- Continue with single crochets to finish the round and skip ahead to attach pom-poms after creating two identical halves of the sun.
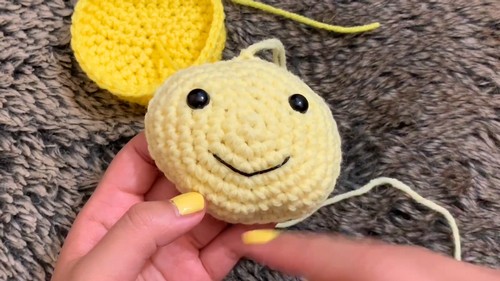
3. Add Face
- Insert safety eyes between Round 5 and Round 6.
- Use embroidery thread to sew a smile on the sun. Begin from the back and weave the thread carefully to create the curve of the smile.
4. Stuff the Sun
- Use fiberfill or scrap material to stuff the body lightly before closing the top.
5. Final Decrease Rounds
- Gradually decrease the stitch count as follows:
- Round 13: 4 sc, then decrease (30 stitches).
- Round 14: 3 sc, then decrease (24 stitches).
- Round 15: 2 sc, then decrease (18 stitches).
- Round 16: 1 sc, then decrease (12 stitches).
- Round 17: Decrease all the way around until six stitches remain.
- Close off the opening by weaving through the final stitches with a yarn needle.
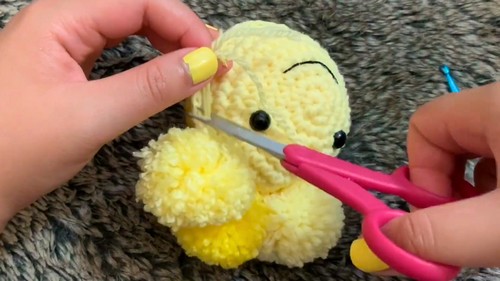
6. Pom-Pom Assembly (For Pom-Pom Sun)
- Create pom-poms using the Clover pom-pom maker:
- Wrap yarn around the pom-pom maker until it’s full and cut it in the middle.
- Tie the pom-pom securely with yarn and shape it by trimming edges.
- Securely attach each pom-pom to the outer edge of the sun by tying the tails to stitches.
- Distribute pom-poms evenly around the sun and align them symmetrically.
7. Complete the Project
For the pom-pom sun, sew or crochet two halves of the sun together, leaving an opening for stuffing. Finish stuffing, then close with single crochet stitches or weaving.
Conclusion
You now have a cheerful, handmade crochet sun! This versatile project allows you to create two different designs: a sunny classic with rays or a playful, textured version with pom-poms. Both styles are beginner-friendly and perfect for gifting or home décor. Customize the colors and design as you like, and enjoy the creative process.
Pro Tip
When attaching safety eyes, insert them before closing the body to ensure they are secured in place. For pom-poms, use long tail threads to ensure they don't fall off!