
Trendy Crochet Kitten Amigurumi Pattern For Your Collection
Hold a Free crochet Kitten Amigurumi Pattern with soft, easy stitches for a cute, huggable toy perfect as a gift or charming decoration.
Little Handmade Friend with Big Charm
There’s something quietly wonderful about crocheting something small but full of personality and this Crochet Kitten Amigurumi fits that feeling perfectly. This project brings a sweet, cuddly kitten to life: compact, lightweight, and full of charm. It makes a lovely gift, a cute decoration for a shelf or desk, or a comforting keepsake for someone special.

Crochet Kitten Amigurumi Pattern That Steals Hearts
Once complete, the kitten stays firm, holds its shape nicely, and has enough detail for a polished, adorable appearance. Whether you stick to a single yarn color or try a mix for example, grey body with white paws you end up with a keepsake that stands out.
Materials
Gather these items to begin crocheting the kitten:
-
Yarn: Use 1mm thickness cotton yarn (or similar).
-
Body color (e.g., pearl gray).
-
Light colors (scraps of red, green, blue, yellow).
-
Embroidery colors (black, white, pink/fuchsia) for facial details.
-
-
Crochet Hook: Use a 2.0 mm hook. (The tutor advises adapting the hook size to your yarn).
-
Eyes: Use 7 mm safety eyes.
-
Filling: Use polyester fiberfill (stuffing).
-
Tools:
-
Use stitch markers and scissors.
-
Use a tapestry needle (darning needle) for sewing and embroidery.
-
Optional: Have a lighter ready to flatten safety eye backings.
-
Prepare a keyring or keychain attachment.
Uses
- Create a charming keychain.
- Use it as a miniature Christmas ornament.
- Give it as a small, handmade gift.
Level of Difficulty
The project is considered Intermediate. It requires comfort with basic stitches and techniques, as well as the skill to work small pieces, execute the popcorn stitch, and perform detailed embroidery and assembly.
Tutor's Suggestions
-
Customize Colors: Choose any color for the kitten's body and use scrap yarn for the lights. The color possibilities are infinite.
-
Flatten Safety Eyes: Before attaching the safety eye backings, melt and flatten them with a lighter. This prevents the eyes from tilting or shifting awkwardly when you stuff the head.
-
Check Resources: Review the video description and the pinned comment for the full material list and a link to a separate, more detailed tutorial on the face embroidery.
-
Embrace Imperfection: Arrange the light garland so it looks imperfect (e.g., slightly more bunched in one area, more separate in another). This adds character.
Simple Steps to Bring the Kitten to Life

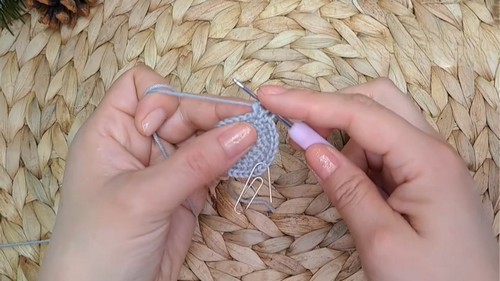
Start by crafting the body (or body + head) using a magic‑ring and working in rounds of single crochet, gradually increasing to the desired size.
Special Features:
-
Integrated Paws: You create the front and back paws directly in the body rounds using the popcorn stitch (punto piña), which eliminates the need to sew them on later.
-
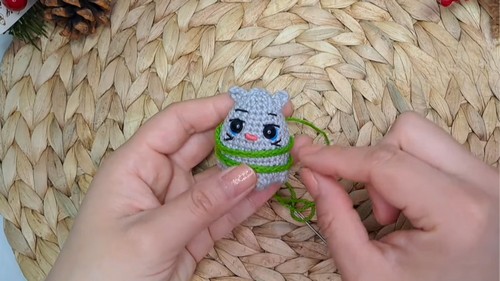
Light Garland: The thin garland is crocheted separately and then carefully fixed and embroidered with colored lights, giving it a unique, festive touch.
-
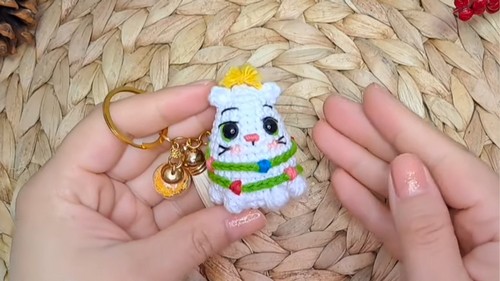
Miniature Size: At 5 cm, the kitten is specifically sized for keychain use.

Then crochet the limbs, tail, and ears separately — each beginning with a small magic ring and shaped by increasing or decreasing stitches as needed.
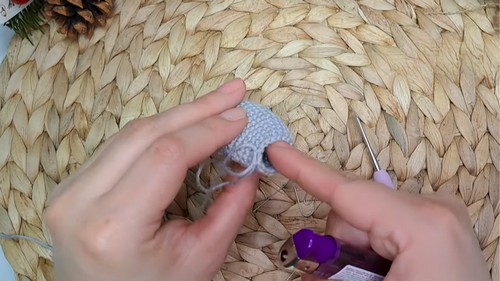
Stuff each piece gently but firmly before sewing them all together.
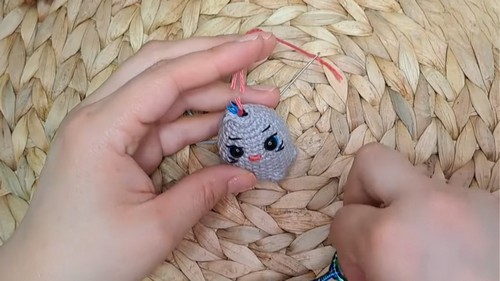
Finally, add finishing touches like embroidered eyes (or safety eyes), nose, and any markings, then weave in all yarn ends to complete your kitten.
Why It’s Great for Makers and Lovers of Cute Things
This pattern works well for both beginners and more experienced crocheters, since it sticks to basic techniques but still gives satisfying results. Making this kitten helps you practice foundational skills like working in spiral rounds, shaping with increases and decreases, and assembling separate parts.
Conclusion
You have now completed the amigurumi kitten with a light garland! The integrated paws and detailed embroidered lights make this project a unique holiday-themed creation. Hang it on your bag, keys, or Christmas tree!
Tip
Use the Popcorn Stitch Technique for Cleaner Sewing: When you work the back of the popcorn stitch, note where the closing stitch of the popcorn falls. When working the next row (R7), ensure you skip this closed stitch and find the stitch after it to keep your stitch count correct and avoid accidentally attaching the paw to the body on the subsequent round.